Page 1251 of 1333

Mismatched tires See WHEEL ALIGNMENT
Broken or sagging spring See SUSPENSION section
Broken torsion bar See SUSPENSION section
Power steering valve not See STEERING section
centered
Front alignment out of See WHEEL ALIGNMENT
tolerance section
Defective wheel bearing See WHEEL BEARINGS in
SUSPENSION section
Uneven sway bar links See SUSPENSION section
Frame bent Check for frame damage
Steering system bushing See STEERING section
worn
������������������\
������������������\
������������������\
������������������\
������������������\
������������������\
������������������\
�������������
Hard Steering Idler arm bushing too tight See STEERING LINKAGE
in STEERING section
Ball joint tight or seized See SUSPENSION section
Steering linkage too tight See STEERING LINKAGE in
STEERING section
Power steering fluid low Add proper amount of
fluid
Power steering drive belt See STEERING section
loose
Power steering pump See STEERING section
defective
Steering gear out of See STEERING section
adjustment
Incorrect wheel alignment See WHEEL ALIGNMENT
Damaged steering gear See STEERING section
Damaged suspension See SUSPENSION section
Bent steering knuckle or See SUSPENSION section
supports
������������������\
������������������\
������������������\
������������������\
������������������\
������������������\
������������������\
�������������
Vehicle Strut rod or control arm See SUSPENSION section
"Wanders" bushing worn
Loose or worn wheel See WHEEL BEARINGS in
bearings SUSPENSION section
Improper tire inflation Check tire pressure
Stabilizer bar missing or See SUSPENSION section
defective
Page 1299 of 1333

WHEEL A LIG NM EN T S PEC IF IC ATIO NS & P R O CED URES
�
1991 M it s u bis h i M onte ro
1991 WHEEL ALIGNMENT
Specifications & Procedures
Chrysler Motors: Colt, Colt Vista, Colt 200,
Ram-50, Stealth, Summit
Mitsubishi: Eclipse, Galant, Mirage, Montero,
Pickup, Precis, 3000GT
WHEEL ALIGNMENT PROCEDURES
NOTE: On vehicles with electronic chassis controls, ensure all
systems are functional before attempting to adjust riding
height or wheel alignment.
CAMBER ADJUSTMENT
Montero, Pickup & Ram-50
1) Check tire inflation. Place front wheel on turning radius
gauge, and level vehicle (unladed). On 2WD models, remove hub cap and
cotter pin. On 4WD models, remove free wheeling hub assembly.
2) On all models, measure camber with camber/caster/kingpin
gauge attached. See appropriate WHEEL ALIGNMENT SPECIFICATIONS table.
If camber is not within specification, remove shock absorber mounting
nut and lock nut.
3) Compress shock absorber and loosen upper arm mounting
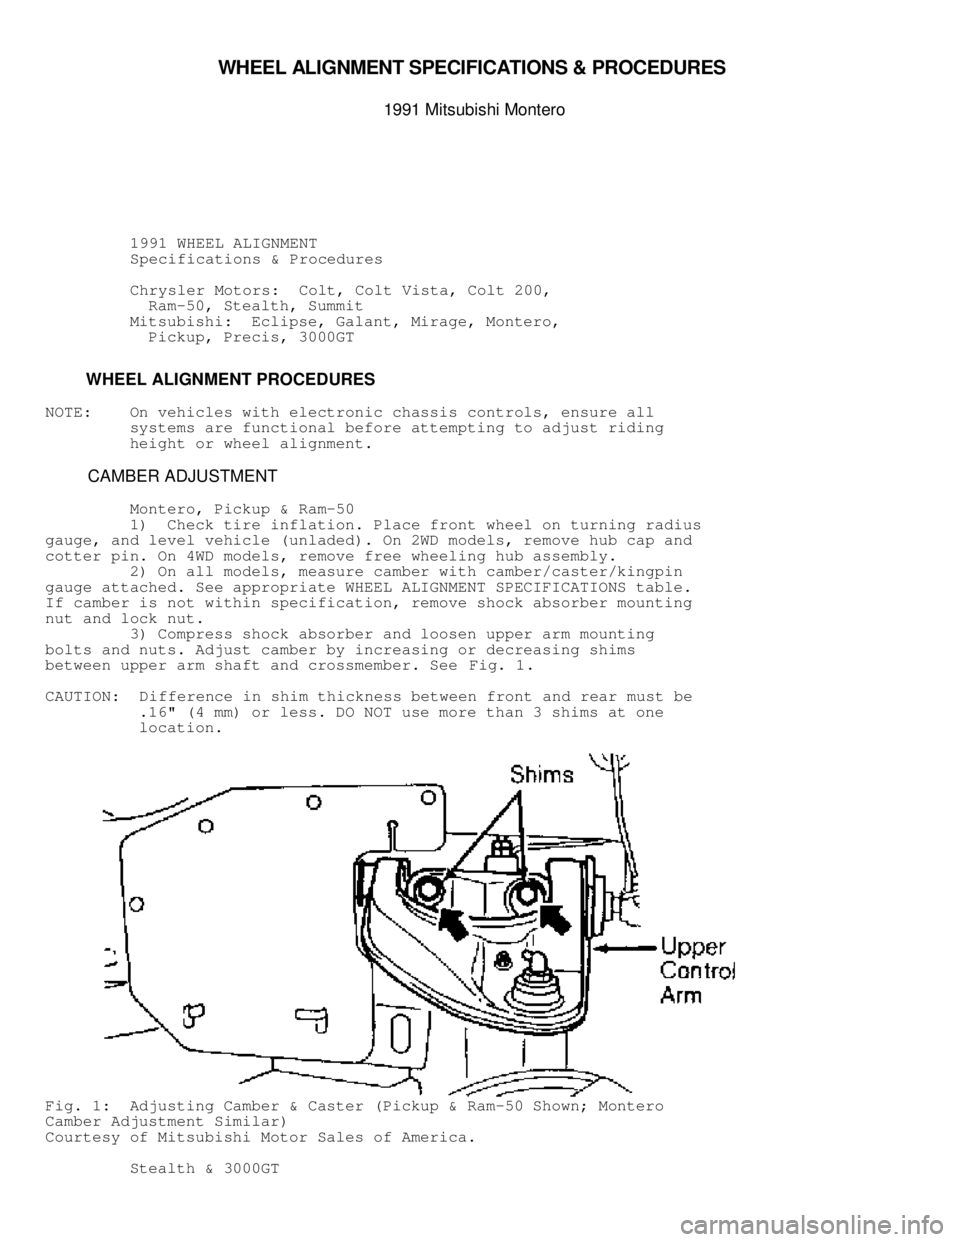
bolts and nuts. Adjust camber by increasing or decreasing shims
between upper arm shaft and crossmember. See Fig. 1.
CAUTION: Difference in shim thickness between front and rear must be
.16" (4 mm) or less. DO NOT use more than 3 shims at one
location.
Fig. 1: Adjusting Camber & Caster (Pickup & Ram-50 Shown; Montero
Camber Adjustment Similar)
Courtesy of Mitsubishi Motor Sales of America.
Stealth & 3000GT
Page 1300 of 1333
Check camber. If camber is not within specification, loosen
eccentric cam nut. Rotate eccentric cam bolt to obtain correct camber.
See Fig. 2 . Each marking represents a change of 1/8-1/4 degree of
camber.
Fig. 2: Adjusting Camber (Stealth & 3000GT)
Courtesy of Mitsubishi Motor Sales of America.
All Other Models
Check camber using a camber/caster/kingpin gauge and turning
radius gauge. See WHEEL ALIGNMENT SPECIFICATIONS table. If camber is
not within specification, replace damaged or bent parts.
CASTER ADJUSTMENT
Colt Vista
Check tire inflation. Place front wheel on turning radius
gauge, and level vehicle (unladed). Remove hub cap and cotter pin.
Measure caster with camber/caster/kingpin gauge attached. See WHEEL
ALIGNMENT SPECIFICATIONS table. If caster is not within specification,
adjust by changing strut bar lock position. See Fig. 3.
Fig. 3: Adjusting Caster (Colt Vista)
Courtesy of Mitsubishi Motor Sales of America.
Montero
Page 1301 of 1333

Remove free wheeling hub. Measure caster with
camber/caster/kingpin gauge and turning radius gauge. See WHEEL
ALIGNMENT SPECIFICATIONS table. If caster is not within specification,
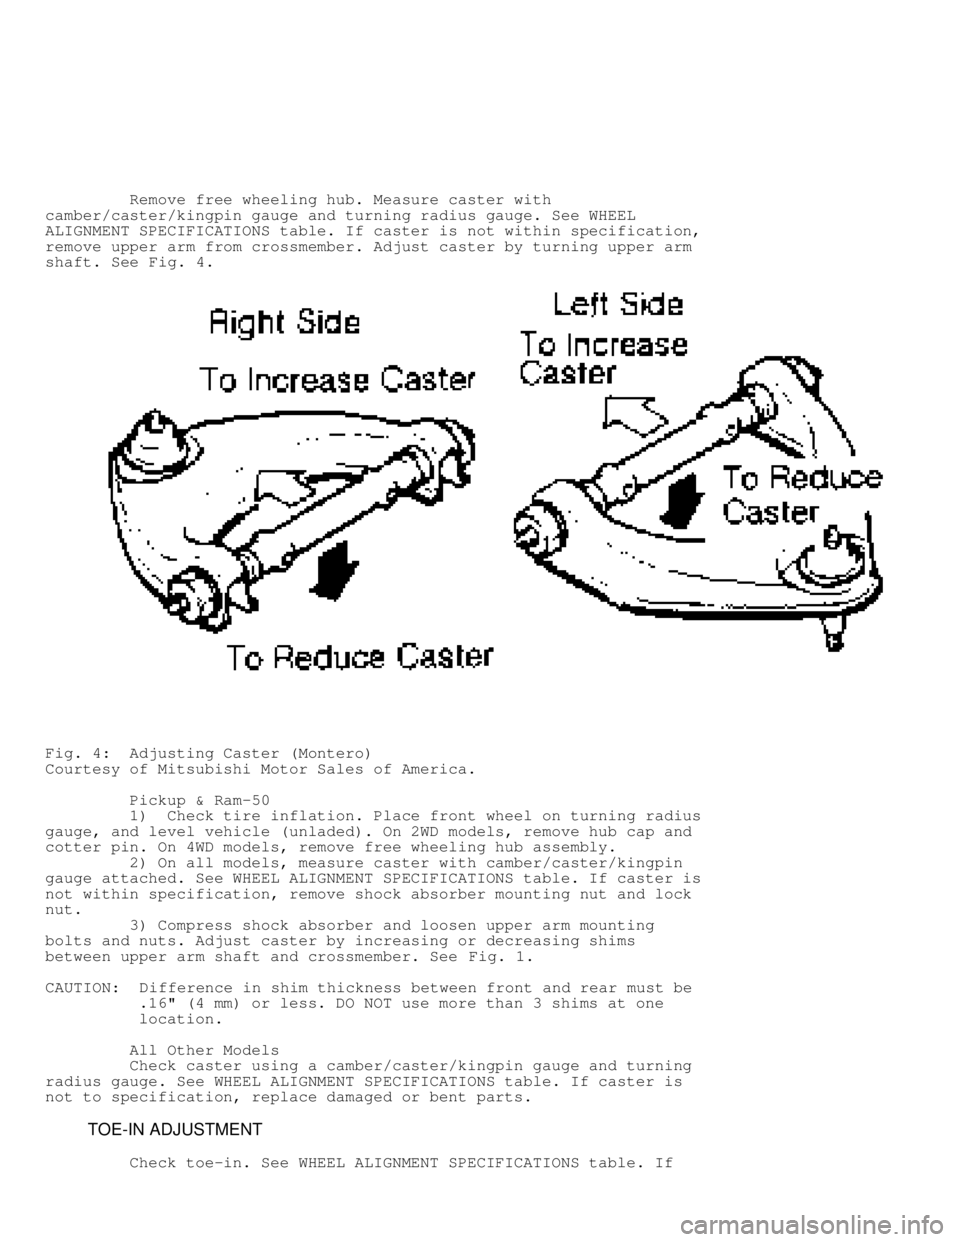
remove upper arm from crossmember. Adjust caster by turning upper arm
shaft. See Fig. 4.
Fig. 4: Adjusting Caster (Montero)
Courtesy of Mitsubishi Motor Sales of America.
Pickup & Ram-50
1) Check tire inflation. Place front wheel on turning radius
gauge, and level vehicle (unladed). On 2WD models, remove hub cap and
cotter pin. On 4WD models, remove free wheeling hub assembly.
2) On all models, measure caster with camber/caster/kingpin
gauge attached. See WHEEL ALIGNMENT SPECIFICATIONS table. If caster is
not within specification, remove shock absorber mounting nut and lock
nut.
3) Compress shock absorber and loosen upper arm mounting
bolts and nuts. Adjust caster by increasing or decreasing shims
between upper arm shaft and crossmember. See Fig. 1.
CAUTION: Difference in shim thickness between front and rear must be
.16" (4 mm) or less. DO NOT use more than 3 shims at one
location.
All Other Models
Check caster using a camber/caster/kingpin gauge and turning
radius gauge. See WHEEL ALIGNMENT SPECIFICATIONS table. If caster is
not to specification, replace damaged or bent parts.
TOE-IN ADJUSTMENT
Check toe-in. See WHEEL ALIGNMENT SPECIFICATIONS table. If
Page 1306 of 1333

\003
WHEEL A LIG NM EN T T H EO RY/O PER ATIO N
�1991 M it s u bis h i M onte ro
GENERAL INFORMATION
Wheel Alignment Theory & Operation
ALL MODELS
* PLEASE READ THIS FIRST *
NOTE: This article is intended for general information purposes
only. This information may not apply to all makes and models.
PRE-ALIGNMENT INSTRUCTIONS
GENERAL ALIGNMENT CHECKS
Before adjusting wheel alignment, check the following:
* Each axle uses tires of same construction and tread style,
equal in tread wear and overall diameter. Verify that radial
and axial runout is not excessive. Inflation should be at
manufacturer's specifications.
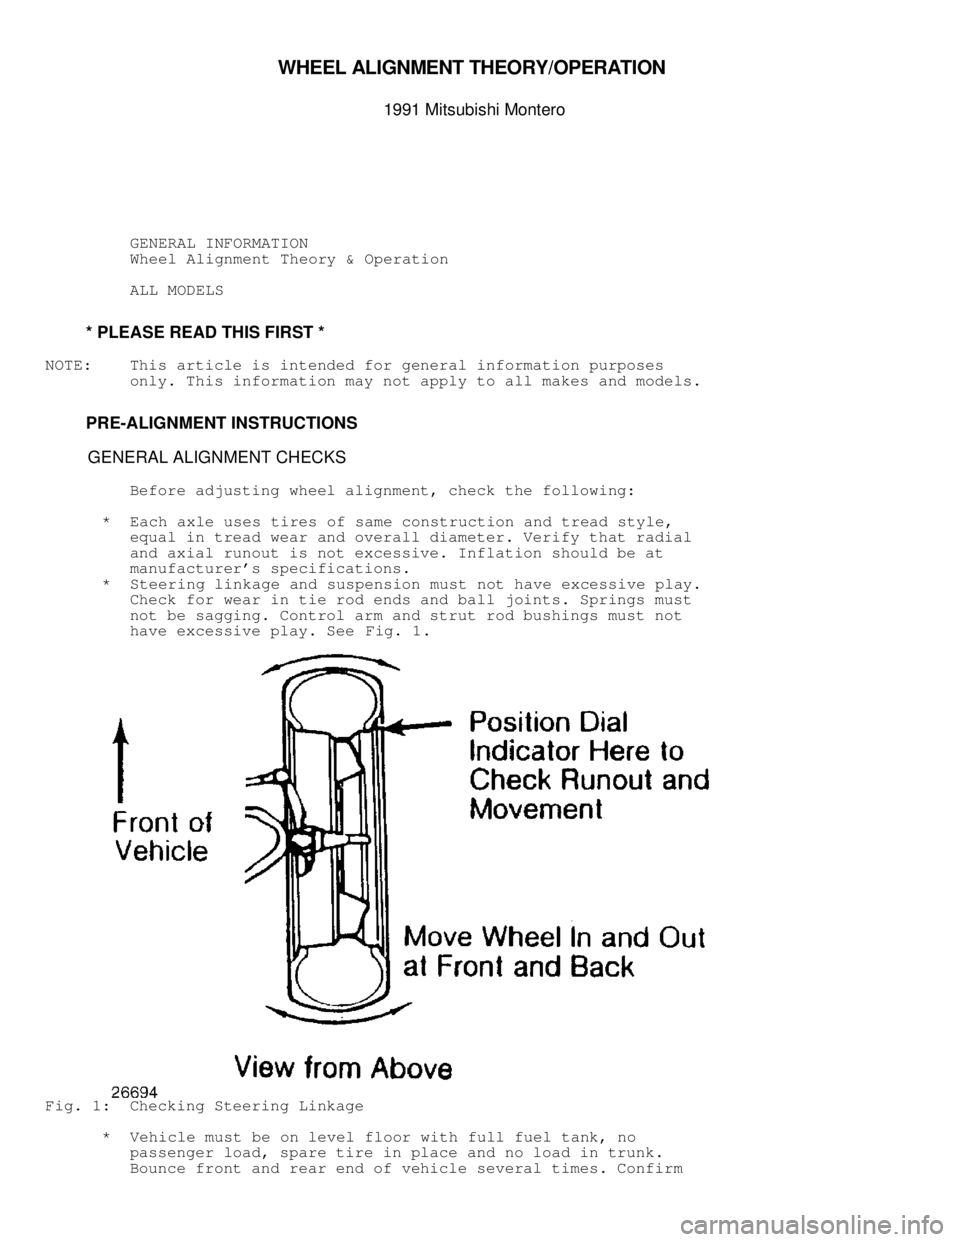
* Steering linkage and suspension must not have excessive play.
Check for wear in tie rod ends and ball joints. Springs must
not be sagging. Control arm and strut rod bushings must not
have excessive play. See Fig. 1.
Fig. 1: Checking Steering Linkage
* Vehicle must be on level floor with full fuel tank, no
passenger load, spare tire in place and no load in trunk.
Bounce front and rear end of vehicle several times. Confirm
Page:
< prev 1-8 9-16 17-24