1991 MITSUBISHI MONTERO lock
[x] Cancel search: lockPage 447 of 1333

ROCKER ARMS & ASSEMBLIES
Rocker Studs
Rocker studs are either threaded or pressed in place.
Threaded studs are removed by locking 2 nuts on the stud. Unscrew the
stud by turning the jam nut. Coat the stud threads with Loctite and
install. Tighten to specification.
Pressed in stud can be removed using a stud puller. Ream the
stud bore to proper specification and press in a new oversize stud.
Pressed in studs are often replaced by cutting threads in the stud
bore to accept a threaded stud.
Rocker Arms & Shafts
Mark rocker arms for location. Remove rocker arm retaining
bolts. Remove rocker arms. Inspect rocker arms, shafts, bushings and
pivot balls (if equipped) for excessive wear. Inspect rocker arms
for wear in valve stem contact area. Measure rocker arm bushing I.D.
Replace bushings if excessively worn.
The rocker arm valve stem contact point can be reground,
using special fixture for valve grinding machine. Remove minimum
amount of material as possible. Ensure all oil passages are clear.
Install rocker arms in original locations. Ensure rocker arm is
properly seated in push rod. Tighten bolts to specification. Adjust
valves if required. See VALVE ADJUSTMENT in this article.
Pushrods
Remove rocker arms. Mark push rods for location. Remove push
rods. Push rods can be steel or aluminum, solid or hollow. Hollow
pushrods must be internally cleaned to ensure oil passage to the
rocker arms is cleaned. Check the pushrod for damage, such as loose
ends on steel tipped aluminum types.
Check push rod for straightness. Roll push rod on a flat
surface. Using feeler gauge, check clearance at center. Replace push
rod if bent. The push rod can also be supported at each end and
rotated. A dial indicator is used to detect bends in the push rod.
Lubricate ends of push rod and install push rod in original
location. Ensure push rod is properly seated in lifter. Install rocker
arm. Tighten bolts to specification. Adjust valves if required. See
VALVE ADJUSTMENT in this article.
LIFTERS
Hydraulic Lifters
Before replacing a hydraulic lifter for noisy operation,
ensure noise is not caused by worn rocker arms or valve tips.
Hydraulic lifter assemblies must be installed in original locations.
Remove the rocker arm assembly and push rod. Mark components for
location. Some applications require intake manifold, or lifter cover
removal. Remove lifter retainer plate (if used). To remove lifters,
use a hydraulic lifter remover or magnet. Different type lifters are
used. See Fig. 13.
Page 449 of 1333

interchangeable. Inspect all components for wear. Note amount of wear
in lifter body-to-camshaft contact area. Surface must have smooth and
convex contact face. If wear is apparent, carefully inspect cam lobe.
Inspect push rod contact area and lifter body for scoring
or signs of wear. If body is scored, inspect lifter bore for damage
and lack of lubrication. On roller type lifters, inspect roller for
flaking, pitting, loss of needle bearings and roughness during
rotation.
Measure lifter body O.D. in several areas. Measure lifter
bore I.D. of cylinder block. Some models offer oversized lifters.
Replace lifter if damaged.
If lifter check valve is not operating, obstructions may be
preventing it from closing or valve spring may be broken. Clean or
replace components as necessary.
Check plunger operation. Plunger should drop to bottom of the
body by its own weight when assembled dry. If plunger is not free,
soak lifter in solvent to dissolve deposits.
Lifter leak-down test can be performed on lifter. Lifter
must be filled with special test oil. New lifters contain special test
oil. Using lifter leak-down tester, perform leak-down test following
manufacturer's instructions. If leak-down time is not within
specifications, replace lifter assembly.
Lifters should be soaked in clean engine oil several hours
prior to installation. Coat lifter base, roller (if equipped) and
lifter body with ample amount of Molykote or camshaft lubricant. See
Fig. 13. Install lifter in original location. Install remaining
components. Valve lash adjustment is not required on most hydraulic
lifters. Preload of hydraulic lifter is automatic. Some models may
require adjustment.
Mechanical Lifters
Lifter assemblies must be installed in original locations.
Remove rocker arm assembly and push rod. Mark components for location.
Some applications require intake manifold or lifter cover removal.
Remove lifter retainer plate (if used). To remove lifters, use lifter
remover or magnet.
Inspect push rod contact area and lifter body for scoring or
signs of wear. If body is scored, inspect lifter bore for damage and
lack of lubrication. Note amount of wear in lifter body-to-camshaft
contact area. Surface must have smooth and convex contact face. If
wear is apparent, carefully inspect cam lobe.
Coat lifter base, roller (if equipped) and lifter body with
ample amount of Molykote or camshaft lubricant. Install lifter in
original location. Install remaining components. Tighten bolts to
specification. Adjust valves. See VALVE ADJUSTMENT in this article.
PISTONS, CONNECTING RODS & BEARINGS
* PLEASE READ THIS FIRST *
NOTE: Always refer to appropriate engine overhaul article in the
ENGINES section for complete overhaul procedures and
specifications for the vehicle being repaired.
RIDGE REMOVAL
Ridge in cylinder wall must be removed prior to piston
removal. Failure to remove ridge prior to removing pistons will cause
piston damage in piston ring locations.
With the piston at bottom dead center, place a rag in the
bore to trap metal chips. Install ridge reamer in cylinder bore.
Adjust ridge reamer using manufacturer's instructions. Remove ridge
Page 450 of 1333

using ridge reamer. DO NOT remove an excessive amount of material.
Ensure ridge is completely removed.
PISTON & CONNECTING ROD REMOVAL
Note top of piston. Some pistons may contain a notch, arrow
or be marked "FRONT". Piston must be installed in proper direction to
prevent damage with valve operation.
Check that connecting rod and cap are numbered for cylinder
location and which side of cylinder block the number faces. Proper cap
and connecting rod must be installed together. Connecting rod cap must
be installed on connecting rod in proper direction to ensure bearing
lock procedure. Mark connecting rod and cap if necessary. Pistons must
be installed in original location.
Remove cap retaining nuts or bolts. Remove bearing cap.
Install stud protectors on connecting rod bolts. This protects
cylinder walls from scoring during removal. Ensure proper removal of
ridge. Push piston and connecting rod from cylinder. Connecting rod
boss can be tapped with a wooden dowel or hammer handle to aid in
removal.
PISTON & CONNECTING ROD
Disassembly
Using ring expander, remove piston rings. Remove piston pin
retaining rings (if equipped). On pressed type piston pins, special
fixtures and procedures according to manufacturer must be used to
remove piston pins. Follow manufacturer's recommendations to avoid
piston distortion or breakage.
Cleaning
Remove all carbon and varnish from piston. Pistons and
connecting rods may be cleaned in cold type chemical tank. Using ring
groove cleaner, clean all deposits from ring grooves. Ensure all
deposits are cleaned from ring grooves to prevent ring breakage or
sticking. DO NOT attempt to clean pistons using wire brush.
Inspection
Inspect pistons for nicks, scoring, cracks or damage in ring
areas. Connecting rod should be checked for cracks using Magnaflux
procedure. Piston diameter must be measured in manufacturers specified
area.
Using telescopic gauge and micrometer, measure piston pin
bore of piston in 2 areas, 90 degrees apart. This is done to check
diameter and out-of-round.
Install proper bearing cap on connecting rod. Ensure bearing
cap is installed in proper location. Tighten bolts or nuts to
specification. Using inside micrometer, measure inside diameter in 2
areas, 90 degrees apart.
Connecting rod I.D. and out-of-round must be within
specification. Measure piston pin bore I.D. and piston pin O.D. All
components must be within specification. Subtract piston pin diameter
from piston pin bore in piston and connecting rod to determine proper
fit.
Connecting rod length must be measured from center of
crankshaft journal inside diameter to center of piston pin bushing
using proper caliper. Connecting rods must be the same length.
Connecting rods should be checked on an alignment fixture for bent or
twisted condition. Replace all components which are damaged or not
within specification.
PISTON & CYLINDER BORE FIT
Page 451 of 1333

Ensure cylinder is checked for taper, out-of-round and
properly honed prior to checking piston and cylinder bore fit. See
CYLINDER BLOCK in this article. Using dial bore gauge, measure
cylinder bore. Measure piston at right angle to piston pin in center
of piston skirt area. Subtract piston diameter from cylinder bore
diameter. The difference is piston-to-cylinder clearance. Clearance
must be within specification. Mark piston for proper cylinder
location.
ASSEMBLING PISTON & CONNECTING ROD
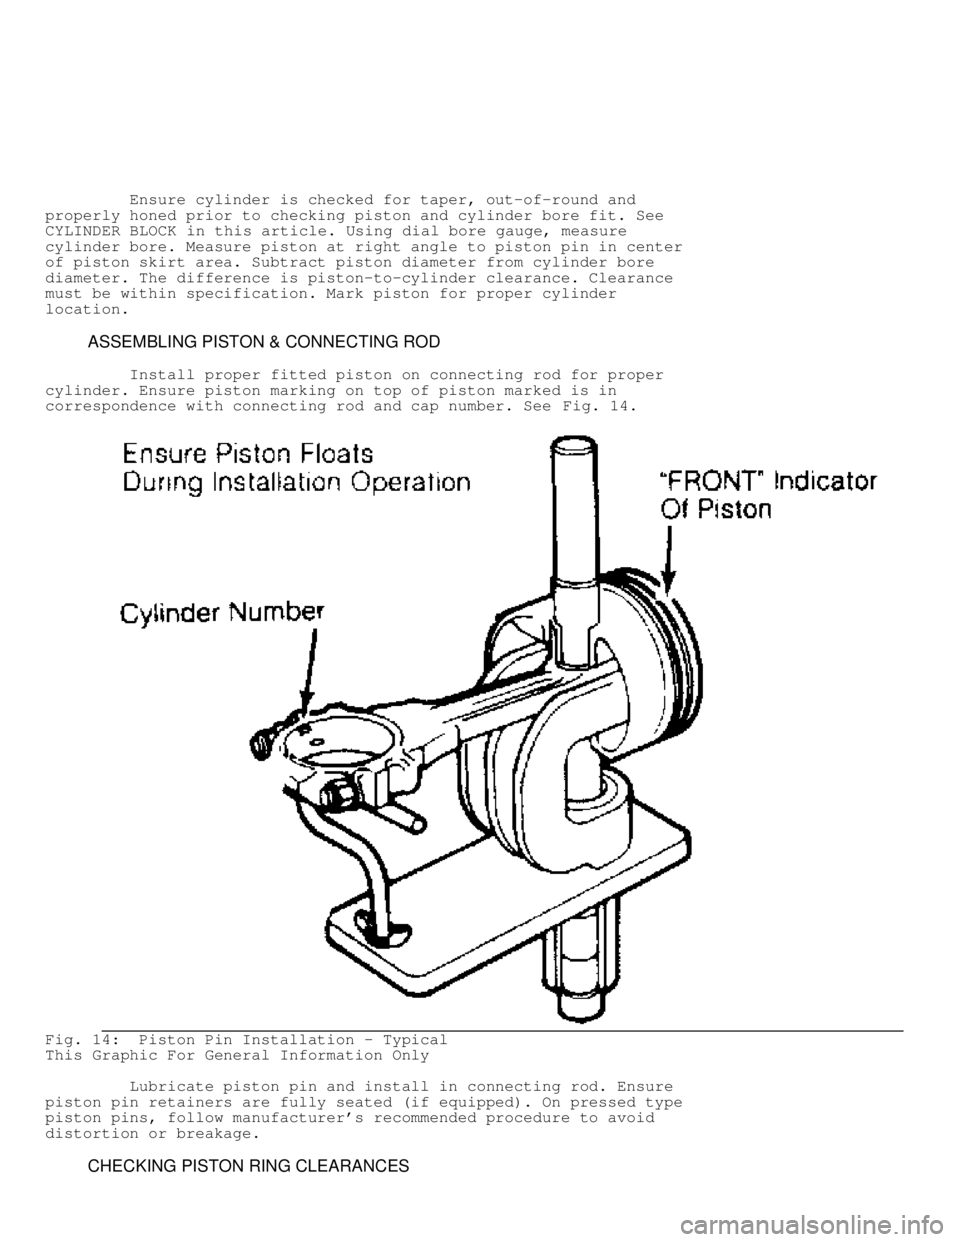
Install proper fitted piston on connecting rod for proper
cylinder. Ensure piston marking on top of piston marked is in
correspondence with connecting rod and cap number. See Fig. 14.
Fig. 14: Piston Pin Installation - Typical
This Graphic For General Information Only
Lubricate piston pin and install in connecting rod. Ensure
piston pin retainers are fully seated (if equipped). On pressed type
piston pins, follow manufacturer's recommended procedure to avoid
distortion or breakage.
CHECKING PISTON RING CLEARANCES
Page 453 of 1333

PISTON & CONNECTING ROD INSTALLATION
Cylinders must be honed prior to piston installation. See
CYLINDER HONING under CYLINDER BLOCK in this article.
Install upper connecting rod bearings. Lubricate upper
bearings with engine oil. Install lower bearings in rod caps. Ensure
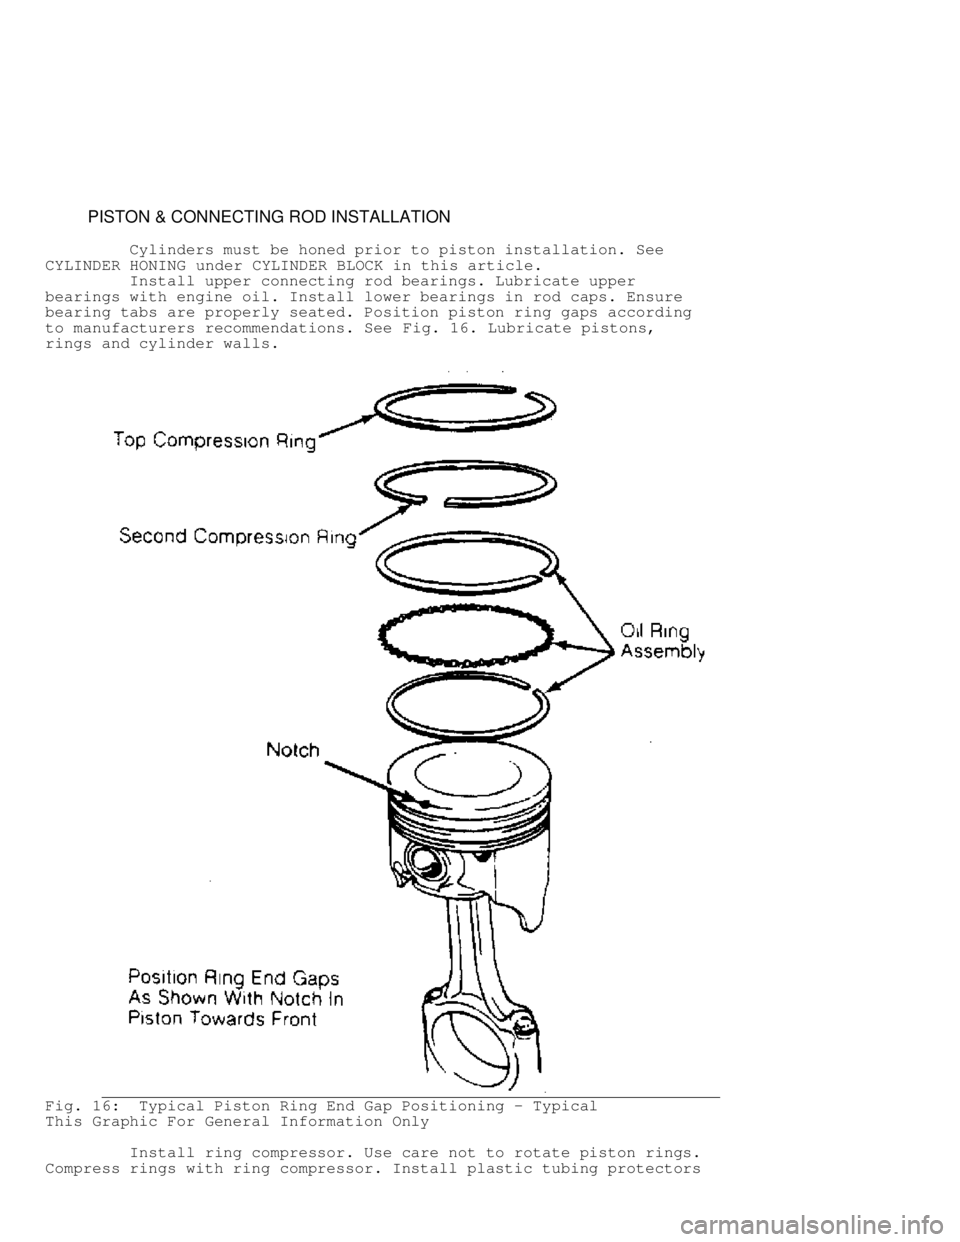
bearing tabs are properly seated. Position piston ring gaps according
to manufacturers recommendations. See Fig. 16. Lubricate pistons,
rings and cylinder walls.
Fig. 16: Typical Piston Ring End Gap Positioning - Typical
This Graphic For General Information Only
Install ring compressor. Use care not to rotate piston rings.
Compress rings with ring compressor. Install plastic tubing protectors
Page 456 of 1333

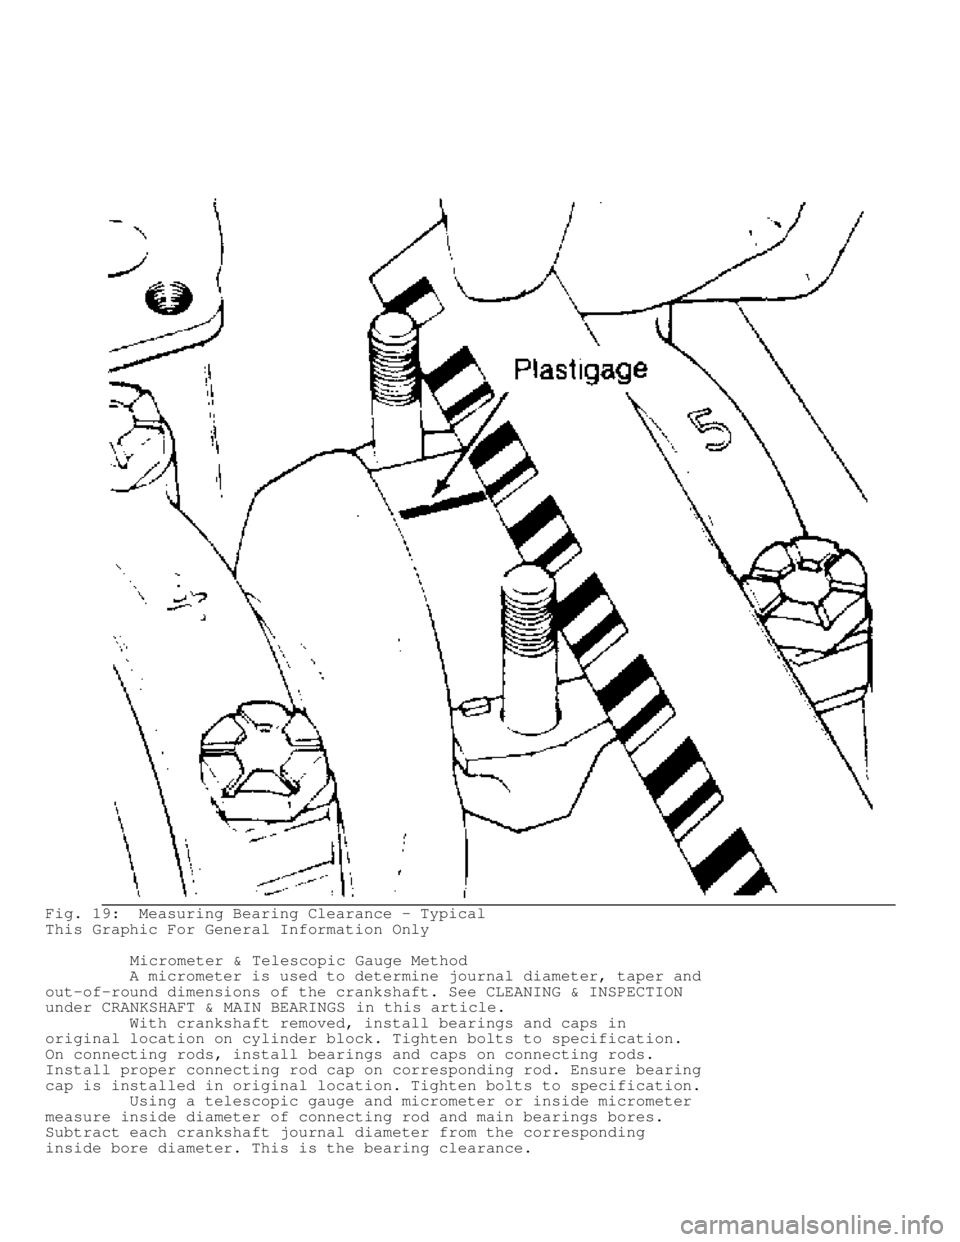
Fig. 19: Measuring Bearing Clearance - Typical
This Graphic For General Information Only
Micrometer & Telescopic Gauge Method
A micrometer is used to determine journal diameter, taper and
out-of-round dimensions of the crankshaft. See CLEANING & INSPECTION
under CRANKSHAFT & MAIN BEARINGS in this article.
With crankshaft removed, install bearings and caps in
original location on cylinder block. Tighten bolts to specification.
On connecting rods, install bearings and caps on connecting rods.
Install proper connecting rod cap on corresponding rod. Ensure bearing
cap is installed in original location. Tighten bolts to specification.
Using a telescopic gauge and micrometer or inside micrometer
measure inside diameter of connecting rod and main bearings bores.
Subtract each crankshaft journal diameter from the corresponding
inside bore diameter. This is the bearing clearance.
Page 457 of 1333

CRANKSHAFT & MAIN BEARINGS
* PLEASE READ THIS FIRST *
NOTE: Always refer to appropriate engine overhaul article in the
ENGINES section for complete overhaul procedures and
specifications for the vehicle being repaired.
REMOVAL
Ensure all main bearing caps are marked for location on
cylinder block. Some main bearing caps have an arrow stamped on it
which must face front of engine. Remove main bearing cap bolts. Remove
main bearing caps. Carefully remove crankshaft. Use care not to bind
crankshaft in cylinder block during removal.
CLEANING & INSPECTION
Thoroughly clean crankshaft using solvent. Dry with
compressed air. Ensure all oil passages are clear and free of sludge,
rust, dirt, and metal chips.
Inspect crankshaft for scoring and nicks. Inspect crankshaft
for cracks using Magnaflux procedure. Inspect rear seal area for
grooving or damage. Inspect bolt hole threads for damage. If pilot
bearing or bushing is used, check pilot bearing or bushing fit in
crankshaft. Inspect crankshaft gear for damaged or cracked teeth.
Replace gear if damaged. Check that oil passage plugs are tight (if
equipped).
Using micrometer, measure all journals in 4 areas to
determine journal taper, out-of-round and undersize. See Fig. 20.
Some crankshafts can be reground to the next largest undersize,
depending on the amount of wear or damage. Crankshafts with rolled
fillet cannot be reground and must be replaced.
Fig. 20: Measuring Crankshaft Journal - Typical
This Graphic For General Information Only
Crankshaft journal runout should be checked. Install
crankshaft in "V" blocks or bench center. Position dial indicator
Page 458 of 1333

with tip resting on the main bearing journal area. See Fig. 21.
Rotate crankshaft and note reading. Journal runout must not exceed
specification. Repeat procedure on all main bearing journals.
Crankshaft must be replaced if runout exceeds specification.
Fig. 21: Measuring Crankshaft Main Bearing Journal Runout - Typical
This Graphic For General Information Only
INSTALLATION
Install upper main bearing in cylinder block. Ensure lock
tab is properly located in cylinder block. Install bearings in main
bearing caps. Ensure all oil passages are aligned. Install rear seal
(if removed).
Ensure crankshaft journals are clean. Lubricate upper main
bearings with clean engine oil. Carefully install crankshaft. Check
each main bearing clearance using Plastigage method. See
MAIN & CONNECTING ROD BEARING CLEARANCE in this article.
Once clearance is checked, lubricate lower main bearing and
journals. Install main bearing caps in original location. Install rear
seal in rear main bearing cap (if removed). Some rear main bearing
caps require sealant to be applied in corners to prevent oil leakage.
Install and tighten all bolts except thrust bearing cap to
specification. Tighten thrust bearing cap bolts finger tight only.
Thrust bearing must be aligned. On most applications, crankshaft
must be moved rearward then forward. Procedure may vary with
manufacturer. Thrust bearing cap is then tighten to specification.
Ensure crankshaft rotates freely. Crankshaft end play should be
checked. See CRANKSHAFT END PLAY in this article.
CRANKSHAFT END PLAY
Dial Indicator Method
Crankshaft end play can be checked using dial indicator.
Mount dial indicator on rear of cylinder block. Position dial
indicator tip against rear of crankshaft. Ensure tip is resting
against flat surface.
Pry crankshaft rearward. Adjust dial indicator to zero.