Page 342 of 1216

9-58ENGINE <1.8L Engine> -Front Case, Oil Pump and Silent Shaft
FRONT CASE, OIL PUMP AND SILENT SHAFTrl
L
I1
26:
25
15-18 Nm
11-13 ftlbs.DISASSEMBLY AND REASSEMBLY8-12 Nm
6.0-8.5 ft.lbs.15-22 Nm11-15 ft.lbs.
Disassembly steps
l +1. Oil filter~~ l +2. Oil pressure switch
3. Oil pressure gauge unit4. Oil filter bracket
5. Gasket
6. Drain plug
7. Drain plug gasket
+e*+ 8. Oil pan
9. Oil screen10. Oil screen gasket
11. Oil pump cover18-25
Nm/13-18 ftlbs.
8-8 Nm
4-8 ft.lbs.
l + 12. Oil pump oil seall + 13. Oil pump gasket
~~ l + 14. Flange boltI)+ 15. Oil pump driven geare+ 16. Oil pump drive gear
+e l + 17. Front case18. Plug
19. Relief spring20. Relief plunger
l + 21.Silent shaft oil seal
l + 22.Crankshaft front oil seal
35-45 Nm25-33 ftlbs.23.
Front case gasket
24. Silent shaft, right
25. Silent shaft, left
4* l + 26.Silent shaft front bearing~~ l + 27.Silent shaft rear bearing
i=G.NogRF-A.r
3EN0088
NOTE(1) Reverse the disassembly procedures to reassemble.(2) +e : Refer to “Service Points of Disassembly”.(3) l + : Refer to “Service Points of Reassembly”.(4) 0 : Non-reusable parts
Page 372 of 1216
9-88ENGINE <2.0L DOHC Engine> - Oil Pan and Oil Screen
/
40-60 Nm
30-40 Nm22-29 ft.lbs..
/80-100 Nm458-72
ft.lbs.
70-80 Nm-51-58 ftlbs.15-22 vNm11-16 ft
11b1
Removal steps
1.Drain plug4.Left member
l *5. Transfer assembly6.Drive shaft
7. Exhaust pipe connection
8.Gasket9. Oil return pipe connection
10.Gasket***+ll. Oilpan
12.Oil screen13.Gasket
35-4; Nm25-33 ftlbs.
OlAO620
NOTE(I) Reverse the removal procedures to reinstall.(2) +I) : Refer to “Service Points of Removal”.
(3) H : Refer to “Service Points of Installation”.(4) m : Non-reusable parts
SERVICE POINTS OF REMOVAL
NOBHBAFal
5. REMOVAL OF TRANSFER ASSEMBLYRefer to GROUP 21-Transfer.
11. REMOVAL OF OIL PAN
(1) Remove the oil pan mounting bolts.
(2) Tap the special tool in between the cylinder block and
the oil pan.
Caution
Do not use a screwdriver, a chisel or a similar tool
when removing the oil pan.
(3) Remove the oil pan by placing a brass bar at the correctof the special tool and then tapping with a hammer.
Page 374 of 1216

9-90ENGINE <2.0L DOHC Engine> - Cylinder Head Gasket
CYLINDER HEAD GASKETNOSJA-S2.5-3.5 Nm 19
3 4 K
REIVIOVAL AND INSTALLATION2-3 ft.lbs.\ I i-6
Pre-removal Operation*Eliminating Fuel Pressure in Fuel20Line1\(Refer to GROUP 14-Service Ad-justment Procedures.)eDraining of Engine Coolant(Refer to GROUP 7-Service Adjust-
ment Procedures.)
,,vs4-6 Nm
’
II28
2936’
/w,=
3i38OlAO5.69
Removal stepsl
1. Connection for accelerator cable orthrottle cable
2. Connection for accelerator cable (Auto-
cruise control)3. Connection for oxygen sensor
temperature sensor
5. Connection for engine coolant
temperature gauge unit6. Connection for engine coolant
7. Connection for crank angle sensor
8. Connection for TPS
ISC and idle switch
10. Connection for fuel injector
12. Connection for power transistor
13. Connection for knock sensor (Turbo)
14. Connection for EGR temperature sensor
(California vehicles only)
15. Connection for ground cable
+e l + 17. Connection for radiator upper hose
/\05ADl9019. Center cover
20. Connection for spark plug cable assembly
21. Connection for air intake hose (Turbo)
22. Connection for breather hose (Turbo)
23.Airintakehose24. Connection for breather hose+e l 25. Connection for fuel high pressure hose26. O-ring
27. Connection for vacuum hoses
28. Connection for heater hose
29. Connection for water by-pass hose
30. Connection for PCV hose
31. Connection for vacuum hose (Turbo)
32. Connection for water hose (Turbo)
33. Eye-bolt (Turbo)
34. Gasket (Turbo)
35. Connection for oil pipe (Turbo)
36. Connection for vacuum hoses (Turbo)
37. Connection for fuel return hose
38. Connection for brake booster vacuum
hoseA
NOTE(1) Reverse the removal procedures to reinstall.(2) +I) : Refer to “Service Points of Removal”.
(3) ~~ : Refer to “Service Points of Installation”.
(4) m : Non-reusable parts
Page 401 of 1216

ENGINE <2.0L DOHC Engine> -Front Case, Oil Pump and Silent Shaft9-117
FRONT CASE, OIL PUMP AND SILENT SHAFT
DISASSEMBLY AND REASSEMBLY
40-45 Nm29-33 ft.lbs.
\
32
I
NOSRF-B11-13
ft.lbs.
LO8-12 Nm6-9 ft.lbs.\
\715-22 Nm -11-16 ft.lbs.,15-22
Nm11-16 ft.lbs.
Disassembly steps
I. Drain pluo
\/‘16EN046835-45
Nm25-33 ft.lbs.2.Gasket-l + 3. Oil filter
4. Oil cooler bolt (Turbo)
~~ 5. Oil cooler (Turbo)
6. Oil pressure switch
7.Harness assembly8. Oil pressure gauge unit
9.Oil pan10.Oil screen
11.Gasket12. Oil filter bracket
13.Gasket14.Relief plug
15.Gasket16.Relief spring17.Relief plunger
l 4 23. Oil seall + 24. Silent shaft oil seall + 25. Crankshaft front oil seal26. Oil pump cover
l * 27. Oil pump driven geare+ 28. Oil pump drive gear
29. Left silent shaft
30. Right silent shaft
W W 31. Silent shaft front bearings
W W 32. Right silent shaft rear bearing
~~ ~~ 33. Left silent shaft rear bearing34. Check valve (Turbo)
35. Gasket (Turbo)
l + 36. Oil jet (Turbo)37. Gasket (Turbo)
l I) W 18. Plug cap-NOTE19. O-ring(1) Reverse the disassembly procedures to reassemble.+e I)+ 20. Driven gear bolt(2) 4I) : Refer to “Service Points of Disassembly”.
I)+ 21. Front case(3) ~~ : Refer to “Service Points of Reassembly”.
22. Gasket(4) m : Non-reusable parts
Page 442 of 1216

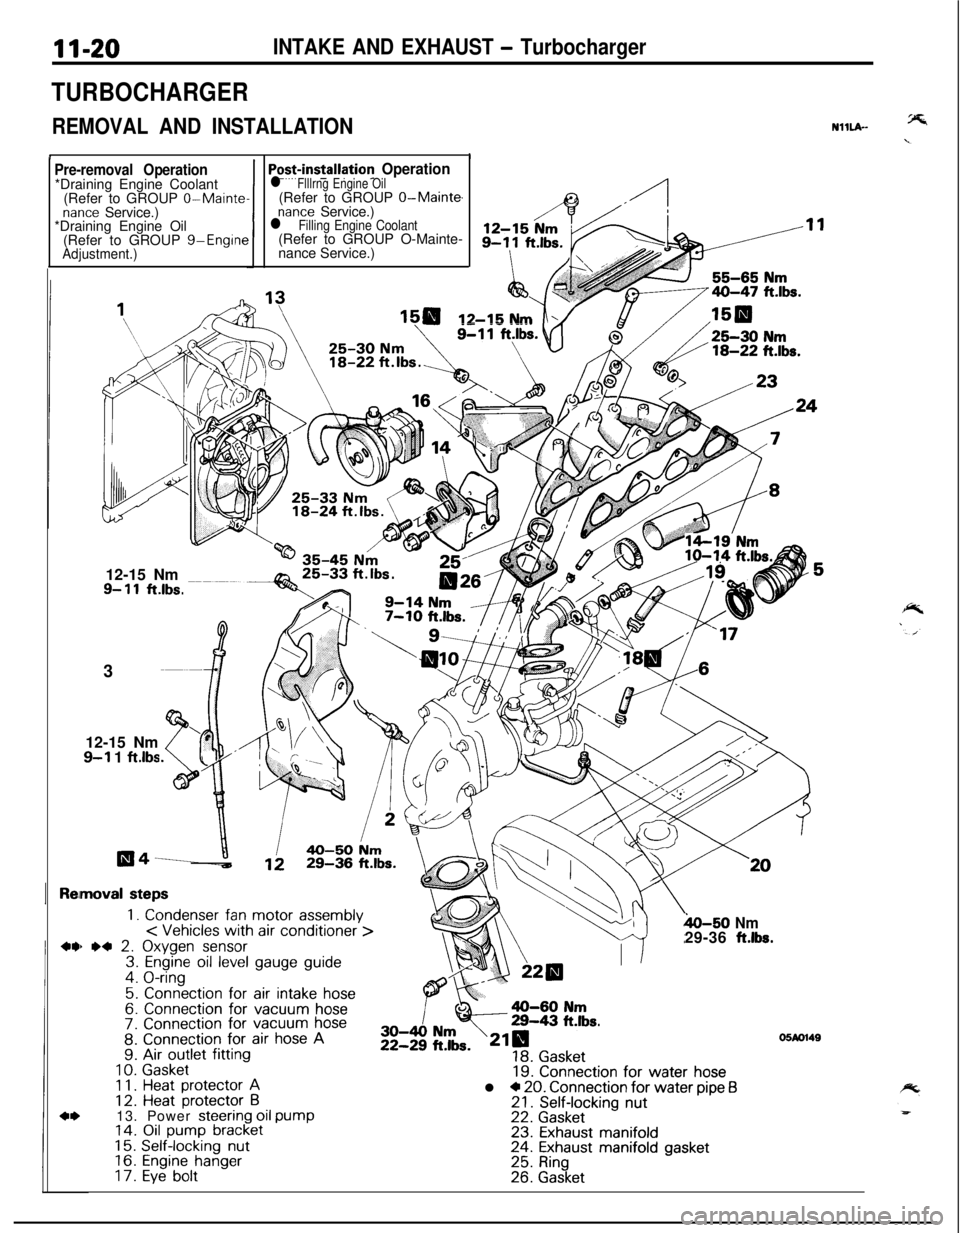
II-20INTAKE AND EXHAUST - Turbocharger
TURBOCHARGER
REMOVAL AND INSTALLATION
II
NHLA-
Pre-removal Operation*Draining Engine Coolant
(Refer to GROUP
0-Maintenance Service.)
*Draining Engine Oil
(Refer to GROUP g-Engine
Adjustment.)1
Po+installation Operationl Flllrng Engine Oil(Refer to GROUP O-Main@
nance Service.)l Filling Engine Coolant(Refer to GROUP O-Mainte-
nance Service.)
12-15 Nm12-15 Nm
9- 11ft.lbs.3
12-15 Nm
9-l 1 ftlbs
moval steps
1. Condenser fan motor assembly< Vehicles with air conditioner >) *4 2. Oxygen sensor3. Engine oil level gauge guide4. O-ring
5. Connection for air intake hose6. Connection for vacuum hose7. Connection for vacuum hose8. Connection for air hose A9. Air outlet fitting
10.Gasket1 1.Heat protector A12. Heat protector B13. Power steering oil pump14. Oil pump bracket15.Self-locking nut16.Engine hanger17.Eye bolt
h-50 Nm29-36 ft.lbs.
19. Connection for water hosel * 20. Connection for water pipe f321. Self-locking nut22. Gasket23. Exhaust manifold24. Exhaust manifold gasket25. Ring26. Gasket
05M1149
Page 450 of 1216

11-28INTAKE AND EXHAUST - Exhaust Manifold ~2.0~ DOHC Enoine (Turbo)>
EXHAUST MANIFOLD <2.0L DOHC Engine (Turbo)>
REMOVAL AND INSTALLATION
Pre-removal Operation*Draining Engine Coolant(Refer to GROUP O-Mainte-nance Service.)*Draining Engine Oil(Refer to GROUP O-Mainte-nance Service.)
Rennova1 steps
1.Condenser fan motor assemblyOxygen sensor connectorEngine oil level gauge guideO-ring
\30-40 Nm22-29 ft.lty3. & (
EJ\\=a-50 N
4 .ri29-38 ftk.
,
Post-installation Operation@Filling Engine Oil(Refer to GROUP O-Mainte-nance Service.)@Filling Engine Coolant(Refer to GROUP O-Mainte-nance Service.)NllNA-C
130 25-30 Nmd/18-22 ft.lbs.
;:4.
s5:7.
::10.Ii.12.13.14.15.
Connection for air intake hose
Connection for vacuum hoseConnection for vacuum hoseConnection for air hose AHeat protector AHeat protector 6Power steering oil pumpOil pump bracketSelf-locking nut
Engine hangerEve bolt
16. Gasket17. Connection for water hose
19IBWI 18. Connection for water pipe B19. Self-locking nut20.
Gasket
05Ao15421.
Exhaust manifold22. Exhaust manifold gasket23.
Ring24. Gasket
NOTE(1) Reverse the removal procedures to reinstall.(2) +, : Refer to “Service Points of Removal”.(3) l * : Refer to “Service Points of Installation”(4) m : Non-reusable parts
Page 459 of 1216

FUEL SYSTEM - SDecifications14-5
-.
Items
Injector coil resistance52
Specifications
13-I 6 [at 20°C (68”F)j
2-3 [at 20°C (68”F)I
TORQUE SPECIFICATIONSN14CC-A
,,-
ItemsINm1 ft.lbs.
Center cover
Oxygen sensor
Engine coolant temperature sensor
Throttle position sensor attaching screws
Idle speed control servo attaching screws <2.0L DOHC Engine>
Delivery pipe mounting bolts
High-pressure fuel hose to delivery pipe
Fuel pressure regulator to delivery pipe
<1.8L Engine>
<2.0L DOHC Engine>
Accelerator cable clamp
Throttle body mounting bolts and nuts
Throttle body stay mounting nut
4ccelerator cable adjusting bolts
Lateral rod attaching bolt
Self-locking nut
Fuel tank drain plug
Electrical fuel pump
Screws
Bolt (at lower side)Gel
gauge unit mounting screws
-ligh pressure hose to electrical fuel pump
iigh pressure hose to fuel main pipe
3attery tray to battery
3attery tray mounting boltGel
main pipe to fuel filter
Zye boltGel filter
mounting bolts
%el pipes clip attaching bolt
Japor pipe assembly mounting bolt
Ianister holder mounting bolt
2.5-3.5
40-50
20-40
1.5-2.5
2.5-4.5
IO-13
4-6
7-l 15-8
8-106-7
IO-137-9
15-2211-16
15-2211-16
4-63-4
80-l 0057-72
21-3115-22
15-2011-14
2-3
9-14
2-3
30-40
30-40
2-3
9-14
30-40
25-35
9-14
9-14
9-14
9-14
2-3
30-36
15-29
1.1-1.8
1.8-3.3
7-9
3-4
1.4-2.2
6.5-10
1.4-2.2
22-29
22-29
1.5-2
7-14
22-29
18-25
7-10
7-10
7-10
7-10
SEALANT AND ADHESIVENMCE-A
Items
Engine coolant temperature sensor threaded portion
Fuel tank hole cover
Specified sealant
MOPAR Part No.4318034 or equivalent
MOPAR Rope Caulk Sealer 3/l 6 x 80” roll Part No.4026044 or equivalent
Page 553 of 1216

FUEL SYSTEM -Fuel Pump, Fuel Gauge Unit and Overfill Limiter (Two-Way Valve) p&&g
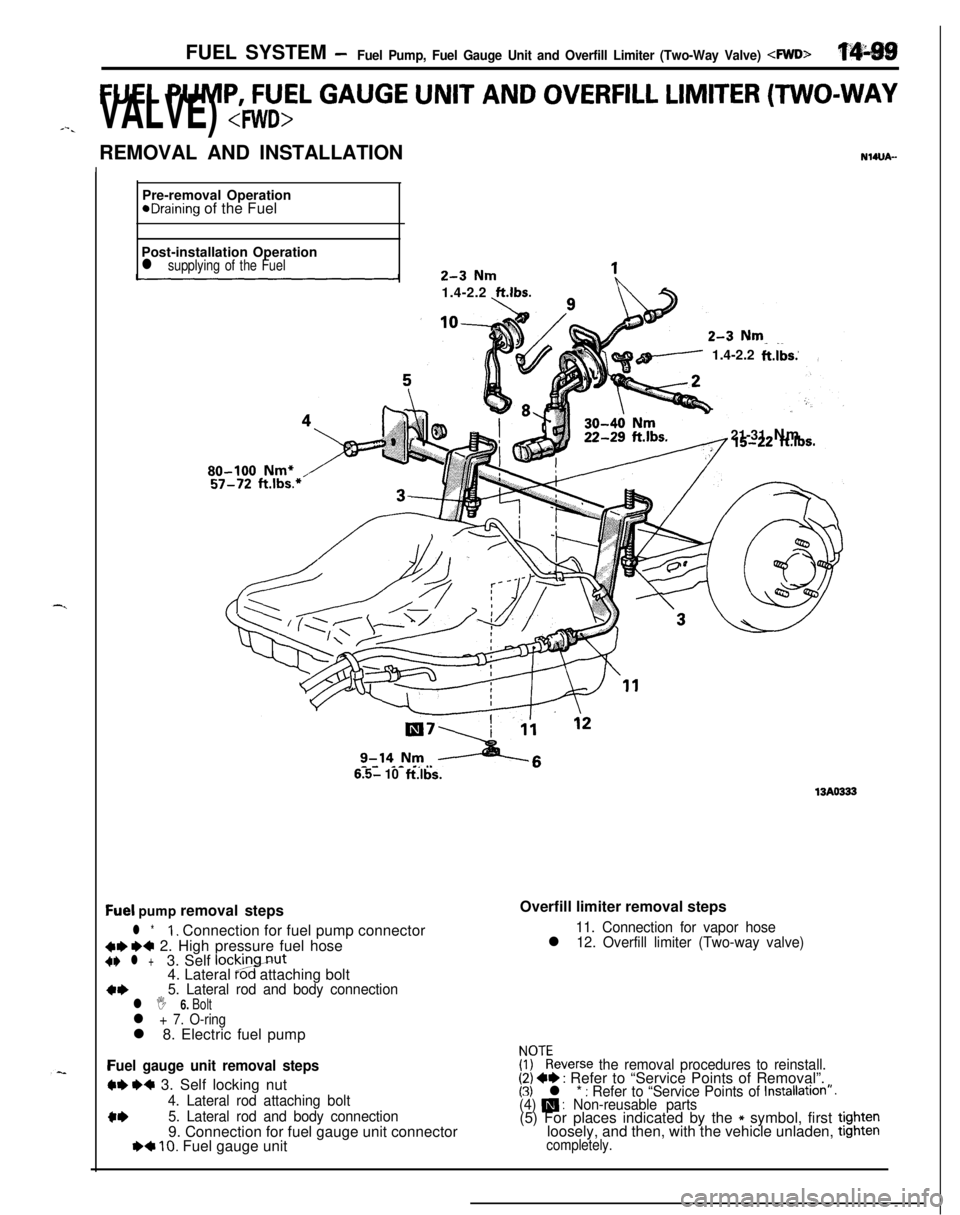
FUEL PUMP, FUEL GAUGE UNIT AND OVERFILL LIMITER (TWO-WAY
J-.VALVE) REMOVAL AND INSTALLATION
NWJA-Pre-removal Operation
eDraining of the Fuel
Post-installation Operation
l supplying of the Fuel1.4-2.2
ft.lbs.
/ 1.4-2.2ft.lbs.
21-31 Nm
80-100 Nm+
6.5- 10ftlbs.
13AO333
Qel pump removal steps
l *1. Connection for fuel pump connector
C+ ~~ 2. High pressure fuel hoseC+ l +3. Self lockingnut
4. Lateral Pod attaching bolt
a*5. Lateral rod and body connectionl I 6. Boltl + 7. O-ringl 8. Electric fuel pump
Fuel gauge unit removal steps
W e+ 3. Self locking nut
4. Lateral rod attaching bolt
c*5. Lateral rod and body connection9. Connection for fuel gauge unit connector
I)+ 10. Fuel gauge unitOverfill limiter removal steps
11. Connection for vapor hosel 12. Overfill limiter (Two-way valve)
FF:everse the removal procedures to reinstall.(2) +e : Refer to “Service Points of Removal”.(3) l * : Refer to “Service Points of Installation”.(4) m : Non-reusable parts(5) For places indicated by the * symbol, first tightenloosely, and then, with the vehicle unladen, tighten
completely.