Page 877 of 4087

Parts Inspection ± Interior Lights
(Integration Relay)
REMOVAL AND INSTALLATION OF
INTEGRATION RELAY
(See page BE±49 )
INSPECTION OF INTEGRATION RELAY
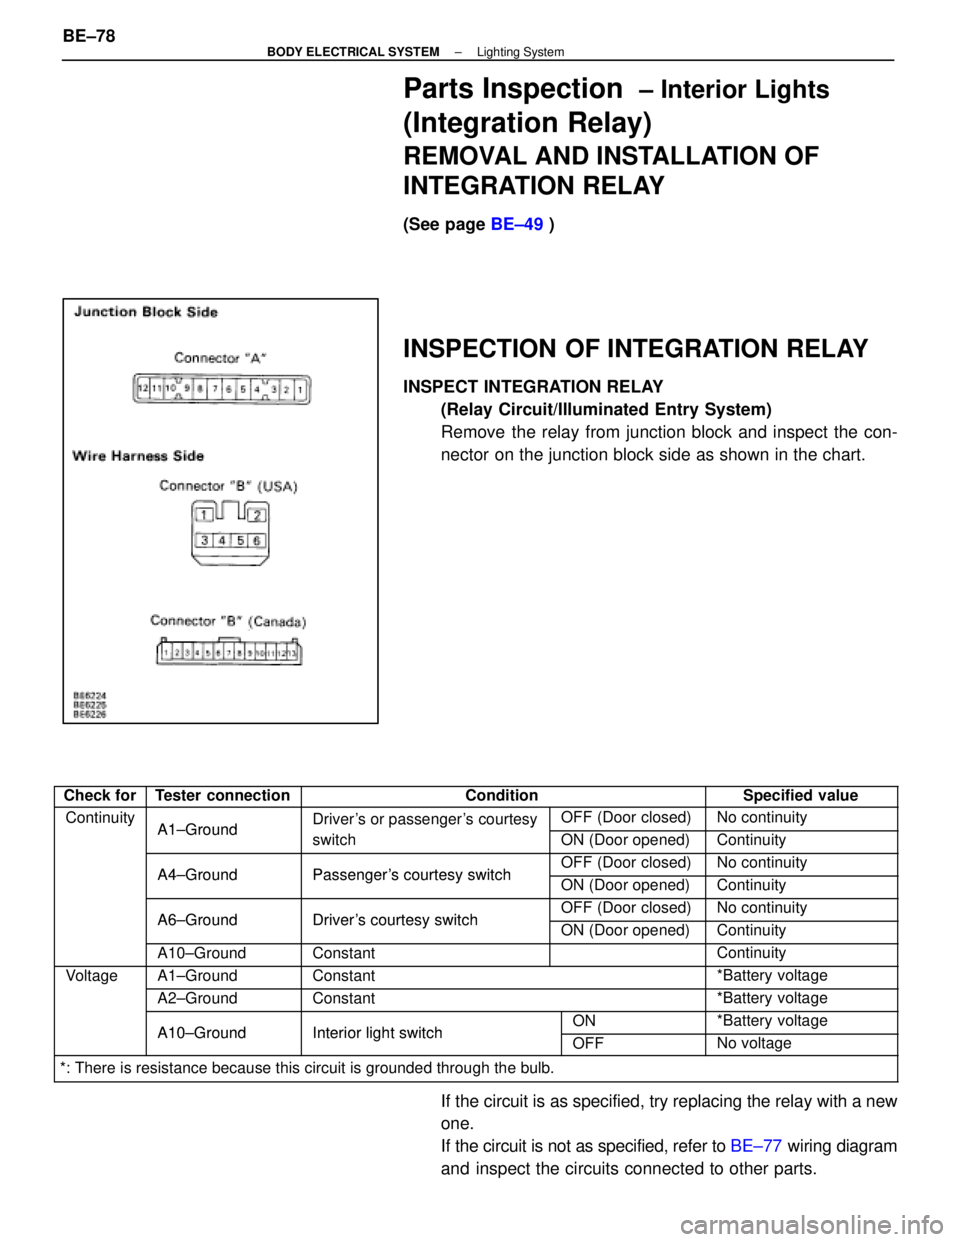
INSPECT INTEGRATION RELAY
(Relay Circuit/Illuminated Entry System)
Remove the relay from junction block and inspect the con-
nector on the junction block side as shown in the chart.
Check forTester connectionConditionSpecified value
ContinuityA1±GroundDriver's or passenger's courtesyOFF (Door closed)No continuityyA1±Groundgy
switchON (Door opened)Continuity
A4±GroundPassenger's courtesy switchOFF (Door closed)No continuityA4±GroundPassenger's courtesy switchON (Door opened)Continuity
A6±GroundDriver's courtesy switchOFF (Door closed)No continuityA6±GroundDriver's courtesy switchON (Door opened)Continuity
A10±GroundConstantContinuity
VoltageA1±GroundConstant*Battery voltageg
A2±GroundConstant*Battery voltage
A10±GroundInterior light switchON*Battery voltageA10±GroundInterior light switchOFFNo voltage
*: There is resistance because this circuit is grounded through the bulb\
.
If the circuit is as specified, try replacing the relay with a new
one.
If the circuit is not as specified, refer to BE±77 wiring diagram
and inspect the circuits connected to other parts.
BE±78
±
BODY ELECTRICAL SYSTEM Lighting System
WhereEverybodyKnowsYourName
Page 882 of 4087
TROUBLESHOOTING
Interior Light System
You will find the cause of trouble more easily using the table shown below. In this table, the numbers indicate
the order priority of the causes in the trouble. Check each part in the ord\
er shown. If necessary, replace the parts.
See pageB±4,21BE±79BE±49BE±80BE±81BE±82
±
BE±6
Trouble
Part Name
DOME FuseDoor Courtesy SwitchIntegration RelayFront Personal LightVanity LightLuggage Compartment Door
Courtesy SwitchWire HarnessBulb
Only one interior light does not light up.21
Interior light does not light up. (All)12
ºIlluminated Entry Systemº does not oper-
ate.213
Interior light does not light up.
(in front personal light)231
Front personal light does not light up.231
Rear personal light does not light up.21
Vanity light does not light up.231
Luggage compartment light does not light
up.231
Courtesy light does not light up.231
±
BODY ELECTRICAL SYSTEM Lighting SystemBE±83
WhereEverybodyKnowsYourName
Page 883 of 4087

WIPER AND WASHER SYSTEM
DESCRIPTION
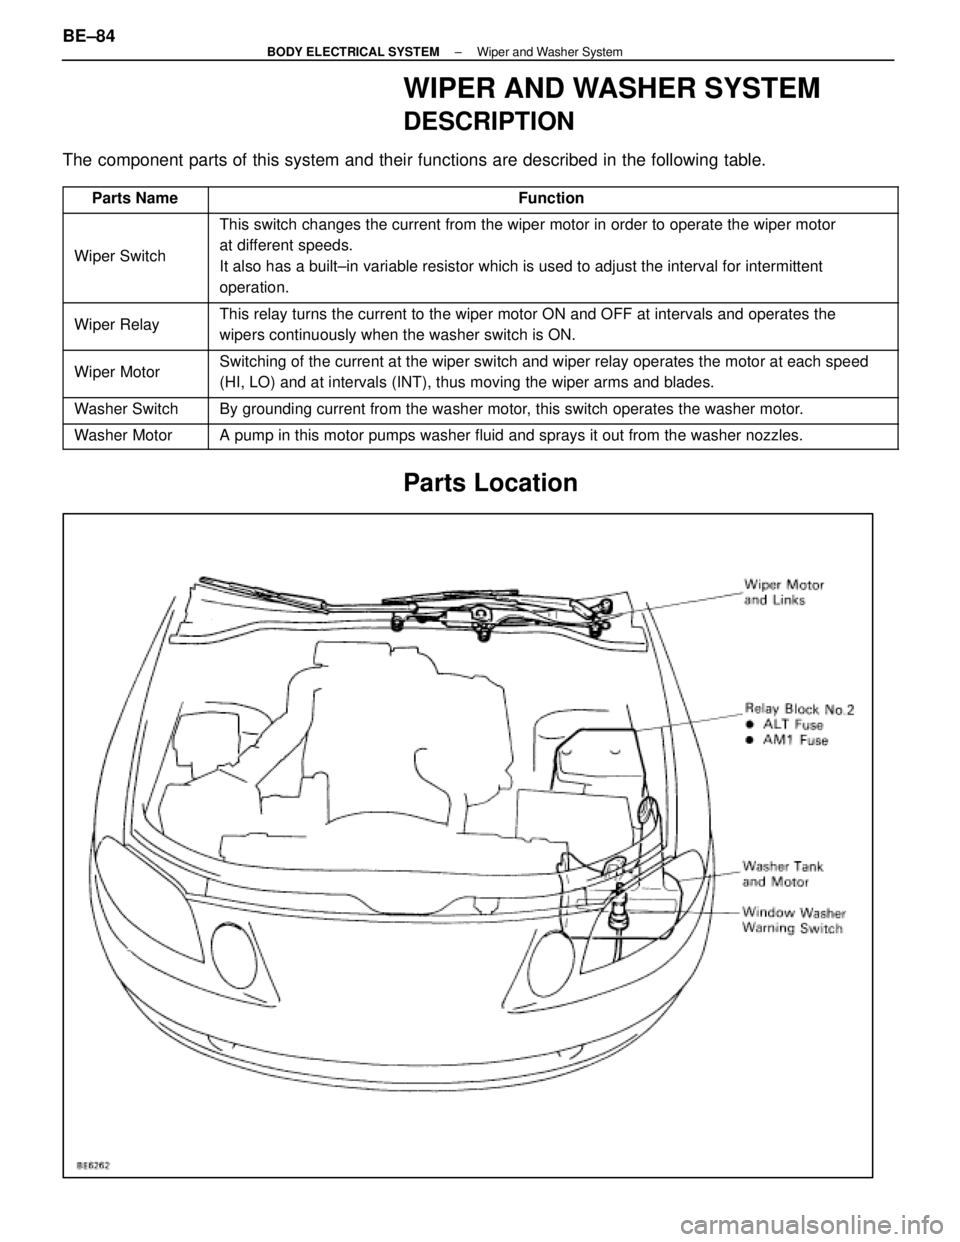
The component parts of this system and their functions are described in the\
following table.
Parts NameFunction
Wiper Switch
This switch changes the current from the wiper motor in order to operate\
the wiper motor
at different speeds.
It also has a built±in variable resistor which is used to adjust the \
interval for intermittent
operation.
Wiper RelayThis relay turns the current to the wiper motor ON and OFF at intervals \
and operates the
wipers continuously when the washer switch is ON.
Wiper MotorSwitching of the current at the wiper switch and wiper relay operates th\
e motor at each speed
(HI, LO) and at intervals (INT), thus moving the wiper arms and blad\
es.
Washer SwitchBy grounding current from the washer motor, this switch operates the washer motor.
Washer MotorA pump in this motor pumps washer fluid and sprays it out from the washe\
r nozzles.
Parts Location
BE±84±
BODY ELECTRICAL SYSTEM Wiper and Washer System
WhereEverybodyKnowsYourName
Page 890 of 4087

Check forTester connectionConditionSpecified value
Continuity1±GroundConstantContinuity
Voltage2±GroundWiper switch position
(I iti it h ON)
HIGH or MISTBattery positive voltage2±Ground(Ignition switch ON)OFF or INT, LOWNo voltage
3±GroundWiper switch position
(I iti it h ON)
LOW and MISTBattery positive voltage3±Ground(Ignition switch ON)OFF or INT, HIGHNo voltage
6±GroundIgnition switchLOCK or ACCNo voltage6±GroundONBattery positive voltage
If circuit is not as specified, refer to BE±86 wiring diagram and
inspect the circuits connected to other parts.
(Combination Switch)
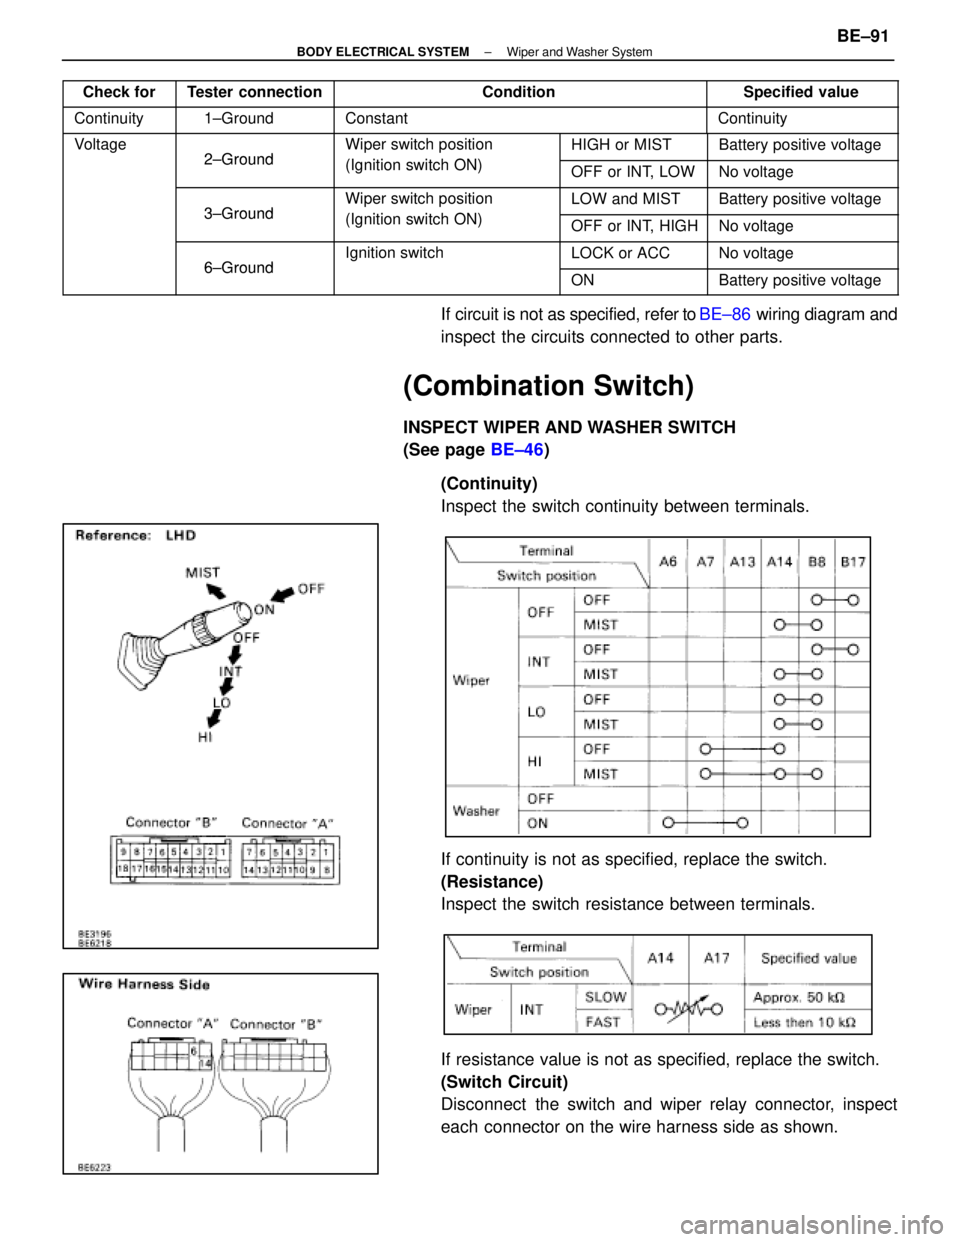
INSPECT WIPER AND WASHER SWITCH
(See page BE±46)
(Continuity)
Inspect the switch continuity between terminals.
If continuity is not as specified, replace the switch.
(Resistance)
Inspect the switch resistance between terminals.
If resistance value is not as specified, replace the switch.
(Switch Circuit)
Disconnect the switch and wiper relay connector, inspect
each connector on the wire harness side as shown.
±
BODY ELECTRICAL SYSTEM Wiper and Washer SystemBE±91
WhereEverybodyKnowsYourName
Page 895 of 4087

DESCRIPTION
The combination meter has various meters and gauges which show the vehicle'\
s condition, warning lights which
monitor abnormalities in the vehicle and inform the driver, indicator lights which inform the driver of the condition
of each part of vehicle, and a function for illumination and brightness ad\
justment of meters and gauges.
The component parts of this system and their functions are described in \
the following table.
Parts NameFunction
SpeedometerThe speedometer needle moves in accordance with signals from the speed s\
ensor to
indicate the vehicle's speed.
TachometerThe tachometer needle moves in accordance with signals from the igniter \
to indicate the
engine's speed.
Water Temperatrue
GaugeThe water temperature gauge's needle moves in accordance with signals from the send-
er gauge and indicates the temperature of the engine coolant.
Fuel GaugeThe fuel gauge needle moves in accordance with signals from the sender g\
auge, indicat-
ing the amount of fuel remaining in the fuel tank.
OdometerThe odometer counts the total distance traveled by the vehicle in accord\
ance with pulse
signals from the speed sensor.
Twin Trip Switch
The twin trip meter counts the distance traveled by the vehicle in accor\
dance with pulse
signals from the speed sensor. It can be reset using a switch and can be used to switch
between trip meters A and B.
Circuit Plate
This plate contains the circuitry for each meter and gauge and for each \
warning light and
indicator light, as well as an internal engine oil level warning drive c\
ircuit, drive circuits for
the odometer and trip meter and brightness adjustment circuitry for each\
indicator.
Speed SensorMounted in the transmission, this sensor outputs pulse signals to the co\
mbination meter
in accordance with the speed of the output shaft.
Twin Trip SwitchOperation of this switch switches between the A and B trip meters and se\
nds reset sig-
nals to the combination meter.
Water
Temperature Sender
GaugeThis sender converts engine coolant temperatures to a resistance value i\
n signal form to
the combination meter.
Fuel Sender GaugeThis sender converts the level of fuel remaining in fuel tank to resista\
nce value and
sends the resistance value in signal form to combination meter.
Rheostat Light
Control VolumeIn order to adjust the degree of illumination of the combination meter, the resistance val-
ue of the built±in variable resistor is sent to the combination meter\
and rheostat light
control.
Fuel Level Warning
SwitchWhen the level of fuel remaining falls below a predetermined level, cont\
inuity is estab-
lished with this switch, which is built into the fuel sender gauge, caus\
ing a warning light
to light up.
Low Oil Pressure
Warning SwitchThis switch is mounted on the engine block. Continuity is established in\
this switch when
the oil pressure is low, causing a warning light to light up.
Integration Relay (Seat
Belt Warning Relay)
This relay receives current from fuse GAUGE and DOME and is connected to\
each
buckle switch, door courtesy switch, key unlock warning switch and warni\
ng light. As
part of the seat belt warning system, it sounds a chime and lights a war\
ning light when
seat belts are unfastened. As part of the key unlock warning system, it \
sounds a chime
when the set conditions are fulfilled.
Light Failure SensorThis sensor senses when a bulb in rear combination light is burnt out an\
d lights up a
warning light.
BE±96±
BODY ELECTRICAL SYSTEM Combination Meter
WhereEverybodyKnowsYourName
Page 970 of 4087

NOYES
OKNG
OKNG
OKNG
OKNG
INSPECTION PROCEDURES
1Is diagnostic trouble code output?
Perform diagnostic trouble code check on page BR±184.
Repair circuit indicated by the code output.
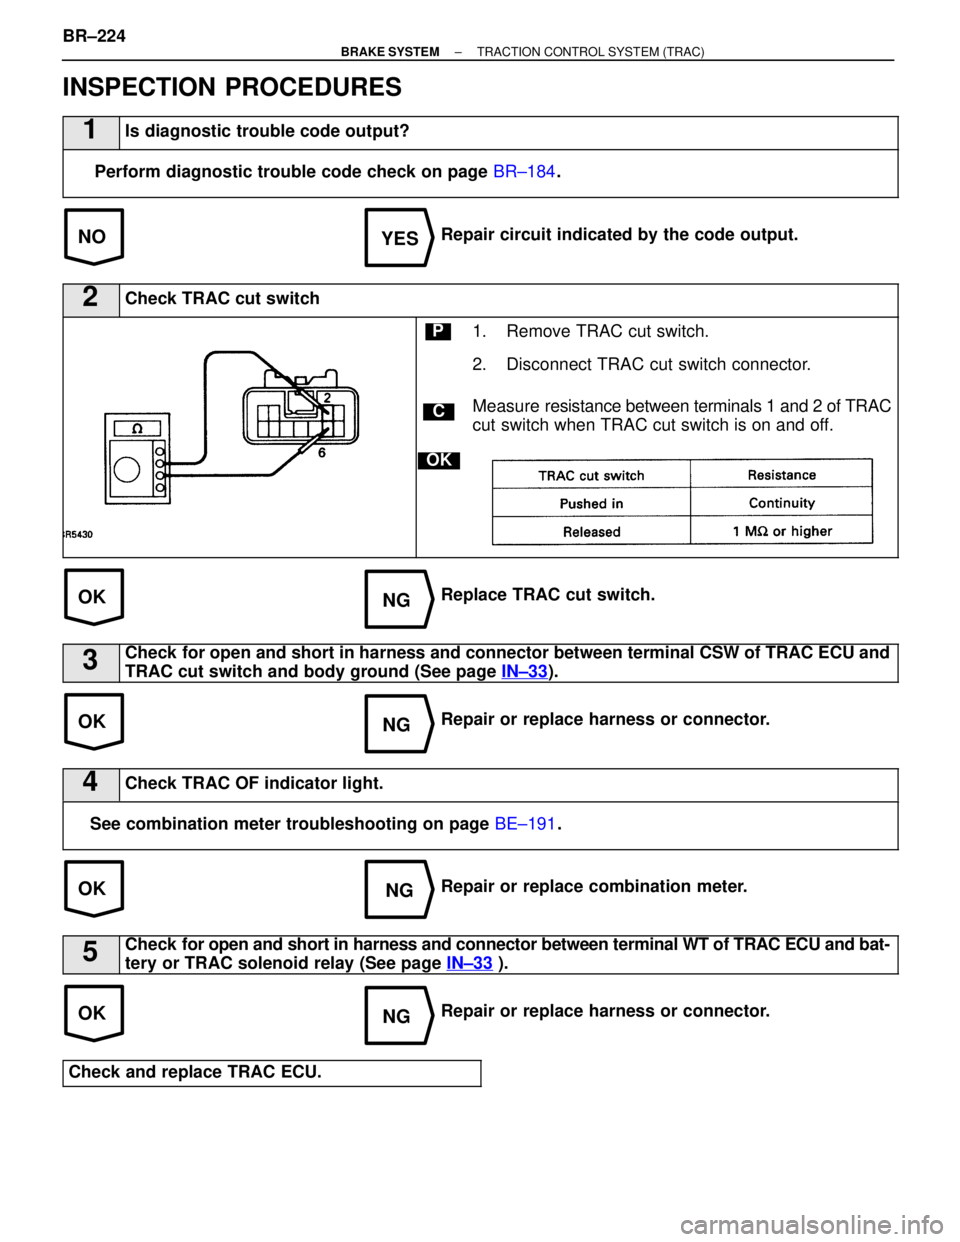
2Check TRAC cut switch
C
OK
P1. Remove TRAC cut switch.
2. Disconnect TRAC cut switch connector.
Measure re sistance between terminals 1 and 2 of TRAC
cut switch when TRAC cut switch is on and off.
Replace TRAC cut switch.
3Check for open and short in harness and connector between terminal CSW of TRA\
C ECU and
TRAC cut switch and body ground (See page IN±33
).
Repair or replace harness or connector.
4Check TRAC OF indicator light.
See combination meter troubleshooting on page BE±191.
Repair or replace combination meter.
5Check for open and short in harness and connector between terminal WT of TRAC ECU \
and bat-
tery or TRAC solenoid relay (See page IN±33
).
Repair or replace harness or connector.
Check and replace TRAC ECU.
BR±224±
BRAKE SYSTEM TRACTION CONTROL SYSTEM (TRAC)
WhereEverybodyKnowsYourName
Page 1034 of 4087

ABS ACTUATOR INSPECTION
BR0F1±03
HINT: Using the ABS actuator checker (SST), check the op-
eration of the actuator. If the actuator does not operate,
check the operation of sub±wire harness G according to
instructions on pages BR±97 and BR101. If the solenoid and/
or pump motor relay are abnormal, replace the relay and in-
spect the actuator operation again.
w/o TRAC:
1. INSPECT BATTERY POSITIVE VOLTAGE
Battery positive voltage:
10±14V
2. DISCONNECT CONNECTORS FROM ACTUATORDisconnect the 2 connectors from the actuator.
3. CONNECT ACTUATOR CHECKER (SST) TO ACTUATOR
(a) Connect the actuator checker (SST) to the actuator side wire harnesses via the sub±wire harnesses (SST), as shown.
SST 09990±00150, 09990±00210, 09990±00250 and09990±00280
(b) Connect the red cable of the checker to the battery positive (+) terminal and the black cable to negative (±) terminal.
Connect the black cable of the sub±wire harnesses to the
battery negative (±) terminal or body ground.
±
BRAKE SYSTEM ANTI±LOCK BRAKE SYSTEM (ABS)BR±65
WhereEverybodyKnowsYourName
Page 1063 of 4087

DTC11, 12ABS Solenoid Relay Circuit
CIRCUIT DESCRIPTION
This relay supplies power to each ABS solenoid. After the ignition switch is\
turned on, if the initial check is OK,
the relay goes on.
DTC No.DTC Detecting ConditionTrouble Area
11
Conditions (1) and (2) continue for 0.2 sec. or more:
(1) ABS solenoid relay (SR) terminal voltage: Battery
positive voltage
(2) Solenoid relay monitor (AST) terminal voltage: 0V
ABS solenoid relay
Open or short in ABS solenoid relay circuit
ECU
12
Conditions (1) and (2) continue for 0.2 sec. or more:
(1) ABS solenoid relay (SR) terminal voltage: 0V
(2) Solenoid relay monitor (AST) terminal voltage: Bat- tery positive voltage
ABS solenoid relay
B+ short in ABS solenoid relay circuit
ECU
Fail safe function: If trouble occurs in the solenoid relay circuit, th\
e ECU cuts off current to the solenoid
relay and prohibits ABS control.
DIAGNOSTIC CHARTDIAGNOSTIC CHART
BR±94±
BRAKE SYSTEM ANTI±LOCK BRAKE SYSTEM (ABS)
WhereEverybodyKnowsYourName