Page 74 of 136
Fluid Locations
AUTOMATIC TRANSMISSION
FLUID DIPSTICK ENGINE OILFILLER CAP
POWER STEERING
FLUID RESERVOIR
RADIATOR
CAP WASHER FLUID
RESERVOIR CAP
RADIATOR RESERVE
TANK CAP BRAKE FLUID
RESERVOIR
ENGINE OIL
DIPSTICKProCarManuals.comMain Menu s t
Page 79 of 136
Use the proper viscosity oil
for the climate in which
you drive:
Ambient Temperature
Automatic
The automatic transmission fluid level is checked (with the engine off and the car on level ground) using the dipstick on the passenger
side of the transmission housing. Remove the dipstick and wipe it
DIPSTICK
UPPER
LOWER
Insert the dipstick and remove it. The fluid level should be between
the upper and lower marks. If necessary, add fluid and recheck. Use only DEXRON
Automatic Transmission Fluid (A.T.F.) when adding or changing fluid.
After checking the fluid level, push the dipstick in securely
AUTOMATIC TRANSMISSION FLUID CHANGE CAPACITY: 2.4 (2.5
US qt, 2.1 Imp qt)ProCarManuals.comMain Menu s t
Page 81 of 136

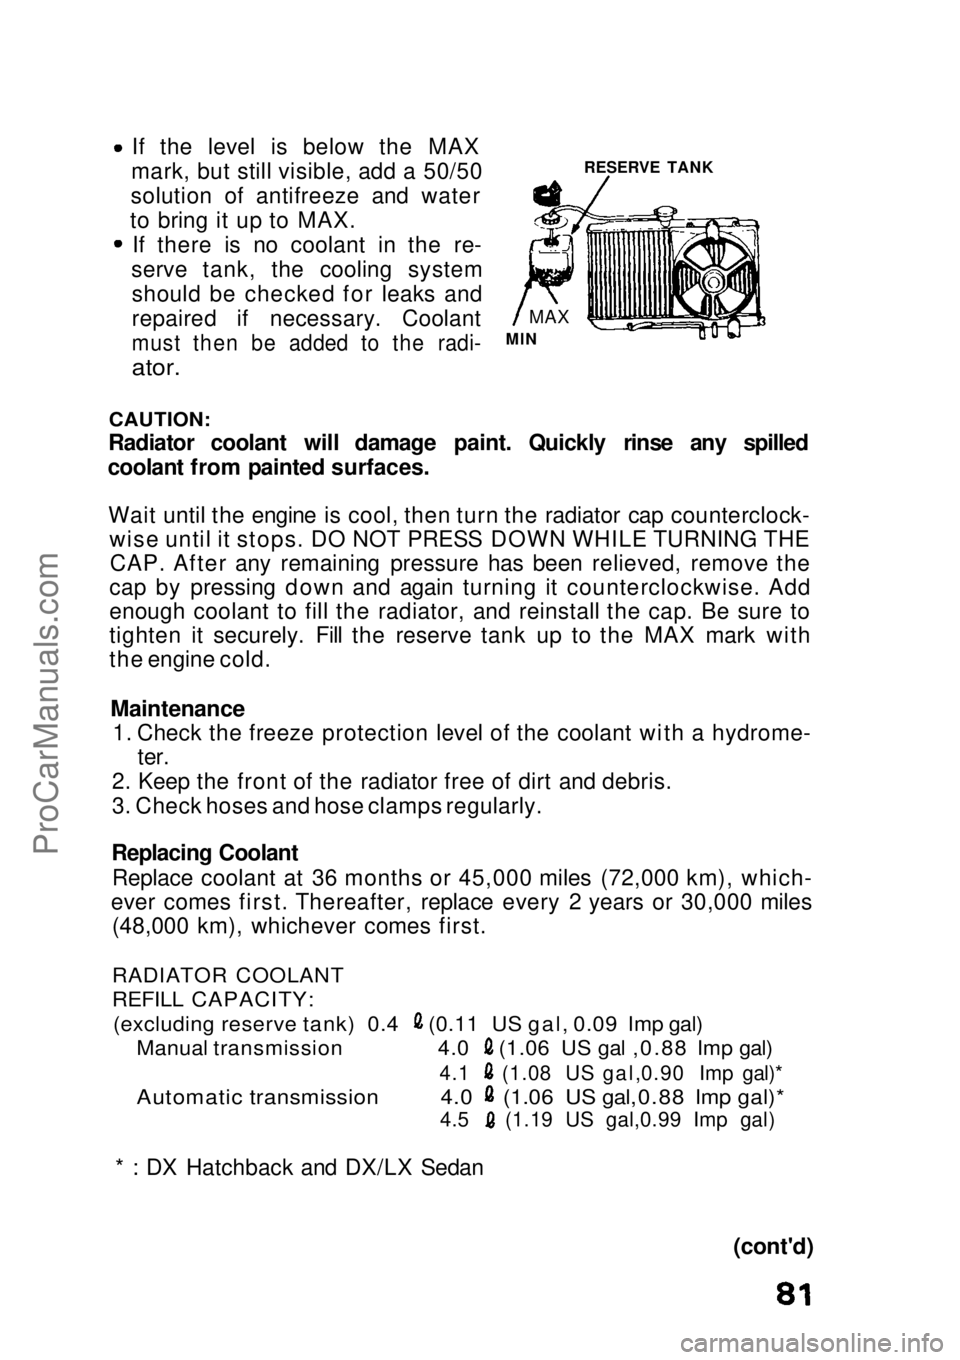
RESERVE TANKIf the level is below the MAX
mark, but still visible, add a 50/50
solution of antifreeze and water
to bring it up to MAX. If there is no coolant in the re-
serve tank, the cooling system should be checked for leaks and
repaired if necessary. Coolant
must then be added to the radi-
ator.
CAUTION:
Radiator coolant will damage paint. Quickly rinse any spilled
coolant from painted surfaces.
Wait until the engine is cool, then turn the radiator cap counterclock- wise until it stops. DO NOT PRESS DOWN WHILE TURNING THECAP. After any remaining pressure has been relieved, remove the
cap by pressing down and again turning it counterclockwise. Add
enough coolant to fill the radiator, and reinstall the cap. Be sure to
tighten it securely. Fill the reserve tank up to the MAX mark with
the engine cold.
Maintenance
1. Check the freeze protection level of the coolant with a hydrome- ter.
2. Keep the front of the radiator free of dirt and debris.
3. Check hoses and hose clamps regularly.
Replacing Coolant Replace coolant at 36 months or 45,000 miles (72,000 km), which-
ever comes first. Thereafter, replace every 2 years or 30,000 miles (48,000 km), whichever comes first.
(cont'd)
MAX
MIN
RADIATOR COOLANT
REFILL CAPACITY:
(excluding reserve tank) 0.4 (0.11 US gal, 0.09 Imp gal)
Manual transmission 4.0 (1.06 US gal ,0.88 Imp gal)
4.1 (1.08 US gal,0.90 Imp gal)*
Automatic transmission 4.0 (1.06 US gal,0.88 Imp gal)*
4.5 (1.19 US gal,0.99 Imp gal)
* : DX Hatchback and DX/LX Sedan
ProCarManuals.comMain Menu s t
Page 85 of 136

Power Steering
The Sedan (except DX with manual transmission) and DX Hatch- back with automatic transmission are equipped with power steering.
The power steering on your car provides easy handling while parking and maneuvering in traffic, without loss of road "feel" at
highway speeds. An engine-driven hydraulic pump provides full
power assist at low speeds and decreasing assist as the car goes
faster.
CAUTION:
If the power steering system should fail, or if the engine should
stall, the car can still be steered. However, much greater effort
will be required, particularly in sharp turns at low speed.
NOTE:
You may feel a slight clunk or knock when turning the wheel with
the engine off. This is a normal condition due to the design of the
system.
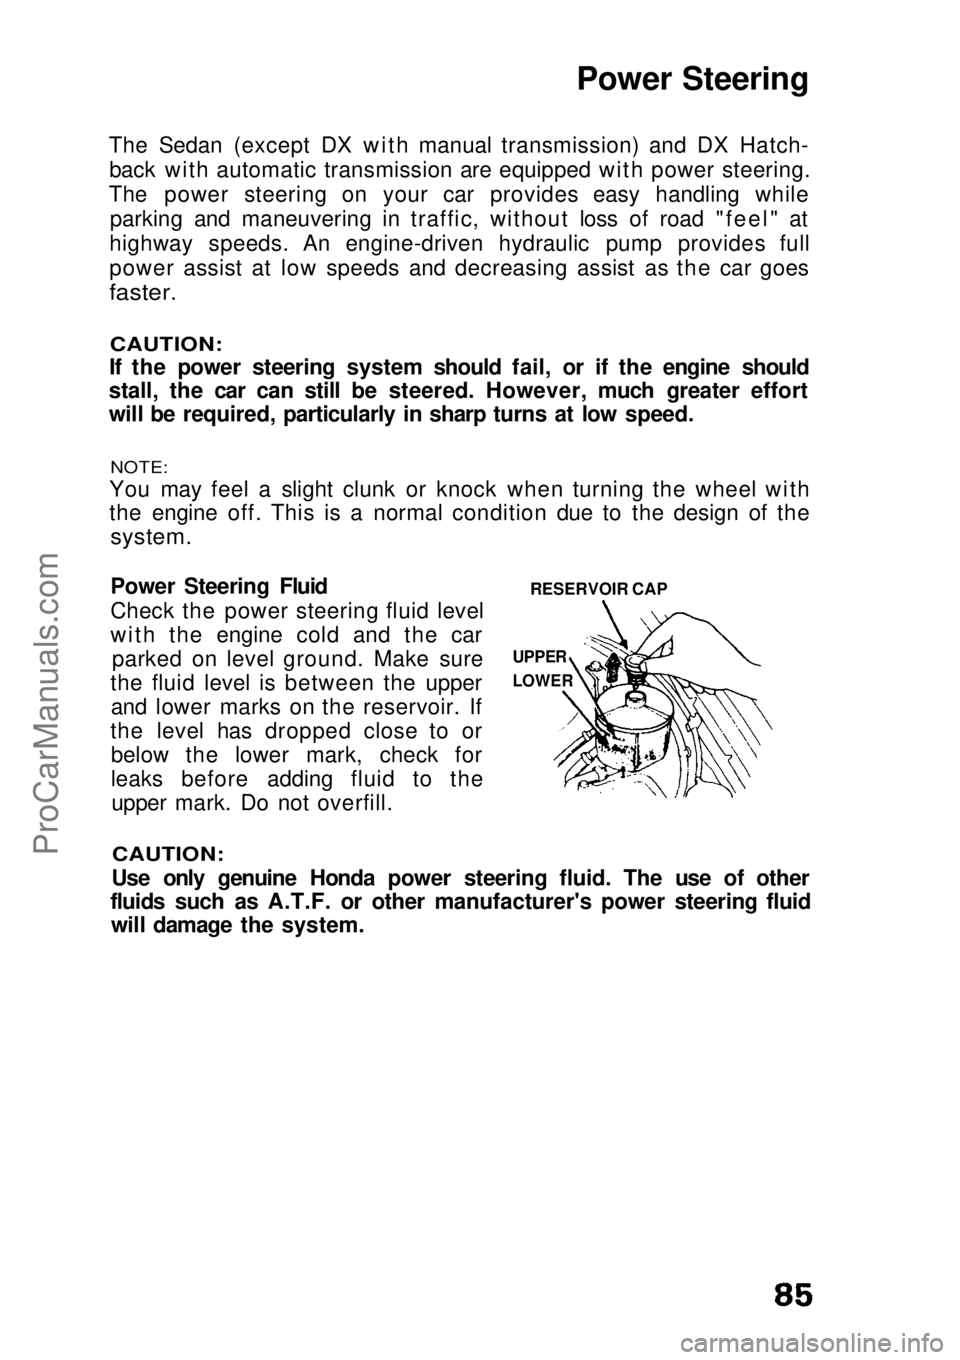
RESERVOIR CAP
UPPER
LOWER
Power Steering Fluid
Check the power steering fluid level
with the engine cold and the car
parked on level ground. Make sure
the fluid level is between the upper and lower marks on the reservoir. If
the level has dropped close to or below the lower mark, check for
leaks before adding fluid to theupper mark. Do not overfill.
CAUTION:
Use only genuine Honda power steering fluid. The use of other
fluids such as A.T.F. or other manufacturer's power steering fluid will damage the system.ProCarManuals.comMain Menu s t
Page 106 of 136

Changing a Flat Tire
Do not attempt to change a tire unless the car is on firm, level
ground and well out of the flow of traffic.
Park the car on a firm, level surface, apply the parking brake, turn
on the hazard warning switch and put the transmission in gear (Park
for automatic).
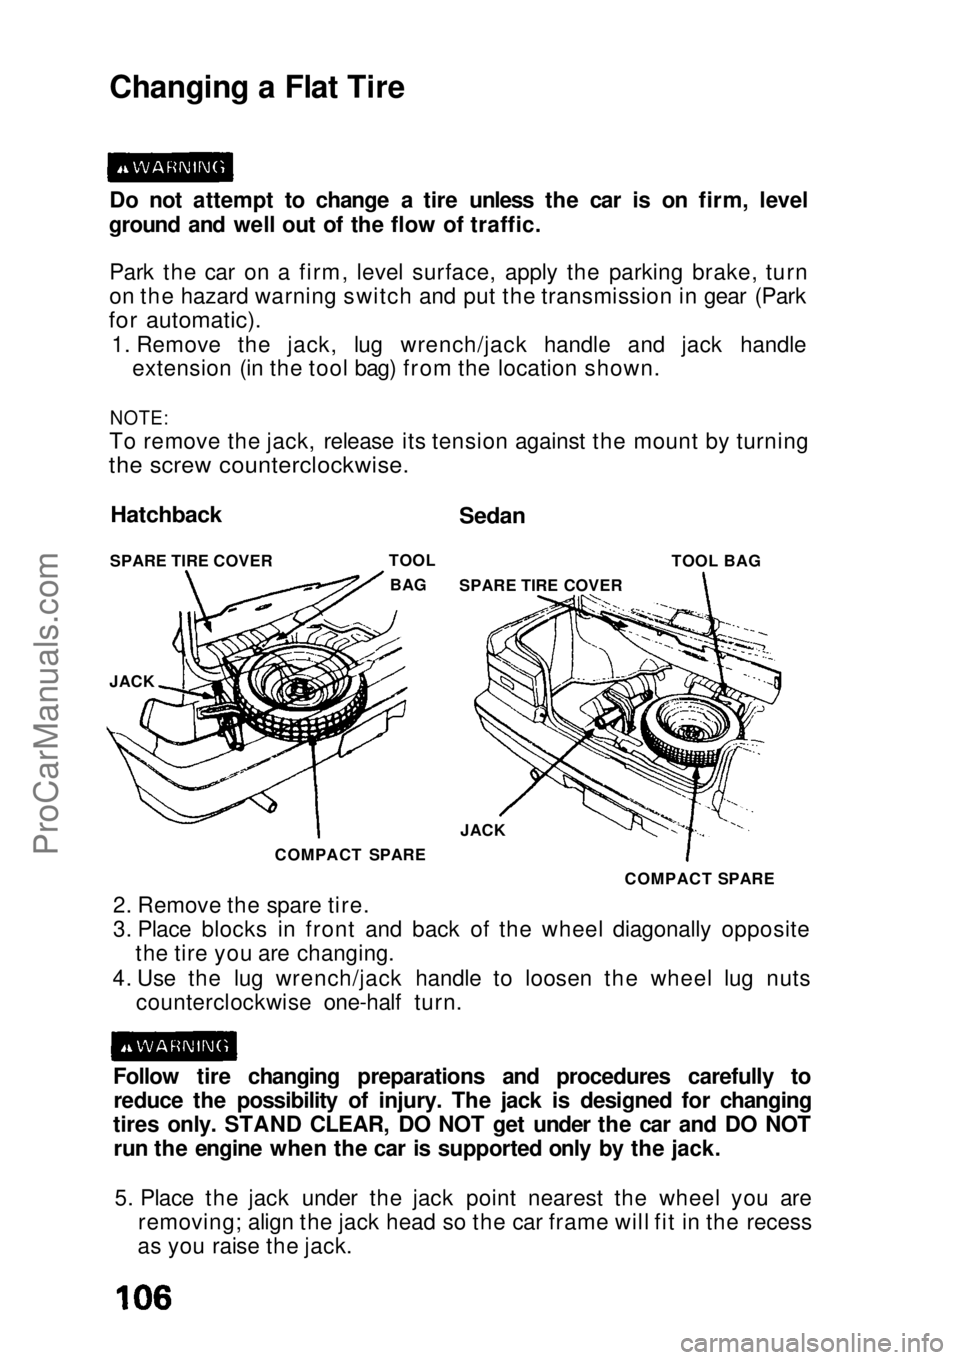
1. Remove the jack, lug wrench/jack handle and jack handle extension (in the tool bag) from the location shown.
NOTE:
To remove the jack, release its tension against the mount by turning
the screw counterclockwise.
JACK TOOL BAG
Follow tire changing preparations and procedures carefully to reduce the possibility of injury. The jack is designed for changing
tires only. STAND CLEAR, DO NOT get under the car and DO NOT run the engine when the car is supported only by the jack.
5. Place the jack under the jack point nearest the wheel you are removing; align the jack head so the car frame will fit in the recess
as you raise the jack.
Hatchback
SPARE TIRE COVER
Sedan
TOOL BAG SPARE TIRE COVER
JACK
COMPACT SPARE COMPACT SPARE
2. Remove the spare tire.
3. Place blocks in front and back of the wheel diagonally opposite the tire you are changing.
4. Use the lug wrench/jack handle to loosen the wheel lug nuts counterclockwise one-half turn.ProCarManuals.comMain Menu s t
Page 111 of 136

If towing is necessary, contact a professional towing service. Your
authorized Honda dealer can assist you with detailed towing
instructions.
Never use tow chains or rope to tow a car; your ability to safely
control the car may be adversely affected.
We recommend the following: Flat Bed Equipment —Entire car is winched on a flat bed vehicle.
This is the best way of transporting your Honda.
Wheel Lift Type—Tow with the front wheels off the ground.
If the car can only be towed with the front wheels on the ground:
make sure the transmission is full of fluid (see pages 78 — 79) and
tow with the transmission in neutral (N) and the ignition key in the 1
position.
CAUTION:
To avoid serious damage on automatic transmission cars, first
start the engine and shift to D4, then to N and shut the engine off. If the engine does not run or the transmission cannot be shifted
while the engine is running, the car must be transported on flat
bed equipment.
Check local regulations for towing.
CAUTION:
Do not exceed 35 mph (55 km/h) or tow for distances of more
than 50 miles (80 km).
If a sling type tow is used, the tow truck driver should position
wood spacer blocks between your car's frame and the chains
and lift straps to avoid damaging the bumper and the body. Do not use the bumpers to lift the car or to support the car's
weight while towing. TowingProCarManuals.comMain Menu s t
Page 112 of 136
If Your Car Gets Stuck
If your car gets stuck in sand, mud, or snow, call a professional
towing service for assistance in getting your car out.
CAUTION: Do not rev up the engine and allow the wheels to spin freely at
high speed. Severe transmission damage may result if the wheels are allowed to spin for more than a few seconds.DO NOT try to free a car with automatic transmission from
snow, etc. by rocking the car alternately between forward and
reverse gears. Severe transmission damage may result from
shifting into gear with the wheels moving.ProCarManuals.comMain Menu s t
Page 121 of 136
Identification Numbers
The Vehicle Identification Number(V.I.N.) is stamped on a plate at-
tached to
the top left side of the
dashboard.
It also appears on the Certification
label attached to the door jamb, as
well as under the hood on the body,
directly behind the engine.
NOTE:
The V.I.N. is also provided in bar code on the Certification label.
Hatchback Sedan
CERTIFICATION LABEL
AUTOMATIC
TRANSMISSION
NUMBER
CERTIFICATION
LABEL
MANUAL
TRANSMISSION NUMBER
ENGINE NUMBER
The Engine Number is stamped on the right front side of the engine
block.
The Transmission Number appears on a label on the top edge of the
transmission where it attaches to the engine.
NOTE:
Do not mistake the transmission number for the engine number.
VEHICLE
IDENTIFICATION
NUMBER
VEHICLE IDENTIFICATION
NUMBERProCarManuals.comMain Menu s t