1991 FORD FESTIVA spark plugs replace
[x] Cancel search: spark plugs replacePage 104 of 454

1. Position new gasket on exhaust manifold, and install turbocharger onto studs. Install 4 retaining nuts and tighten to specification. See
TORQUE SPECIFICATIONS
table at end of article.
2. Remove oil supply line from turbocharger. Position new (2-piece) exhaust gasket on cylinder head with heavy gasket installed first .
Carefully position turbocharger assembly in engine compartment and slide exhaust manifold on studs. Position heater tube bracket onto
exhaust stud. Install 11 retaining nuts onto exhaust manifold and tighten to specification. See TORQUE SPECIFICATIONS
table at
end of article. Tighten heater tube clamp bolt securely.
3. Raise vehicle. Position new gasket and install 2 retaining bolts on heater tube outlet. Install 2 retaining bolts into turbocharger support
bracket and tighten bolts to specification.
4. Connect coolant return hose. Connect oil return hose and secure with clamp. Position exhaust pipe onto turbocharger, and start nuts
and washers. Install 2 retaining bolts on exhaust hanger at engine. Slide on 2 rubber exhaust hangers at catalytic converter. Tighten
exhaust pipe retaining nuts to specification. Lower vehicle.
5. Install retaining bolt and brass washers on oil supply line, carefully position oil line into vehicle and hand-start bolt into engine block.
Connect and finger tighten oil line to turbocharger. Tighten oil line bolt and oil supply line on turbocharger to specification.
6. Connect coolant supply hose. Position air cleaner duct tube on turbocharger and tighten clamp. Install 2 screws retaining air cleaner
duct tube. Position power steering pump bracket on engine, and install 2 retaining bolts and one retaining nut. Tighten to specification.
Position power steering pump on mounting bracket, and install though bolt and adjuster. Connect lower radiator hose. Install power
steering belt. Position upper heat shield and install 2 retaining bolts finger tight.
7. Position lower heat shield and install three retaining bolts finger tight. Tighten all heat shield bolts to specification. Connect O2 sensor
and install connector into its retaining clip. See TORQUE SPECIFICATIONS
table at end of article. Position intercooler hose on
turbocharger and secure with clamp. Install throttle body air intake tube. Connect negative battery cable. Refill cooling system.
CYLINDER HEAD
Removal (1.3L)
1. Disconnect battery ground cable. Mark and disconnect fuel lines at fuel pump. Remove accessory belts, water pump pulley, crankshaft
pulley, timing belt covers, timing belt tensioner, timing belt, valve cover and exhaust and intake manifolds. Drain cooling system.
2. Mark and remove electrical connectors and vacuum hoses. Remove spark plug wires from spark plugs, and remove spark plugs. Remove
distributor cap. Disconnect vacuum hoses and distributor wiring.
3. Index distributor-to-mount position and remove hold-down bolt. Remove distributor assembly. Remove engine ground strap. Remove
front and rear engine lifting hooks. Remove upper radiator hose, by-pass hose and bracket.
4. Remove bolts retaining rocker arm shaft. Remove rocker arm assemblies. Remove cylinder head bolts. Remove head and gasket.
Inspection (1.3L)
1. Thoroughly clean and check gasket mating surface of cylinder head and block. Check cylinder for cracks, nicks, burrs or damage. Using
a straightedge and feeler gauge, check warpage over entire gasket area. Ensure cylinder head and/or block warpage does not
exceed .006" (.15 mm).
2. If warpage exceeds .006" (.15 mm), machine cylinder head and/or block gasket surface. Maximum machining allowed is .008" (.20 mm).
If more machining is required, replace block and/or cylinder head.
Installation (1.3L)
1. Place new head gasket properly on block. Carefully place cylinder head in position on block. Install head bolts. Tighten bolts in
sequence and in 2 steps. See Fig. 1
.
2. While tightening rocker arm shaft, slide shaft springs away from retaining bolt to prevent pinching springs. Tighten rocker arm shaft bolts
in sequence and to specification. See Fig. 5
. To complete installation, reverse removal procedure. Tighten all bolts/nuts to
specification. Fill all fluids to proper levels. NOTE:T urbocharger-to-exhaust m anifold m ounting nuts are of special quality. Ensure correct nuts are
used.
NOTE:Ensure one brass washer is positioned on each side of oil line fitting.
NOTE:Feed O2 sensor wire through upper heat shield. Install wire retainer under LH bolt.
NOTE:If turbocharger was replaced: Disconnect ignition coil, crank engine for 20 seconds, connect ignition
coil, start engine and run at idle for 30 seconds and check for leaks.
NOTE:If original tim ing belt is being reused, m ark direction of rotation for installation reference.
Page 4 of 19 MITCHELL 1 ARTICLE - ENGINE OVERHAUL 1991-92 FORD MOTOR CO. ENGINES 1.3L & 1.6L 4-Cylinder
3/10/2009 http://www.eautorepair.net/app/PrintItems.asp?S0=2097152&S1=0&SG=%7B959286D2%2D3A85%2D4BFC%2D9C5C%2D
...
Page 107 of 454
Remove timing belt covers, See TIMING BELT COVER procedure to remove timing belt from this engine.
Installation (1.6L)
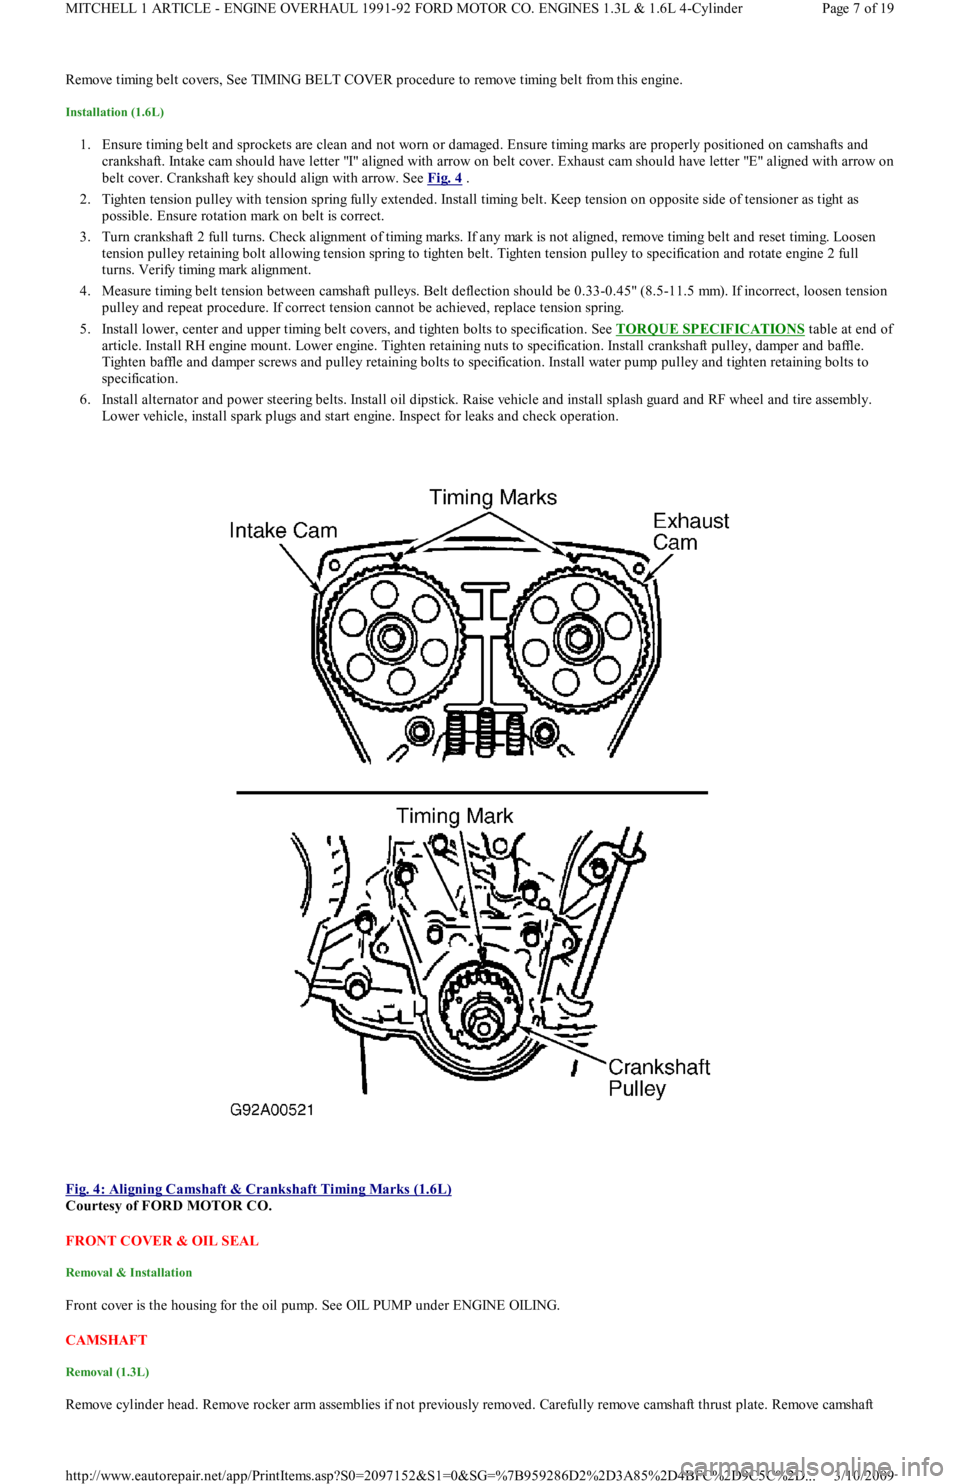
1. Ensure timing belt and sprockets are clean and not worn or damaged. Ensure timing marks are properly positioned on camshafts and
crankshaft. Intake cam should have letter "I" aligned with arrow on belt cover. Exhaust cam should have letter "E" aligned with arrow on
belt cover. Crankshaft key should align with arrow. See Fig. 4
.
2. Tighten tension pulley with tension spring fully extended. Install timing belt. Keep tension on opposite side of tensioner as tight as
possible. Ensure rotation mark on belt is correct.
3. Turn crankshaft 2 full turns. Check alignment of timing marks. If any mark is not aligned, remove timing belt and reset timing. Lo o se n
tension pulley retaining bolt allowing tension spring to tighten belt. Tighten tension pulley to specification and rotate engine 2 full
turns. Verify timing mark alignment.
4. Measure timing belt tension between camshaft pulleys. Belt deflection should be 0.33-0.45" (8.5-11.5 mm). If incorrect, loosen tension
pulley and repeat procedure. If correct tension cannot be achieved, replace tension spring.
5. Install lower, center and upper timing belt covers, and tighten bolts to specification. See TORQUE SPECIFICATIONS
table at end of
article. Install RH engine mount. Lower engine. Tighten retaining nuts to specification. Install crankshaft pulley, damper and baffle.
Tighten baffle and damper screws and pulley retaining bolts to specification. Install water pump pulley and tighten retaining bolts to
specification.
6. Install alternator and power steering belts. Install oil dipstick. Raise vehicle and install splash guard and RF wheel and tire assembly.
Lower vehicle, install spark plugs and start engine. Inspect for leaks and check operation.
Fig. 4: Aligning Camshaft & Crankshaft Timing Marks (1.6L)
Courtesy of FORD MOTOR CO.
FRONT COVER & OIL SEAL
Removal & Installation
Front cover is the housing for the oil pump. See OIL PUMP under ENGINE OILING.
CAMSHAFT
Removal (1.3L)
Remove cylinder head. Remove rocker arm assemblies if not previously removed. Carefully remove camshaft thrust plate. Remove camsh aft
Page 7 of 19 MITCHELL 1 ARTICLE - ENGINE OVERHAUL 1991-92 FORD MOTOR CO. ENGINES 1.3L & 1.6L 4-Cylinder
3/10/2009 http://www.eautorepair.net/app/PrintItems.asp?S0=2097152&S1=0&SG=%7B959286D2%2D3A85%2D4BFC%2D9C5C%2D
...
Page 153 of 454
Back To Article
C - SPECIFICATIONS
1991 ENGINE PERFORMANCE Ford/Mercury - Service & Adjustm ent Specifications
INTRODUCTION
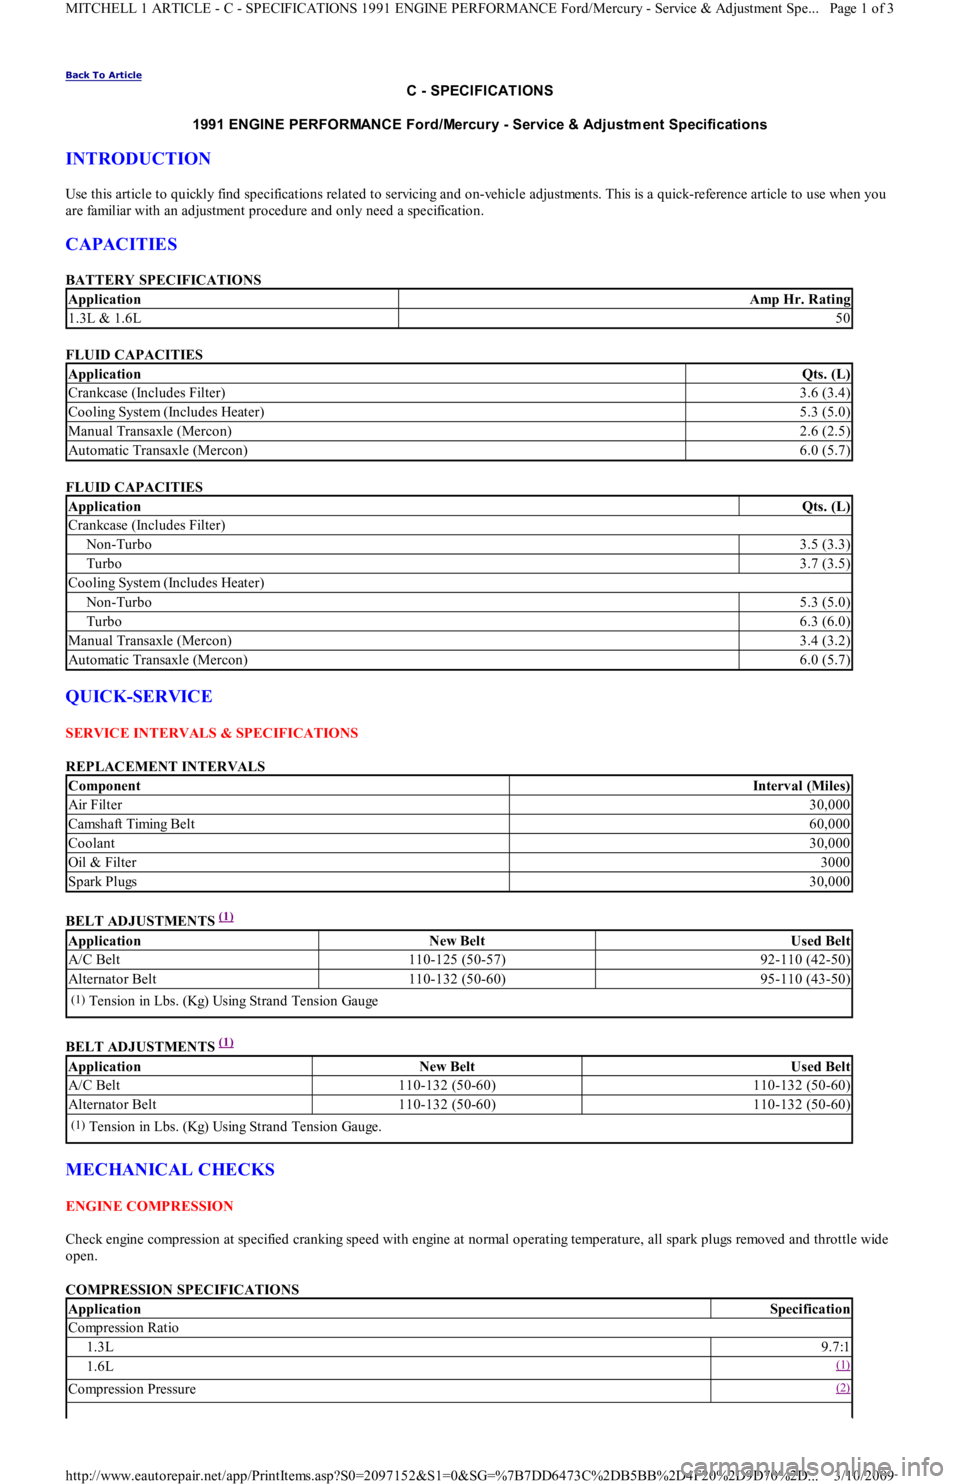
Use this article to quickly find specifications related to servicing and on-vehicle adjustments. This is a quick-reference article to use when you
are familiar with an adjustment procedure and only need a specification.
CAPACITIES
BATTERY SPECIFICATIONS
FLUID CAPACITIES
FLUID CAPACITIES
QUICK-SERVICE
SERVICE INTERVALS & SPECIFICATIONS
REPLACEMENT INTERVALS
BELT ADJUSTMENTS
(1)
BELT ADJUSTMENTS
(1)
MECHANICAL CHECKS
ENGINE COMPRESSION
Check engine compression at specified cranking speed with engine at normal operating temperature, all spark plugs removed and throttle wide
open.
COMPRESSION SPECIFICATIONS
ApplicationAmp Hr. Rating
1.3L & 1.6L50
ApplicationQts. (L)
Crankcase (Includes Filter)3.6 (3.4)
Cooling System (Includes Heater)5.3 (5.0)
Manual Transaxle (Mercon)2.6 (2.5)
Automatic Transaxle (Mercon)6.0 (5.7)
ApplicationQts. (L)
Crankcase (Includes Filter)
Non-Turbo3.5 (3.3)
Turbo3.7 (3.5)
Cooling System (Includes Heater)
Non-Turbo5.3 (5.0)
Turbo6.3 (6.0)
Manual Transaxle (Mercon)3.4 (3.2)
Automatic Transaxle (Mercon)6.0 (5.7)
ComponentInterval (Miles)
Air Filter30,000
Camsh aft Timin g Bel t60,000
Coolant30,000
Oil & Filter3000
Spark Plugs30,000
ApplicationNew BeltUsed Belt
A/C Belt110-125 (50-57)92-110 (42-50)
Alternator Belt110-132 (50-60)95-110 (43-50)
(1)Tension in Lbs. (Kg) Using Strand Tension Gauge
ApplicationNew BeltUsed Belt
A/C Belt110-132 (50-60)110-132 (50-60)
Alternator Belt110-132 (50-60)110-132 (50-60)
(1)Tension in Lbs. (Kg) Using Strand Tension Gauge.
ApplicationSpecification
Compression Ratio
1.3L9.7:1
1.6L(1)
Compression Pressure(2)
Page 1 of 3 MITCHELL 1 ARTICLE - C - SPECIFICATIONS 1991 ENGINE PERFORMANCE Ford/Mercury - Service & Adjustment Spe
...
3/10/2009 http://www.eautorepair.net/app/PrintItems.asp?S0=2097152&S1=0&SG=%7B7DD6473C%2DB5BB%2D4F20%2D9D70%2D
...
Page 223 of 454
Engine overheatingCheck cooling system, See
COOLING
Auto. Trans. pressure regulator valve faultyReplace pressure regulator
va l ve
Auto. Trans. fluid level too lowAdd fluid as necessary
Improper vacuum diverter valve operationReplace vacuum diverter valve
Vacuum leaksInspect vacuum system and
repair as required
Leaking piston ringsReplace piston rings, See
ENGINES
Faulty High Speed Operation
Low fuel pump volumeReplace fuel pump
Le a kin g va l ve s o r wo r nReplace valves and/or springs,
See ENGINES
Incorrect valve timingReset valve timing,See
ENGINES
In t ake man ifo l d rest rict edRemove restriction
Worn distributor shaftReplace distributor
Faulty Acceleration
Improper fuel pump strokeRemove pump and reset pump
stroke
Incorrect ignition timingReset ignition timing, See
TUNE-UP
Le a kin g va l ve sReplace valves, See ENGINES
Worn fuel pump diaphragm or pistonReplace diaphragm or piston
In t ake Backfire
Improper ignition timingReset ignition timing, See
TUNE-UP
Faulty accelerator pump dischargeReplace accelerator pump
Improper choke operationCheck choke and adjust as
required
Defective EGR valveReplace EGR valve
Fuel mixture too leanReset air/fuel mixture, See
TUNE-UP
Choke valve initial clearance too largeReset choke valve initial
clearance
Exhaust Backfire
Vacuum leakInspect and repair vacuum
system
Faulty vacuum diverter valveReplace vacuum diverter valve
Faulty choke operationCheck choke and adjust as
required
Exhaust system leakrepair exhaust system leak
Engine Detonation
Ignition timing too far advancedReset ignition timing, See
TUNE-UP
Faulty ignition systemCheck ignition timing, See
TUNE-UP
Spark plugs loose or faultyRetighten or replace plugs
Fuel delivery system cloggedInspect lines, pump and filter
fo r cl o g
EGR valve inoperativeReplace EGR valve
PCV system inoperativeInspect and/or replace hoses
or valve
Vacuum leaksCheck vacuum system and
repair leaks
Excessive combustion chamber depositsRemove built-up deposits
Leaking, sticking or broken valvesInspect and/or replace valves
External Oil Leakage
Fuel pump improperly seated or worn gasketRemove pump, replace gasket
and seat properly
Oil pan gasket broken or pan bentStraighten pan and replace
ga ske t
Timing chain cover gasket brokenReplace timing chain cover
ga ske t
Rear main oil seal wornReplace rear main oil seal
Oil pan drain plug not seated properlyRemove and reinstall drain
plug
Camshaft bearing drain hole blockedRemove restriction
Oil pressure sending switch leakingRemove and reinstall sending
switch
Excessive Oil Consumption
Worn valve stems or guidesReplace stems or guides, See
Page 10 of 36 MITCHELL 1 ARTICLE - GENERAL INFORMATION Trouble Shooting - Basic Procedures
3/10/2009 http://www.eautorepair.net/app/PrintItems.asp?S0=2097152&S1=0&SG=%7B9B990D68%2D660A%2D45E9%2D8F46%2DE
...
Page 234 of 454
TUNE-UP TROUBLE SHOOTING - GAS ENGINE VEHICLES
BASIC SPARK PLUG TROUBLE SHOOTING CHARTS
Faulty solenoid switch, switch connections or relayCheck all wiring between
relay and solenoid or replace
relay or solenoid as necessary
Broken lead or loose soldered connectionsRepair wire or wire
connections as necessary
Solenoid Plunger Vibrates When Switch is Engaged
Weak batteryCharge or replace battery as
necessary
Solenoid contacts corrodedClean contacts or replace
solenoid
Faulty wiringCheck all wiring leading to
solenoid
Broken connections inside switch coverRepair connections or replace
solenoid
Open hold-in wireReplace solenoid
Low Current Draw
Worn brushes or weakReplace brushes or brush
springs as necessary
High Pitched Whine During Cranking Before Engine Fires but Engine Fires and Cranks Normally
Distance too great between starter pinion and flywheelAlign starter or check that
correct starter and flywheel
are being used
High Pitched Whine After Engine Fires With Key released. Engine Fires and Cranks Normally
Distance too small between starter pinion and flywheelFlywheel runout contributes
to the intermittent nature
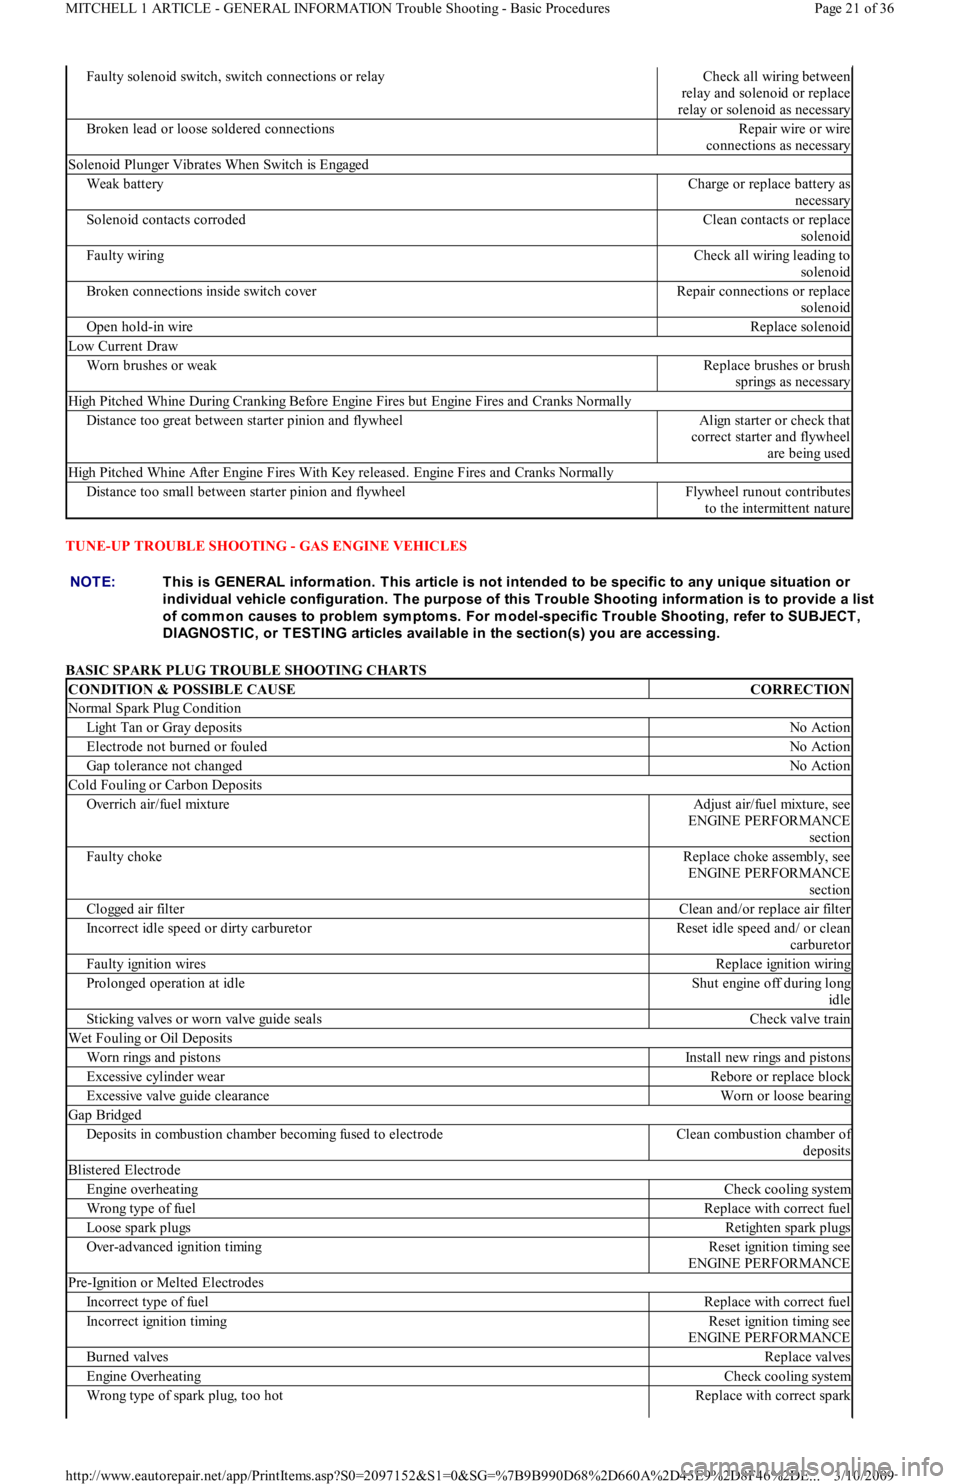
NOTE:This is GENERAL inform ation. This article is not intended to be specific to any unique situation or
individual vehicle configuration. T he purpose of this T rouble Shooting inform ation is to provide a list
of com m on causes to problem sym ptom s. For m odel-specific T rouble Shooting, refer to SUBJECT ,
DIAGNOST IC, or T EST ING articles available in the section(s) you are accessing.
CONDITION & POSSIBLE CAUSECORRECTION
Normal Spark Plug Condition
Light Tan or Gray depositsNo Action
Electrode not burned or fouledNo Action
Gap tolerance not changedNo Action
Cold Fouling or Carbon Deposits
Overrich air/fuel mixtureAdjust air/fuel mixture, see
ENGINE PERFORMANCE
section
Faulty chokeReplace choke assembly, see
ENGINE PERFORMANCE
section
Clogged air filterClean and/or replace air filter
Incorrect idle speed or dirty carburetorReset idle speed and/ or clean
carburetor
Faulty ignition wiresReplace ignition wiring
Prolonged operation at idleShut engine off during long
idle
Sticking valves or worn valve guide sealsCheck valve train
Wet Fouling or Oil Deposits
Worn rings and pistonsInstall new rings and pistons
Excessive cylinder wearRebore or replace block
Excessive valve guide clearanceWorn or loose bearing
Gap Bridged
Deposits in combustion chamber becoming fused to electrodeClean combustion chamber of
deposits
Blistered Electrode
Engine overheatingCheck cooling system
Wrong type of fuelReplace with correct fuel
Loose spark plugsRetighten spark plugs
Over-advanced ignition timingReset ignition timing see
ENGINE PERFORMANCE
Pre-Ignition or Melted Electrodes
Incorrect type of fuelReplace with correct fuel
Incorrect ignition timingReset ignition timing see
ENGINE PERFORMANCE
Burned valvesReplace valves
Engine OverheatingCheck cooling system
Wrong type of spark plug, too hotReplace with correct spark
Page 21 of 36 MITCHELL 1 ARTICLE - GENERAL INFORMATION Trouble Shooting - Basic Procedures
3/10/2009 http://www.eautorepair.net/app/PrintItems.asp?S0=2097152&S1=0&SG=%7B9B990D68%2D660A%2D45E9%2D8F46%2DE
...
Page 235 of 454
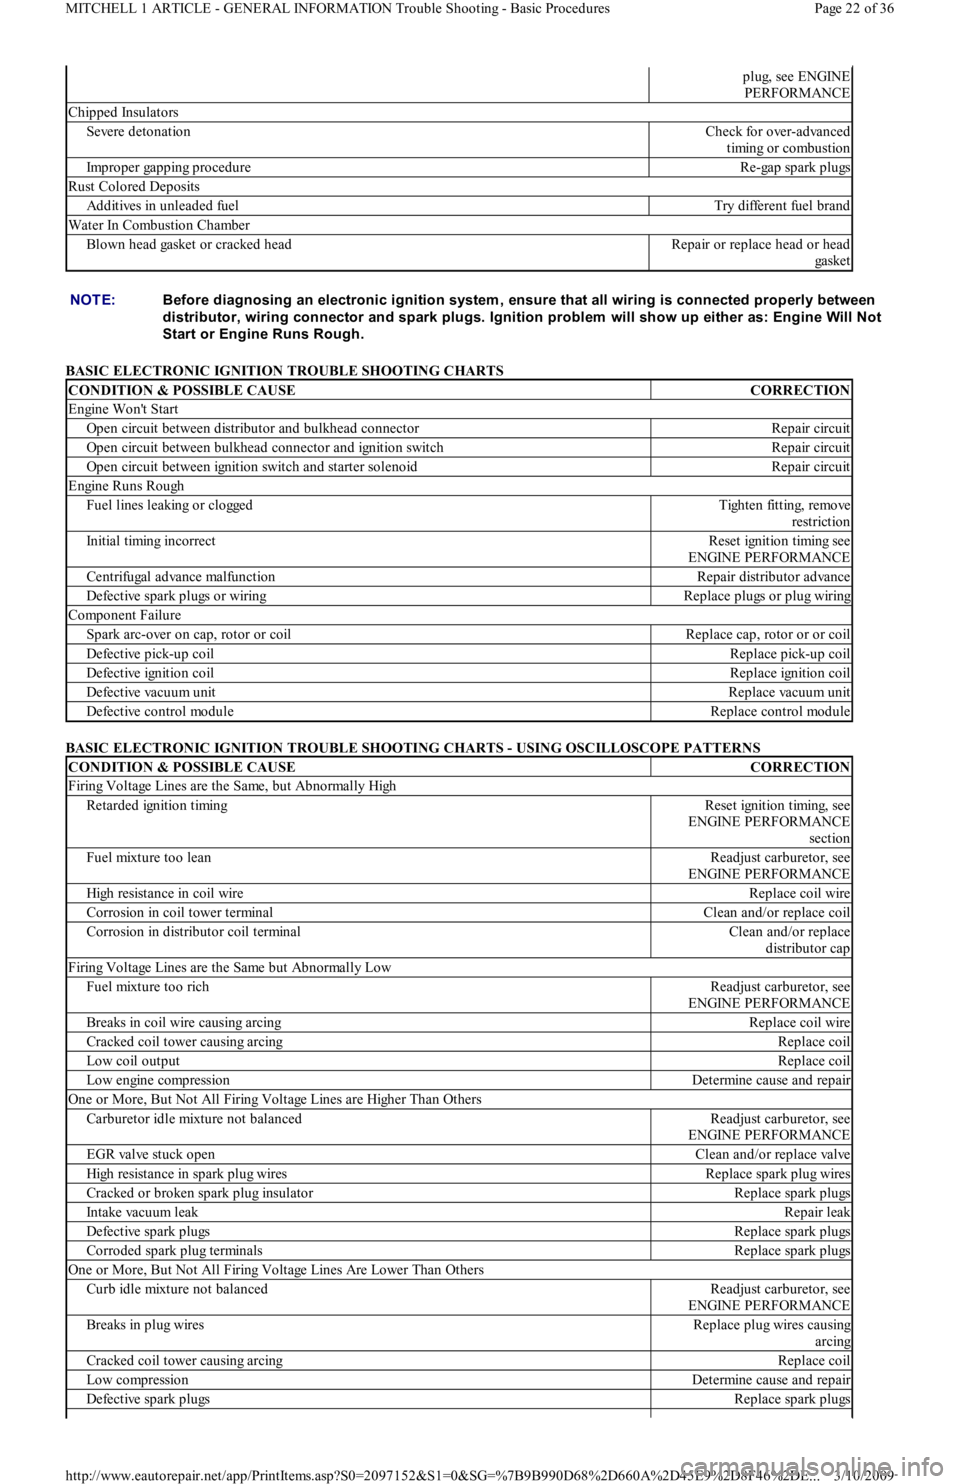
BASIC ELECTRONIC IGNITION TROUBLE SHOOTING CHARTS
BASIC ELECTRONIC IGNITION TROUBLE SHOOTING CHARTS - USING OSCILLOSCOPE PATTERNS
plug, see ENGINE
PERFORMANCE
Chipped Insulators
Severe detonationCheck for over-advanced
timing or combustion
Improper gapping procedureRe-gap spark plugs
Rust Colored Deposits
Additives in unleaded fuelTry different fuel brand
Water In Combustion Chamber
Blown head gasket or cracked headRepair or replace head or head
ga ske t
NOTE:Before diagnosing an electronic ignition system , ensure that all wiring is connected properly between
distributor, wiring connector and spark plugs. Ignition problem will show up either as: Engine Will Not
Start or Engine Runs Rough.
CONDITION & POSSIBLE CAUSECORRECTION
Engine Won't Start
Open circuit between distributor and bulkhead connectorRepair circuit
Open circuit between bulkhead connector and ignition switchRepair circuit
Open circuit between ignition switch and starter solenoidRepair circuit
Engine Runs Rough
Fuel lines leaking or cloggedTigh t e n fit t in g, r e mo ve
restriction
Initial timing incorrectReset ignition timing see
ENGINE PERFORMANCE
Centrifugal advance malfunctionRepair distributor advance
Defective spark plugs or wiringReplace plugs or plug wiring
Component Failure
Spark arc-over on cap, rotor or coilReplace cap, rotor or or coil
Defective pick-up coilReplace pick-up coil
Defective ignition coilReplace ignition coil
Defective vacuum unitReplace vacuum unit
Defective control moduleReplace control module
CONDITION & POSSIBLE CAUSECORRECTION
Firing Voltage Lines are the Same, but Abnormally High
Retarded ignition timingReset ignition timing, see
ENGINE PERFORMANCE
section
Fuel mixture too leanReadjust carburetor, see
ENGINE PERFORMANCE
High resistance in coil wireReplace coil wire
Corrosion in coil tower terminalClean and/or replace coil
Corrosion in distributor coil terminalClean and/or replace
distributor cap
Firing Voltage Lines are the Same but Abnormally Low
Fuel mixture too richReadjust carburetor, see
ENGINE PERFORMANCE
Breaks in coil wire causing arcingReplace coil wire
Cracked coil tower causing arcingReplace coil
Low coil outputReplace coil
Low engine compressionDetermine cause and repair
One or More, But Not All Firing Voltage Lines are Higher Than Others
Carburetor idle mixture not balancedReadjust carburetor, see
ENGINE PERFORMANCE
EGR valve stuck openClean and/or replace valve
High resistance in spark plug wiresReplace spark plug wires
Cracked or broken spark plug insulatorReplace spark plugs
Intake vacuum leakRepair leak
Defective spark plugsReplace spark plugs
Corroded spark plug terminalsReplace spark plugs
One or More, But Not All Firing Voltage Lines Are Lower Than Others
Curb idle mixture not balancedReadjust carburetor, see
ENGINE PERFORMANCE
Breaks in plug wiresReplace plug wires causing
arcing
Cracked coil tower causing arcingReplace coil
Low compressionDetermine cause and repair
Defective spark plugsReplace spark plugs
Page 22 of 36 MITCHELL 1 ARTICLE - GENERAL INFORMATION Trouble Shooting - Basic Procedures
3/10/2009 http://www.eautorepair.net/app/PrintItems.asp?S0=2097152&S1=0&SG=%7B9B990D68%2D660A%2D45E9%2D8F46%2DE
...
Page 236 of 454
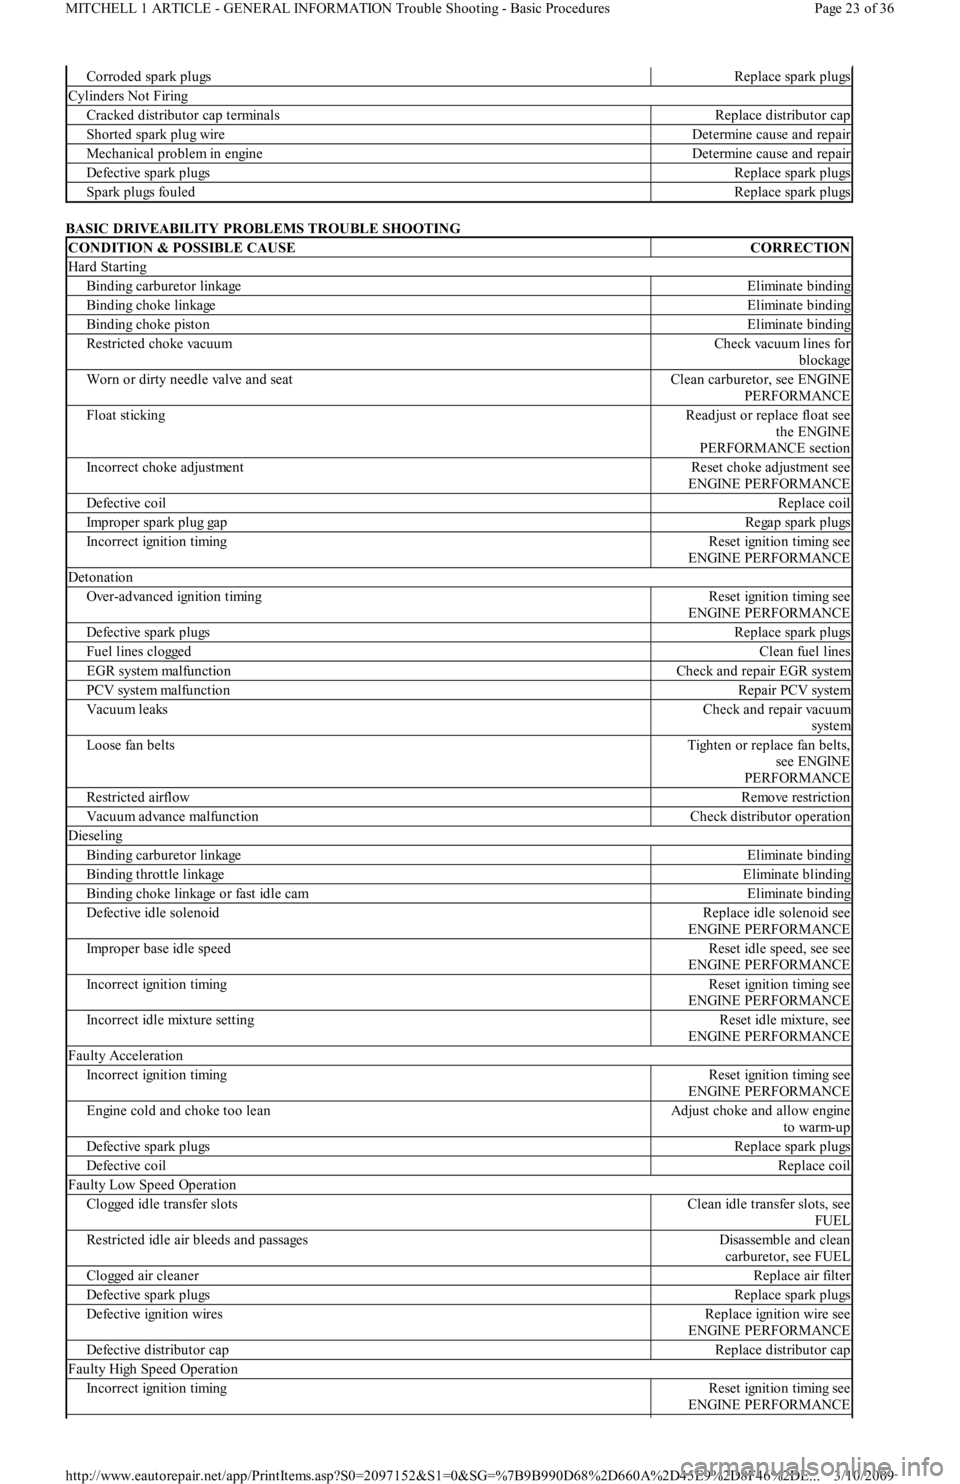
BASIC DRIVEABILITY PROBLEMS TROUBLE SHOOTING
Corroded spark plugsReplace spark plugs
Cylinders Not Firing
Cracked distributor cap terminalsReplace distributor cap
Shorted spark plug wireDetermine cause and repair
Mechanical problem in engineDetermine cause and repair
Defective spark plugsReplace spark plugs
Spark plugs fouledReplace spark plugs
CONDITION & POSSIBLE CAUSECORRECTION
Hard Starting
Binding carburetor linkageEliminate binding
Binding choke linkageEliminate binding
Binding choke pistonEliminate binding
Restricted choke vacuumCheck vacuum lines for
blockage
Worn or dirty needle valve and seatClean carburetor, see ENGINE
PERFORMANCE
Float stickingReadjust or replace float see
the ENGINE
PERFORMANCE section
Incorrect choke adjustmentReset choke adjustment see
ENGINE PERFORMANCE
Defective coilReplace coil
Improper spark plug gapRegap spark plugs
Incorrect ignition timingReset ignition timing see
ENGINE PERFORMANCE
Detonation
Over-advanced ignition timingReset ignition timing see
ENGINE PERFORMANCE
Defective spark plugsReplace spark plugs
Fuel lines cloggedClean fuel lines
EGR system malfunctionCheck and repair EGR system
PCV system malfunctionRepair PCV system
Vacuum leaksCheck and repair vacuum
system
Loose fan beltsTighten or replace fan belts,
see ENGINE
PERFORMANCE
Restricted airflowRemove restriction
Vacuum advance malfunctionCheck distributor operation
Dieseling
Binding carburetor linkageEliminate binding
Binding throttle linkageEliminate blinding
Binding choke linkage or fast idle camEliminate binding
Defective idle solenoidReplace idle solenoid see
ENGINE PERFORMANCE
Improper base idle speedReset idle speed, see see
ENGINE PERFORMANCE
Incorrect ignition timingReset ignition timing see
ENGINE PERFORMANCE
Incorrect idle mixture settingReset idle mixture, see
ENGINE PERFORMANCE
Faulty Acceleration
Incorrect ignition timingReset ignition timing see
ENGINE PERFORMANCE
Engine cold and choke too leanAdjust choke and allow engine
to warm-up
Defective spark plugsReplace spark plugs
Defective coilReplace coil
Faulty Low Speed Operation
Clogged idle transfer slotsClean idle transfer slots, see
FUEL
Restricted idle air bleeds and passagesDisassemble and clean
carburetor, see FUEL
Clogged air cleanerReplace air filter
Defective spark plugsReplace spark plugs
Defective ignition wiresReplace ignition wire see
ENGINE PERFORMANCE
Defective distributor capReplace distributor cap
Faulty High Speed Operation
Incorrect ignition timingReset ignition timing see
ENGINE PERFORMANCE
Page 23 of 36 MITCHELL 1 ARTICLE - GENERAL INFORMATION Trouble Shooting - Basic Procedures
3/10/2009 http://www.eautorepair.net/app/PrintItems.asp?S0=2097152&S1=0&SG=%7B9B990D68%2D660A%2D45E9%2D8F46%2DE
...
Page 237 of 454
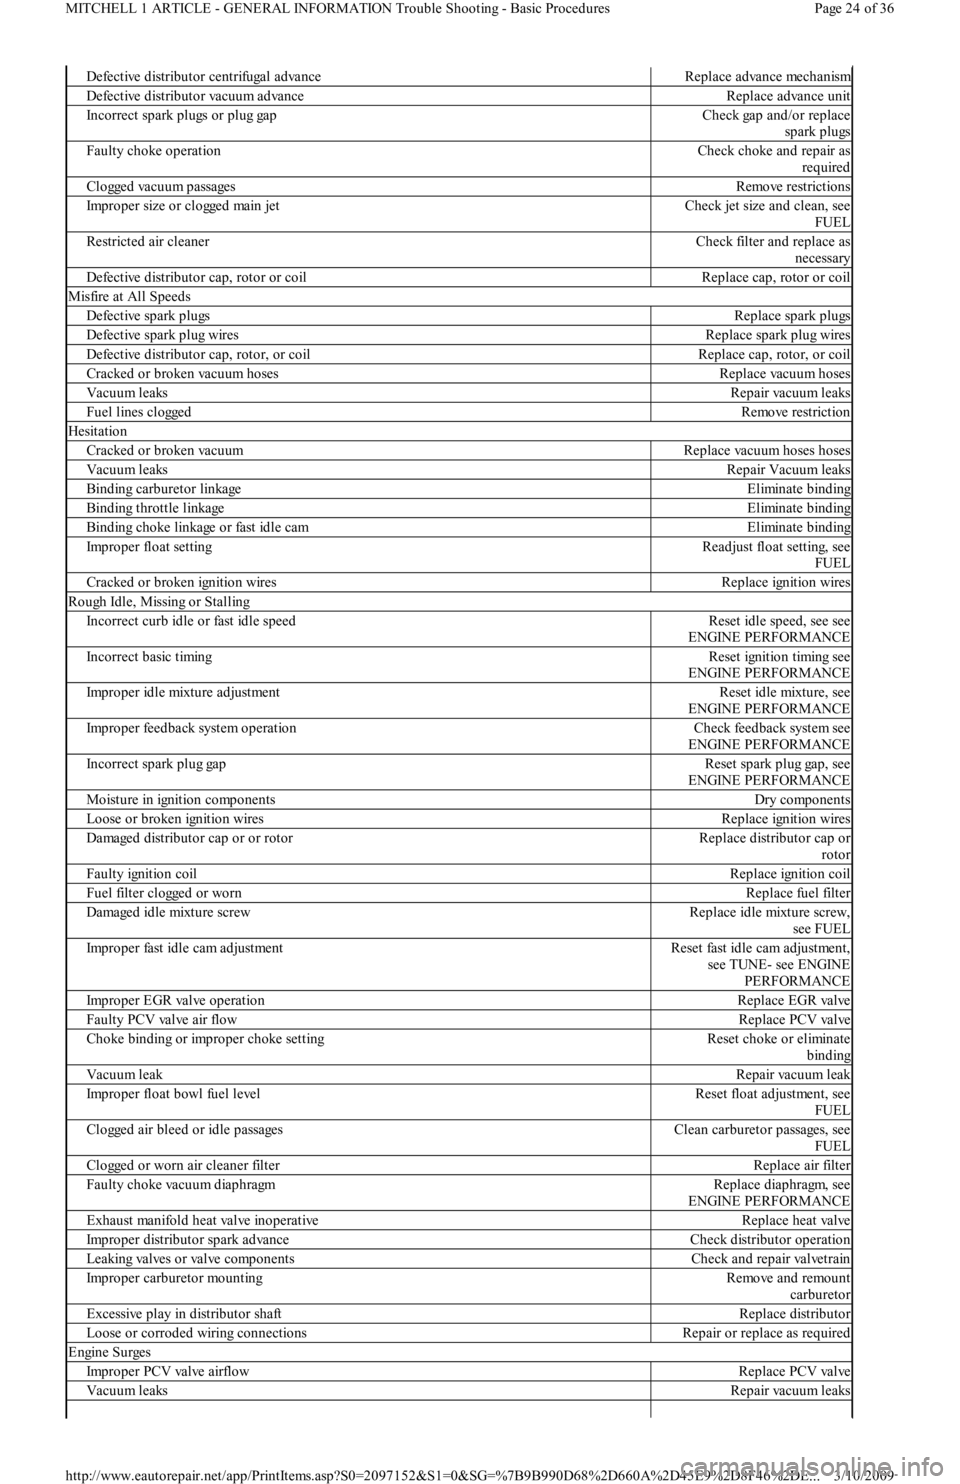
Defective distributor centrifugal advanceReplace advance mechanism
Defective distributor vacuum advanceReplace advance unit
Incorrect spark plugs or plug gapCheck gap and/or replace
spark plugs
Faulty choke operationCheck choke and repair as
required
Clogged vacuum passagesRemove restrictions
Improper size or clogged main jetCheck jet size and clean, see
FUEL
Restricted air cleanerCheck filter and replace as
necessary
Defective distributor cap, rotor or coilReplace cap, rotor or coil
Misfire at All Speeds
Defective spark plugsReplace spark plugs
Defective spark plug wiresReplace spark plug wires
Defective distributor cap, rotor, or coilReplace cap, rotor, or coil
Cracked or broken vacuum hosesReplace vacuum hoses
Vacuum leaksRepair vacuum leaks
Fuel lines cloggedRemove restriction
Hesitation
Cracked or broken vacuumReplace vacuum hoses hoses
Vacuum leaksRepair Vacuum leaks
Binding carburetor linkageEliminate binding
Binding throttle linkageEliminate binding
Binding choke linkage or fast idle camEliminate binding
Improper float settingReadjust float setting, see
FUEL
Cracked or broken ignition wiresReplace ignition wires
Rough Idle, Missing or Stalling
Incorrect curb idle or fast idle speedReset idle speed, see see
ENGINE PERFORMANCE
Incorrect basic timingReset ignition timing see
ENGINE PERFORMANCE
Improper idle mixture adjustmentReset idle mixture, see
ENGINE PERFORMANCE
Improper feedback system operationCheck feedback system see
ENGINE PERFORMANCE
Incorrect spark plug gapReset spark plug gap, see
ENGINE PERFORMANCE
Moisture in ignition componentsDry components
Loose or broken ignition wiresReplace ignition wires
Damaged distributor cap or or rotorReplace distributor cap or
rotor
Faulty ignition coilReplace ignition coil
Fuel filter clogged or wornReplace fuel filter
Damaged idle mixture screwReplace idle mixture screw,
see FUEL
Improper fast idle cam adjustmentReset fast idle cam adjustment,
see TUNE- see ENGINE
PERFORMANCE
Improper EGR valve operationReplace EGR valve
Faulty PCV valve air flowReplace PCV valve
Choke binding or improper choke settingReset choke or eliminate
binding
Vacuum leakRepair vacuum leak
Improper float bowl fuel levelReset float adjustment, see
FUEL
Clogged air bleed or idle passagesClean carburetor passages, see
FUEL
Clogged or worn air cleaner filterReplace air filter
Faulty choke vacuum diaphragmReplace diaphragm, see
ENGINE PERFORMANCE
Exhaust manifold heat valve inoperativeReplace heat valve
Improper distributor spark advanceCheck distributor operation
Leaking valves or valve componentsCheck and repair valvetrain
Improper carburetor mountingRemo ve an d remo u n t
carburetor
Excessive play in distributor shaftReplace distributor
Loose or corroded wiring connectionsRepair or replace as required
Engine Surges
Improper PCV valve airflowReplace PCV valve
Vacuum leaksRepair vacuum leaks
Page 24 of 36 MITCHELL 1 ARTICLE - GENERAL INFORMATION Trouble Shooting - Basic Procedures
3/10/2009 http://www.eautorepair.net/app/PrintItems.asp?S0=2097152&S1=0&SG=%7B9B990D68%2D660A%2D45E9%2D8F46%2DE
...