Page 94 of 677
![MAZDA 232 1990 Workshop Manual Suplement SPECIFICATlONS
-
km
Cootlng system
Coolant camacltv
EnginelTtansaxte
lrters [US Qt. Imo at)
8P SOHC ] 8P DOW Turbo
MTX ATX
I MTX
Water-cooled, forced crrculation
5.0 (5.3, 4.4)
I 6.0 t&3,5 MAZDA 232 1990 Workshop Manual Suplement SPECIFICATlONS
-
km
Cootlng system
Coolant camacltv
EnginelTtansaxte
lrters [US Qt. Imo at)
8P SOHC ] 8P DOW Turbo
MTX ATX
I MTX
Water-cooled, forced crrculation
5.0 (5.3, 4.4)
I 6.0 t&3,5](/manual-img/28/57056/w960_57056-93.png)
SPECIFICATlONS
-
km
Cootlng system
Coolant camacltv
EnginelTtansaxte
lrters [US Qt. Imo at)
8P SOHC ] 8P DOW Turbo
MTX ATX
I MTX
Water-cooled, forced crrculation
5.0 (5.3, 4.4)
I 6.0 t&3,5.3) -
1 Type
Water puma 1
I Water seal Centrifugal
Unified mechanical
seal
: Type I Wax,single stage”‘, Wax, two-stage*’ 1 Wax, two-stage
80.5-83.5 (177-182)“1
Opening temperature
“C (OF)
Main: 86.5-89.5 (188-l 93) *’ Main: 86.5-89.5 (lSS--193)
The:mosta! 1 Sub : 83.5-86.5 (182-188) Sub 83.G86.5 (182-188)
1 Full-open temperature OC
(OF) 95 (203)*‘, 100 (212)*’ i 100 (212)
L I
“...Except cold area, *2...Cotd area only
1 r 1 93GOEX-706 j Full-open lift mm (in) 8.5 (0.335) or more’l
Main: 8.0 (0.31).mln.‘2
Sub : 1.5 10.061 min * Main: 8.0 (0.31) min.
Sub : I.5 (0.06) mm.
Radiator 1 Type
Cap vaive opening-pressure ’
kPa (kglcm2, psi) Corrugated fin
74-l 03 (0.75-I .05, 11-l 5) j Tvm?
EIectnc I
Coohg fan f Outer drameter mm (in) 320 (12.6) 340 (13.4)
Blade
Number 4 5
Motor
/ Current A
6.6 * 1 Hi : 13.3 + 10% max.
Lo: 8.8 + 10% max. E-5
Page 95 of 677
E OUTlANE
TWO-STAGE THERMOSTAT (BP DOHC TURBO)
MAIN VALVE
SINGLE-STAGE THERMOSTAT
(AMBIENT fEMP. -20% (4*f))
NTRANCE PORT TEMP
GINE EXIT PORT TEMP.
- 100 km/h
60 kndh
(63 mph) ~~~~~ (38 mph)
TWO-STAGE THERMOSTAT
A sub-valve is incorporated in the thermostat to stabilize the coolant temperature in the engine, to improve
cold weather performance, and to reduce heater output temperature fluctuations as noted in the diagram.
Operation
Stage 1
During cold weather operation, 83.5*C [182°F]-86.50C [t 88OF] only the sub-valve opens to control the
engine coolant temperature.
Stage 2
During normal operation, 86.5OC (1 88°F)-89.50C (I 93OF) the main valve opens to permit increased coul-
an: flow through the radiator.
E-6
Page 96 of 677
RADIATOR AND COOLING FAN
The radiator and cooling fan specifications are revised.
Specifications
r
EnginelTransaxle BP SOHC 1 BP DOHC Turbo
ATX I
Item MTX MTX 1 Radiator I
Width 647 +
+
Core size
mm (in) H etght 390 t *-
Depth 16 25 e
Fm pnch
mm (in) 1.3 t c
Heat dissipaton capacity kcallh
38,800 43,800 C
Type -
Double tube - Transaxle oil cooler
Heat dissipation capacity
-
kcal/h I 1,650 -
Cooling fan
Number of biades
4 5 +
Outer drameter
mm (in> 320
340 C
Capacity
w-v 80-12 160-12 c
Current
A
1 I 6.6 * 1 Hi : 13.3 + 7 0% max. + Lo: 8.8 + 10% max.
93GOEX-708
OIL COOLER (ATX
;ECTION A-A
4WD MODEL ZWD MODEL
I
DEPTH E-7
Page 99 of 677
E ELECTRIC COOLING FAN SYSTEM
ELECTRIC COOLING FAN SYSTEM (BP
DUHC TURBO)
SYSTEM ClRCUIT
r
WITH A/C
r-- _______ ------
I ADDITIONAL
1 FAN
I PRESSL
SWITCH
I WATER
THERMOSWfTCtl
ABOVE 87OC (207OF): ON
RADlATOjl THERMOSWITCH
ABOVE 105*C (221 “I=): ON
8 93GOEX-719
-
%
J--- QY- -THERMOME?ERsi-=i
--
--------L-
93GOEX-7 i 2
E-10 SYSTEM INSPECTION
1. Jump across the test fan (TFA) terminal and the ground
(GN D) terminal of the diagnosis connector.
2. Turn the ignition switch ON and verify that the fan operates.
If the fan does not operate, inspect the cooling fan system
components and wiring harness.
3. Remove the radiator cap and place a thermometer in the
radiator filler neck.
4. Start the engine.
5. Verify that the fan operates when the coolant temperature
reaches approx. 97*C (207°F).
If it does, check the water thermoswitch.
(Refer to page
E--i I.)
Page 101 of 677

E RADIATOR THERMUSWlTCki
RADIATOR THERMOSWITCH (BP DUHC TURBO)
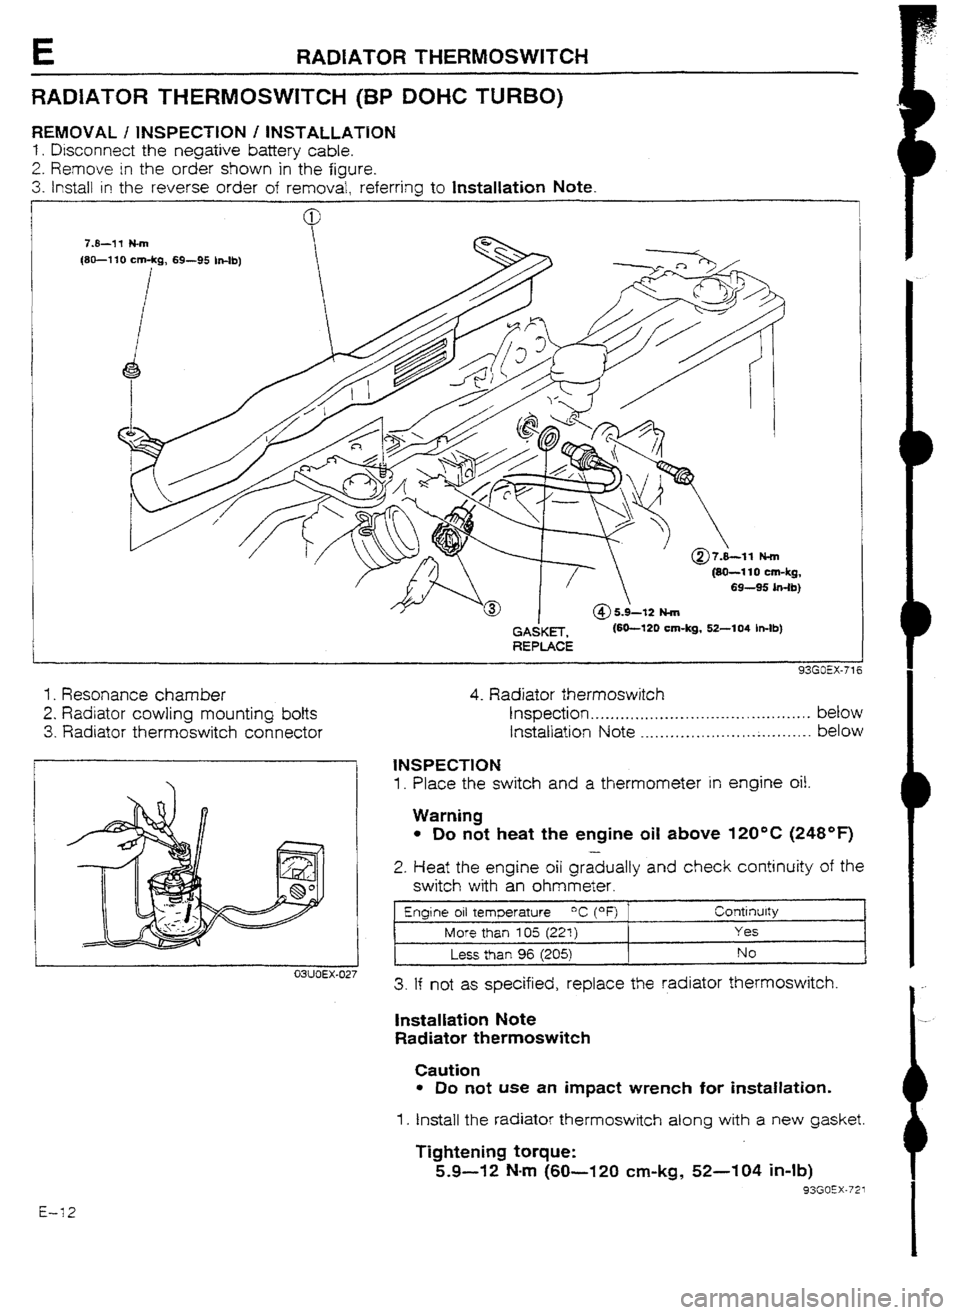
REMOVAL I INSPECTION I INSTALLATION
I. Disconnect the negative battery cable.
2. Remove in the order shown in the figure.
3. Install in the reverse order of removal, referring to InstaHation Note.
7.8-13 H-m
(80-l 10 cm-kg, 69-95 h-lb)
(80-110 cm-kg,
69-95In4b)
REPLACE 1. Resonance chamber
2. Radiator cowling mounting bolts
3. Radiator thermoswitch connector
03WEX-027 4. Radiator thermoswitch
Inspection . . . . . . . . * . . . . . . . . . . . . . ..-. -.*,.a..- . . . . . . .I. below
Installation Note _.,............................._. below
1NSPECTlON 1. Place the switch and a thermometer in engine oil.
Warning
l Do not heat the engine oil above 12O*C (248OF) 2. Heat the engine oil gradually and check continuity of the
switch with
an ohmmeter.
Engine oil temperature “C (*F) Continuity
More than 105 (221) Yes I
t Less than 96 (205) No
1
3. If not as specified, replace the radiator thermoswitch.
Installation Note
Radiator thermoswitch
Caution
l Do not use an impact wrench for installation. 1. Install the radiator thermoswitch along with a new gasket.
Tightening torque: 5.9-12
Nom (60-120 cm-kg, 52-104 in-lb) 93GOEX.721 E-12
Page 106 of 677

OUTLINE Fl
OlJTLlNE OF CONSTRUCTION
The fuel and emission control systems of the New 3.23 BP SOHC-engine equipped 4WD model are basically
the same as those of the New 323 8P DOHC-engine equipped 2WD model, however, the fuel tank is designed
with separate right
and left sections due to the installation of the propeller shaft for the 4-wheel-drive system
and
a transfer pump is equipped to pump the fuel from the left to the right (fuei pump side) section of the
fue! tank. The following chart shows the differences between the major parts of the BP DO% 2WD model
and the BP SOHC 4WD model.
33GO”l-703
Difference
I t
Part BP DOHC 2WD 1 BP SOHC 4WD Remark Transfer pump -
0 Due to
installation of propeller shaft
Variable Inertra charging system 0 -
Two group fuel qectron Due to change of engine
-
G-slgnal (Drstnbutor) 0
I -
Due to abolishment of two group fuel Injection
93GOfl-70s
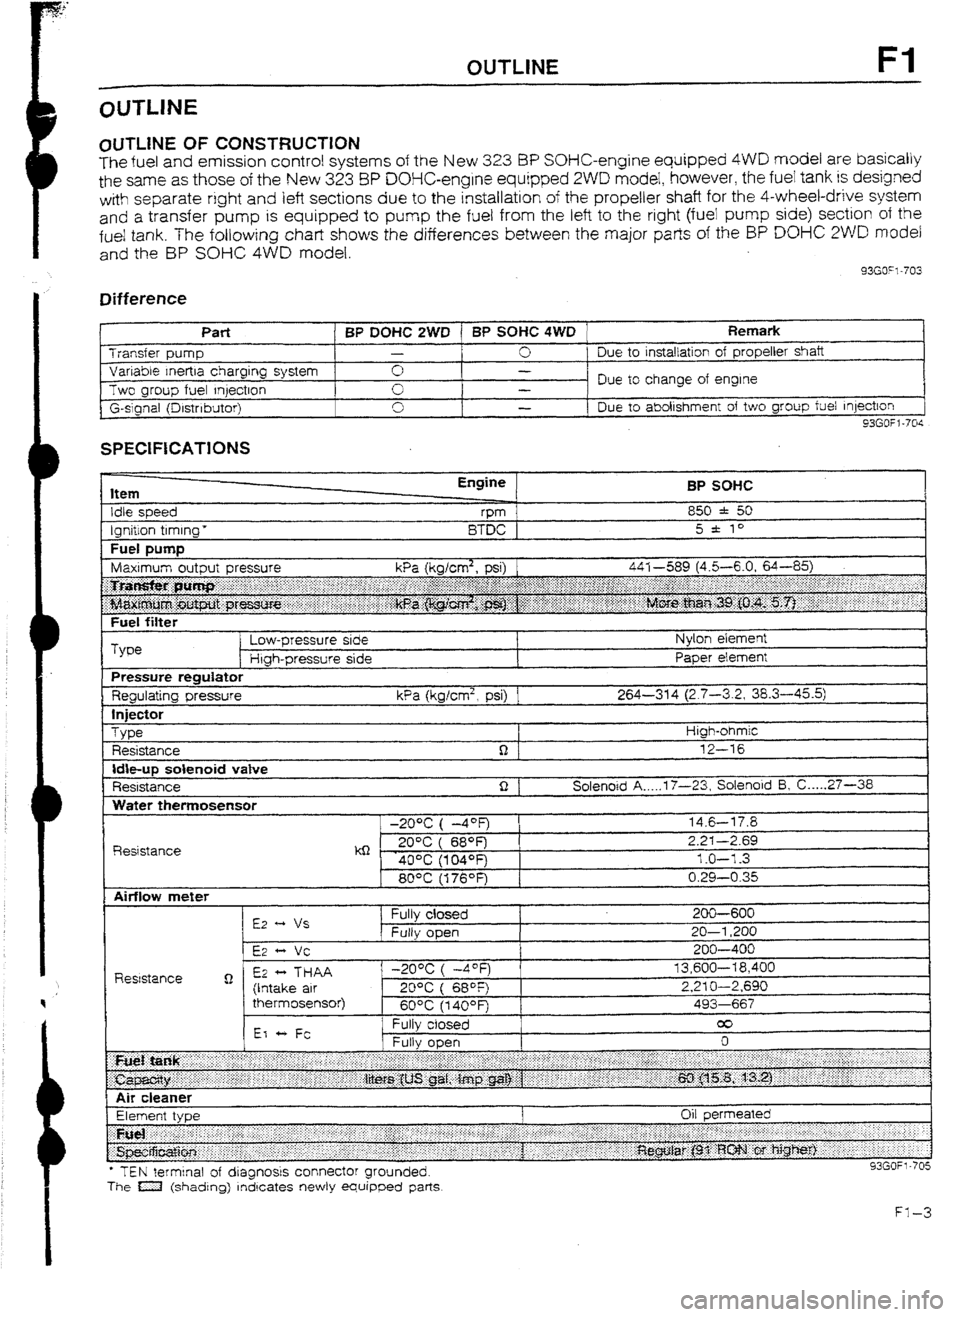
SPECIFICATIONS
Item
Idle speed
Ignition timing * Engine
vm
BTDC BP SOHC
850 * 50
5 * to
Fuel DUtTlD I
Fuel filter
Type Low-pressure side
Htgh-pressure side Nylon element
Paper element
Pressure regulator
Regulating pressure kPa (kglcm2, psi) 1 264-314 (2.7-3.2, 38.3-45.5)
In
jfXt0r
Type
Resistance High-ohmic
12-16
Idbup solenoid vatve
Resistance Solenoid A _.._. 17-23, Solenoid 5, C ._... 27-36
Water themosensor
R&stance -20% ( -4OF)
kQ - . 20°C ( 689=)
40% (104OFj
80°C (176OF) 14.6-l 7.8
2.2-I -2.69
1.0-l -3
0.29-0.35
l TEN terminal of dragnosrs connector grounded.
The a (shading) rndrcates newly equipped parts
Page 107 of 677
I
(WITH INTAKE AIR
THERMOSENSOR) AIR CLEANER METER
RESONANCE
CHAMBER /
SOLENOID VALVE
(PRESSURE REGULATOR CONTROL) FUEL FILTER
(HIGH-PRESSURE
SIDE)
P-“---j
Ne-S’GtiAL * ----El
DlSTRlfjUTOR IDLE-UP
SOLENOID VALVE
* TO ENGINE CONTROL UNIT ,CHECKVALVE
(TWO-WAY)
FUEL VAPOR VALVE
*
THERMOSENSOR
‘FUEL PUMP
FUEL FILTER
I TRANSFER PUMP
Page 112 of 677

SUPPLEMENTAL SERVICE INFORMATION, FUEL SYSTEM Fl
SUPPLEMENTAL SERVICE INFORMATION
The following points in this section are changed in comparison with Mazda 323 Workshop Manuals
(I 203-I U-89F, 1204-I O-89F, I2061 O-89F).
fuel tank
l Removal I Inspection I Installation
4x4 control unit (Fuel pump control unit)
l Inspection procedure added
l Replacement procedure added
Transfer pump switch
l Inspection procedure added
l Replacement procedure added
Transfer pump
l Inspection procedure added
l Replacement procedure added
Exhaust system components
l Removai I Inspection I installation 93GOF? -706
FUELSYSTEM
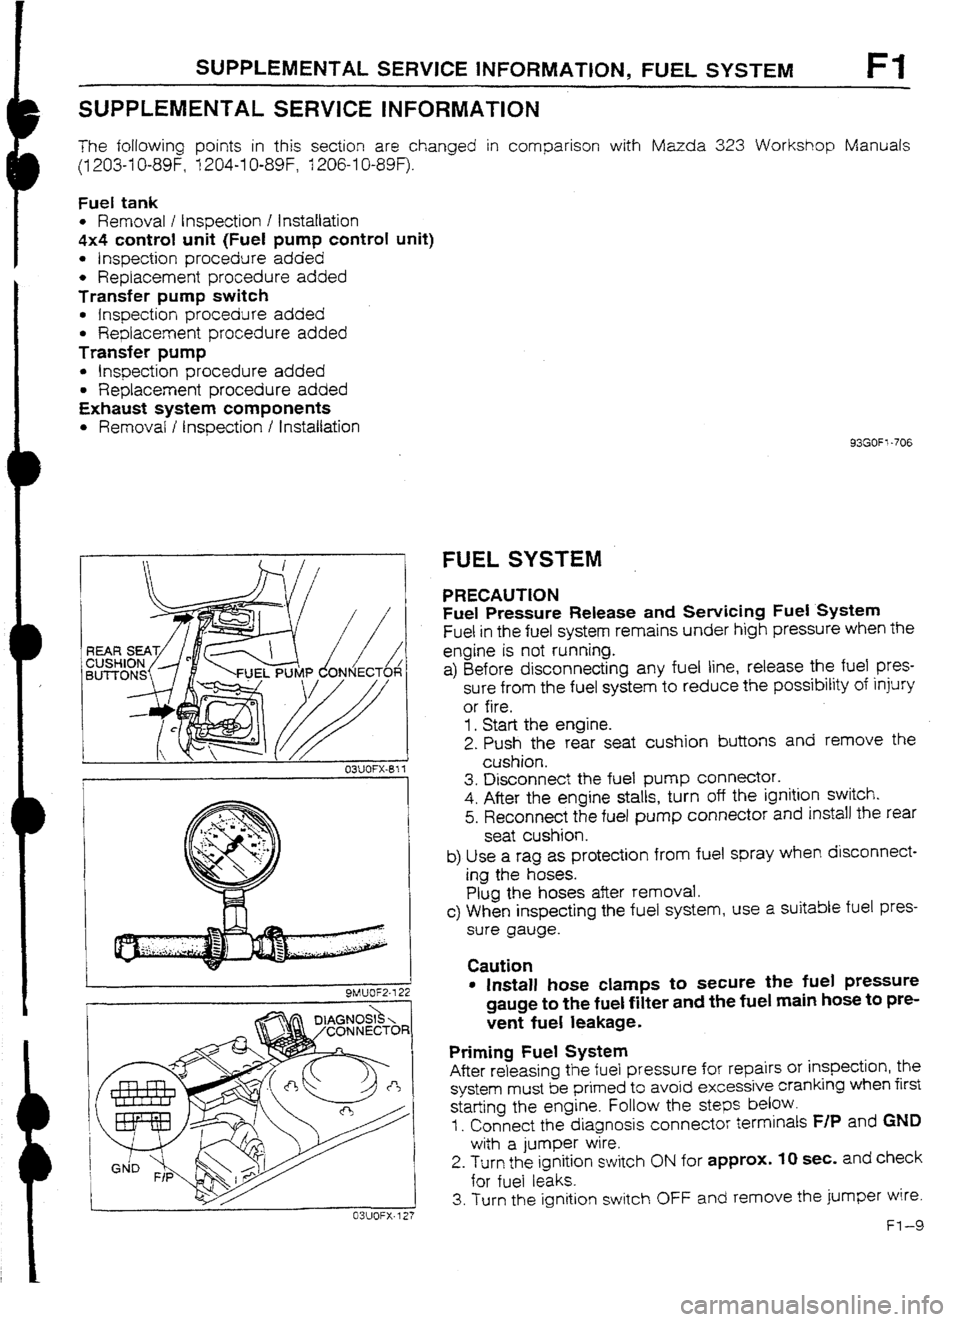
PRECAUTION
Fuel Pressure Release and Sewicing Fuel System
Fuel in the fuel system remains under high pressure when the
engine is not running.
a) Before disconnecting any fuel line, release the fuel
pres-
sure from the fuel system to reduce the possibility of injury
or fire.
1. Start the engine.
2. Push the rear seat cushion buttons and remove the
cushion.
3. Disconnect the fuel pump connector.
4. After the engine stalls, turn off the ignition switch.
5. Reconnect the fuel pump connector and install the rear
seat cushion.
b) Use a rag as protection from fuel spray when disconnect-
ing the hoses.
Plug the hoses after removal.
c> When inspecting the fuel system, use a suitable fuel pres-
sure gauge.
Caution
l Install hose clamps to secure tile fuel pressure
gauge to the fuel filter and the fuel main hose to pre-
vent fuel leakage.
Priming Fuel System
After releasing the fuel pressure for repairs or inspection, the
system must be primed to avoid excessive cranking when first
starting the engine. Follow the
steps below.
I. Connect the diagnosis connector terminals F/P and GND
with a jumper wire.
2. Turn the ignition switch ON for approx. IO sec. and check
for fuel leaks.
3. Turn the ignition switch OFF and remove the jumper wire.
Fl-9