1989 MAZDA 323 coolant reservoir
[x] Cancel search: coolant reservoirPage 20 of 1164

PRE-DELIVERY INSPECTION
PRE-DELIVERY INSPECTION
PRE-DELIVERY INSPECTION TABLE
Following items may be done at any time prior to delivery to your customer.
INSPECT and ADJUST, if necessary, the following items to
the specifications:
0 Glass, exterior bright metal and paint for damage
Cl Wheel lug nuts, and locks (if equipped)
88-118 N.m (9-12 m-kg, 65-87 ft-lb)
q All weatherstrips for damage or detachment
0 Operation of hood release and lock
0 Operation of trunk lid, rear hatch, and fuel lid opener
Cl With trunk open, check for spare jack, tire, tools, and
fasteners securing these items in place.
Cl Door operation and alignment
Cl Headlight aim
INSTALL the following parts:
Cl Wheel caps or rings (if equipped)
q Outside rearview mirror(s)
1 UNDER HOOD-ENGINE OFF )
INSPECT and ADJUST, if necessary, the following items to
the specifications:
0 Fuel, coolant and hydraulic lines, fittings, connections and
components for leaks
Cl Engine oil level
0 Power steering fluid level
0 Brake and clutch master cylinder fluid level
El Windshield washer reservoir fluid level
Cl Radiator coolant level
Cl Tightness of battery terminals
Cl Manual transaxle oil level
riizmiq
INSTALL the following parts:
Cl Rubber stopper for inside rearview mirror
CHECK operation of the following items:
0 Seat controls (sliding and reclining) and head restraint
Cl Folding rear seat
0 Door locks, including childproof door locks (if equipped)
Seat belts and warning system
Cl Ignition switch and steering lock
0 Inhibitor switch (ATX only)
U Starter interlock switch (clutch pedal, MTX only)
Cl All lights, including warning and indicator lamps
Cl Sound warning system
Cl Horn, wipers and washers (front and rear, if equipped)
0 Audio system (if equipped) 0 Cigarette lighter and clock
0 Sunroof (if equipped)
II Remote control outside rearview mirrors (if equipped)
Cl Power windows (if equipped)
q Heater, defroster and air conditioner at various mode
selections (if equipped)
CHECK the following items:
Cl Presence of spare fuse
0 Upholstery and interior finish
CHECK and ADJUST, if necessary, the following items:
0 Pedal height and free play of brake and clutch pedal
Pedal height mm (in) Free play mm (in)
0 Parking brake
5-7 notches/98 N (10 kg, 22lb)
UNDER HOOD-ENGINE RUNNING AT
OPERATING TEMPERATURE
CHECK the following items:
q Automatic transaxle fluid level
[I
CHECK the following items:
Cl Underside fuel, coolant and hydraulic lines, fittings, con-
nections and components for leaks
0 Tires for cuts or bruises
0 Steering linkage, suspension, exhaust system and all un-
derside hardware for looseness or damage
[I
CHECK the following items:
0 Brake operation
0 Clutch operation
Cl Steering control
Cl Operation of gauges
q Squeaks, rattles or unusual noise
Cl Emergency locking retractors
0 Cruise control system (if equipped)
1 AFTER ROAD TEST (
CHECK for necessary owner information materials.
Following items must be done just before the delivery to your customer.
q Load test battery and charge if necessary
1 Volts 1 0 Install fuses for accessories
i.. _
0 Adjust tire pressure to the specification
Load test result cl Remove seat and floor mat protective covers
(Refer to door label) 0 Vacuum and clean interior of vehicle
0 Clean outside of vehicle q Inspect installation of option parts with invoice
23UOAX-002
A-2
Page 58 of 1164
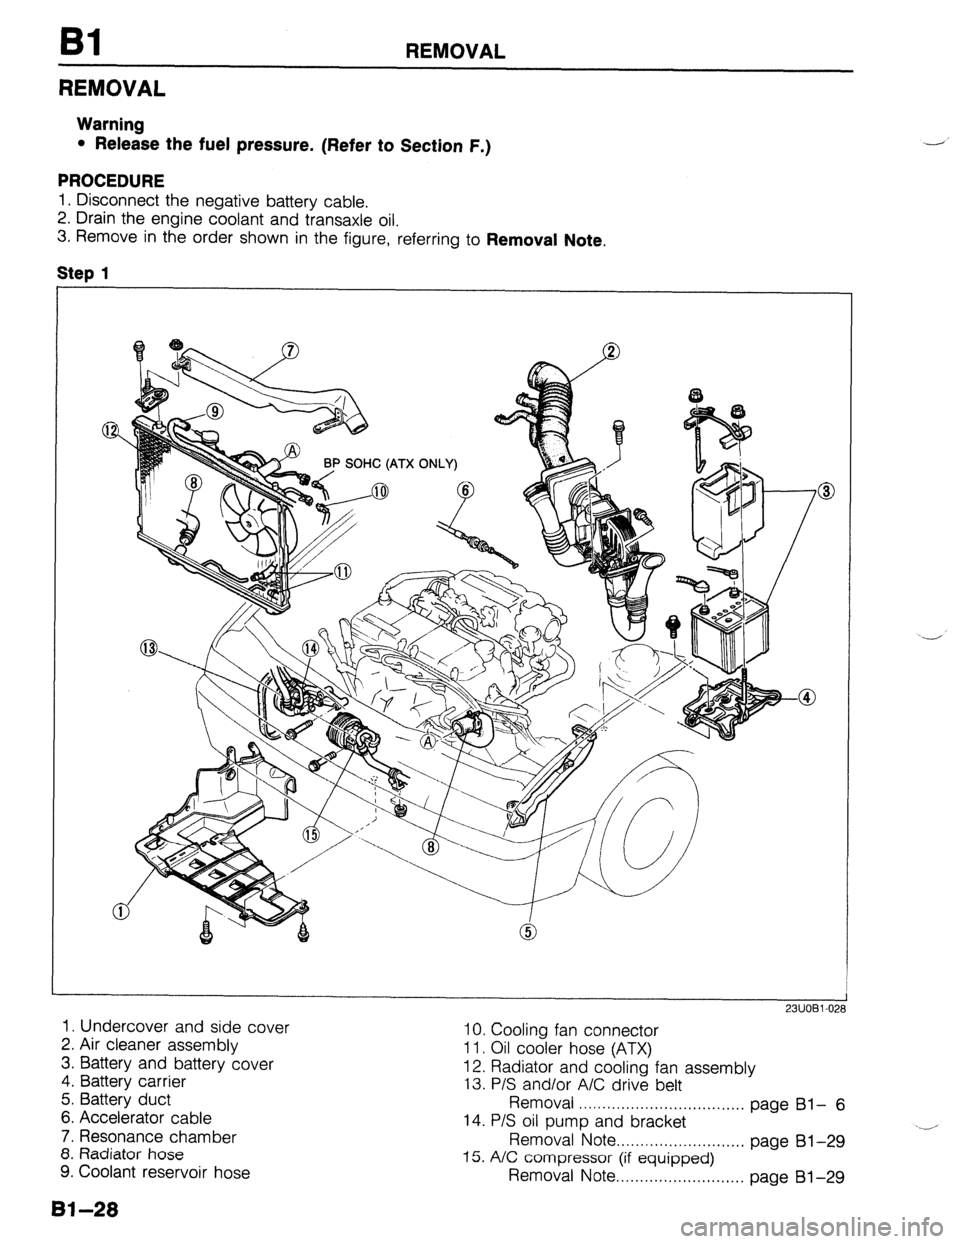
REMOVAL
REMOVAL
Warning
l Release the fuel pressure. (Refer to Section F.)
PROCEDURE
1. Disconnect the negative battery cable.
2. Drain the engine coolant and transaxle oil.
3. Remove in the order shown in the figure, referring to Removal Note,
Step 1
1. Undercover and side cover
2. Air cleaner assembly 10. Cooling fan connector
3. Battery and battery cover 11. Oil cooler hose (ATX)
4. Battery carrier 12. Radiator and cooling fan assembly
13. P/S and/or A/C drive belt
5. Battery duct
Removal . . . . . . . . . . . . . . . . . . . . . . . . . . . . . . . . . . .
6. Accelerator cable page Bl- 6
7. Resonance chamber 14. P/S oil pump and bracket
8. Radiator hose Removal Note . . . . . . . . . . . . . . . . . . . . . . . . . . . page 81-29
9. Coolant reservoir hose 15. A/C compressor (if equipped)
Removal Note . . . . . . . . . . . . . . . . . . . . . . . . . . . page 81-29
81-28
Page 131 of 1164
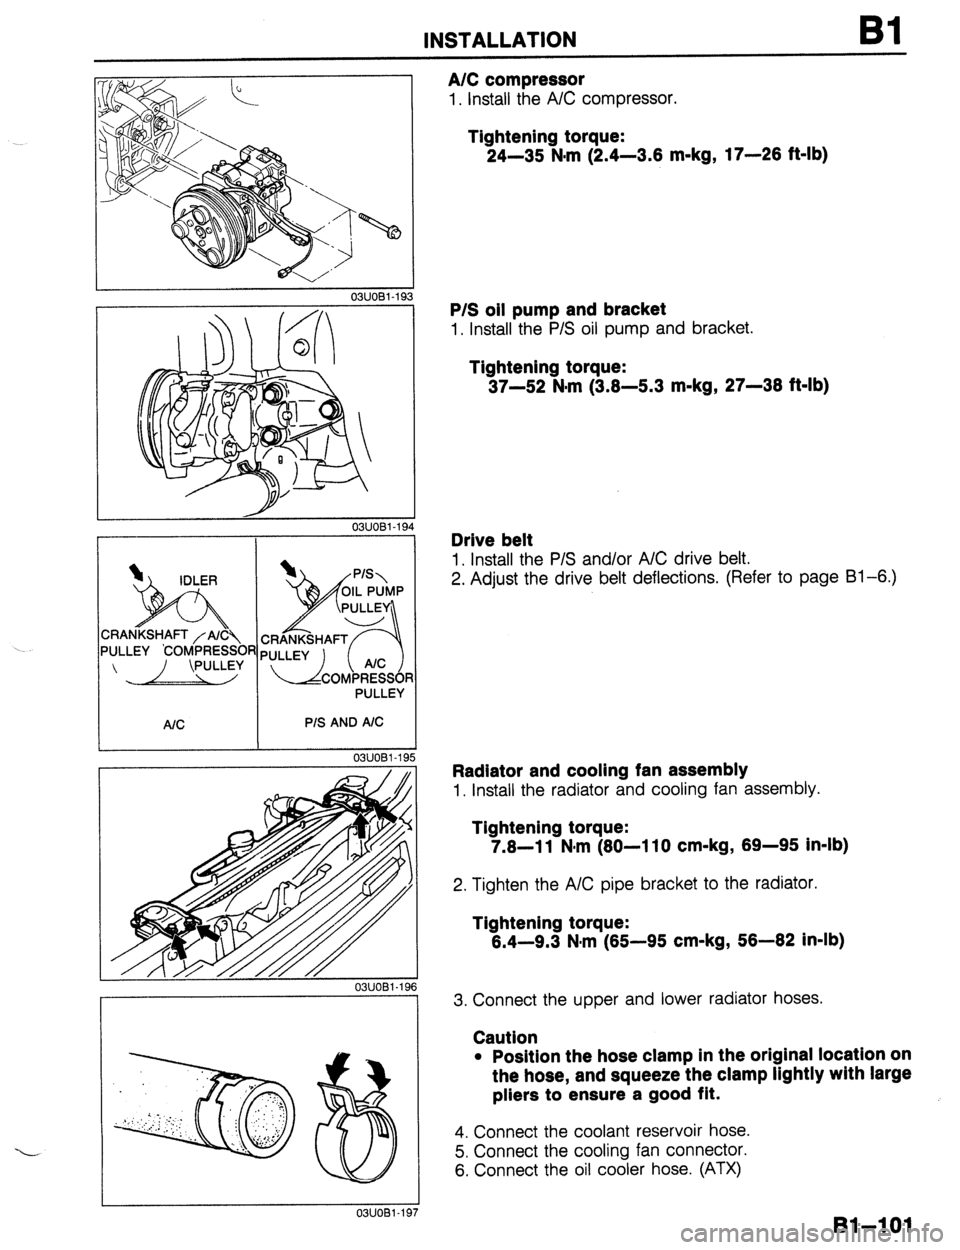
INSTALLATION Bl
I I
03UOBl-193
03UOBl-19
1
PULLEY
P/S AND A/C
OWOBl-19
03UOBl-15
A/C compressor
1. Install the A/C compressor.
Tightening torque:
24-35 N-m (2.4-3.6 m-kg, 17-26 ft-lb)
P/S oil pump and bracket
1. Install the P/S oil pump and bracket.
Tightening torque:
37-52 N-m (3.6-5.3 m-kg, 27-36 ft-lb)
Drive belt
1. Install the P/S and/or A/C drive belt.
2. Adjust the drive belt deflections. (Refer to page Bl-6.)
Radiator and cooling fan assembly
1. Install the radiator and cooling fan assembly.
Tightening torque:
7.6-11 N#m (60-110 cm-kg, 69-95 in-lb)
2. Tighten the A/C pipe bracket to the radiator.
Tightening torque:
6.4-9.3 N*rn (65-95 cm-kg, 56-62 in-lb)
3. Connect the upper and lower radiator hoses.
Caution
l Position the hose clamp in the original location on
the hose, and squeeze the clamp lightly with large
pliers to ensure a good fit.
4. Connect the coolant reservoir hose.
5. Connect the cooling fan connector.
6. Connect the oil cooler hose. (ATX)
Bl-=lOl
Page 163 of 1164
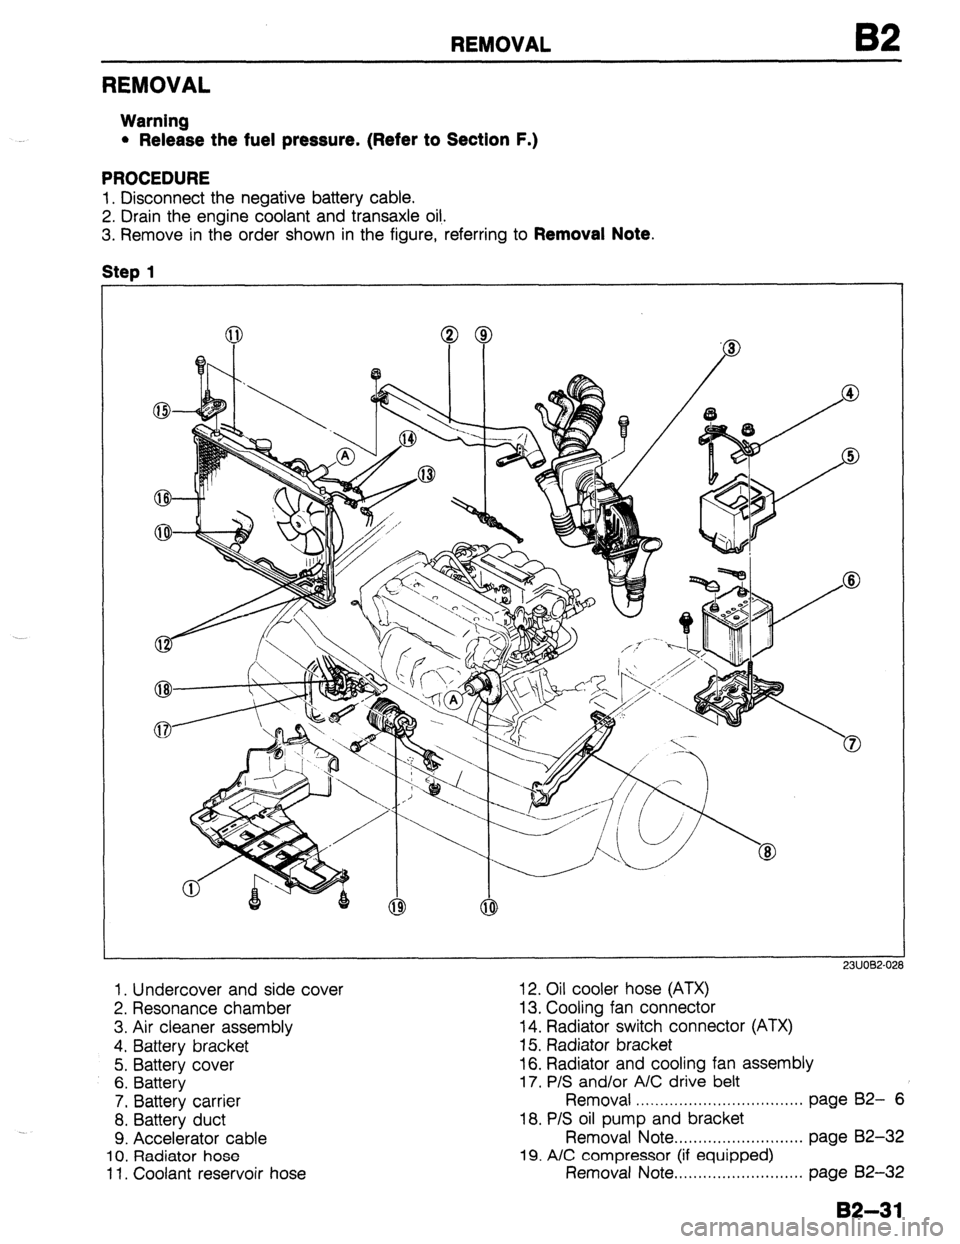
REMOVAL
REMOVAL
Warning
l Release the fuel pressure. (Refer to Section F.)
PROCEDURE
1. Disconnect the negative battery cable.
2. Drain the engine coolant and transaxle oil,.
3. Remove in the order shown in the figure, referring to
Removal Note.
Step
1
1. Undercover and side cover 12. Oil cooler hose (ATX)
2. Resonance chamber 13. Cooling fan connector
3. Air cleaner assembly 14. Radiator switch connector (ATX)
4. Battery bracket 15. Radiator bracket
5. Battery cover 16. Radiator and cooling fan assembly
6. Battery
17. P/S and/or A/C drive belt
7. Battery carrier Removal . . . . . . . . . . . . . . . . . . . . . . . . . . . . . . . . . . . page B2- 6
8. Battery duct 18. P/S oil pump and bracket
9. Accelerator cable Removal Note . . . . . . . . . . . . . . . . . . . . + . . . . . . page 82-32
10. Radiator hose 19. A/C compressor (if equipped)
11. Coolant reservoir hose Removal Note.. . . . . . . . . . . . . . . . . . . . . . . . . . page 82-32
B2-31
Page 233 of 1164
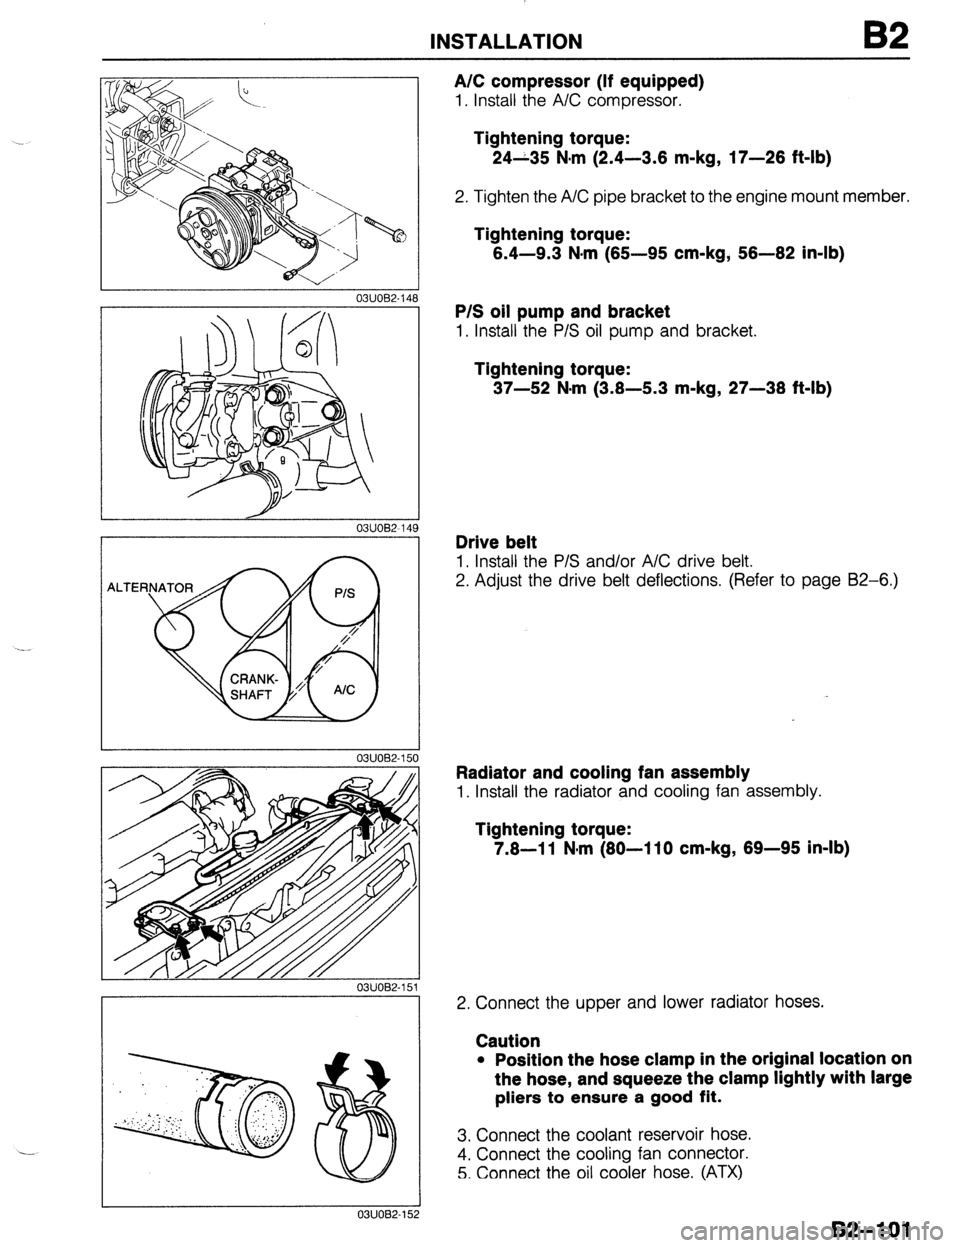
INSTALLATION
03UOB2-141
/ 03UOB2-14!
1 03UOB2-150
03UOB2-151
8,’
1
a : :“.;,
.’
s,::, ; i .:.;...
..:.a.. :..,:.
. .
. .
” . : 0 ,.: ::
: .:.. ..,
., ‘:;
.<.,:.,);
‘zi :
I 0311082-152
A/C compressor (If equipped)
1. Install the A/C compressor.
Tightening torque:
24-35 N,m (2.4-3.6 m-kg, 17-26 ft-lb)
2. Tighten the A/C pipe bracket to the engine mount member.
Tightening torque:
6.4-9.3 N-m (65-95 cm-kg, 56-62 in-lb)
P/S oil pump and bracket
1. Install the P/S oil pump and bracket.
Tightening torque:
37-52 N.m (3.8-5.3 m-kg, 27-38 ft-lb)
Drive belt
1. Install the P/S and/or A/C drive belt.
2. Adjust the drive belt deflections. (Refer to page B2-6.)
Radiator and cooling fan assembly
1. Install the radiator and cooling fan assembly.
Tightening torque:
7.8-11 N-m (80-110 cm-kg, 69-95 in-lb)
2. Connect the upper and lower radiator hoses.
Caution
l Position the hose clamp in the original location on
the hose, and squeeze the clamp lightly with large
pliers to ensure a good
fit.
3. Connect the coolant reservoir hose.
4. Connect the cooling fan connector.
5. Connect the oil cooler hose. (ATX)
B2-101
Page 250 of 1164
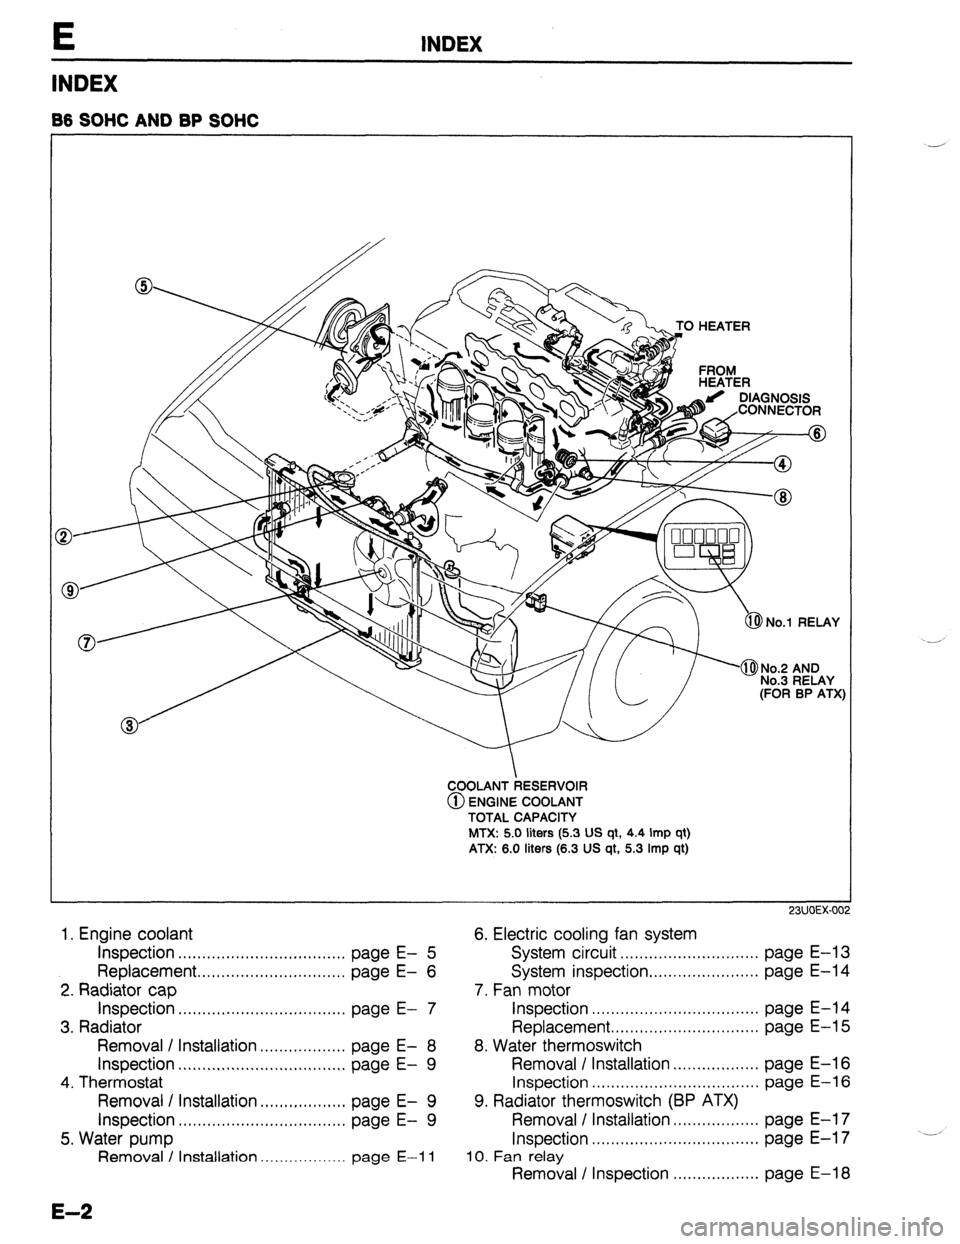
INDEX
B6 SOHC AND BP SOHC
COOLANT RESERVOIR
@ ENGINE COOLANT
TOTAL CAPACITY
MTX: 5.0 liters (5.3 US qt, 4.4 Imp qt)
ATX: 6.0 liters (6.3 US qt, 5.3 Imp qt)
1. Engine coolant 6. Electric cooling fan system
23UOEX-00
inspection . . . . . . . . . . . . . . . . . . . . . . . . . . . . . . . . . . . page E- 5
Replacement . . . . . . . . . . . . . . . . . . . . . . . . . . . . . . . page E-
Inspection . . . . . . . . . . . . . . . . . . . . . . . . . . . . . . . . . . . 6
page E- 2. Radiator cap
7
3. Radiator
Removal I Installation . . . . . . . ,.......... page E- 8
Inspection . . . . . . . . . . . . . . . . . . . . . . . . . . . . . . . . . . . page E- 9
4. Thermostat
Removal / Installation . . . . . . . . . . . . . . . . . . page E- 9
Inspection . . . . . . . . . . . . . . . . . . . . . . . . . . . . . . . . . . . page E- 9
5. Water pump
Removal / Installation ....t___.......... page E-i 1
System
Inspection . . . . . . . . . . . . . . . . . . . . . . . . . . . . . . . . . . circuit . . . . . . . . . . . . . . . . . . . . . . . . . . . .
Replacement . . . . . . . . . . . . . . . . . . . . . . . . . . . . . .
8. Water thermoswitch
Removal / Installation . . . . . . . . . . . . . . . . .
Inspection . . . . . . . . . . . . . . . . . . . . . . . . . . . . . . . . . .
9. Radiator thermoswitch (BP ATX) System
Removal I Installation . . . . . . . . . . . . . . . . . inspection . . . . . . . . . . . . . . . . . . . . . .
Inspection . . . . . . . . . . . . . . . . . . . . . . . . . . . . . . . . . .
IO. Fan relay
7. Fan motor
Removal / Inspection . . . . . . . . . . . . . . . . . page E-13
page E-14
page E-14
page E-15
page E-16
page E-16
page E-17
page E-l 7
page E-18 ..--’
E-2
Page 256 of 1164
E RADIATOR
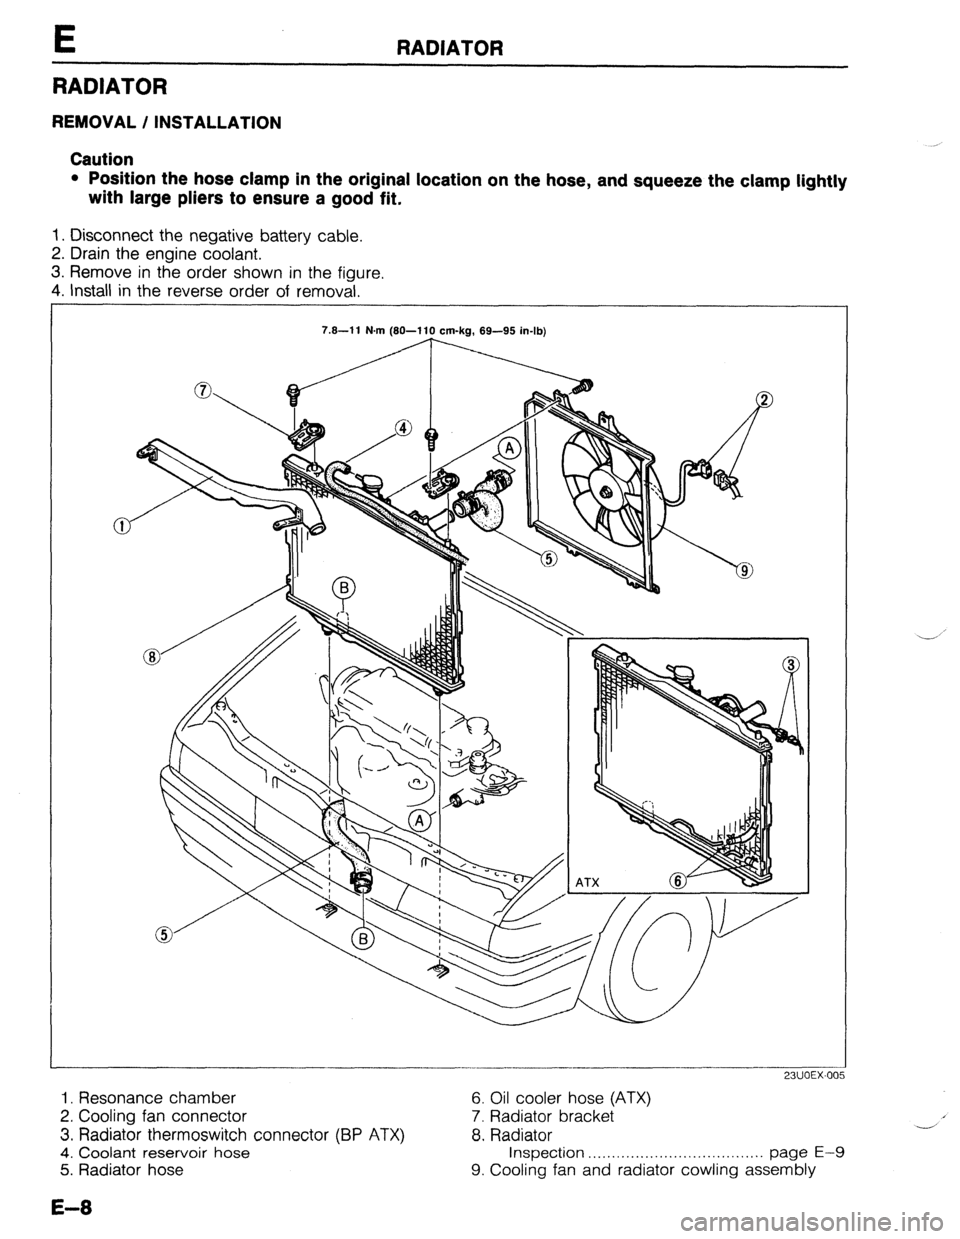
RADIATOR
REMOVAL / INSTALLATION
Caution
l Position the hose clamp in the original location on the hose, and squeeze the clamp lightly
with large pliers to ensure a good fit.
1. Disconnect the negative battery cable.
2. Drain the engine coolant.
3. Remove in the order shown in the figure.
4. Install in the reverse order of removal.
7.8-11 N.m (80-110 cm-kg, 69-95 in-lb)
-...__--- --- i
771 InFu.nnc; cvyILII ..,.,..
6. Oil cooler hose (ATX)
7. Radiator bracket
8. Radiator
Inspection . . . . . . . . . . . . . . . . . . . . . . . . . . . . . . . . . . . . . page E-9
9. Cooling fan and radiator cowling assembly 1. Resonance chamber
2. Cooling fan connector
3. Radiator thermoswitch connector (BP ATX)
4. Coolant reservoir hose
5. Radiator hose i
Y’
E-8
Page 344 of 1164
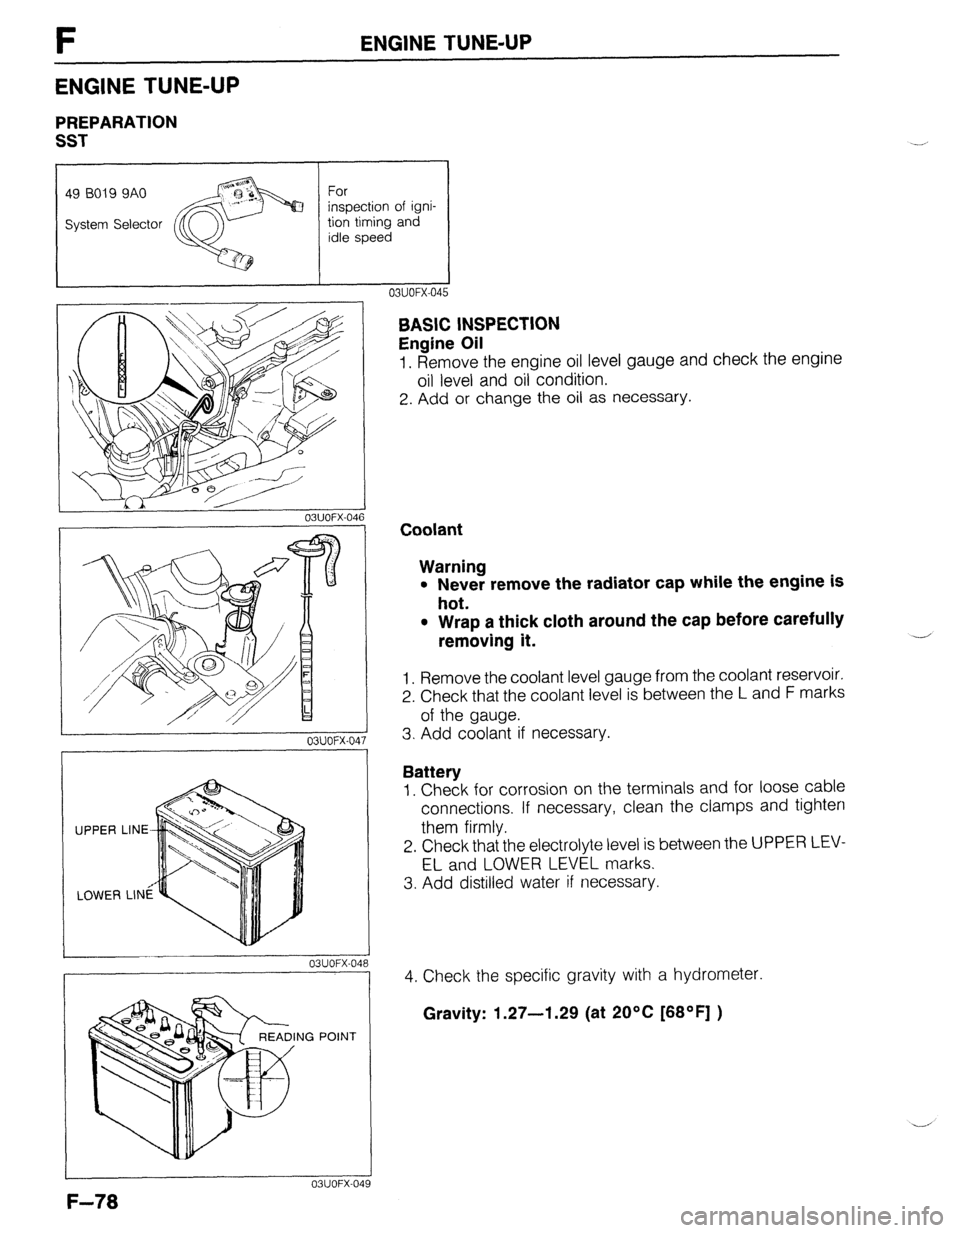
F ENGINE TUNE-UP
ENGINE TUNE-UP
PREPARATlON
SST
I
I I
49 BO19 9AO
System Selector For
inspection of igni-
tion timing and
idle speed
hA ‘I
03UOFX-04
03UOFX-04
03UOFX-04
NG POINT
03UOFX-04 03UOFX-045
BASIC INSPECTION
Engine Oil
1. Remove the engine oil level gauge and check the engine
oil level and oil condition.
2. Add or change the oil as necessary.
Coolant
Warning
l Never remove the radiator cap while the engine is
hot.
l Wrap a thick cloth around the cap before carefully
removing it.
1. Remove the coolant level gauge from the coolant reservoir.
2. Check that the coolant level is between the L and F marks
of the gauge.
3. Add coolant if necessary.
Battery
1. Check for corrosion on the terminals and for loose cable
connections. If necessary, clean the clamps and tighten
them firmly.
2. Check that the electrolyte level is between the UPPER LEV-
EL and LOWER LEVEL marks.
3. Add distilled water if necessary.
4. Check the specific gravity with a hydrometer.
Gravity: 1.27-l .29 (at 20% [68OF] )