Page 675 of 1164
CONVENTIONAL BRAKE SYSTEM
03UOPX-021
PEDAL-TO-FLOOR
CLEARANCE
03UOPX-02
Pedal Play
Inspection
1. Depress the pedal a few times to eliminate the vacuum in
the system.
2. Gently depress the pedal by hand and check the free play
(until resistance is felt).
Pedal play: 4-7mm (0.16-0.26 in)
Adjustment
1. Loosen locknut @and turn rod @to adjust the free play.
2. Verify the pedal height and the stoplight operation.
Pedal-To-Floor Clearance
Inspection
Verifv that the distance from the floor panel to the center of
the pedal pad is as specified when the pedal is depressed
with a force of 569 N (60
kg, 132 lb).
Pedal-to-floor clearance: 70mm (2.76 in) min.
If the distance is less than specified, check for the following
problems:
1. Air in brake system
2. Malfunction of automatic adjuster (Rear drum brakes)
3. Worn shoes or pads
P-9
Page 679 of 1164

CONVENTIONALBRAKESYSTEM P
1 SUOPX-001
03UOPX-03
0
o3uoPx-os
0
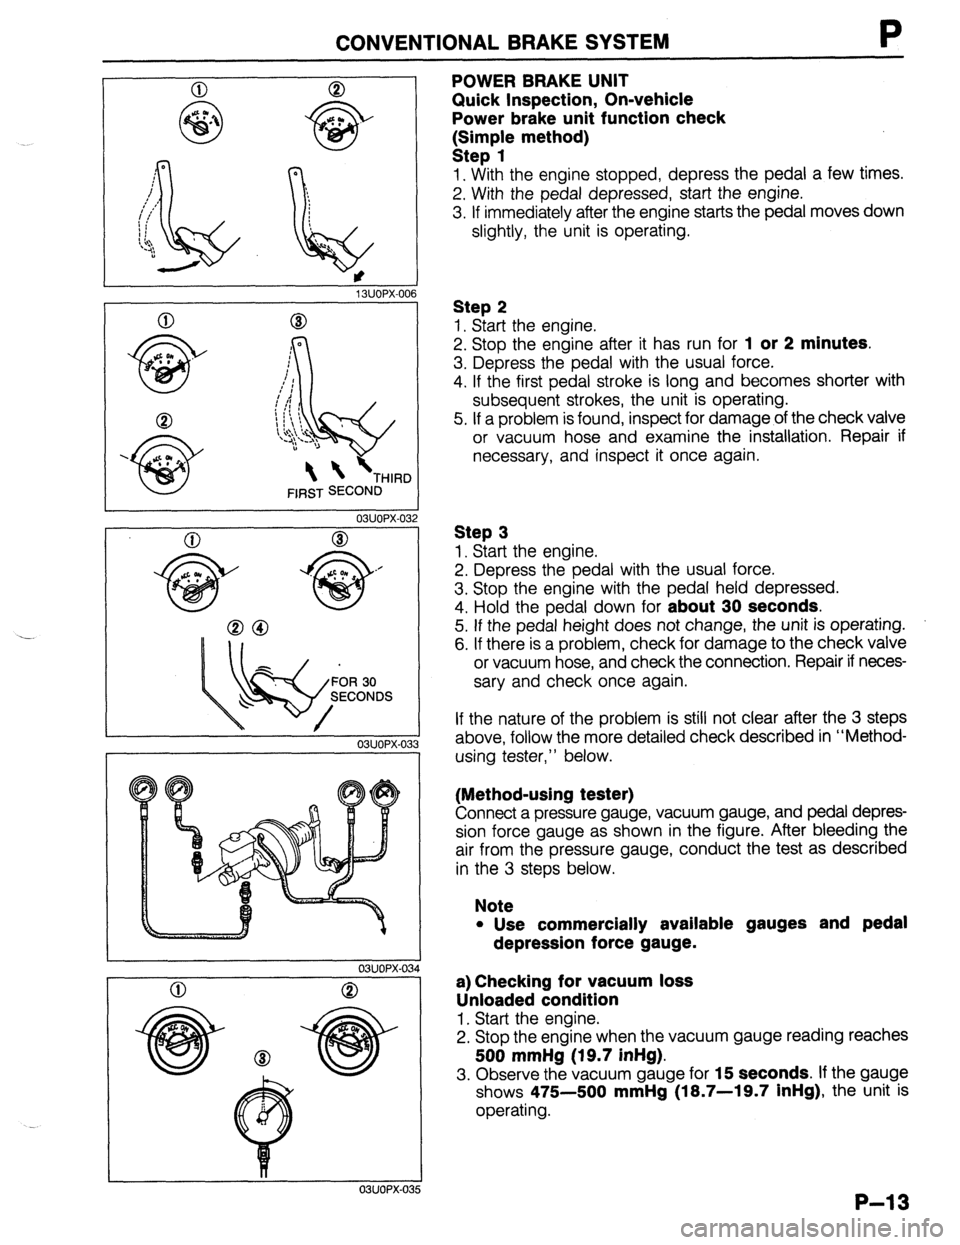
POWER BRAKE UNIT
Quick Inspection, On-vehicle
Power brake unit function check
k:;;p{e method)
1. With the engine stopped, depress the pedal a few times.
2. With the pedal depressed, start the engine.
3. If immediately after the engine starts the pedal moves down
slightly, the unit is operating.
Step 2
1. Start the engine.
2. Stop the engine after it has run for
1 or 2 minutes.
3. Depress the pedal with the usual force.
4. If the first pedal stroke is long and becomes shorter with
subsequent strokes, the unit is operating.
5. If a problem is found, inspect for damage of the check valve
or vacuum hose and examine the installation. Repair if
necessary, and inspect it once again.
Step 3
1. Start the engine.
2. Depress the pedal with the usual force.
3. Stop the engine with the pedal held depressed.
4. Hold the pedal down for
about 30 seconds.
5. If the pedal height does not change, the unit is operating.
6. If there is a problem, check for damage to the check valve
or vacuum hose, and check the connection. Repair if neces-
sary and check once again.
If the nature of the problem is still not clear after the 3 steps
above, follow the more detailed check described in “Method-
using tester,” below.
(Method-using tester)
Connect a pressure gauge, vacuum gauge, and pedal depres-
sion force gauge as shown in the figure. After bleeding the
air from the pressure gauge, conduct the test as described
in the 3 steps below.
Note
l Use commercially available gauges and pedal
depression force gauge.
a) Checking for vacuum loss
Unloaded condition
1. Start the engine.
2. Stop the engine when the vacuum gauge reading reaches
500 mmHg (19.7 inHg).
3. Observe the vacuum gauge for 15 seconds. If the gauge
shows 475-500
mmHg (18.7-19.7 inHg), the unit is
operating.
P-13
Page 710 of 1164

R OUTLINE
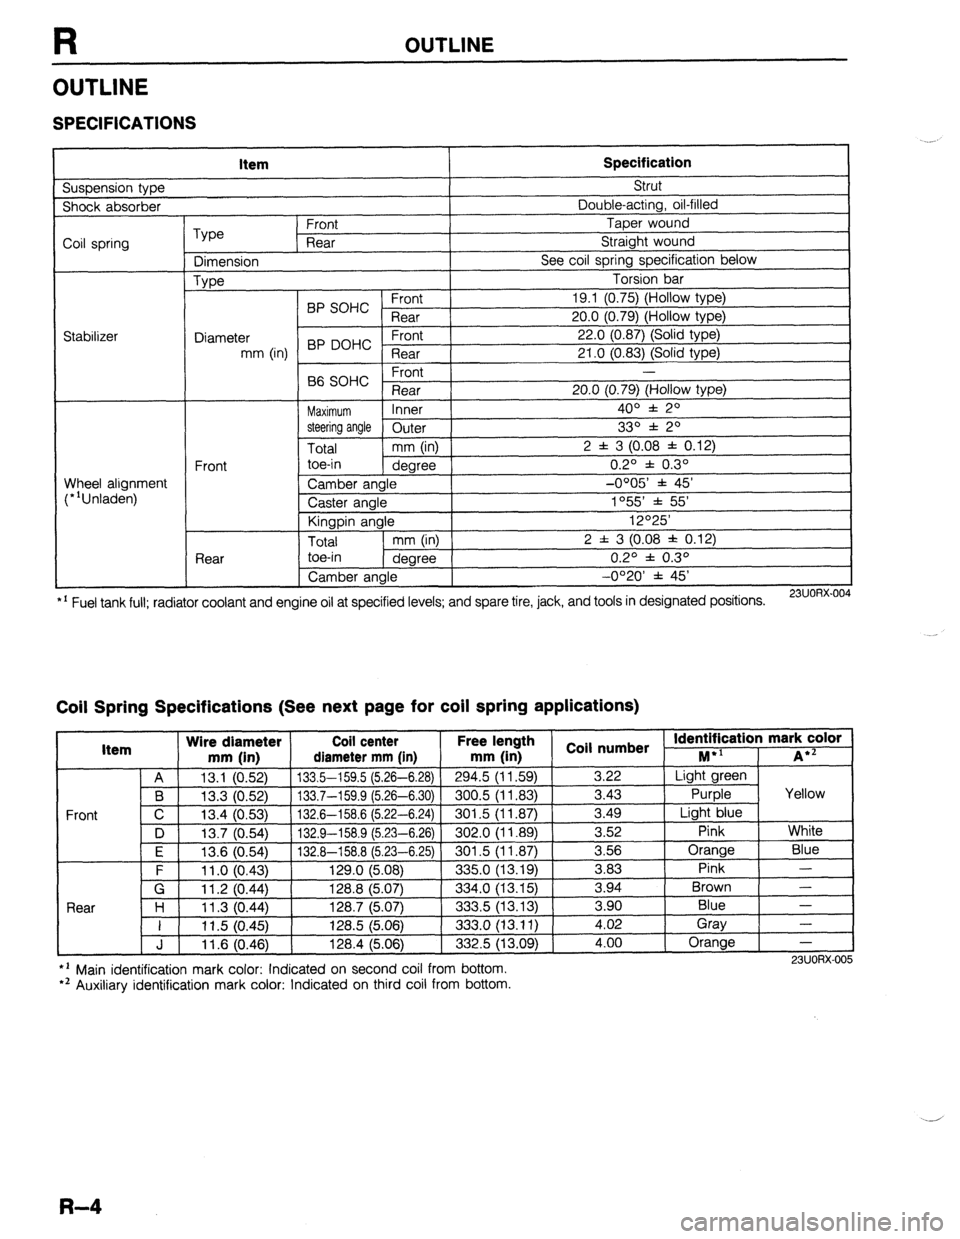
OUTLINE
SPECIFICATIONS
Suspension type Item Specification Strut
Shock absorber Double-acting, oil-filled
Coil spring
Stabilizer Type Front Taper wound
Rear Straight wound
Dimension See coil spring specification below
Type Torsion bar
BP SOHC Front 19.1 (0.75) (Hollow type)
Rear 20.0 (0.79) (Hollow type)
Diameter 22.0 (0.87) (Solid type)
mm (in) BP DOHC ;eTrt
21 .O (0.83) (Solid type)
P ,
-
66 SOHC rronr
Rear 20.0 (0.79) (Hollow type)
Maximum Inner 400 f 20
steering angle
Outer 330 f 20
Total mm (in) 2 f 3 (0.08 f 0.12)
Front toe-in
degree 0.2O f 0.3O
Wheel alignment
(*‘Unladen) Camber angle -0005’ f 45’
Caster angle 1055 * 55’
Kingpin angle 12O25’
Total mm (in) 2 f 3 (0.08 * 0.12)
Rear toe-in
degree 0.2O f 0.3O
Camber angle -0°20’ f 45’
*’ Fuel tank full; radiator coolant and engine oil at specified levels; and spare tire, jack, and tools in designated positions.
23UORX.004
Coil Spring Specifications (See next page for coil spring applications)
I Item Wire diameter Coil center Free lel.=-. .
mm iin1 rliamotor mm [in mm (in 1 coil numbs
Front
nath
1 _ . . *St Identification mark color +l
., . . . . I...,
-*.....-.“, * . . . . . ,..-, -....- I--‘, M iA*=
A 13.1 (0.52) 133.5-159.5 (5.26-6.28)
294.5 (11.59) 3.22 Light green
B 13.3 (0.52) 133.7-159.9 (5.26-6.30) 300.5 (11.83)
3.43 Purple Yellow
C 13.4 (0.53)
132.6-158.6 (5.22-6.24) 301.5 (11.87) 3.49
Light blue
D 13.7 (0.54)
132.9-158.9 (5.23-6.26) 302.0 (11.89) 3.52
Pink White
I F I 12f3 Kl5Al I 1.17 A-l!% 8 f!i PR-Fi 751
I RrIl .5 II 1 6x71 I 3.56 Orange
Blue
3 83 Pink -
Brown - .“._ \“.- .,
. “W.., ~ - -. - \-. -- -. - -, -- .-
\’ .‘-‘I t
F 11 .o (0.43) 129.0 (5.08)
335.0 (13.19) -.--
G 11.2 (0.44) 128.8 (5.07)
334.0 (13.15) 3.94
Rnnr l-4
1 I ? 07 AA 1387 /5n7
.?m !i 113 1% 3 an Blue - I I I I .” \v.-7, I&V., \V.“., ---.., \.-. .-, I 11.5 (0.45) 128.5 (5.06)
333.0 (13.11) i:oi Gray
-
J 11.6 (0.46) 128.4 (5.06)
332.5 (13.09) 4.00 Orange
-
l ’ Main identification mark color: Indicated on second coil from bottom.
*’ Auxiliary identification mark color: Indicated on third coil from bottom. 23UORX-005
R-4
Page 743 of 1164
FRONT FENDER PANEL S
FRONT FENDER PANEL
COMPONENTS
Removal / Installation
1, Remove in the order shown in the figure.
7 Install in the reverse order of removal.
-. . . .-.-*. . .
6.9-9.6 N.m (70-100
13uosx-004
1. Front combination light
Removal I Installation . . . . . . . . . . . . . . . . . . . . . Section T
2. Radiator grille
Removal I Installation .,................ page S-51
3. Headlight, lower grille molding
Removal / Installation .,,.,......,......... Section T 4. Front flap
5. Mud guard
6. Front fender panel
s-7
Page 769 of 1164
TRUNK LID S
TRUNK LID
COMPONENTS
Removal / Installation
1. Disconnect the negative battery cable.
2. Remove in the order shown in the figure, referring to
Removal Note.
3. Install in the reverse order of removal, referrina to Installation Note.
m-kg, 69-95 in-lb)
1. Lid lock protector 6. High-mount stoplight (Interior mounted)
2. Trunk ooener cable Removal / Installation . . . . . . . . . . . . . . . . . . . . . Section T
3. Rear harness
4. Trunk lid
Adjustment Note . . . . . . . . . . . . . . . . . . . . . . . . . page S-34
5. Balance spring
Removal Note.. . . . . . . . . . . . . . . page S-34
Installation Note . .._. ._._.._.____...r..__ page S-34
Adjustment Note.. . . . . . . . . page S-34 7. Rear package trim
Removal / Installation . . . . . . . . . . . . . . . . . . page S-97
8. Lid hinge assembly
s-33
Page 775 of 1164
FRONT BUMPER S
FRONT BUMPER
COMPONENTS
Removal / Installation
1. Disconnect the negative battery cable.
2. Remove in the order shown in the figure.
3. Install in the reverse order of removal.
16-23 (1.6-2.3, 12-17
6.9-9.6 N.m (70-100 cc-kg,
61-67 in-lb) 16-23 (1.6-2.3, 12-17) /
6.9-9.6 N.m (70-100 cm-kg, 61-67 in-lb)
N.m (m-kg, Mb)
1. Front combination light
Removal / Installation . . . . . . . . . . . . . . . . . . . . . Section
T
2. Radiator grille
Removal I Installation . . . . . . . . . . . . . . . . . . page S-51
3. Headlight and lower grille molding
Removal / Installation . . . . . . . . . . . . . . . . . . . . . Section
T
4. Front bumper assembly
a. Front bumper reinforcement and bracket
b. Energy absorbing foam
c. Front bumper facia
5. License plate holder
6. Front bumper bracket
s-39
Page 776 of 1164
REAR BUMPER
REAR BUMPER
COMPONENTS
Removal / Installation
1. Remove in the order shown in the figure.
2. Install in the reverse order of removal.
16- -23 (1.6-2.3, 12-17)
16-23 (1.6-2.3, 12-17)
1 HATCHBACK
A
1’ : PROTEG&
N.m (m-kg, ft-lb)
13uosx-01
1. Trunk end trim 5. Rear bumper assembly
Removal / Installation . . . . . . . . . .
pa
2. Bumper bracket cover (PROTEG ii es S-97, 98 a. Rear bumper retainer
) b. Rear bumper reinforcement
3. Rear reflector light c. Energy absorbing foam
4. Licence plate light (Hatchback) d. License plate light harness (Hatchback)
e. License plate light holder (Hatchback)
f. Rear bumper facia
6. Rear flap
s-40
Page 787 of 1164
RADIATOR GRILLE, LOWER GRILLE MOLDING S
RADIATOR GRILLE, LOWER GRILLE MOLDING
COMPONENTS
Removal / Installation
1. Remove in the order shown in the figure.
2. Install in the reverse order of removal, referring to Installation Note.
1. Radiator grille 3. Lower grille molding
Installation Note. . . . . . . . . . . . . . . . . . . . .
page S-51 4. Clip
2. Front combination light
Removal I Installation ..,.,,...,..,........ Section T
Installation Note
Radiator grille
1. Insert the clips into the grille, and align them with the instal-
lation holes in the body.
2. Press the grille into the body.
s-51