Page 772 of 1164
S TRUNK LID LOCK AND OPENER
Removal Note
Trunk lid lock cylinder
1. Disconnect the opening rod from the trunk lid lock assembly.
2. Remove the retainer and the trunk lid lock cylinder and
-/
opening rod.
S-36
Page 773 of 1164
FUEL FILLER LID AND OPENER s
FUEL FILLER LID AND OPENER
COMPONENTS
Removal / Installation
1, Remove in the order shown in the figure.
2. Install in the reverse order of removal.
Note
l Remove the rear seat belt retractor for removal of the trunk side trim (PROTEGe).
(Refer to page S-101 .)
Filler lid Filler lid opener, Opener lever, Opener cable
1 . Filler lid 5. Trunk end trim
2.
3.
4. Lift spring (With opener) Removal / Installation . . . . . . . . . . . . . . . . page S- 97
Lock cylinder retainer (Without opener) 6. Trunk side trim (L.H. side)
Filler lid lock (Without opener) Removal I Installation . . . . . . . . . . . . . . . . page S- 97
7. Filler lid opener
8. Scuff plate (L.H. side)
Removal / Installation . . . . . . . . . . . . . . . . page S- 97
9. B-pillar lower trim (L.H. side)
Removal / Installation . . . . . . . . . . . . . . . . page S- 97
10. Rear seat
Removal I Installation .,.............. page S-l 11
11. Opener lever
12. Opener cable
s-37
Page 774 of 1164
S FUEL FILLER LID AND OPENER
-iATCHBACK
Filler lid
1 Filler lid
2. Lift spring (With opener)
3. Lock cylinder retainer (Without opener)
4. Filler lid lock (Without opener) Filler lid opener, Opener lever, Opener cable
5. Trunk end trim
Removal / Installation . . . . . . . . . . . . . . . . page S- 98
6. Trunk side cover
Removal I Installation . . . . . . . . . . . . . . . . page S- 98
7. Trunk side trim
Removal I Installation . . . . . . . . . . . . . . . . page S- 98
8. Filler lid opener
9. Scuff plate
Removal I Installation . . . . . . . . . . . . . . . . page S- 98
10. Rear seat
Removal I Installation . . . . . . . . . . . . . . . . page S-l 12
11. Quarter trim
Removal / Installation . . . . . . . . . . . . . . . . page S- 98
12. Opener lever
13. Opener cable
S-38
Page 776 of 1164
REAR BUMPER
REAR BUMPER
COMPONENTS
Removal / Installation
1. Remove in the order shown in the figure.
2. Install in the reverse order of removal.
16- -23 (1.6-2.3, 12-17)
16-23 (1.6-2.3, 12-17)
1 HATCHBACK
A
1’ : PROTEG&
N.m (m-kg, ft-lb)
13uosx-01
1. Trunk end trim 5. Rear bumper assembly
Removal / Installation . . . . . . . . . .
pa
2. Bumper bracket cover (PROTEG ii es S-97, 98 a. Rear bumper retainer
) b. Rear bumper reinforcement
3. Rear reflector light c. Energy absorbing foam
4. Licence plate light (Hatchback) d. License plate light harness (Hatchback)
e. License plate light holder (Hatchback)
f. Rear bumper facia
6. Rear flap
s-40
Page 815 of 1164

REAR WIPER AND WASHER S
Wiper
Washer
1. Rear hatch lower trim
7. Trunk end trim
Removal / Installation . . . . . . . . . . . . . . . . page S-
98 Removal / Installation . . . . . . . . . . . . . . . . page
S- 98
2. Wiper arm cover 8. Trunk side cover
3. Rear wiper arm and blade Removal / Installation . . . . . . . . . . . . . . . . page S-
98
Adjustment
Note . . . . . . . . . . . . . . . . . . . . . . . page S- 79 9. Trunk side trim
4. Seal cap Removal / Installation . . . . . . . . . . . . . . . . page S-
98
5. Outer bushing 10. Rear header trim
6. Rear wiper motor Removal / Installation . . . . . . . . . . . . . . . . page S- 98
Inspection .,, ., . . . . . . . . . . . . . . . . . . . . . . . . . . . .
page S- 77 11. Rear seat belt upper anchor
Removal / Installation . . . . . . . . . . . . . . . . page S-l 01
12. C-pillar trim
Removal / Installation . . . . . . . . . . . . . . . . page S-
98
13. Washer tank assembly
a. Washer tank
b. Washer motor
Inspection . . . . . . . . . . . . . . . . . . . . . . . . . . . . . . . . .
page S- 77
14. Washer nozzle
Adjustment Note . . . . . . . . . . . . . . . . . . . . . . . page S-
79
15. Washer pipe
23UOSX-032
REAR WINDOW MOLDING
mm (in)
03uosx-14
REAR WINDQW MOLDING I
mm (in
03uosx-14
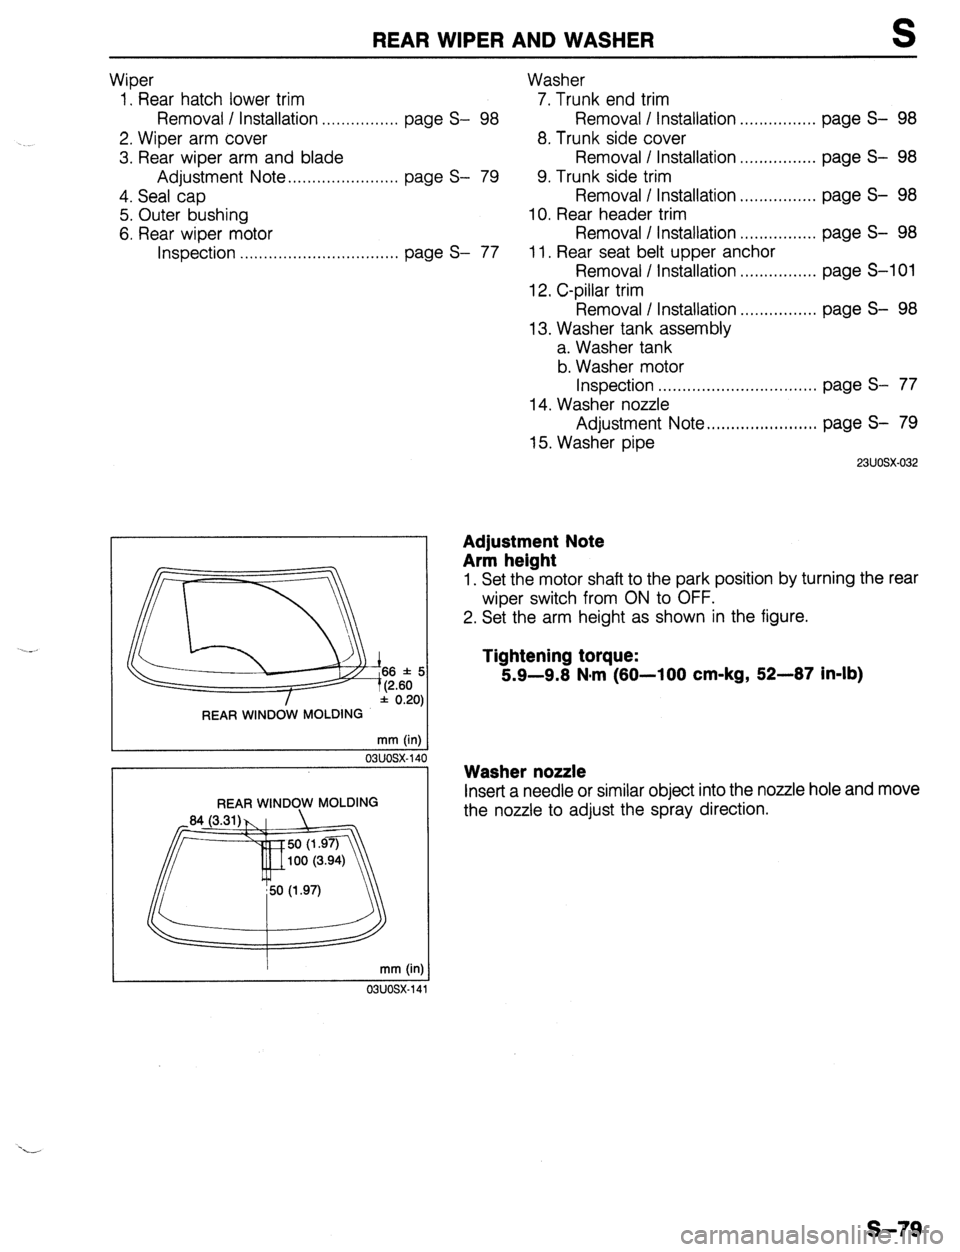
Adjustment Note
Arm height
1. Set the motor shaft to the park position by turning the rear
wiper switch from ON to OFF.
2. Set the arm height as shown in the figure.
Tightening torque:
5.9-9.8 N*m (80-100 cm-kg, 52-87 in-lb)
Washer nozzle
Inset-t a needle or similar object into the nozzle hole and move
the nozzle to adjust the spray direction.
s-79
Page 833 of 1164

TRIM
TRIM
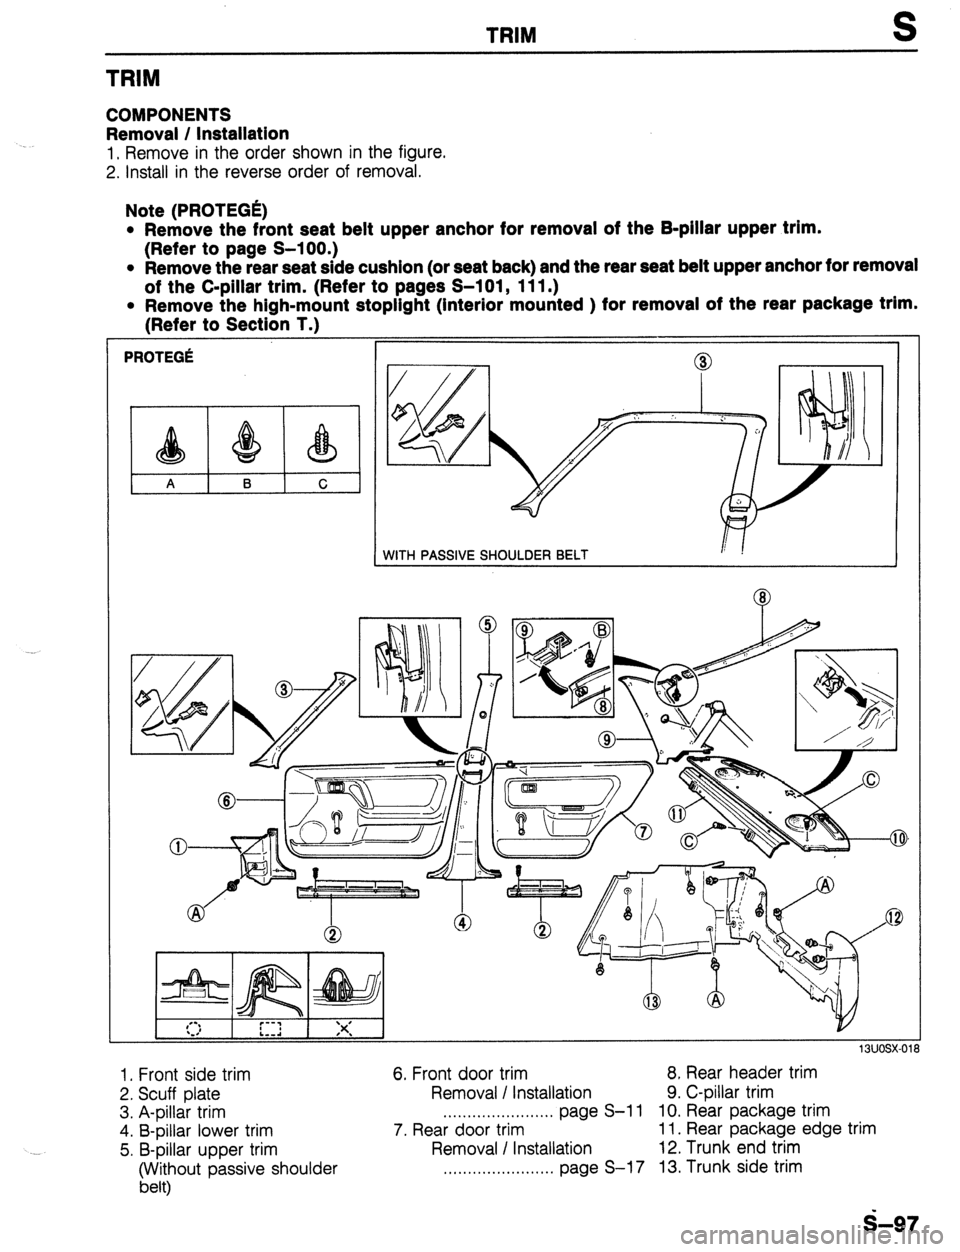
COMPONENTS
Removal / Installation
1, Remove in the order shown in the figure.
2. install in the reverse order of removal.
Note (PROTEGE)
l Remove the front seat belt upper anchor for removal of the B-pillar upper trim.
(Refer to page S-100.)
l Remove the rear seat side cushion (or seat back) and the rear seat belt upper anchor for removal
of the C-pillar trim. (Refer to pages S-l 01, 111.)
l Remove the high-mount stopllght (Interior mounted ) for removal of the rear package trlm.
(Refer to Section T.)
PROTEGe
WITH PASSIVE SHOULDER BELT
Q
8
I I
, -- ,, , ,--.
*.I r---i ‘Y’ L--d I ST
I
1RI insx-ni
1. Front side trim
2. Scuff plate
3. A-pillar trim
4. B-pillar lower trim
5. B-pillar upper trim
(Without passive shoulder
belt) 6. Front door trim 8. Rear header trim
Removal I Installation 9. C-pillar trim
. . . . . . . . . . . . . . . . . . . . . . . page S-l 1 10. Rear package trim
7. Rear door trim 11. Rear package edge trim
Removal / Installation 12. Trunk end trim
,.,.................... page S-l 7 13. Trunk side trim
s-97
Page 834 of 1164
S TRIM
Note (Hatchback)
l Remove the front seat belt upper anchor for removal of the B-pillar upper trim.
(Refer to page S-100.)
l Remove the rear seat belt upper anchor and the quarter window lock for removal of the C-
pillar trim. (Refer to pages S-62, 101.)
l Remove the rear seat cushion for removal of the quarter trim. (Refer to page S-112.)
* Disconnect the negative battery cable for removal of the rear hatch lower trim. (With luggage
compartment lamp.)
iATCHBACK
'. .' LA I i-i I / '.
1. Front side trim 7. Quarter trim
2. Scuff plate 8. B-pillar upper trim
3. Front door trim (Without passive shoulder belt)
Removal I Installation . . . . . . . . . . page S-l 0 9. A-pillar trim
4. Trunk end trim 10. Rear header trim
5. Trunk side cover 11. C-pillar trim
6. Trunk side trim 12. Rear hatch lower trim
S-98
Page 837 of 1164
SEAT BELT
38-78 (3.9-8.0, 28-58)
IEAR
PROTEGt
38-78 (3.9-8.0, 2848)
HATCHBACK
38-78 (3.9-8.0, 28-58)
N.m (m-kg, fl-lb)
13uosx-0:
PROTEGC Hatchback
1. Rear seat cushion
Removal I Installation . . . . . . . . . . . . . . . . page S-l 11
2. High-mount stoplight (Interior mounted)
Removal I Installation ..,.................. Section T
3. Rear package trim
Removal / Installation . . . . . . . . . . . . . . . . page S- 97
4. Rear seat belt
Inspection . . . . . . . . . . . . . . . . . . . . . . . . . . . . . . . . . page S-102 5. Rear seat cushion
Removal / Installation . . . . . . . . . . . . . . . . page S-l 12
6. Trunk end trim
Removal / Installation . . . . . . . . . . . . . . . . page S- 98
7. Trunk side cover
Removal / Installation . . . . . . . . . . . . . . . . page S- 98
8. Trunk side trim
Removal I Installation . . . . . . . . . . . . . . . . page S- 98
9. Rear seat belt inspection . . . . . . . . . . . . . . . . . . . . . . . . . . . . . . . . . page S-l 02
s-1 01