Page 830 of 1378

electrical system overload.
BATTERY WARNING
WARNING: When battery is disconnected, vehicles equipped with
computers may lose memory data. When battery power is
restored, driveability problems may exist on some
vehicles. These vehicles may require a relearn procedure.
See the COMPUTER RELEARN PROCEDURES article in GENERAL
INFORMATION section.
ELECTROSTATIC DISCHARGE SENSITIVE (ESD) PARTS
WARNING: Many solid state electrical components can be damaged by
static electricity (ESD). Some will display a warning label,
but many will not. Discharge personal static electricity by
touching a metal ground point on the vehicle prior to
servicing any ESD sensitive component.
HALOGEN BULBS
Halogen bulbs contain pressurized gas which may explode if
overheated. DO NOT touch glass portion of bulb with bare hands. Eye
protection should be worn when handling or working around halogen
bulbs.
RADIATOR CAP
CAUTION: Always disconnect the fan motor when working near the
radiator fan. The fan is temperature controlled and could
start at any time even when the ignition key is in the OFF
position. DO NOT loosen or remove radiator cap when cooling
system is hot.
Page 845 of 1378

IG NIT IO N S W IT C H & L O CK C YLIN DER
�
1988 J e ep C hero ke e
1988 Ignition Switch & Lock Cylinders
JEEP
DESCRIPTION
The ignition switch and lock cylinder is typically mounted on
the steering column and actuated by an ignition key.
SERVICING
To gain access to ignition components on Jeep vehicles, the
steering column must be removed or lowered and the turn signal switch
must be removed.
CAUTION: The lock plate is held by high spring pressure. DO NOT
remove snap ring without using a compressor tool. If the
steering shaft has standard threads, use Compressor Tool
(J-23653); if the shaft has metric threads use Metric
Forcing Screw (J-23653-4).
CAUTION: Special care must be taken to avoid bumping, jolting or
hammering on the steering shaft and gearshift tube.
REMOVAL & INSTALLATION
LOCK CYLINDER
Removal
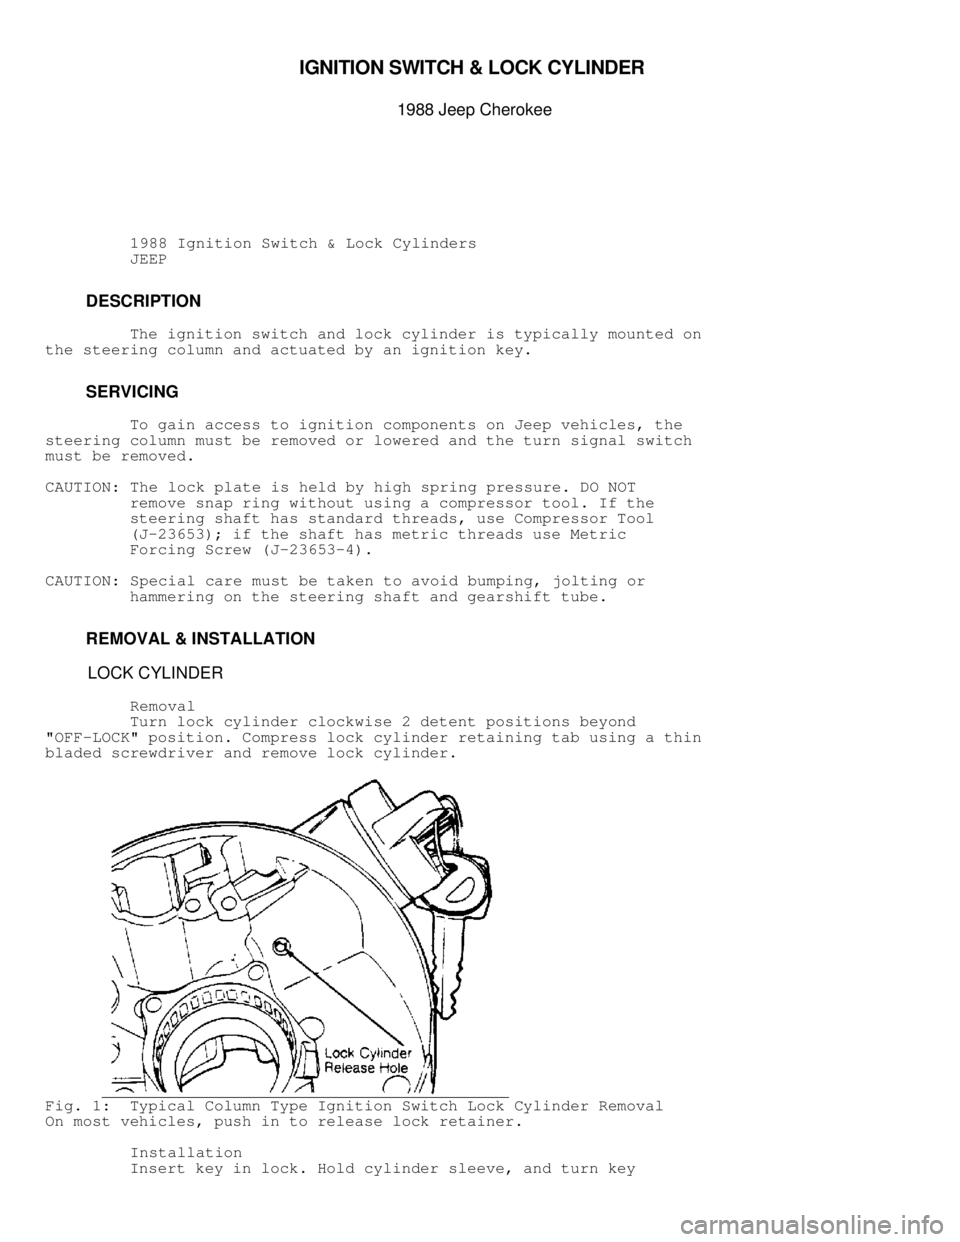
Turn lock cylinder clockwise 2 detent positions beyond
"OFF-LOCK" position. Compress lock cylinder retaining tab using a thin
bladed screwdriver and remove lock cylinder.
Fig. 1: Typical Column Type Ignition Switch Lock Cylinder Removal
On most vehicles, push in to release lock retainer.
Installation
Insert key in lock. Hold cylinder sleeve, and turn key
Page 846 of 1378
clockwise until key stops. Insert cylinder lock into bore with
cylinder tab aligned with keyway in housing. Push cylinder in until it
bottoms. Rotate cylinder counterclockwise to engage lock sector, and
push in until cylinder tab engages in housing groove.
IGNITION SWITCH
Removal
Lower column and remove switch mounting screws. Disconnect
harness connector. Remove switch.
Installation
Move switch slider to "ACC" position. Move switch slider back
2 clicks to "OFF-UNLOCK" position. Insert remote rod in switch slider,
and position switch on column. Do not move slider. Install and tighten
screws.
Fig. 2: Rod-Actuated Ignition Switch
Page 847 of 1378

\003
IG NIT IO N S YSTE M - 2 .5 L W /R EN IX E LE C TR O NIC IG NIT IO N
�
1988 J e ep C hero ke e
Distributors & Ignition Systems
JEEP RENIX ELECTRONIC IGNITION
2.5L TBI: Cherokee, Comanche, Wagoneer, Wrangler
DESCRIPTION
The Renix electronic ignition system consists of a solid-
state Ignition Control Module (ICM), a distributor, a Top Dead Center
(TDC) sensor, and an Electronic Control Unit (ECU).
OPERATION
IGNITION CONTROL MODULE (ICM)
The ignition control module is located in engine compartment,
just left of battery. The ICM consists of a solid-state ignition
circuit and an integrated ignition coil that can be removed and
serviced separately.
Electronic signals from the electronic control unit to the
ICM determine the amount of ignition timing or retard needed to meet
various engine requirements. The electronic control unit provides an
input signal to the ICM. The ICM has only 2 outputs: a tach signal to
the tachometer and diagnostic connector, and a high voltage signal
from the coil to the distributor cap.
TDC SENSOR
The TDC sensor senses TDC and BDC crankshaft positions as
well as engine RPM. Sensor is located on left rear side of engine and
is not adjustable. Sensor is secured by special shouldered bolts to
flywheel/drive plate housing.
TESTING
1) Disconnect ignition coil wire from center tower of
distributor cap. Using insulated pliers, hold coil wire about 1/2" (13
mm) away from engine block. Crank engine and check for spark between
wire and engine block.
2) If spark occurs, reconnect coil wire to distributor cap.
Remove spark plug wire from one spark plug. Using insulated pliers,
hold wire about 1/2" (13 mm) away from engine block.
3) Crank engine and check for spark between wire and engine
block. If spark occurs, check fuel system for problems. If no spark
occurs, check for a defective rotor, distributor cap, or spark plug
wires. Replace parts as necessary.
4) If rotor, cap and wires are okay, check for loose or
corroded connections at coil terminals. If necessary, clean terminals
and wires. Ensure wires are properly seated on coil terminals and not
wedged between coil body and terminal. If okay, go to next step.
5) Check for loose connectors at ICM or ECU. Verify that wire
connectors are firmly plugged into ICM and ECU. Also check for loose
ICM or ECU ground wire connections at oil dipstick bracket. Clean and
tighten if necessary.
6) Load test battery to ensure battery is fully charged.
Replace battery if necessary. If battery is okay, check voltage
between terminals "A" and "B" of ICM connector while cranking engine.
See Fig. 1 .
Page 848 of 1378
7) Minimum voltage reading should be 9.5 volts. If voltage is
okay, go to next step. If voltage is low, check continuity of ICM and
ECU ground wires. Repair or replace as necessary.
8) Using an ohmmeter, check ignition coil resistance.
Resistance on primary winding should be .4-.8 ohms. Secondary
resistance should be 2500-4000 ohms. If correct, go to next step. If
not, replace ignition coil.
9) Check ECU and ICM with Tester (MS 1700). Replace ICM or
ECU if either fails MS 1700 test sequence.
Fig. 1: 2.5L TBI ICM Connector Terminals
Courtesy of American Motors/Jeep Corp.
OVERHAUL
NOTE: The 2.5L TBI distributor contains no electrical components
other than the rotor and distributor cap. If any other
distributor part is defective, the entire distributor
assembly must be replaced.
Page 849 of 1378

\003
IG NIT IO N S YSTE M - 4 .0 L W /S O LID S TA TE IG NIT IO N ( S SI)
�1 988 J e ep C hero ke e
DISTRIBUTORS & IGNITION SYSTEMS
Jeep Solid State Ignition
4.0L 6-Cylinder
DESCRIPTION
IGNITION SYSTEM GENERAL DESCRIPTION
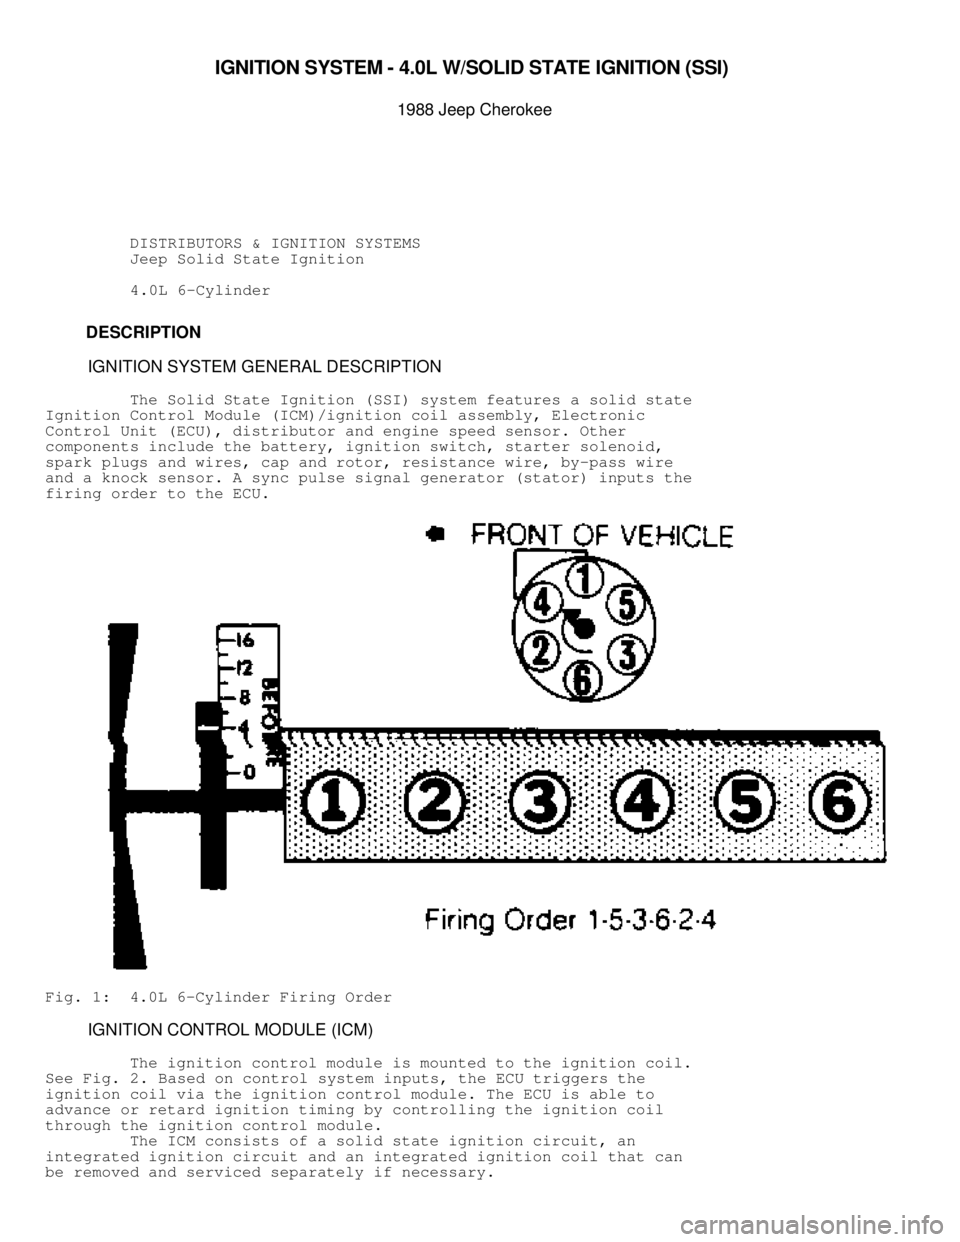
The Solid State Ignition (SSI) system features a solid state
Ignition Control Module (ICM)/ignition coil assembly, Electronic
Control Unit (ECU), distributor and engine speed sensor. Other
components include the battery, ignition switch, starter solenoid,
spark plugs and wires, cap and rotor, resistance wire, by-pass wire
and a knock sensor. A sync pulse signal generator (stator) inputs the
firing order to the ECU.
Fig. 1: 4.0L 6-Cylinder Firing Order
IGNITION CONTROL MODULE (ICM)
The ignition control module is mounted to the ignition coil.
See Fig. 2 . Based on control system inputs, the ECU triggers the
ignition coil via the ignition control module. The ECU is able to
advance or retard ignition timing by controlling the ignition coil
through the ignition control module.
The ICM consists of a solid state ignition circuit, an
integrated ignition circuit and an integrated ignition coil that can
be removed and serviced separately if necessary.
Page 850 of 1378
The ECU provides an input signal to the ICM. The ICM has only
two outputs:
* Tach signal to the tachometer and diagnostic connector
* High voltage from the coil to the distributor cap
Fig. 2: View of Ignition Control Module/Ignition Coil Assembly
IGNITION CONTROL MODULE (ICM) ELECTRICAL FEED CONNECTIONS
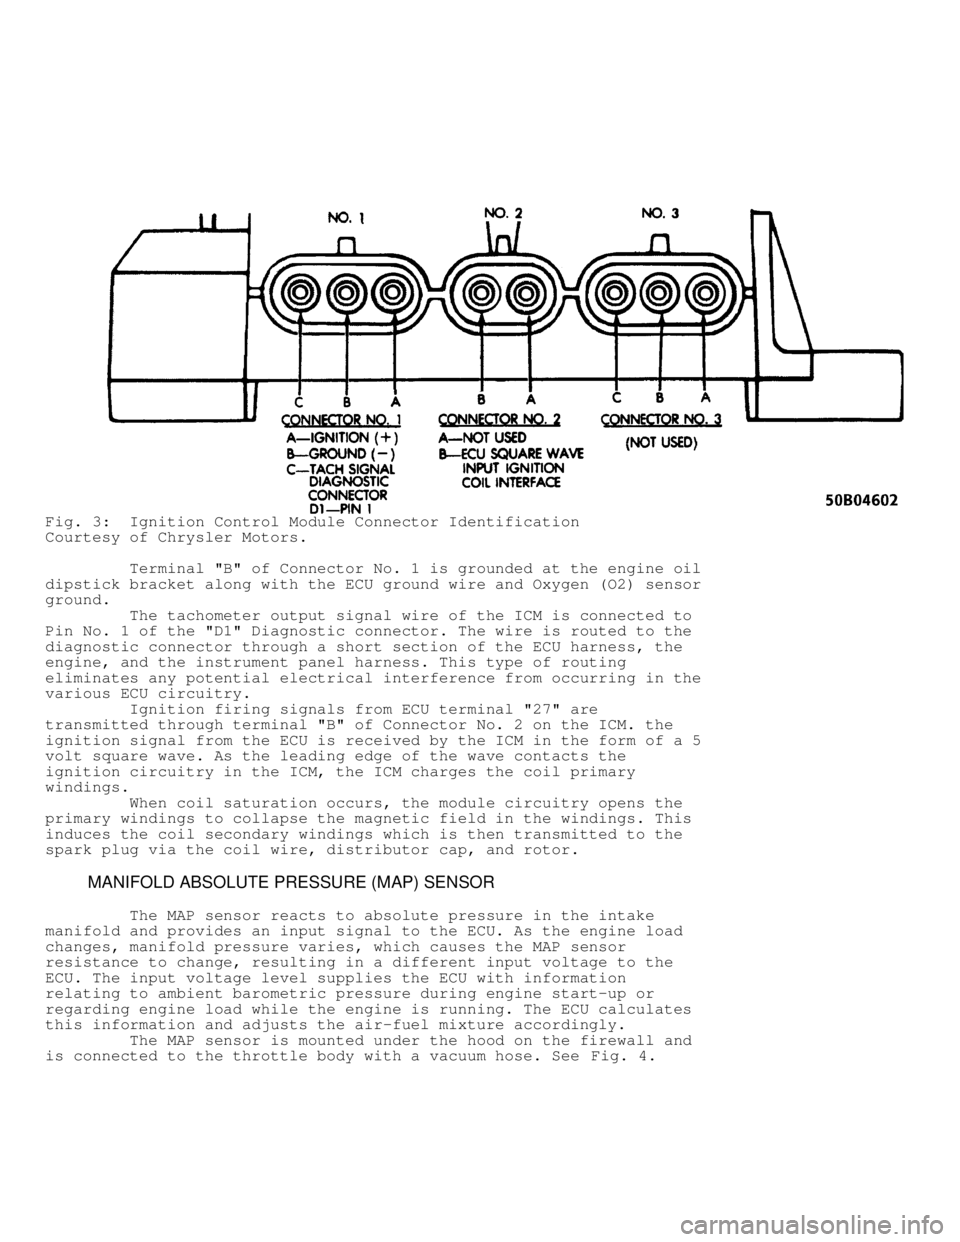
Electrical feed to the ICM is through terminal "A" of
Connector No. 1 on the module. See Fig. 3.
NOTE: Electrical supply only occurs with the ignition switch in
the START and RUN position.
Page 851 of 1378

Fig. 3: Ignition Control Module Connector Identification
Courtesy of Chrysler Motors.
Terminal "B" of Connector No. 1 is grounded at the engine oil
dipstick bracket along with the ECU ground wire and Oxygen (O2) sensor\
ground.
The tachometer output signal wire of the ICM is connected to
Pin No. 1 of the "D1" Diagnostic connector. The wire is routed to the
diagnostic connector through a short section of the ECU harness, the
engine, and the instrument panel harness. This type of routing
eliminates any potential electrical interference from occurring in the
various ECU circuitry.
Ignition firing signals from ECU terminal "27" are
transmitted through terminal "B" of Connector No. 2 on the ICM. the
ignition signal from the ECU is received by the ICM in the form of a 5
volt square wave. As the leading edge of the wave contacts the
ignition circuitry in the ICM, the ICM charges the coil primary
windings.
When coil saturation occurs, the module circuitry opens the
primary windings to collapse the magnetic field in the windings. This
induces the coil secondary windings which is then transmitted to the
spark plug via the coil wire, distributor cap, and rotor.
MANIFOLD ABSOLUTE PRESSURE (MAP) SENSOR
The MAP sensor reacts to absolute pressure in the intake
manifold and provides an input signal to the ECU. As the engine load
changes, manifold pressure varies, which causes the MAP sensor
resistance to change, resulting in a different input voltage to the
ECU. The input voltage level supplies the ECU with information
relating to ambient barometric pressure during engine start-up or
regarding engine load while the engine is running. The ECU calculates
this information and adjusts the air-fuel mixture accordingly.
The MAP sensor is mounted under the hood on the firewall and
is connected to the throttle body with a vacuum hose. See Fig. 4.