1987 PORSCHE 944 hood release
[x] Cancel search: hood releasePage 12 of 66

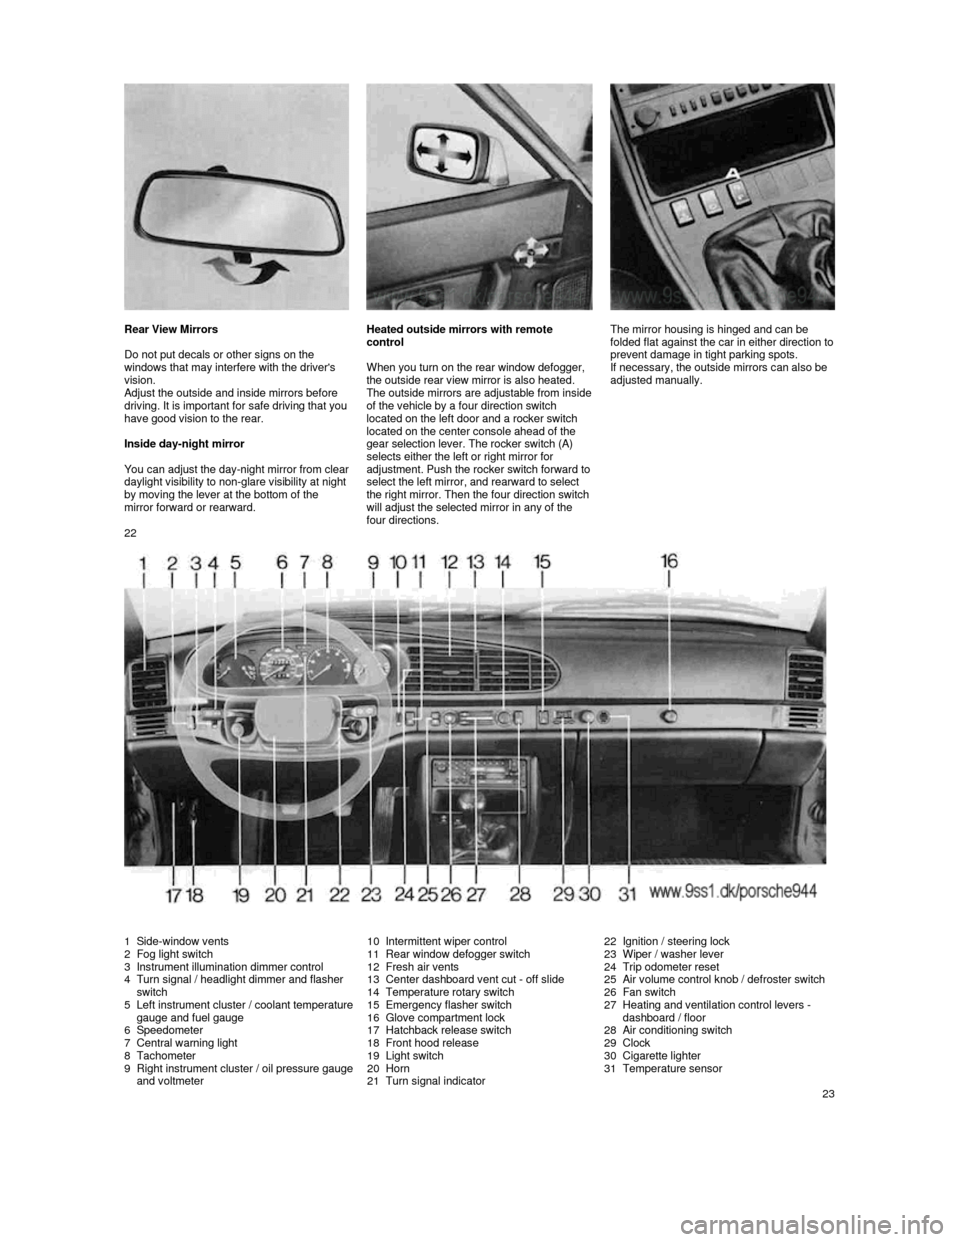
Rear View Mirrors
Do not put decals or other signs on the
windows that may interfere with the driver's
vision.
Adjust the outside and inside mirrors before driving. It is important for safe driving that you have good vision to the rear.
Inside day-night mirror
You can adjust the day-
night mirror from clear daylight visibility to non-glare visibility at night by moving the lever at the bottom of the
mirror forward or rearward.
Heated outside mirrors with remote
control
When you turn on the rear window defogger,
the outside rear view mirror is also heated.
The outside mirrors are ad
justable from inside of the vehicle by a four direction switch
located on the left door and a rocker switch
located on the center console ahead of the
gear selection lever. The rocker switch (A)
selects either the left or right mirror for
adjustment. Push
the rocker switch forward to select the left mirror, and rearward to select
the right mirror. Then the four direction switch
will adjust the selected mirror in any of the four directions.
The mirror housing is hinged and can be
folded flat against the c
ar in either direction to prevent damage in tight parking spots.
If necessary, the outside mirrors can also be
adjusted manually.
22
1 Side-window vents 2 Fog light switch
3 Instrument illumination dimmer control
4 Turn signal / headlight dimmer and flasher
switch
5
Left instrument cluster / coolant temperature gauge and fuel gauge
6 Speedometer
7 Central warning light
8 Tachometer
9 Right instrument cluster / oil pressure gauge and voltmeter
10 Intermittent wiper control
11 Rear window defogger switch
12 Fresh air vents
13 Center dashboard vent cut -
off slide14 Temperature rotary switch
15 Emergency flasher switch
16 Glove compartment lock
17 Hatchback release switch
18 Front hood release
19 Light switch
20 Horn
21 Turn signal indicator
22 Ignition / steering lock
23 Wiper / washer lever
24 Trip odometer reset
25
Air volume control knob / defroster switch
26 Fan switch
27 Heating and ventilation control levers -
dashboard / floor
28
Air conditioning switch
29 Clock
30 Cigarette lighter
31 Temperature sensor
23
Page 28 of 66

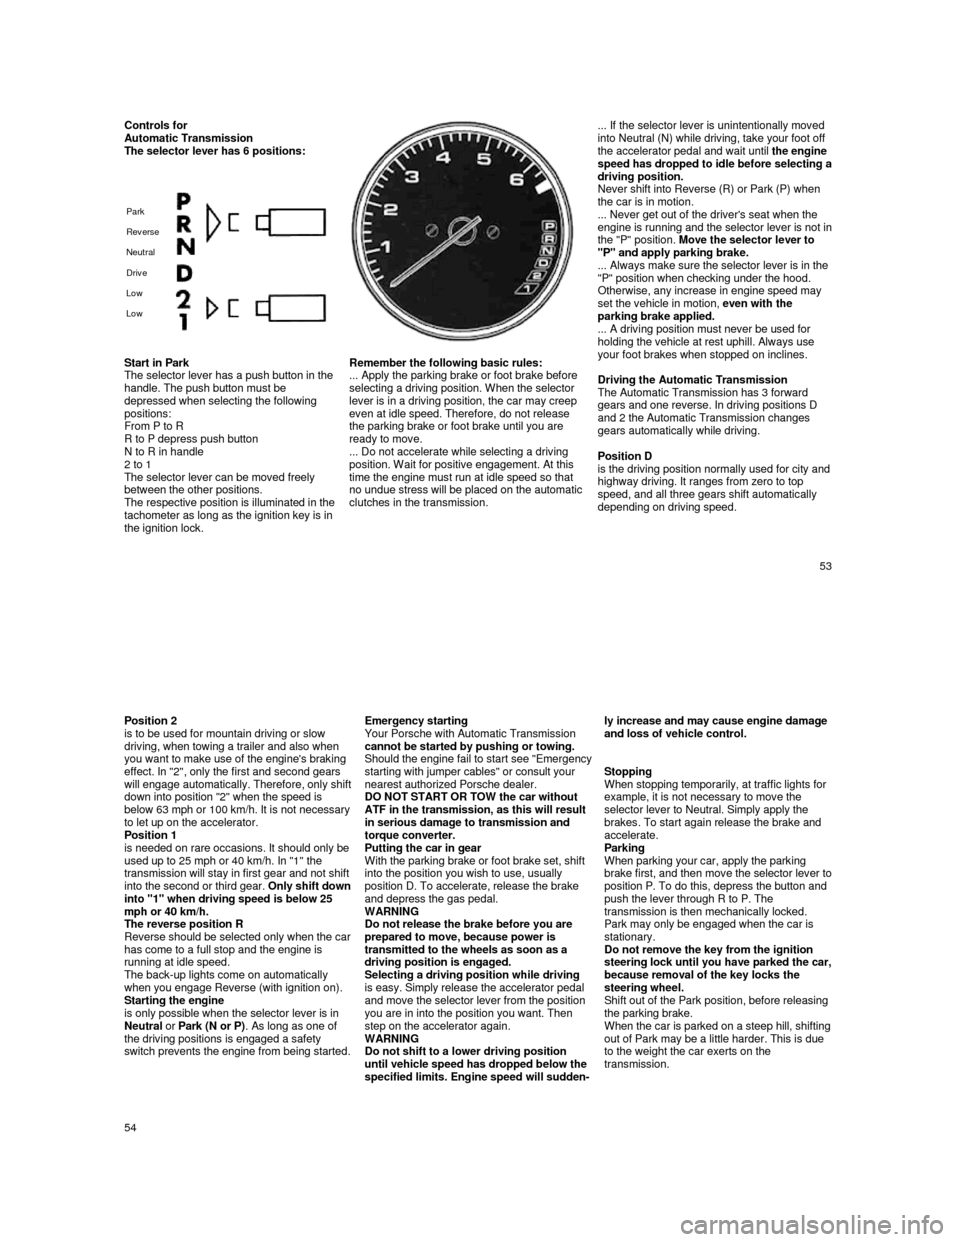
Controls for Automatic Transmission
The selector lever has 6 positions:
Park
Rev erse
Neutral
Driv e
Low
Low
... If the selector lever is unintentionally mo ved
into Neutral (N) while driving, take your foot off
the accelerator pedal and wait until the engine
speed has dropped to idle before selecting a driving position.
Never shift into Reverse (R) or Park (P) when
the car is in motion.
... Never get out of the driver's seat when the
engine is running and the selector lever is not in the "P" position. Move the selector lever to
"P" and apply parking brake.
... Always make sure the selector lever is in the
"P" position when checking under the hood.
Otherwise, any increase in engine speed may
set the vehicle in motion, even with the
parking brake applied.
... A driving position must never be used for
holding the vehicle at rest uphill. Always use
your foot brakes when stopped on inclines.
Driving the Automatic Transmission
The Automatic Transmission has 3 forward
gears and one reverse. In driving positions D
and 2 the Automatic Transmission changes
gears automatically while driving.
Position D
is the driving position normally used for city and highway driving. It ranges from zero to top
speed, and all three gears shift automatically
depending on driving speed.
Start in Park
The selector lever has a push button in the
handle. The push button must be
depressed when selecting the following
positions:
From P to R
R to P depress push button
N to R in handle
2 to 1
The selector lever can be moved freely
between the other positions.
The respective position is illuminated in the tachometer as long as the ignition key is in
the ignition lock.
Remember the following basic rules:
... Apply the parking brake or foot brake before
selecting a driving position. When the selector
lever is in a driving position, the car may creep
even at idle speed. Therefore, do not release
the parking brake or foot brake until you are
ready to move.
... Do not accelerate while selecting a driving
position. Wait for positive engagement. At this
time the engine must run at idle speed so that
no undue stress will be placed on the automatic
clutches in the transmission.
53
Position 2
is to be used for mountain driving or slow
driving, when towing a trailer and also when
you want to make use of the engine's braking
effect. In "2", only the first and second gears
will engage automatically. Therefore, only shift down into position "2" when the speed is below 63 mph or 100 km/h. It is not necessary to let up on the accelerator.
Position 1
is needed on rare occasions. It should only be
used up to 25 mph or 40 km/h. In "1" the
transmission will stay in first gear and not shift
into the second or third gear.
Only shift down into "1" when driving speed is below 25
mph or 40 km/h.
The reverse position R
Reverse should be selected only when the car has come to a full stop and the engine is
running at idle speed.
The back-up lights come on automatically
when you engage Reverse (with ignition on). Starting the engine
is only possible when the selector lever is in
Neutral or Park (N or P) . As long as one of
the driving positions is engaged a safety
switch prevents the engine from being started.
Emergency starting
Your Porsche with Automatic Transmission
cannot be started by pushing or towing.
Should the engine fail to start see "Emergency starting with jumper cables" or consult your
nearest authorized Porsche dealer.
DO NOT START OR TOW the car without
ATF in the transmission, as this will result
in serious damage to transmission and
torque converter.
Putting the car in gear
With the parking brake or foot brake set, shift
into the position you wish to use, usually
position D. To accelerate, release the brake
and depress the gas pedal.
WARNING
Do not release the brake before you are
prepared to move, because power is
transmitted to the wheels as soon as a
driving position is engaged.
Selecting a driving position while driving
is easy. Simply release the accelerator pedal
and move the selector lever from the position
you are in into the position you want. Then
step on the accelerator again.
WARNING
Do not shift to a lower driving position
until vehicle speed has dropped below the
specified limits. Engine speed will sudden-
ly increase and may cause engine damage and loss of vehicle control.
Stopping
When stopping temporarily, at traffic lights for
example, it is not necessary to move the
selector lever to Neutral. Simply apply the
brakes. To start again release the brake and
accelerate.
Parking
When parking your car, apply the parking
brake first, and then move the selector lever to position P. To do this, depress the button and
push the lever through R to P. The
transmission is then mechanically locked.
Park may only be engaged when the car is
stationary.
Do not remove the key from the ignition
steering lock until you have parked the car, because removal of the key locks the
steering wheel.
Shift out of the Park position, before releasing
the parking brake.
When the car is parked on a steep hill, shifting
out of Park may be a little harder. This is due
to the weight the car exerts on the
transmission.
54
Page 30 of 66

Luggage Compartment
Luggage and other belongings should be
protected from the sun and "inquisitive eyes"
by pulling the rolled-up luggage cover from
behind the rear seat back and hooking it into
the eyelets on the rear cross wall. When
unhooked, the cover rolls itself up
automatically.
To prevent luggage and other objects from
sliding around while the car is in motion, you
can secure them with spider straps available
through your dealer or other supply firms. The
eyelets for this purpose can be found behind
the rear seat back and on the luggage
compartment floor. Luggage space
To provide for additional luggage space, press the knob on the left or right side to release the rear seat back. Then tilt forward.
Luggage compartment light
The light is located on the left side of the
luggage compartment. The light can be
switched on or off, regardless of ignition or
vehicle light switch positions.
Roofracks
The installation of commercially available
roofracks is not compatible with the roof
design of your Porsche.
When installing the Genuine Porsche Roof-
rack available up till now, the maximum
permissible weight load of 75 Ibs or 35 kg
must not be exceeded.
The "New Genuine Porsche Roofload
Transport System" provides for maximum
permissible weight loads of up to 165 Ibs or
75kg.
Your Porsche dealer will be glad to advise you about which type of roofrack can best serve
your individual needs and load carrying
requirements.
WARNING
Make sure that the load is carefully
mounted. Secure it additionally by locking
the roof transport system.
57
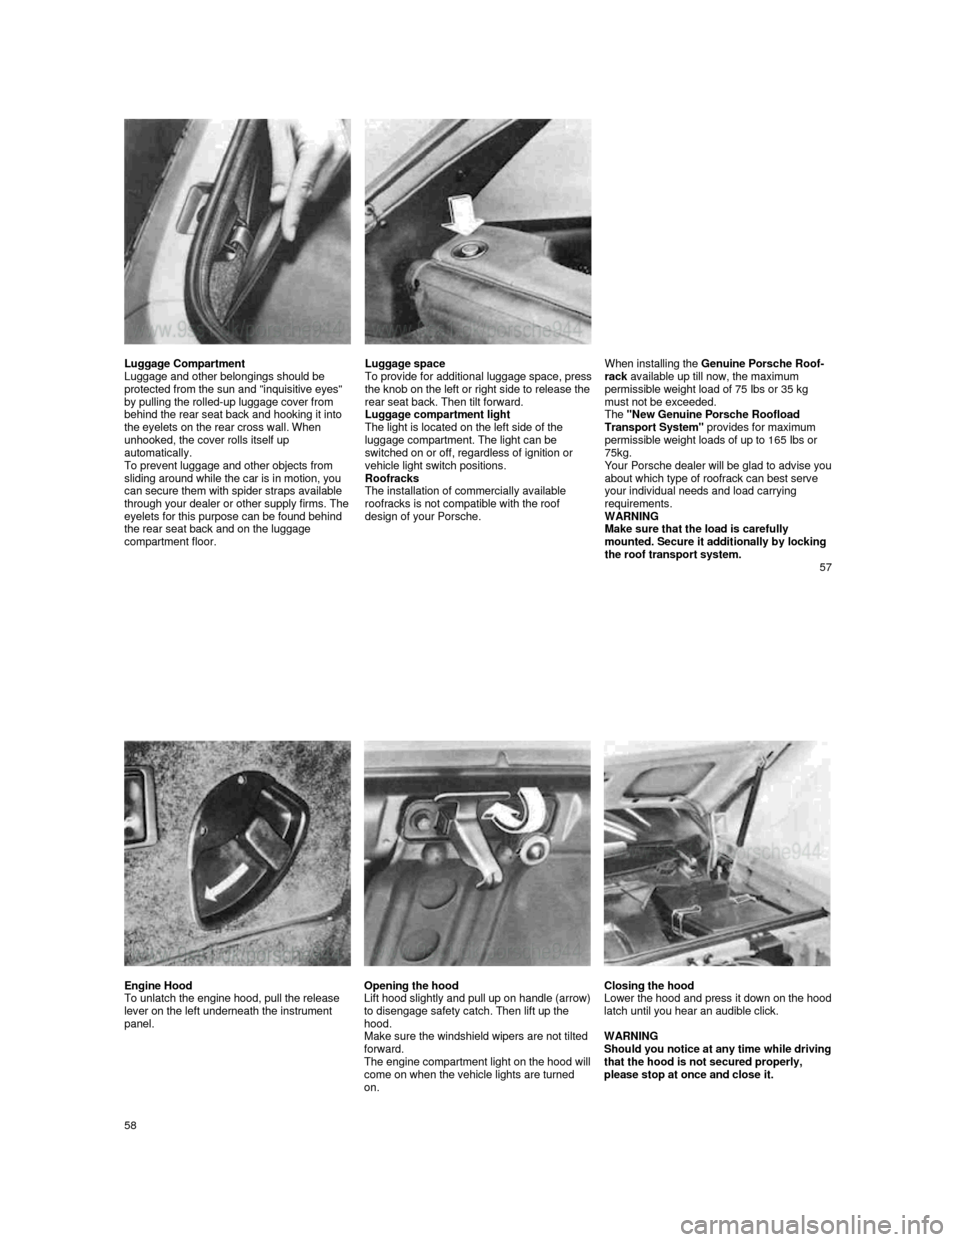
Engine Hood
To unlatch the engine hood, pull the release
lever on the left underneath the instrument
panel. Opening the hood
Lift hood slightly and pull up on handle (arrow) to disengage safety catch. Then lift up the
hood.
Make sure the windshield wipers are not tilted
forward.
The engine compartment light on the hood will come on when the vehicle lights are turned
on.
Closing the hood
Lower the hood and press it down on the hood latch until you hear an audible click.
WARNING
Should you notice at any time while driving that the hood is not secured properly,
please stop at once and close it.
58
Page 65 of 66

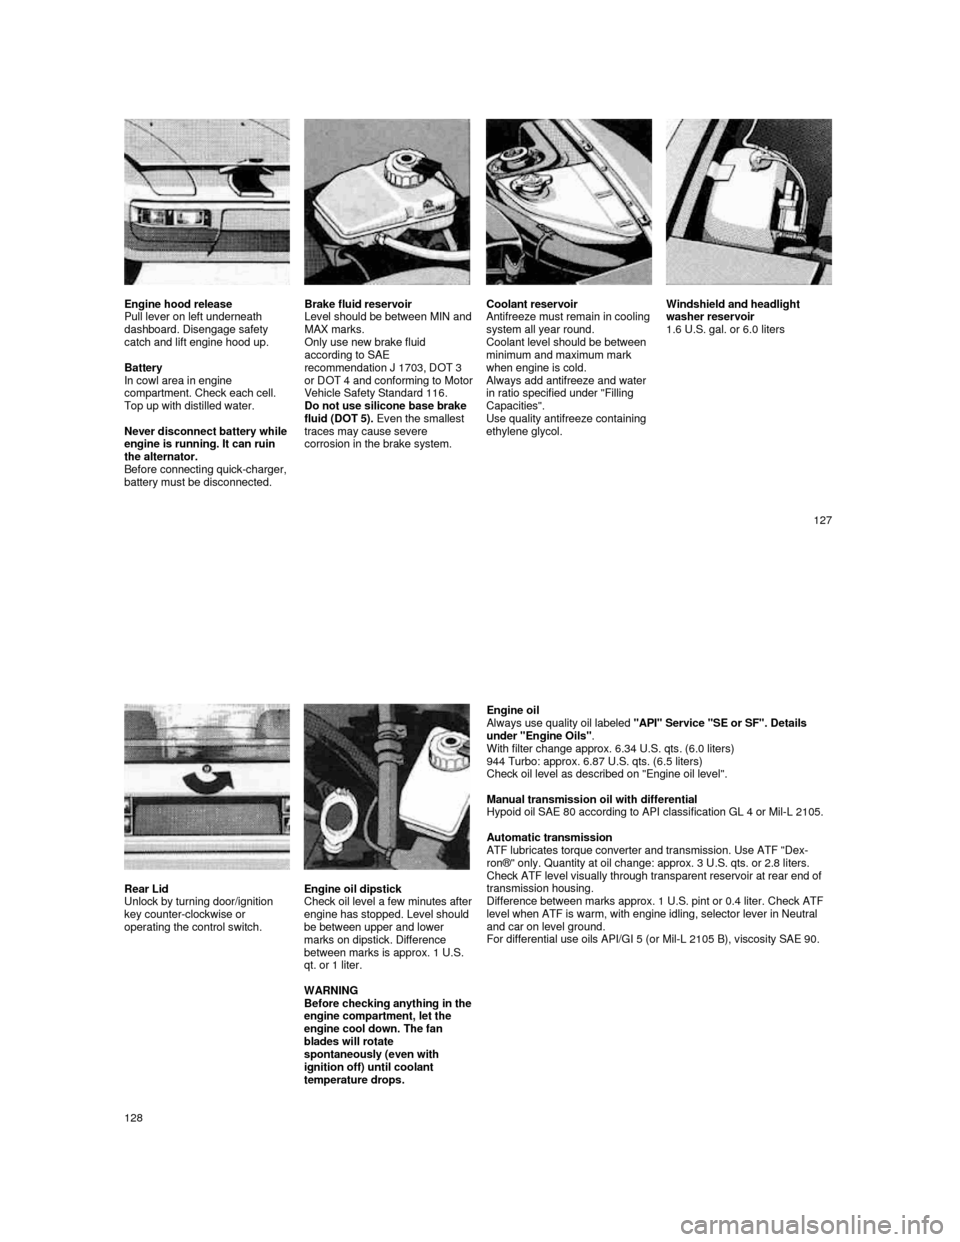
Engine hood release
Pull lever on left underneath
dashboard. Disengage safety
catch and lift engine hood up.
Battery
In cowl area in engine
compartment. Check each cell.
Top up with distilled water.
Never disconnect battery while
engine is running. It can ruin
the alternator.
Before connecting quick-charger,
battery must be disconnected. Brake fluid reservoir
Level should be between MIN and MAX marks.
Only use new brake fluid
according to SAE
recommendation J 1703, DOT 3
or DOT 4 and conforming to Motor Vehicle Safety Standard 116.
Do not use silicone base brake
fluid (DOT 5). Even the smallest
traces may cause severe
corrosion in the brake system.
Coolant reservoir
Antifreeze must remain in cooling
system all year round.
Coolant level should be between
minimum and maximum mark
when engine is cold. Always add antifreeze and water in ratio specified under "Filling
Capacities".
Use quality antifreeze containing
ethylene glycol.
Windshield and headlight
washer reservoir
1.6 U.S. gal. or 6.0 liters
127
Rear Lid
Unlock by turning door/ignition
key counter-clockwise or
operating the control switch.
Engine oil dipstick
Check oil level a few minutes after engine has stopped. Level should
be between upper and lower
marks on dipstick. Difference
between marks is approx. 1 U.S.
qt. or 1 liter.
WARNING
Before checking anything in
the engine compartment, let the
engine cool down. The fan
blades will rotate
spontaneously (even with
ignition off) until coolant
temperature drops.
Engine oil Always use quality oil labeled "API" Service "SE or SF". Details
under "Engine Oils" .
With filter change approx. 6.34 U.S. qts. (6.0 lite rs)
944 Turbo: approx. 6.87 U.S. qts. (6.5 liters)
Check oil level as described on "Engine oil level".
Manual transmission oil with differential
Hypoid oil SAE 80 according to API classification G L 4 or Mil-L 2105.
Automatic transmission
ATF lubricates torque converter and transmission. U se ATF "Dex-
ron®" only. Quantity at oil change: approx. 3 U.S. qts. or 2.8 liters.
Check ATF level visually through transparent reserv oir at rear end of
transmission housing.
Difference between marks approx. 1 U.S. pint or 0.4 liter. Check ATF
level when ATF is warm, with engine idling, selecto r lever in Neutral
and car on level ground.
For differential use oils API/GI 5 (or Mil-L 2105 B ), viscosity SAE 90.
128