1987 PORSCHE 944 display
[x] Cancel search: displayPage 19 of 66

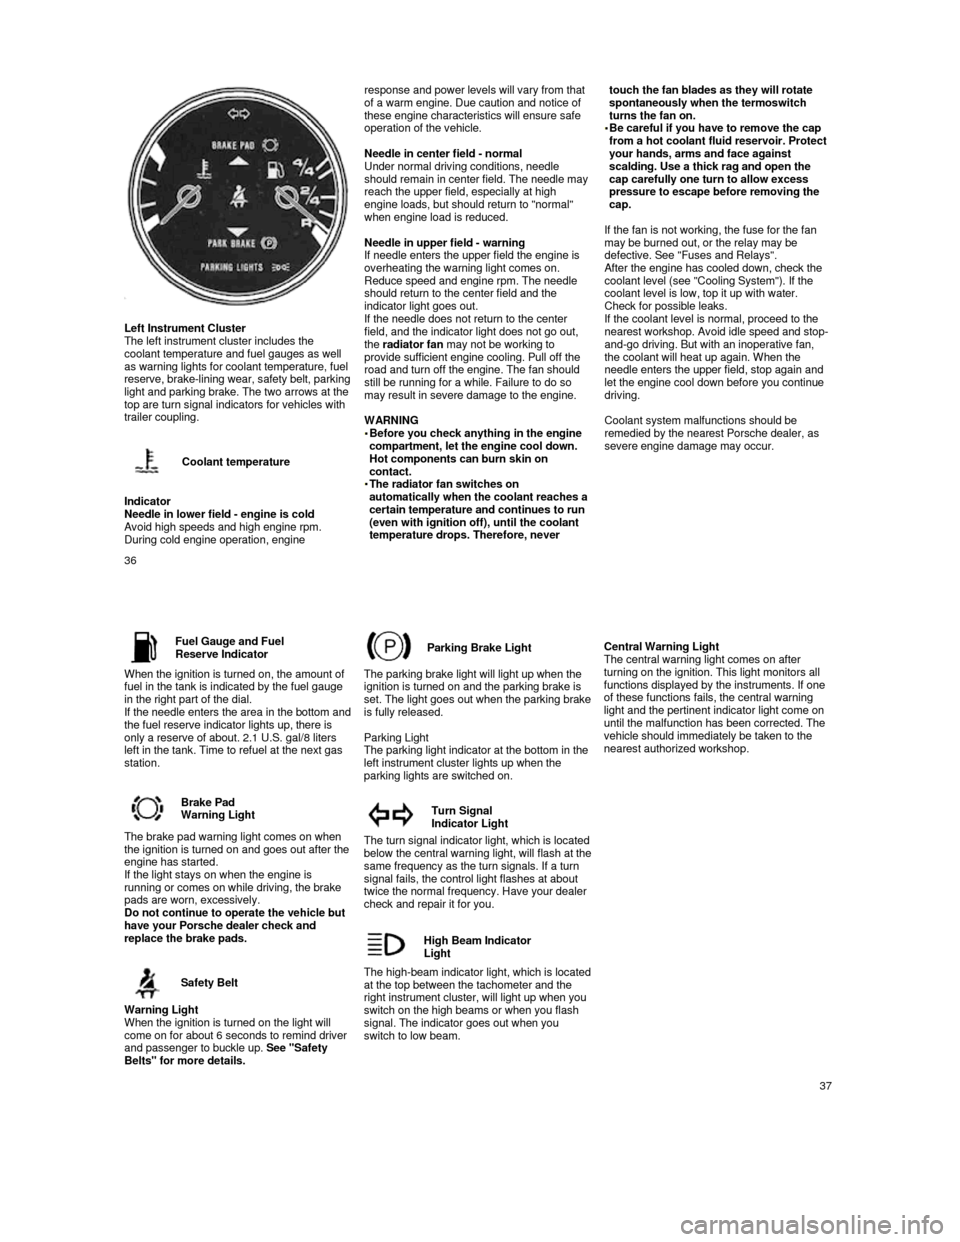
Left Instrument Cluster
The left instrument cluster includes the
coolant temperature and fuel gauges as well
as warning lights for coolant temperature, fuel
reserve, brake-
lining wear, safety belt, parking light and parking brake. The two arrows at the
top are turn signal indicators for vehicles with
trailer coupling.
Coolant temperature
Indicator
Needle in lower field - engine is cold
Avoid high speeds and high engine rpm. During cold engine operation, engine
response and power levels will vary from that
of a warm engine. Due caution and notice of
these engine characteristics will ensure safe
operation of the vehicle.
Needle in center field - normal
Under normal driving conditions, needle
should remain in center field. The needle may
reach the upper field, especially at high
engine loads, but should return to "normal"
when engine load is reduced.
Needle in upper field - warning
If needle enters the upper field the engine is
overheating the warning light comes on.
Reduce speed and engine rpm. The needle
should return to the center field and the
indicator light goes out.
If the needle does not return to the center
field, and the indicator light does not go out,
the radiator fan may not be working to
provide sufficient engine cooling. Pull off the
road and turn off the engine. The fan should
still be running for a while. Failure to do so
may result in severe damage to the engine.
WARNING
Before you check anything in the engine compartment, let the engine cool down.
Hot components can burn skin on
contact. The radiator fan switches on automatically when the coolant reaches a
certain temperature and continues to run
(even with ignition off), until the coolant
temperature drops. Therefore, never
touch the fan blades as they will rotate spontaneously when the termoswitch
turns the fan on.
Be careful if you have to remove the cap from a hot coolant fluid reservoir. Protect
your hands, arms and face against
scalding. Use a thick rag and open the
cap carefully one turn to allow excess
pressure to escape before removing the
cap.
If the fan is not working, the fuse for the fan
may be burned out, or the relay may be
defective. See "Fuses and Relays".
After the engine has cooled down, check the coolant level (see "Cooling System"). If the
coolant level is low, top it up with water.
Check for possible leaks.
If the coolant level is normal, proceed to the
nearest workshop. Avoid idle speed and stop-
and-go driving. But with an inoperative fan,
the coolant will heat up again. When the
needle enters the upper field, stop again and
let the engine cool down before you continue
driving.
Coolant system malfunctions should be
remedied by the nearest Porsche dealer, as
severe engine damage may occur.
36
Fuel Gauge and FuelReserve Indicator
When the ignition is turned on, the amount of
fuel in the tank is indicated by the fuel gauge
in the right part of the dial.
If the needle enters the area in the bottom and the fuel reserve indicator lights up, there is
only a reserve of about. 2.1 U.S. gal/8 liters
left in the tank. Time to refuel at the next gas
station.
Brake Pad
Warning Light
The brake pad warning light comes on when the ignition is turned on and goes out after the engine has started.
If the light stays on when the engine is
running or comes on while driving, the brake
pads are worn, excessively.
Do not continue to operate the vehicle but
have your Porsche dealer check and
replace the brake pads.
Safety Belt
Warning Light
When the ignition is turned on the light will
come on for about 6 seconds to remind driver
and passenger to buckle up. See "Safety
Belts" for more details.
Parking Brake Light
The parking brake light will light up when the
ignition is turned on and the parking brake is
set.
The light goes out when the parking brake is fully released.
Parking Light
The parking light indicator at the bottom in the
left instrument cluster lights up when the
parking lights are switched on.
Turn Signal
Indicator Light
The turn signal indicator light, which is located below the central warning light, will flash at the same frequency as the turn signals. If a turn
signal fails, the control light flashes at about
twice the normal frequency. Have your dealer
check and repair it for you.
High Beam Indicator
Light
The high-beam indicator light, which is located at the top between the tachometer and the
right instrument cluster, will light up when you
switch on the high beams or when you flash
signal. The indicator goes out when you
switch to low beam.
Central Warning Light
The central warning light comes on after
turning on the ignition. This light monitors all
functions displayed by the instruments. If one
of these functions fails, the central warning
light and the pertinent indicator light come on
until the malfunction has been corrected. The
vehicle should immediately be taken to the
nearest authorized workshop.
37
Page 21 of 66

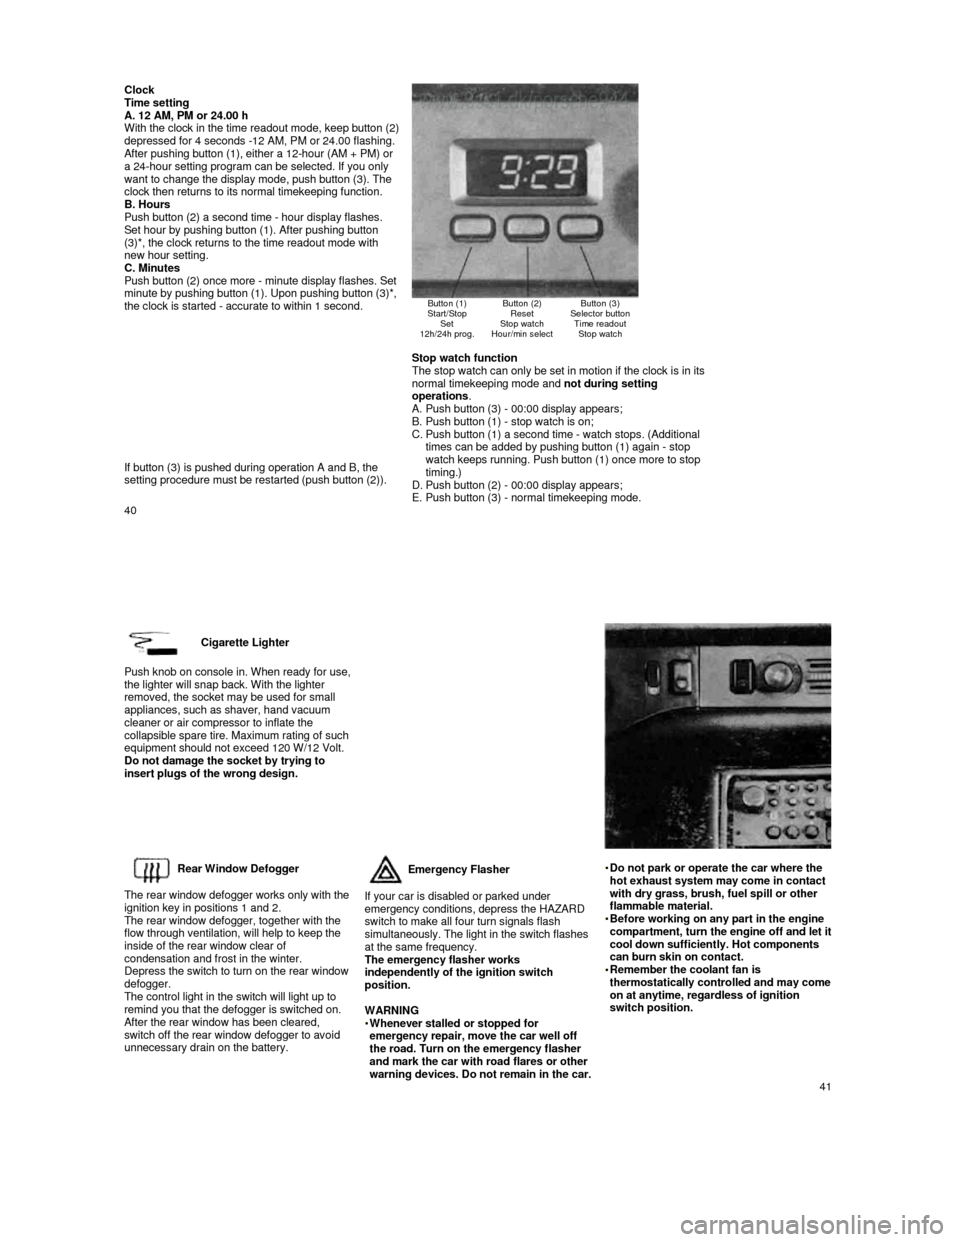
Clock Time setting
A. 12 AM, PM or 24.00 h
With the clock in the time readout mode, keep butto n (2) depressed for 4 seconds -12 AM, PM or 24.00 flashin g. After pushing button (1), either a 12-hour (AM + PM) or
a 24-hour setting program can be selected. If you o nly
want to change the display mode, push button (3). The
clock then returns to its normal timekeeping functi on.
B. Hours
Push button (2) a second time - hour display flashe s.
Set hour by pushing button (1). After pushing butto n
(3)*, the clock returns to the time readout mode wi th
new hour setting.
C. Minutes
Push button (2) once more -
minute display flashes. Set minute by pushing button (1). Upon pushing button ( 3)*, the clock is started - accurate to within 1 second.
Button (1)
Start/Stop Set
12h/24h prog.
Button (2) Reset
Stop watch
Hour/min select
Button (3)
Selector button Time readout Stop watch
If button (3) is pushed during operation A and B, t he
setting procedure must be restarted (push button (2 )).
Stop watch function
The stop watch can only be set in motion if the clo ck is in its
normal timekeeping mode and not during setting
operations .
A. Push button (3) - 00:00 display appears;
B. Push button (1) - stop watch is on;
C. Push button (1) a second time - watch stops. (Addit ional
times can be added by pushing button (1) again - st op
watch keeps running. Push button (1) once more to s top timing.)
D. Push button (2) - 00:00 display appears;
E. Push button (3) - normal timekeeping mode.
40
Cigarette Lighter
Push knob on console in. When ready for use, the lighter will snap back. With the lighter
removed, the socket may be used for small
appliances, such as shaver, hand vacuum
cleaner or air compressor to inflate the
collapsible spare tire. Maximum rating of such
equipment should not exceed 120 W/12 Volt.
Do not damage the socket by trying to
insert plugs of the wrong design.
Rear Window Defogger
The rear window defogger works only with the
ignition key in positions 1 and 2.
The rear window defogger, together with the
flow through ventilation, will help to keep the
inside of the rear window clear of
condensation and frost in the winter.
Depress the switch to turn on the rear window
defogger.
The control light in the switch will light up to
remind you that the defogger is switched on.
After the rear window has been cleared, switch off the rear window defogger to avoid
unnecessary drain on the battery.
Emergency Flasher
If your car is disabled or parked under
emergency conditions, depress the HAZARD
switch to make all four turn signals flash
simultaneously. The light in the switch flashes
at the same frequency.
The emergency flasher works
independently of the ignition switch
position.
WARNING
Whenever stalled or stopped for emergency repair, move the car well off
the road. Turn on the emergency flasher
and mark the car with road flares or other
warning devices. Do not remain in the car.
Do not park or operate the car where the hot exhaust system may come in contact
with dry grass, brush, fuel spill or other
flammable material.
Before working on any part in the engine compartment, turn the engine off and let it cool down sufficiently. Hot components
can burn skin on contact.
Remember the coolant fan is thermostatically controlled and may come on at anytime, regardless of ignition
switch position.
41
Page 26 of 66

Fuel Economy
Fuel economy will vary depending on where,
when and how you drive, optional equipment installed, and the general condition of your
car. A car tuned to specifications and correctly maintained, will help you get maximum fuel
economy.
Have your vehicle tuned to specifications.
Fuel injection should be adjusted to
specifications.
Spark plugs should be clean, properly
gapped and fire efficiently.
Air cleaner should be dirt free to allow proper engine "breathing". Battery should be fully charged. Wheels should be properly aligned. Tires should be inflated at correct pressures. Keep a light foot on the accelerator pedal. Drive smoothly, avoid abrupt changes in
speed as much as possible.
Avoid jack rabbit starts and sudden stops. Do not drive longer than necessary in the
lower gears. Shifting up early helps to save
fuel.
Avoid unnecessary idling. Turn the engine
off.
Prolonged "warm up" idling wastes gas. Start the vehicle just before you are ready to drive. Accelerate slowly and smoothly.
Any additional weight carried in the vehicle reduces fuel economy. Always keep cargo to
a minimum and remove all unnecessary
items.
Organize your trips to take in several
errands.
Use air conditioner only when needed. All electrical equipment contribute to increased fuel consumption.
The EPA estimated m.p.g. is to be used for
comparison purposes, actual mileage may be
different from the estimated m.p.g., depending on your driving speed, weather conditions and trip length. Your actual highway mileage will
probably be less than the estimated m.p.g.
Please observe all local and national speed
limits.
49
Fuel Filler Cap
The lockable fuel filler cap is on the right side
panel of the car. When putting the cap back
on, twist it clockwise until it stops with an
audible click.
We recommend you turn off the engine
when filling the fuel tank.
Fuel tank capacity is listed under "Filling
Capacities".
If you lose your fuel filler cap, replace it
immediately with a cap of the same design to
reduce the possibility of a fire in a collision.
Fuel Recommendation
Your Porsche is equipped with a catalytic
converter and must use UNLEADED FUEL
ONLY.
944:
Minimum octane rating is 91 RON (87
CLC or AKI rating on US fuel pumps).
944 S / 944 Turbo: Minimum octane rating is
95 RON (90 CLC or AKI rating on US fuel
pumps).
Federal law prohibits use of leaded fuel in
this vehicle.
The use of UNLEADED FUEL ONLY is
critically important to the life of the catalytic
converter. Deposits from leaded gasolines will ruin the converter and make it ineffective as
an emission control device.
Cars with a catalytic converter have a smaller
fuel tank opening, and gas station pumps
have smaller nozzles. This will prevent
accidental pumping of leaded fuel into cars
with a catalytic converter.
Unleaded fuels may not be available outside
the continental U.S. and Canada. Therefore,
we recommend you do not take your car to areas or countries where unleaded fuel may
not be available.
Octane ratings
Octane rating indicates a gasoline's ability to
resist detonation. Therefore, buying the
correct octane gas is important to prevent
engine "knock" and possible engine damage.
The 91 RON (95 RON) octane rating of your
car is based on the research method. The CLC (U.S. Cost of Living Council octane
rating) or AKI (antiknock index) usually
displayed on U.S. gasoline pumps is
calculated as research octane number plus
motor octane number, divided by 2, that is
written as:
The CLC or AKI octane rating is usually lower
than the RON rating:
91 RON equals ............ 87 CLC or AKI
95 RON equals ............ 90 CLC or AKI
50