1987 MITSUBISHI MONTERO horn
[x] Cancel search: hornPage 1 of 284

Service Manual
MONTERO
1987 : Volume 2
FOREWORD
This Service Manual has been prepared with the
latest service information available at the time of
publication. It is subdivided into various group
categories and each section contains diagnosis,
disassembly, repair, and installation procedures
along with complete specifications and tightening
references. Use of this manual will aid in properly
performing any servicing necessary to maintain or
restore the high levels of performance and reliability
designed into these outstanding vehicles.
WE SUPPORT
VOLUNTARY TECHNICIAN
CERTIFICATION THROUGH
MITSUBISHI MOTOR SALES OF AMERICA. Inc.
Mitsubishi Motors corporation reserves the right to make changes in
design or to make additions to or improvements in its products without
imposing any obligations upon itself to install them on its products
previously manufactured.
I
GROUP/SECTION INDEX ‘kme-.
INTRODUCTION ..............................
Electrical ...........................................
Electrical System Parts
Location .........................................
Relays, Control Units, Sensors,
Fuses, Groundings
Inspection of Harness
Connector ......................................
Wiring Harness .............................
Charging System ..........................
Starting System ............................
Ignition System .............................
Meters and Gauges ......................
Lighting System .............................
Wiper and Washer System ..........
Horn ...............................................
Accessory ......................................
Audio System ................................
Back Door Window Defogger ......
Automatic Free-wheeling Hub
Indicator System ..........................
Heaters and Air-conditioning .........
Heaters ..........................................
Air-conditioning ............................
**, For Engine Chassis & Body refer to
0 1986 Mitsubishi Motors Corporation Printed in Japan
Page 21 of 284

8-1
ELECTRICAL
CONTENTS
NOBAA-
ACCESSORY ......................................................
188
Cigarette Lighter ............................................
,190
Clock ...............................................................
,191
AUDIO SYSTEM ................................................
.192
AUTOMATIC FREE-WHEELING HUB
INDICATOR SYSTEM ........................................
208
Automatic Free-wheeling Hub
Indicator Control Unit
..................................... ,216
Pulse Generator ..............................................
215
BACK DOOR WINDOW DEFOGGER
................ .203
Defogger switch ............................................
,206
Printed Heater Lines
...................................... ,207
CHARGING SYSTEM .........................................
71
Alternator ........................................................
83
Service Adjustment Procedures
..................... 77
Battery Charging ........................................
82
Inspection of Battery ..................................
81
Output Current Test ...................................
78
Regulated Voltage Test ..............................
79
Voltage Drop Test of Alternator Output
Wire ............................................................
77
ELECTRICAL SYSTEM PARTS LOCATION
...... 2
Diode ...............................................................
5
Fusible Link and Fuse
..................................... 6
Grounding .......................................................
7
Relay and Control Unit ....................................
2
Sensor .............................................................
4
HORN ..................................................................
184
Horn Switch
.................................................... 187
IGNITION SYSTEM ............................................
105
Ignition Switch
................................................ 122
Ignition System ...............................................
1 14
Service Adjustment Procedures
.................... .l 1 1
Checking Ignition System
..........................
11 1
Checking Ignition Timing
...........................
11 1
Spark Plug Cable Test
................................
1 12
Spark Plug Test
.......................................... 1 12 INSPECTION OF HARNESS CONNECTOR ...... 9
Check for Improper Engagement of
Terminal .......................................................... 9
Continuity and Voltage Test for Connector .... 9
Engaging and Disengaging of Connector
Terminal ..........................................................
9
LIGHTING SYSTEM ........................................... 143
Column Switch
................................ .
.............. .I59
Dimmer Control Switch
................................. .I62
Hazard Warning Switch
................................. .I61
Headlight ........................................................ ,158
Service Adjustment Procedures
.................... .I57
Headlight Aiming .......................................
157
METERS AND GAUGES .................................... 123
Service Adjustment Procedures
.................... .I30
Fuel Gauge Simple Test ................................. .I31
Fuel Gauge Unit Inspection ........................... .I31
Oil Pressure Gauge Simple Test
.................... .I32
Oil Pressure Gauge Unit Simple Test
............ ,132
Speedometer Inspection
............................... .I30
Tachometer Inspection .................................. ,130
Voltage Meter Simple Test
............................ .I33
Water Temperature Gauge Simple Test
....... ..I3 1
Water Temperature Gauge Unit Inspection
. ..I3 2
STARTING SYSTEM .......................................... 91
Starter Motor ............ ....................................... 97
WIPER AND WASHER SYSTEM
....................... .163
WIRING HARNESS ............................................ 13
Centralized Junction ....................................... 69
Circuit Diagram ............................................... 34
Configuration Diagram .................................... 27
How to Read Wiring Diagrams ....................... 20
Troubleshooting .............................................. 13
Page 74 of 284

,
8-54 WIRING HARNESS - Horn Circuit
13 HORN CIRCUIT
/
m I
1
Battery
A-23 Sub fusible link
3
0.5-G
5-w/-75-w m Z-W
u
Main
fusible link
1
Multi-purpose a
fuse
-i
::
C
Ignition switch
OFF
]AM
ACC]
Column switch A-3 To wiper motor
[Refer to P.8-59.1
A-39
37W608
Remark
For information concerning the ground points (example: q ),
refer to P.8-7.
Wiring color code
B: Black Br: Brown
G: Green GI
LI: Light blue
0: Orange P: Pink .: Gray
R: Red L: Blue
Y: Yellow Lg: Light green
W: White
1 STB Revision
Page 90 of 284

WIRING HARNESS - Centralized Junction
Multi-purpose Fuse
Power supply circuit Fuse No. Rated
capacity A Applicable circuits
Battery 1 20
Clock, Dome light, Hazard warning flashers
Headlight relay 2 10 Tail lights, License plate lights, Illumination lights, Headlight
washer relay, Position lights
__-
Ignition switch (IG) 3 10 Heater relay, Seat belt warning timer, Turn-signal lights,
Alternator, Seat belt switches, Power window relay, Fuel and
water temperature gauges, Oil pressure gauge, Voltage meter,
Indicator and warning lights, Inhibitor switch, Automatic
free-wheeling hub indicator control unit
4
IO Back-up lights, Auto choke relay, OD-OFF relay
__-
5 15 Rear window defogger
Battery 6 20 Heater, Back door lock
7 15 Key-reminder switch, Stop lights, Buzzer
Ignition switch (ACC) 8 15 Windshield wipers and washer, Headlight washer relay,
Intermittent wiper relay, Horn
9 10 Rear window wiper and washer
10 15 Cigarette lighter, Radio, Tape player, Clock (ACC), Spare terminal,
Air conditioner relay
Page 204 of 284

8-184
HORN
HORN - Specifications / Troubleshooting
SPECIFICATIONS
GENERAL SPECIFICATIONS I NOBLE--
Items
Effective sounding voltage V
Power consumption (at 12V) A
Sound level dB
Fundamental frequency Hz
“High” sound
“Low” sound 11-14.5
Max. 3.5
100-7 10
400--440
340--380 Specifications
TORQUE SPECIFICATIONS
Steering wheel lock nut Items
i Nm ft.lbs.
35-45 26-33
TROUBLESHOOTING
HORN NOBLH-
Horn does not sound
Horn will not stop sounding
NOTE
Number in circle indicates inspection sequence. 0 Q 0 @I 0 l Horn contact plate
0 0
1 STB Revision
~-1
Page 205 of 284

HORN - Circuit Diagram 8485
CIRCUIT DIAGRAM
HORN CIRCUIT
fusible link
OFF
Multi-purpose @
fuse
I r t
m
I
2
d
1 To wiper
[Refer to
Horn switch
Column switch mm
mm
I I
I I
2%
$2
dd
I--J!
dd
A-37 A-36
A-39
A-38 motor
P.8-59.1
(H) (U
37W608
Remark
For information concerning the ground points (example:
refer to P.8-7.
Wiring color code
B: Black Br: Brown
G: Green Gr: Gray
L: Blue Lg: Light green
LI: Light blue
0: Orange P: Pink R: Red
Y: Yellow
W: White 1 STB Revision
Page 206 of 284

8486 HORN - Horn
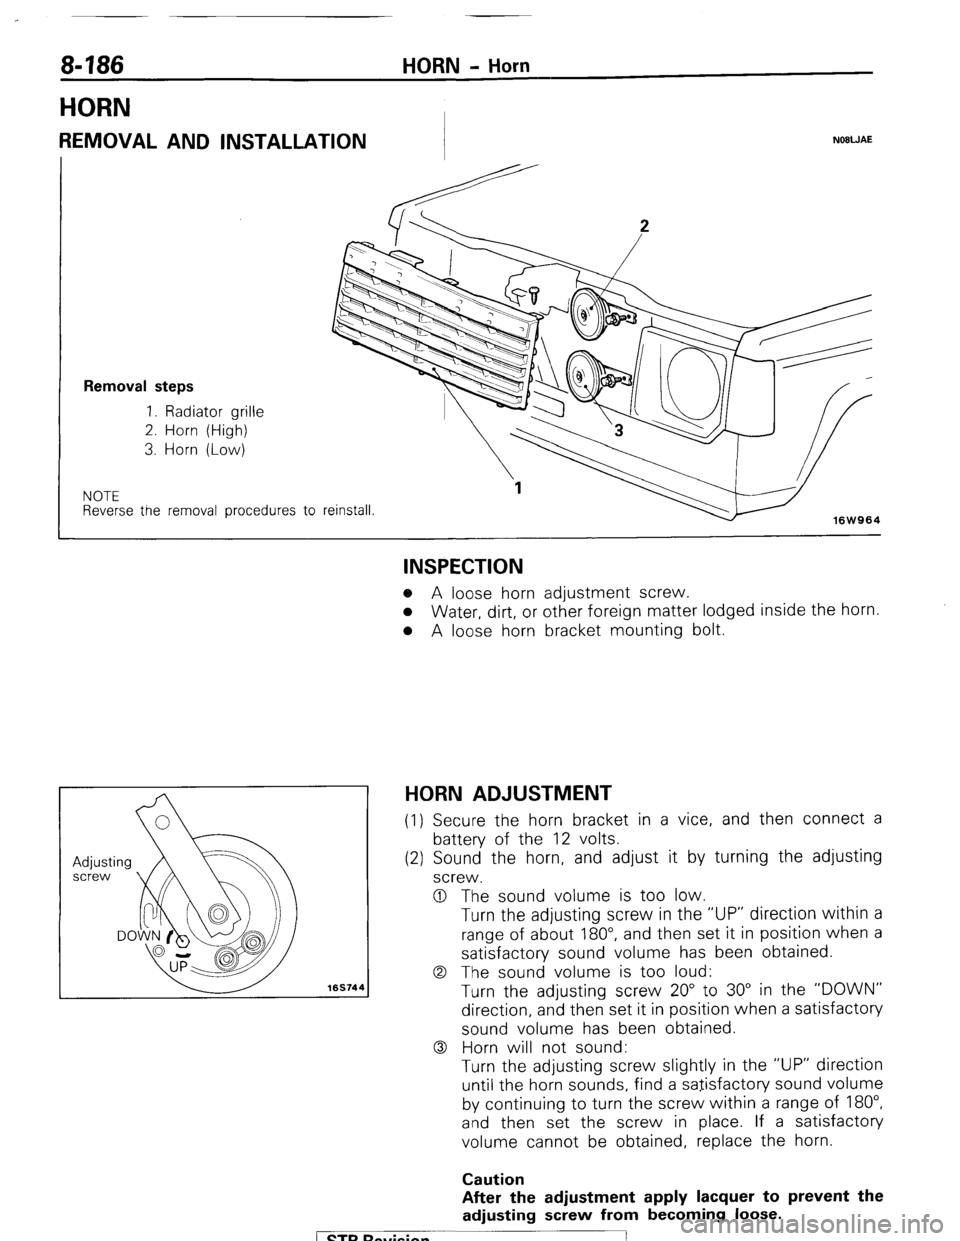
HORN
REMOVAL AND INSTALLATION NOBWAE
Removal steps
1. Radiator grille
2. Horn (High)
3. Horn (Low)
NOTE Reverse tne removal procedures to
reinstall.
16W964
169744
INSPECTION o A loose horn adjustment screw.
o Water, dirt, or other foreign matter lodged inside the horn.
l A loose horn bracket mounting bolt.
HORN ADJUSTMENT (1) Secure the horn bracket in a vice, and then connect a
battery of the 12 volts.
(2) Sound the horn, and adjust it by turning the adjusting
screw.
0 The sound volume is too low.
Turn the adjusting screw in the “UP” direction within a
range of about 180”, and then set it in position when a
satisfactory sound volume has been obtained.
0 The sound volume is too loud:
Turn the adjusting screw 20” to 30” in the “DOWN”
direction, and then set it in position when a satisfactory
sound volume has been obtained.
0 Horn will not sound:
Turn the adjusting screw slightly in the “UP” direction
until the horn sounds, find a satisfactory sound volume
by continuing to turn the screw within a range of 180”,
and then set the screw in place. If a satisfactory
volume cannot be obtained, replace the horn.
Caution
After the adjustment apply lacquer to prevent the
adjusting screw from becoming loose.
1 ST6 Revision
Page 207 of 284

HORN SWITCH
HORN - Horn Switch 8-187
REMOVAL AND INSTALLATION NOILKAE
I T--J2
Removal steps
1. Steering wheel pa
+I) 2. Steering wheel
3. Steering bossplate
16W1570
4. Steering wheel cover
5. Horn switch I”” IL (1) Reverse the removal procedure to reinstall.
(2) +e : Refer to “Service Points of Removal”.
SERVICE POINTS OF REMOVAL 2. REMOVAL OF STEERING WHEEL
Remove the steering wheel by using the steering wheel
puller.
Caution
Do not hammer on the steering wheel to remove it;
doing so may damage the collapsible mechanism.
INSPECTION
l A burned out or short-circuited horn switch contact.
l A broken or damaged horn switch spring.
l A damaged horn switch harness. 1 STB Revision