Page 1850 of 2389
(b) Using a tinning light, check the ignition tinning.
Ignition timing: 10
°6TDC @ idle
(Transmission in N range)
(c) Loosen the two hold±down bolts, and adjust by turning
the distributor.
(d) Tighten the hold±down bolts, and recheck the ignition
timing.
Torque: 130 kg±cm (9 ft±Ib, 13 N±m)
9. ADJUST IGNITION TIMING
(a) Using SST connect terminals TE1 and E1 of the check
connector.
SST 09843±18020
HINT: After engine rpm are kept at 1, 1,300 rpm for 5 sec-
onds, check that they return to. idle speed.
10. FURTHER CHECK IGNITION TIMING
Ignition timing: 13 ± 22
° BTDC @ idle
(Transmission in N range)
HINT: The timing mark moves in a range between 13°
and 22°.
11. DISCONNECT TACHOMETER AND TIMING LIGHT
FROM ENGINE (e) Remove SST.
SST 09843±18020
± IGNITION SYSTEMDistributor (3S±FE)IG±17
Page 1854 of 2389
![TOYOTA CAMRY V20 1986 Service Information 6. WARM UP ENGINE
Allow the engine to normal operating temperature.
7. CONNECT TACHOMETER AND TIMING LIGHT TO
ENGINE
Connect the tachometer test probe to terminal IG [±] of the
check connector.
NOTIC TOYOTA CAMRY V20 1986 Service Information 6. WARM UP ENGINE
Allow the engine to normal operating temperature.
7. CONNECT TACHOMETER AND TIMING LIGHT TO
ENGINE
Connect the tachometer test probe to terminal IG [±] of the
check connector.
NOTIC](/manual-img/14/57449/w960_57449-1853.png)
6. WARM UP ENGINE
Allow the engine to normal operating temperature.
7. CONNECT TACHOMETER AND TIMING LIGHT TO
ENGINE
Connect the tachometer test probe to terminal IG [±] of the
check connector.
NOTICE:
wNEVER allow the tachometer test probe to touch ground
as it could result in damage to the igniter
and/or ignition coil.
wAs some tachometers are not compatible with this igni-
tion system, we recommended that you confirm the
compatibility of your unit before use.
8. ADJUST IGNITION TIMING
(a) Check the idle speed.
Idle speed: 700
+ 50 rpm
(b) Using SST connect terminals TE1 and E1 of the check con-
nector.
SST 09843±18020
(c) Using a timing light, check the ignition timing.
Ignition timing: 10°6TDC @ idle
(Transmission in N range)
(d) Loosen the two hold±down bolts, and adjust by turning the
distributor.
(e) Tighten the hold±down bolts, and recheck the ignition timing.
Torque: 185 kg±cm (13 ft±Ib, 18 N±m)
9. FURTHER CHECK IGNITION TIMING
Ignition timing: 10°BTDC @ idle
(Transmission in N range)
HINT: The timing mark moves in a range between 13°
and 27°.
10. DISCONNECT TACHOMETER AND TIMING LIGHT
FROM ENGINE (f) Remove SST.
SST 09843±18020
± IGNITION SYSTEMDistributor (2VZ±FE)IG±21
Page 1869 of 2389

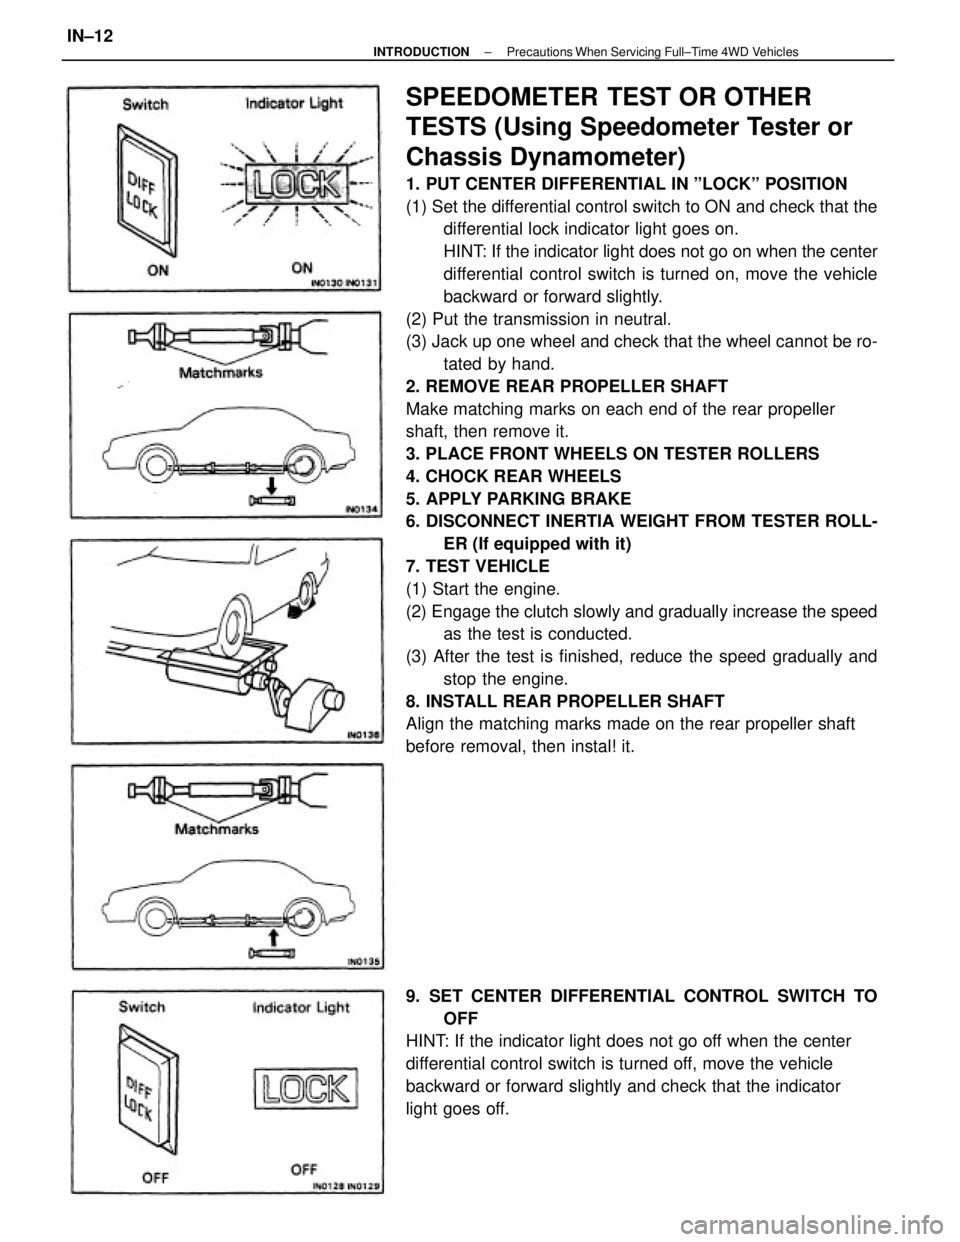
SPEEDOMETER TEST OR OTHER
TESTS (Using Speedometer Tester or
Chassis Dynamometer)
1. PUT CENTER DIFFERENTIAL IN ºLOCKº POSITION
(1) Set the differential control switch to ON and check that the
differential lock indicator light goes on.
HINT: If the indicator light does not go on when the center
differential control switch is turned on, move the vehicle
backward or forward slightly.
(2) Put the transmission in neutral.
(3) Jack up one wheel and check that the wheel cannot be ro-
tated by hand.
2. REMOVE REAR PROPELLER SHAFT
Make matching marks on each end of the rear propeller
shaft, then remove it.
3. PLACE FRONT WHEELS ON TESTER ROLLERS
4. CHOCK REAR WHEELS
5. APPLY PARKING BRAKE
6. DISCONNECT INERTIA WEIGHT FROM TESTER ROLL-
ER (If equipped with it)
7. TEST VEHICLE
(1) Start the engine.
(2) Engage the clutch slowly and gradually increase the speed
as the test is conducted.
(3) After the test is finished, reduce the speed gradually and
stop the engine.
8. INSTALL REAR PROPELLER SHAFT
Align the matching marks made on the rear propeller shaft
before removal, then instal! it.
9. SET CENTER DIFFERENTIAL CONTROL SWITCH TO
OFF
HINT: If the indicator light does not go off when the center
differential control switch is turned off, move the vehicle
backward or forward slightly and check that the indicator
light goes off.
± INTRODUCTIONPrecautions When Servicing Full±Time 4WD VehiclesIN±12
Page 1870 of 2389

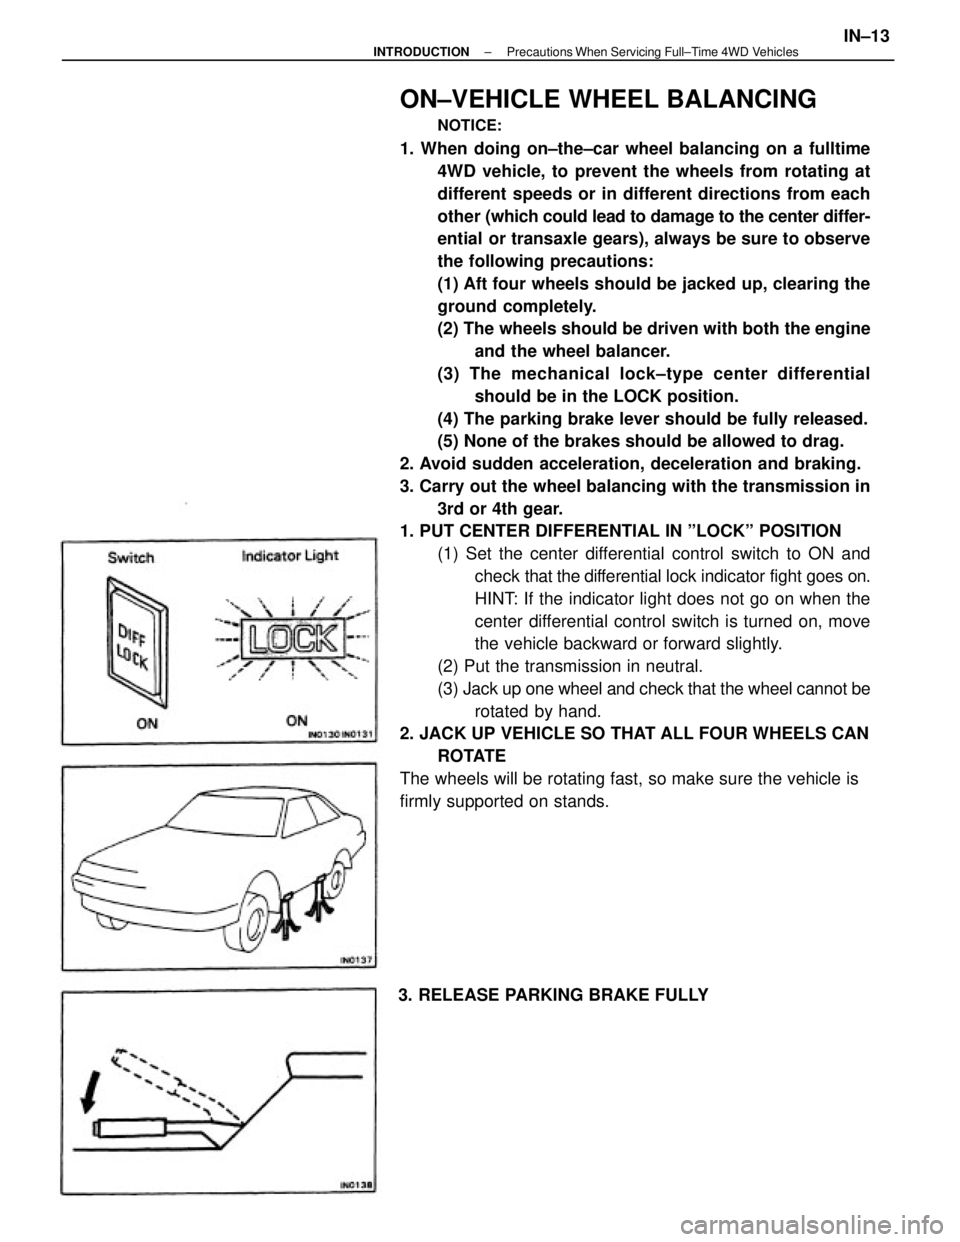
ON±VEHICLE WHEEL BALANCING
NOTICE:
1. When doing on±the±car wheel balancing on a fulltime
4WD vehicle, to prevent the wheels from rotating at
different speeds or in different directions from each
other (which could lead to damage to the center differ-
ential or transaxle gears), always be sure to observe
the following precautions:
(1) Aft four wheels should be jacked up, clearing the
ground completely.
(2) The wheels should be driven with both the engine
and the wheel balancer.
(3) The mechanical lock±type center differential
should be in the LOCK position.
(4) The parking brake lever should be fully released.
(5) None of the brakes should be allowed to drag.
2. Avoid sudden acceleration, deceleration and braking.
3. Carry out the wheel balancing with the transmission in
3rd or 4th gear.
1. PUT CENTER DIFFERENTIAL IN ºLOCKº POSITION
(1) Set the center differential control switch to ON and
check that the differential lock indicator fight goes on.
HINT: If the indicator light does not go on when the
center differential control switch is turned on, move
the vehicle backward or forward slightly.
(2) Put the transmission in neutral.
(3) Jack up one wheel and check that the wheel cannot be
rotated by hand.
2. JACK UP VEHICLE SO THAT ALL FOUR WHEELS CAN
ROTATE
The wheels will be rotating fast, so make sure the vehicle is
firmly supported on stands.
3. RELEASE PARKING BRAKE FULLY
± INTRODUCTIONPrecautions When Servicing Full±Time 4WD VehiclesIN±13
Page 1871 of 2389
9. SET CENTER DIFFERENTIAL CONTROL SWITCH TO
OFF
HINT: If the indicator light does not go off when the center
differential control switch is turned off, move the vehicle
backward or forward slightly and check that the indicator light
goes off.8. ROTATE WHEELS USING BOTH ENGINE'S DRIVING
FORCE AND DRIVING FORCE OF WHEEL BALANCER
AND CHECK WHEEL BALANCE
HINT: When doing this be careful of the other wheels, which
will rotate at the same time. 6. START ENGINE
7. PUT TRANSMISSION IN 3RD OR 4TH GEAR AND
ENGAGE CLUTCH SLOWLY, THEN GRADUALLY
INCREASE SPEED TO TEST SPEED 5. PLACE WHEEL TO BE BALANCED ON WHEEL
BALANCER
Follow the procedure specified by the wheel balancer
manufacturer. 4. MAKE SURE THAT BRAKES ARE NOT DRAGGING ON
ANY OF FOUR WHEELS
± INTRODUCTIONPrecautions When Servicing Full±Time 4WD VehiclesIN±14
Page 1872 of 2389

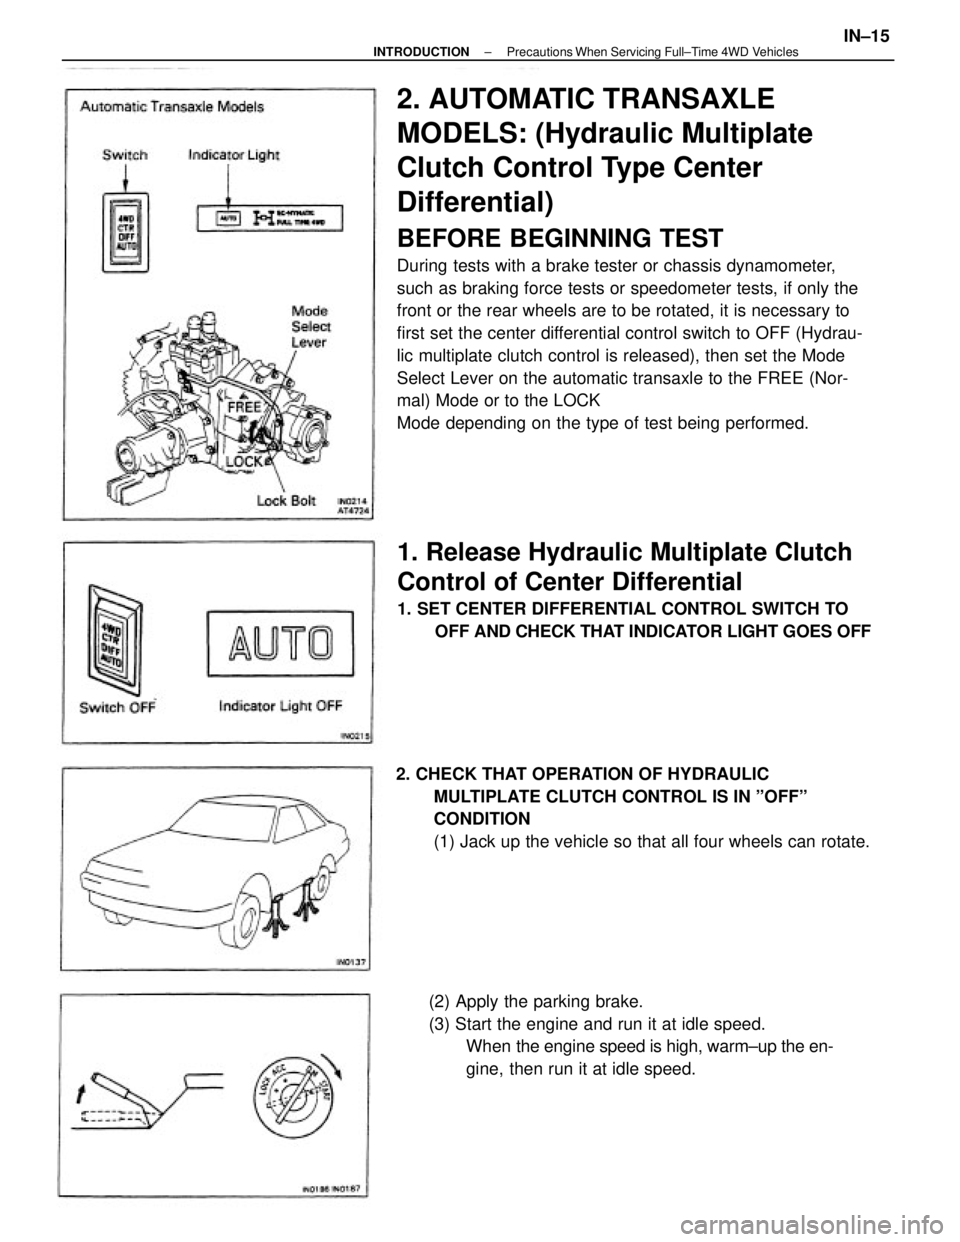
2. AUTOMATIC TRANSAXLE
MODELS: (Hydraulic Multiplate
Clutch Control Type Center
Differential)
BEFORE BEGINNING TEST
During tests with a brake tester or chassis dynamometer,
such as braking force tests or speedometer tests, if only the
front or the rear wheels are to be rotated, it is necessary to
first set the center differential control switch to OFF (Hydrau-
lic multiplate clutch control is released), then set the Mode
Select Lever on the automatic transaxle to the FREE (Nor-
mal) Mode or to the LOCK
Mode depending on the type of test being performed.
1. Release Hydraulic Multiplate Clutch
Control of Center Differential
1. SET CENTER DIFFERENTIAL CONTROL SWITCH TO
OFF AND CHECK THAT INDICATOR LIGHT GOES OFF
2. CHECK THAT OPERATION OF HYDRAULIC
MULTIPLATE CLUTCH CONTROL IS IN ºOFFº
CONDITION
(1) Jack up the vehicle so that all four wheels can rotate.
(2) Apply the parking brake.
(3) Start the engine and run it at idle speed.
When the engine speed is high, warm±up the en-
gine, then run it at idle speed.
± INTRODUCTIONPrecautions When Servicing Full±Time 4WD VehiclesIN±15
Page 1876 of 2389
![TOYOTA CAMRY V20 1986 Service Information TEST METHOD B (High Speed Test)
[Vehicle speed: Over 38 mph (60 km/h)]
1. SET CENTER DIFFERENTIAL CONTROL SWITCH TO
OFF
(1) Check that the center differential control indicator light
goes oft.
(2) Fur TOYOTA CAMRY V20 1986 Service Information TEST METHOD B (High Speed Test)
[Vehicle speed: Over 38 mph (60 km/h)]
1. SET CENTER DIFFERENTIAL CONTROL SWITCH TO
OFF
(1) Check that the center differential control indicator light
goes oft.
(2) Fur](/manual-img/14/57449/w960_57449-1875.png)
TEST METHOD B (High Speed Test)
[Vehicle speed: Over 38 mph (60 km/h)]
1. SET CENTER DIFFERENTIAL CONTROL SWITCH TO
OFF
(1) Check that the center differential control indicator light
goes oft.
(2) Further check that the operation of the hydraulic multi-
plate clutch control of the center differential is in
OFF condition.
(See page IN±15)
2. MOVE MODE SELECT LEVER ON TRANSAXLE TO ºLOCKº
MODE AND LOCK IT SECURELY WITH BOLT
(See page IN±16)
3. CONFIRM MODE SELECTION
(See page IN±17) 7. OPERATE TESTER ROLLERS AND MEASURE
BRAKING FORCE WITH ENGINE AT IDLE
HINT: Since different types of tester are used, such as spe-
cialized brake testers and combination testers with built in
chassis dynamometer, speedometer tester, brake tester, etc.,
conduct the test in accordance with the instructions furnished
for the tester model used.
4. REMOVE REAR PROPELLER SHAFT
Make matching marks on each end of the propeller shaft,
then remove it.8. AFTER FINISHING TEST, RETURN CENTER
DIFFERENTIAL CONTROL SWITCH TO ºAUTOº AND
CHECK THAT INDICATOR LIGHT GOES ON
± INTRODUCTIONPrecautions When Servicing Full±Time 4WD VehiclesIN±19
Page 1878 of 2389
![TOYOTA CAMRY V20 1986 Service Information SPEEDOMETER TEST OR OTHER TESTS
[Using Speedometer Tester or Chassis Dynamometer]
1. SET CENTER DIFFERENTIAL CONTROL SWITCH TO
OFF
(1) Check that the center differential control indicator light
goes TOYOTA CAMRY V20 1986 Service Information SPEEDOMETER TEST OR OTHER TESTS
[Using Speedometer Tester or Chassis Dynamometer]
1. SET CENTER DIFFERENTIAL CONTROL SWITCH TO
OFF
(1) Check that the center differential control indicator light
goes](/manual-img/14/57449/w960_57449-1877.png)
SPEEDOMETER TEST OR OTHER TESTS
[Using Speedometer Tester or Chassis Dynamometer]
1. SET CENTER DIFFERENTIAL CONTROL SWITCH TO
OFF
(1) Check that the center differential control indicator light
goes oft.
(2) Further check that the operation of the hydraulic
multiplate clutch control of the center differential is in
OFF condition.
(See page IN±15)
2. MOVE MODE SELECT LEVER ON TRANSAXLE TO ºLOCKº
MODE AND LOCK IT SECURELY WITH BOLT (See page
IN±16)
3. CONFIRM MODE SELECTION
(See page IN±17)
8. DISCONNECT INERTIA WEIGHT FROM TESTER ROLL-
ER (If equipped with it)
9. TEST VEHICLE
(1) Start the engine.
(2) Put the transmission in D range, then gradually in-
crease the speed as the test in conducted.
(3) After the test is finished, reduce the speed gradually
and stop the engine. 4. REMOVE REAR PROPELLER SHAFT
Make matching marks on each end of the rear propeller
shaft, then remove it.
5. PLACE FRONT WHEELS ON TESTER ROLLERS
6. CHOCK REAR WHEELS
7. APPLY PARKING BRAKE
10. AFTER FINISHING TEST, INSTALL REAR PROPELLER
SHAFT
Align the matching marks made on the rear propeller shaft
before removal, then install it.
± INTRODUCTIONPrecautions When Servicing Full±Time 4WD VehiclesIN±21