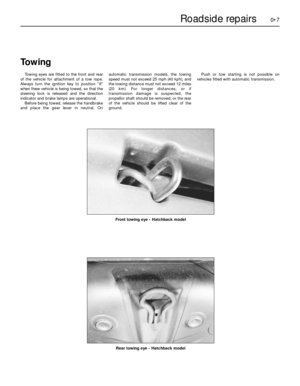
Page 9 of 18

0•9Roadside repairs
When jump-starting a car using a
booster battery, observe the following
precautions:
4Before connecting the booster
battery, make sure that the ignition is
switched off.
4Ensure that all electrical equipment
(lights, heater, wipers, etc) is
switched off.
4Make sure that the booster battery is
the same voltage as the discharged
one in the vehicle.
4If the battery is being jump-started
from the battery in another vehicle,
the two vehcles MUST NOT TOUCH
each other.
4Make sure that the transmission is in
neutral (or PARK, in the case of
automatic transmission).
Jump starting will get you out
of trouble, but you must correct
whatever made the battery go
flat in the first place. There are
three possibilities:
1The battery has been drained by
repeated attempts to start, or by
leaving the lights on.
2The charging system is not working
properly (alternator drivebelt slack
or broken, alternator wiring fault or
alternator itself faulty).
3The battery itself is at fault
(electrolyte low, or battery worn out).
Connect one end of the red jump lead to
the positive (+) terminal of the flat
batteryConnect the other end of the red lead to
the positive (+) terminal of the booster
battery.Connect one end of the black jump lead
to the negative (-) terminal of the
booster battery
Connect the other end of the black
jump lead to a bolt or bracket on the
engine block, well away from the
battery, on the vehicle to be started.
123
4
Make sure that the jump leads will not
come into contact with the fan, drive-
belts or other moving parts of the
engine.5
Start the engine using the booster
battery, then with the engine running at
idle speed, disconnect the jump leads in
the reverse order of connection.6
Jump starting
Page 10 of 18

0•10
There are some very simple checks which
need only take a few minutes to carry out, but
which could save you a lot of inconvenience
and expense.
These "Weekly checks" require no great skill
or special tools, and the small amount of time
they take to perform could prove to be very
well spent, for example;MKeeping an eye on tyre condition and
pressures, will not only help to stop them
wearing out prematurely, but could also save
your life.
MMany breakdowns are caused by electrical
problems. Battery-related faults are
particularly common, and a quick check on a
regular basis will often prevent the majority of
these.MIf your car develops a brake fluid leak, the
first time you might know about it is when your
brakes don't work properly. Checking the level
regularly will give advance warning of this kind
of problem.
MIf the oil or coolant levels run low, the cost
of repairing any engine damage will be far
greater than fixing the leak, for example.
Underbonnet check points
§2.0 litre OHC
Carburettor model
(air cleaner removed for clarity)
ALocation of oil level dipstick
BEngine oil filler cap
CCoolant expansion tank
DBrake fluid reservoir
EWindscreen washer reservoir
FBattery
§2.0 litre OHC
Fuel injection model
AOil level dipstick
BEngine oil filler cap
CCoolant expansion tank
DBrake fluid reservoir
EWindscreen washer reservoir
FBattery
Introduction
Weekly checks
Page 11 of 18
0•11
§1.8 litre CVH
Air cleaner removed for clarity
AOil level dipstick
BEngine oil filler cap
CCoolant expansion tank
DBrake fluid reservoir
EWindscreen washer reservoir
FBattery
§2.0 litre DOHC
AOil level dipstick
BEngine oil filler cap
CCoolant expansion tank
DPower steering fluid reservoir
EWindscreen washer reservoir
FBattery
Weekly checks
Page 12 of 18

Coolant level Engine oil level
Before you start
4Make sure that your car is on level ground.
4Check the oil level before the car is driven,
or at least 5 minutes after the engine has been
switched off.
The correct oil
Modern engines place great demands on their
oil. It is very important that the correct oil for
your car is used (See “Lubricants and Fluids”).
Car Care
l If you have to add oil frequently, you should
check whether you have any oil leaks. Place
some clean paper under the car overnight,
and check for stains in the morning. If there
are no leaks, the engine may be burning oil
(see “Fault Finding”).
lAlways maintain the level between the
upper and lower dipstick marks (see photo 3).
If the level is too low severe engine damage
may occur. Oil seal failure may result if the
engine is overfilled by adding too much oil.
0•12
Using a clean rag or paper towel remove
all oil from the dipstick. Insert the clean
dipstick into the tube as far as it will go, then
withdraw it again.
Add a mixture of water and antifreeze
through the expansion tank filler neck
until the coolant reaches the “MAX” level
mark. Refit the cap, turning it clockwise as far
as it will go until it is secure.
If topping-up is necessary, wait until the
engine is cold. Slowly turn the expansion
tank cap anti-clockwise to relieve the system
pressure. Once any pressure is released, turn
the cap anti-clockwise unti it can be lifted off.The coolant level varies with the
temperature of the engine. When the
engine is cold, the coolant level should be at
the “MAX” mark. When the engine is hot, the
level may rise slightly above this mark.
Note the oil level on the end of the
dipstick, which should be between the
upper (“MAX”) mark and lower (“MIN”) mark.
Approximately 1.0 litre of oil will raise the level
from the lower mark to the upper mark.Oil is added through the filler cap.
Unscrew the cap and top-up the level; a
funnel may help to reduce spillage . Add the
oil slowly, checking the level on the dipstick
frequently. Avoid overfilling (see “Car Care”).
On some models, the dipstick is brightly
coloured for easy identification. Refer to
the photos on pages 0•10 and 0•11 for the
exact location for each engine type12
3
123
4
Warning: DO NOT attempt to
remove the expansion tank
pressure cap when the engine
is hot, as there is a very great
risk of scalding. Do not leave
open containers of coolant
about, as it is poisonous.Car Care
lWith a sealed-type cooling system, adding
coolant should not be necessary on a regular
basis. If frequent topping-up is required, it is
likely there is a leak. Check the radiator, all
hoses and joint faces for signs of staining or
wetness, and rectify as necessary.lIt is important that antifreeze is used in the
cooling system all year round, not just during
the winter months. Don’t top-up with water
alone, as the antifreeze will become too
diluted.
If the oil is checked
immediately after driving the
vehicle, some of the oil will
remain in the upper engine
components, resulting in an inaccurate
reading on the dipstick!
Weekly checks
Page 13 of 18

Warning:Brake hydraulic fluid
can harm your eyes and
damage painted surfaces, so
use extreme caution when
handling and pouring it.
l Do not use fluid that has been
standing open for some time, as it
absorbs moisture from the air
which can cause a dangerous loss
of braking effectiveness.
Safety first
lIf the reservoir requires repeated topping-
up this is an indication of a fluid leak
somewhere in the system, which should be
investigated immediately.
lIf a leak is suspected, the car should not be
driven until the braking system has been
checked. Never take any risks where brakes
are concerned.
lOn ABS models, switch the ignition off and
pump the brake pedal at least 20 times or until
the pedal feels hard. Open the bonnet. Switch
on the ignition: the hydraulic unit pump will be
heard running. Wait until the pump stops, then
switch off the ignition.
Brake fluid level
0•13
Carefully add fluid avoiding spilling it on
surrounding paintwork. Use only the
specified hydraulic fluid; mixing different types
of fluid can cause damage to the system. After
filling to the correct level, refit the cap
securely, to prevent leaks and the entry of
foreign matter. Wipe off any spilt fluid.When adding fluid, it’s a good idea to
inspect the reservoir. The system should
be drained and refilled if dirt is seen in the fluid
(see Chapter 9 for details).
The “MAX” and “MIN” marks are
indicated on the side of the reservoir. The
fluid level must be kept between the marks.
Disconnect the wiring plug (arrowed) before
removing the cap.1If topping-up is necessary, first wipe the
area around the filler cap with a clean rag
before removing the cap.2
34
Screen washer fluid level
Some models have a visible reservoir,
whilst others have only the filler nozzle
(arrowed) showing. Either way, the location is
in the same place.Top-up the washer reservoir using a
propietary screen wash.On models with only the filler tube fitted,
a dipstick is fitted to show the quantity of
fluid left in the reservoir
Screenwash additives not only keep the
winscreen clean during foul weather, they also
prevent the washer system freezing in coldweather - which is when you are likely to need
it most. Don’t top up using plain water as the
screenwash will become too diluted, and willfreeze during cold weather. On no account use
engine antifreeze in the washer system - this
could discolour or damage paintwork.
123
• Make sure that your car is
on level ground.
• The fluid level in the
master cylinder reservoir will
drop slightly as the brake pads wear
down, but the fluid level must never be
allowed to drop below the ‘MIN’ mark.
Weekly checks
Page 14 of 18

0•14
Before you start:
4Park the vehicle on level ground.
4Set the steering wheel pointing straight-
ahead.
4The system should be at operating
temperature and the engine should be
turned off.
Safety First:
lThe need for frequent topping-up indicates
a leak, which should be investigated
immediately.
Top-up if necessary with clean fluid of
the specified typeIf the level is checked
cold, use the “MIN” or “FULL COLD” mark.
Recheck the level at operating temperature.
The fluid level should be up to the
“MAX” or upper “HOT” markThe power steering fluid reservoir is
located next to the coolant expansion
tank. Clean around the filler cap and then
remove it should topping up be required.123
For the check to be accurate
the steering must not be
turned once the engine has
been stopped.
Power steering fluid level
Weekly checks
Electrical system
To replace a blown fuse, simply pull it out.
Fit a new fuse of the same rating,
available from car accessory shops.
It is important that you find the reason that the
fuse blew - a checking procedure is given in
Chapter 13.If more than one indicator light or
headlight has failed it is likely that either a
fuse has blown or that there is a fault in the
circuit (refer to“Electrical fault-finding”in
Chapter 13).
The fuses are mounted in a box in the engine
compartment on the right-hand side of the
bulkhead. Remove the loose cover (and spring
clip if fitted), pulling the plastic clip, and
removing the plastic cover.If a single indicator light, brake light or
headlight has failed it is likely that a bulb
has blown and will need to be replaced. Refer
to Chapter 12 for details.
If both brake lights have failed, it is possible
that the brake light switch above the brake
pedal needs adjusting. This simple operation
is described in Chapter 9.1
If you need to check your
brake lights and indicators
unaided, back up to a wall
or garage door and operate
the lights. The reflected light should
show if they are working properly.
4Check all external lights and the horn. Refer
to the appropriate Sections of Chapter 13 for
details if any of the circuits are found to be
inoperative.4Visually check all wiring connectors,
harnesses and retaining clips for security, and
for signs of chafing or damage.
23
Page 15 of 18
 with your fingers, and slide the
blade out of the arms h")
0•15
To remove a wiper blade, pull the arm
fully away from the glass until it locks.
Swivel the blade through 90°, press the
locking tab(s) with your fingers, and slide the
blade out of the arm's hooked end. On
refitting, ensure that the blade locks securely
into the arm.Check the condition of the wiper blades;
if they are cracked or show any signs of
deterioration, or if the glass swept area is
smeared, renew them. For maximum clarity of
vision, wiper blades should be renewed
annually, as a matter of course.21Weekly checks
Battery
Caution:Before carrying out any work on the
vehicle battery, read the precautions given in
“Safety first” at the start of this manual.
4Make sure that the battery tray is in good
condition, and that the clamp is tight.
Corrosion on the tray, retaining clamp and the
battery itself can be removed with a solution
of water and baking soda. Thoroughly rinse all
cleaned areas with water. Any metal parts
damaged by corrosion should be covered with
a zinc-based primer, then painted.
4Periodically (approximately every three
months), check the charge condition of the
battery as described in Chapter 5A.
4If the battery is flat, and you need to jump
start your vehicle, see “Roadside Repairs”.The battery is located on the left-hand
side of the engine compartment. The
exterior of the battery should be inspected
periodically for damage such as a cracked
case or cover.
Check the tightness of battery clamps (A)
to ensure good electrical connections.
You should not be able to move them. Also
check each cable (B) for cracks and frayed
conductors.
If corrosion (white, fluffy deposits) is
evident, remove the cables from the
battery terminals, clean them with a small wire
brush, then refit them. Accessory stores sell a
useful tool for cleaning the battery post ...
12
3... as well as the battery cable clamps4
Battery corrosion can be kept to a
minimum by applying a layer of
petroleum jelly to the clamps and
terminals after they are reconnected.
Wiper blades
Page 16 of 18

0•16Weekly checks
It is very important that tyres are in good
condition, and at the correct pressure - having
a tyre failure at any speed is highly dangerous.
Tyre wear is influenced by driving style - harsh
braking and acceleration, or fast cornering,
will all produce more rapid tyre wear. As a
general rule, the front tyres wear out faster
than the rears. Interchanging the tyres from
front to rear (“rotating” the tyres) may result in
more even wear. However, if this is completely
effective, you may have the expense of
replacing all four tyres at once!
Remove any nails or stones embedded in the
tread before they penetrate the tyre to cause
deflation. If removal of a nail does reveal thatthe tyre has been punctured, refit the nail so
that its point of penetration is marked. Then
immediately change the wheel, and have the
tyre repaired by a tyre dealer.
Regularly check the tyres for damage in the
form of cuts or bulges, especially in the
sidewalls. Periodically remove the wheels, and
clean any dirt or mud from the inside and
outside surfaces. Examine the wheel rims for
signs of rusting, corrosion or other damage.
Light alloy wheels are easily damaged by
“kerbing” whilst parking; steel wheels may
also become dented or buckled. A new wheel
is very often the only way to overcome severe
damage.New tyres should be balanced when they are
fitted, but it may become necessary to re-
balance them as they wear, or if the balance
weights fitted to the wheel rim should fall off.
Unbalanced tyres will wear more quickly, as
will the steering and suspension components.
Wheel imbalance is normally signified by
vibration, particularly at a certain speed
(typically around 50 mph). If this vibration is
felt only through the steering, then it is likely
that just the front wheels need balancing. If,
however, the vibration is felt through the whole
car, the rear wheels could be out of balance.
Wheel balancing should be carried out by a
tyre dealer or garage.
Tyre Pressure Check
Check the tyre pressures regularly with
the tyres cold. Do not adjust the tyre
pressures immediately after the vehicle has
been used, or an inaccurate setting will result.
Tyre pressures are shown on the next page.
Tread Depth - manual check
Alternatively tread wear can be monitored
with a simple, inexpensive device known
as a tread depth indicator gauge.
Tread Depth - visual check
The original tyres have tread wear safety
bands (B), which will appear when the
tread depth reaches approximately 1.6 mm.
The band positions are indicated by a
triangular mark on the tyre sidewall (A).123
Tyre condition and pressure
Tyre tread wear patterns
Shoulder Wear
Under-inflation (wear on both sides)
Under-inflation will cause overheating of the
tyre, because the tyre will flex too much, and
the tread will not sit correctly on the road
surface. This will cause a loss of grip and
excessive wear, not to mention the danger of
sudden tyre failure due to heat build-up.
Check and adjust pressures
Incorrect wheel camber (wear on one side)
Repair or renew suspension parts
Hard cornering
Reduce speed!
Centre Wear
Over-inflation
Over-inflation will cause rapid wear of the
centre part of the tyre tread, coupled with
reduced grip, harsher ride, and the danger of
shock damage occurring in the tyre casing.
Check and adjust pressures
If you sometimes have to inflate your car’s
tyres to the higher pressures specified for
maximum load or sustained high speed, don’t
forget to reduce the pressures to normal
afterwards.
Uneven Wear
Front tyres may wear unevenly as a result of
wheel misalignment. Most tyre dealers and
garages can check and adjust the wheel
alignment (or "tracking") for a modest charge.
Incorrect camber or castor
Repair or renew suspension parts
Malfunctioning suspension
Repair or renew suspension parts
Unbalanced wheel
Balance tyres
Incorrect toe setting
Adjust front wheel alignment
Note: The feathered edge of the tread which
typifies toe wear is best checked by feel.
4