1986 CHEVROLET CORVAIR oil
[x] Cancel search: oilPage 3 of 56
Downloaded from www.Manualslib.com manuals search engine OM
MOili·I'''·''iliii
This is the General Motors mark of exceiience that appears on ail Chevrolet motor vehicles.
We use it in the same spirit with which craftsmen, through the centuries, have used a personal mark
to identify the products of their skiils: We are proud of the things we make, and we want our customers
to be able to identify them easily and to know that we stand behind them.
Whenever you see this mark of exceiience, you can be certain that it represents our very finest in design
and engineering ... that it has been built with care and dedication ... and that it offers ail the quality,
reliability, safety and value that you have come to expect from Chevrolet.
Chevrolet Motor Division
General Motors Corporation
Detroit. Michigan 48202
Page 10 of 56
Downloaded from www.Manualslib.com manuals search engine OPERATING INSTRUCTIONS
I
YOUR CORVAIR'S FIRST FEW HUNDRED MILES OF DRIVING
Sound design and precision manufacturing methods
will permit you to operate your new Corvair without
adhering to a formal "break-in" schedule. However,
during the first few hundred miles of driving you can,
by observing a few simple precautions, odd to the future
performance and economy of your cor.
It is recommended that your speed during the first
500 miles be confined to a maximum of 60 MPH, but
do not drive for extended periods at anyone constant
speed,
either fast or slow. During this period, ovoid full
throttle starts and unnecessary, quick abrupt stops .
Gentle braking during the first few hundred miles of
operation will result in longer broke life and better
future performance. Avoid unnecessary, hard stops espe
cially during the first 200 miles of operation since broke
misuse during this period will destroy much future broke
efficiency.
Always drive at a moderate speed until the engine
has completely warmed up.
DRIVING FOR ECONOMY
Proper maintenance and wise operation will com
bine to help you achieve maximum fuel economy with
your Corvair. Your Authorized Chevrolet Dealer can
properly tune and maintain your car but wise operation
is your responsibility. Give the cor sufficient warm-up
time, do not make "Full Throttle" storts or unnecessary
severe stops,
and drive at reasonable speeds and as
steady as traffic permits to gain the benefits of all the
economy built into your Corvair.
CAUTION: Avoid inhaling exhaust gases especially in an enclosed area such as a garage. Exhaust gases
contain
a percentage of carbon monoxide which is a potentially lethal gas that, by itself, is tasteless, color
less, and odorless. The exhaust system should be inspected for proper mounting, leaks and missing or damaged
parts each time the vehicle is raised for lubrication or oil change service.
7
Page 17 of 56
Downloaded from www.Manualslib.com manuals search engine operating, except the GEN-FAN indicator rna)' flicker
when
engine is idling.
CAUTION: If either of these indicators light
while .
car is being. -driYen, immediately follow the
procedure outlined .vnder "EMERGENCY OPER
ATING INSTRUCTIONS," so car may be driyen
to the nearest service facility.
BRAKE SYSTEM WARNING LIGHT
This dual purpose indicator light operates as
follows:
With parking brake applied the red light will light
when
the ignition switch is turned on.
As a dual service brake system warning, the red
light will come on when the brake pedal is depressed
if low pressure has developed in either the front or
rear brake system. Have your authorized Chevrolet
dealer locate and correct the trouble immediately.
EMERGENCY OPERATING INSTRUCTIONS
(To be followed if either
TEMP-PRESS or GEN-FAN indi
cators
light while car is being
driven.)
1. Set heoter FAN and HEAT
controls to full "ON" positions.
14
(If equipped with air conditioning, turn air condi
tioning
COOL switch to OFF.)
NOTE: After setting the heater controls, leave
them in that position until cause of trouble is
corrected.
2.
Stop the car a -s , soon as driving conditions permit.
furn ignition
key to OFF to stop engine but turn
key
back to·-PNso heoter blower will continue
to
cool engine.
3. Check for broken fan belt or belt off pulleys or
engine low oil level. If only GEN-FAN indicator
is lighted, belt is not broken or off pulleys and en
gine oil level is satisfactory, car can be driven at
slow speeds; however, generator must be checked
and serviced as soon as possible.
4. If trouble is found to be a broken fan belt or belt
off pulleys, wait approximately five minutes, start
engine and drive car at no more than 25 miles per
hour until TEMP-PRESS indicator comes on, then
repeat Step 2.
NOTE: The GEN-FAN indicator will stay on until
fan
belt is installed.
5. Repeat Step 4 as necessary until facility is reached
where fan belt can be installed.
Page 31 of 56
Downloaded from www.Manualslib.com manuals search engine ing the front corner of the top and rotating the top for
ward until top rests on windshield header.
The locking handles are then rotated outboard
which engages the lock hooks to the striker assembly
located on the windshield header.
Installing the Top Boot
Remove top boot from its protective case, which is normally stored in the luggage compartment.
Grasping forward
end of the boot, slide the welt on
the
boot into the retainer located on the top of the rear
seat back panel. The boot can then be placed over the
lowered top and the metal snap fasteners on the boot
can be snapped onto the studs on the belt molding and quarter trim. Any wrinkles that may exist may be re
lieved
by sliding the forward portion of the boot to the
right or left in the retainer.
Care of Folding Top and Rear Window
The folding top should never be subiected to vola
tile cleaners or household bleaches. Frequent washing
with
neutral soap suds, lukewarm water and soft bristle
brush
is normally all that is necessary to maintain the
"Factory Fresh" look. In the event heavy soilage or
stubborn stains are encountered, a mild foaming cleanser, lukewarm water, and a soft bristle brush may be
used. If desired, the top may be supported from the
underside during the cleaning
operation. Regardless
which cleaning method is used, a generous amount of
28
rinse water is to be used as any soap that runs down
on the
body finish and allowed to dry, may cause streaks.
After cleaning,
always be sure the top is thoroughly dry before it is lowered.
The pliable plastic window, due to its texture, is sus
ceptible
to scratches and abrasions. As a result, the top
should not be lowered when the rear window is dirty.
When cleaning the
rear window, do not use a dry
cloth or volatile cleaning agents. A soft cloth moistened
with
water should be used to remove superficial dust.
When completely washing the rear window, cold or
luke warm water and a mild neutral soap suds may be
used along with a generous amount of rinse water. In
addition, the rear window can be cleaned with G.M. Plastic Cleaner available at your dealer.
A scraper should never be used for removing snow
or ice from the rear window. In an emergency, warm
water may be cautiously used.
NOTE: DO NOT paste any stickers or masking tape
on rear window as damage will result.
ENGINE COMPARTMENT
• To open: Push up the lid release while lifting the lid.
Lift the lid all the way up, then release.
• To close: Lift up on lid, unlock the support arm catch
lock, then lower the lid. Drop the lid the last six
Page 33 of 56
Downloaded from www.Manualslib.com manuals search engine CLEANING HINTS
EXTERIOR APPEARANCE
Your Corvair is fi"nished with General Motors "Magi<=
Mirror" acrylic lacquer. This is a finish of maximum beauty
which, in depth of color, gloss retention and durability is
superior to conventional lacquer finishes.
Washing Your Corvair
Thebest way to preserve the finish is to keep it clean.
Normally only frequent washings are required to maintain
its original beauty. Wash the car in either warm or cold
(never hot)
water, notin the direct rays of the sun, and not
while the sheet metal surfaces are hot. Never wipe dirt
from dry
painted surfaces because this may scratch the
finish. The use
of strong soaps and chemical detergents
should
be avoided and in any event cleaning agents
should be promptly flushed from the surface (lnd not
allowed to dry or they may streak the finish.
Polishing and Waxing YourCorvair
Even though the acrylic paint on your car is more
durable than conventional finishes, under certaincondi
tions you may wish to wax or polish your car to provide
30
maximum protection. Calcium chloride and other salts,
road oil and tar, tree sap, chemicals from factory chim
neys and other foreign matter may damage any known
automobile finish if
allowed to remain in contact with the
paint
film. Prompt washing may not thoroughly remove
these deposits
and, particularly in geographical areas
where these exposure conditions are severe, properly
applied polishes and waxes of known quality will pro
vide the best protection. Chevrolet Dealers offer G.M.
Acry-Mel Hand Applied Cleaner and Polish and G. M.
Triple Acti()n
Cleaner and Polish; both are excellent for
use on acrylic finishes . Road oil
and tar removers must
be warranted safe for use on acrylic finishes. Chevrolet
recommends G. M. Road Oil and Tar Remover.
Protection of Exterior Bright Metal Parts
All bright metal parts of the car should be regularly
cleaned and protected against the same substances
harmful to the painted surfaces. Normally, washing with
water is all that is required. Never use chrome polish,
steam or any caustic soap to clean ALUMINUM. Wash
only with luke-warm water, and if necessary, a mild soap.
Rinse well and dry thoroughly. Severe cases may be
Page 34 of 56
Downloaded from www.Manualslib.com manuals search engine cleaned with a cleaning compound specified for acrylic
finishes.
It is recommended that all bright metal parts of your
Corvair,
after being thoroughly cleaned, be given a
coating
of wax and rubbed to a high polish. This will
serve to keep corrosive agents away from these surfaces,
and should be repeated as often as required.
Cleaning White Sidewall Tires
Use soap, warm water or a tire cleaner and a stiff
brush to remove
road grime and' dirt from white sidewall
tires. A fine
grade of steel wool will remove severe curb
scrapes .
Do not use gasoline, kerosene or any oil product
which would discolor or deteriorate the rubber.
INTERIOR APPEARANCE
Dust and Dirt
Clean the interior of your car frequently, using a
broom
or vacuum cleaner.
Polish should not be used to clean interior bright
finish parts. Abrasive compounds used
in most polishes
may damage the finish. Cleaning with a damp cloth,
then rubbing with a polishing cloth
is all that is required.
31
CAUTION: Some white sidewall cleaners will cause
serious damage to aluminum trim. Use caution
when cleaning tires with this type
of cleaner .
Spots and Stains
Remove upholstery stains as soon as possible or
they may become "set" and difficult or impossible to
remove. First determine the type
and age of the stain
and the kind of upholstery material. Kar Kleen Uphol
stery Cleaner, available from your Authorized Chevrolet
Dealer,
will remove most stains. Do not use alkaline
cleaners for they may
damage the color or finish of the
materials.
Other solutions such as hot or cold water,
ammonia water,
soap, ink eradicator, etc., will probably
discolor and disturb the material.
CAUTION: When cleaning interior fabrics or
carpeting, do not use volatile cleaning solvents
such
as: acetone, lacquer thinners, carbon tetra
chloride, enamel reducers, nail polish removers,
or laundry soaps, bleaches and reducing agents.
NEVER USE GASOLINE OR NAPHTHA FOR ANY
CLEANING PURPOSE.
Page 36 of 56
Downloaded from www.Manualslib.com manuals search engine ENGINE OIL REQUIREMENTS
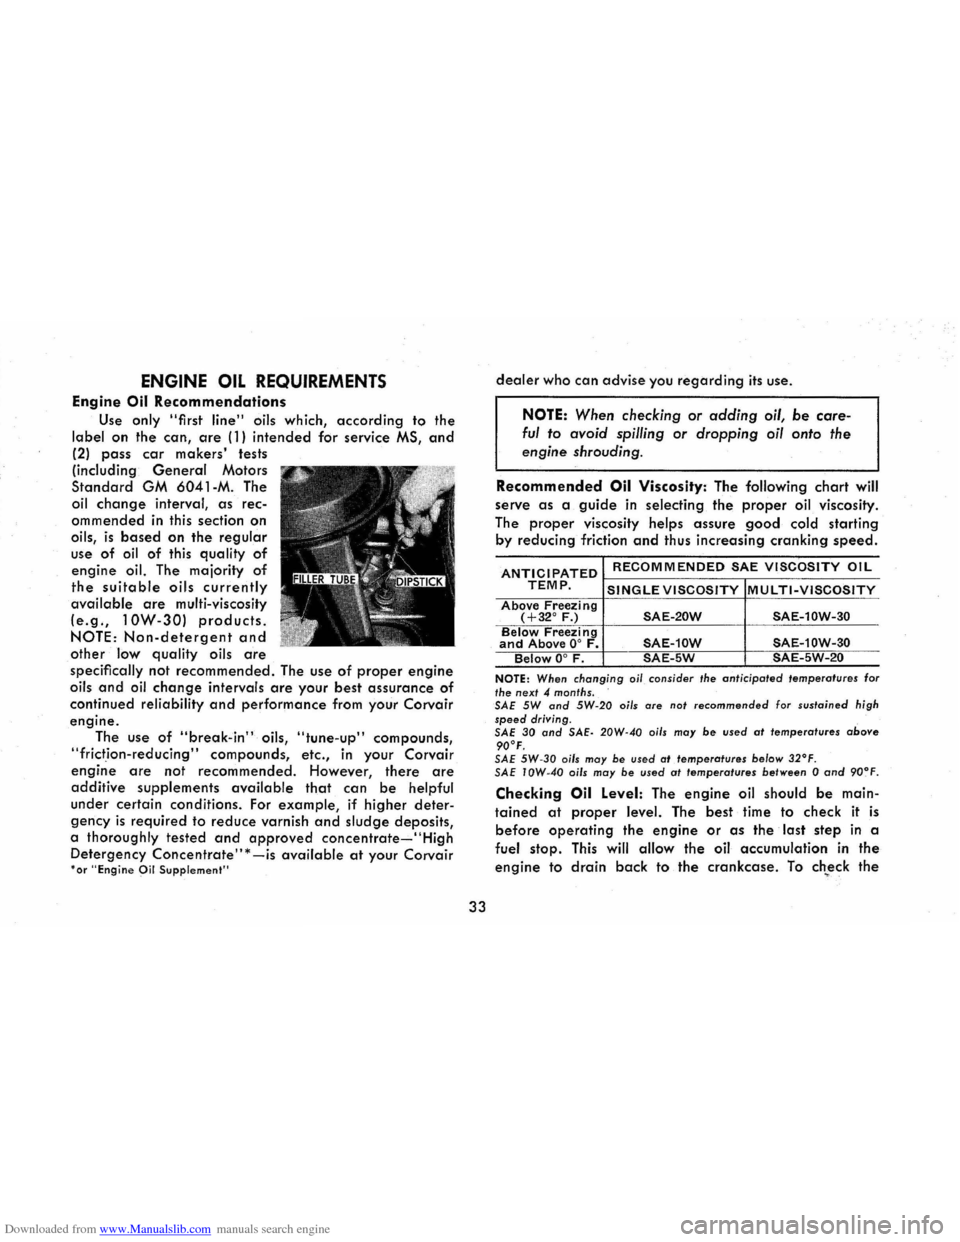
Engine Oil Recommendations
Use only "first line" oils which, according to the
label on the can, are (1) intended for service MS, and
(2) pass car makers' tests
(including
General Motors
Standard GM 6041-M. The
oil
change interval, as rec
ommended in this section on
oils,
is based on the regular
use of oil of this quality of
engine oil. The majority of
the suitable oils currently
available are multi-viscosity
(e.g., 10W-30) products.
NOTE: Non-detergent and
other low quality oils are
specifically not recommended. The use of proper engine
oils and oil change intervals are your best assurance of
continued reliability and performance from your Corvair
engine.
The use of "break-in" oils, "tune-up" compounds,
"frictIon-reducing" compounds, etc., in your Corvair
engine are not recommended. However, there are
additive supplements available that can be helpful
under certain conditIons. For example, if higher deter
gency is required to reduce varnish and sludge deposits,
a thoroughly tested
and approved concentrate-"High
Detergency Concentrate" * -is available at your Corvair 'or "Engine Oil Supplement"'
33
dealer who can advise you regarding its use.
NOTE: When checking or adding oil, be care
ful to avoid spilling or dropping oil onto the
engine shrouding .
Recommended Oil Viscosity: The following chart will
serve
as a guide in selecting the proper oil viscosity.
The
proper viscosity helps assure good cold starting
by reducing friction and thus increasing cranking speed.
ANTICIPATED RECOMMENDED SAE VISCOSITY OIL
TEMP. SINGLE VISCOSITY MULTI-VISCOSITY Above Freezing (+32° F.) SAE-20W SAE-10W-30 Below Freezing and Above 0° F. SAE-10W SAE-10W-30 Below 0° F. SAE-5W SAE-5W-20
NOTE: When changing oi/ consider the anticipoted temperatures for the next 4 months.
SAE 5W and 5W·20 oils are not recommended for sustained high speed driving.
SAE 30 and SAE· 20W-40 oils may be used at temperatures above 90°F. SAE 5W-30 oils may be used at temperatures be/ow 32°F . SAE IOW-40 oils may be used at temperatures between 0 and 90~F.
Checking Oil Level: The engine oil should be main
tained at proper level. The best time to check it is
before operating the engine or as the last step in a
fuel stop.
This will allow the oil accumulation in the
engine to drain back to the crankcase. To ch~eck the
Page 37 of 56
Downloaded from www.Manualslib.com manuals search engine level, remove the oil gauge rod (dip stick), wipe it
clean and reinsert it firmly for an accurate reading.
The oil level should be maintained in the safety margin,
neither going above the FULL line nor below the ADD
mark. Reseat the gauge firmly after taking the reading.
DO NOT OVERFilL.
COOLING SYSTEM CARE
The engine fan belt should be checked for tightness
at regular intervals. When a new belt is needed use only
the approved premium belt available from your Chev
rolet dealer. If any other belt is installed, replace with
recommended belt when possible.
Watch the TEMP-PRESS and GEN-FAN indicators on the
instrument
panel for signs of overheating.
Air inlet louvers, located in the panel below the rear
window, supply air for engine combustion and cooling
and for the Direct Air Heater. Make sure the louvers are
never sealed or blocked.
TIRES
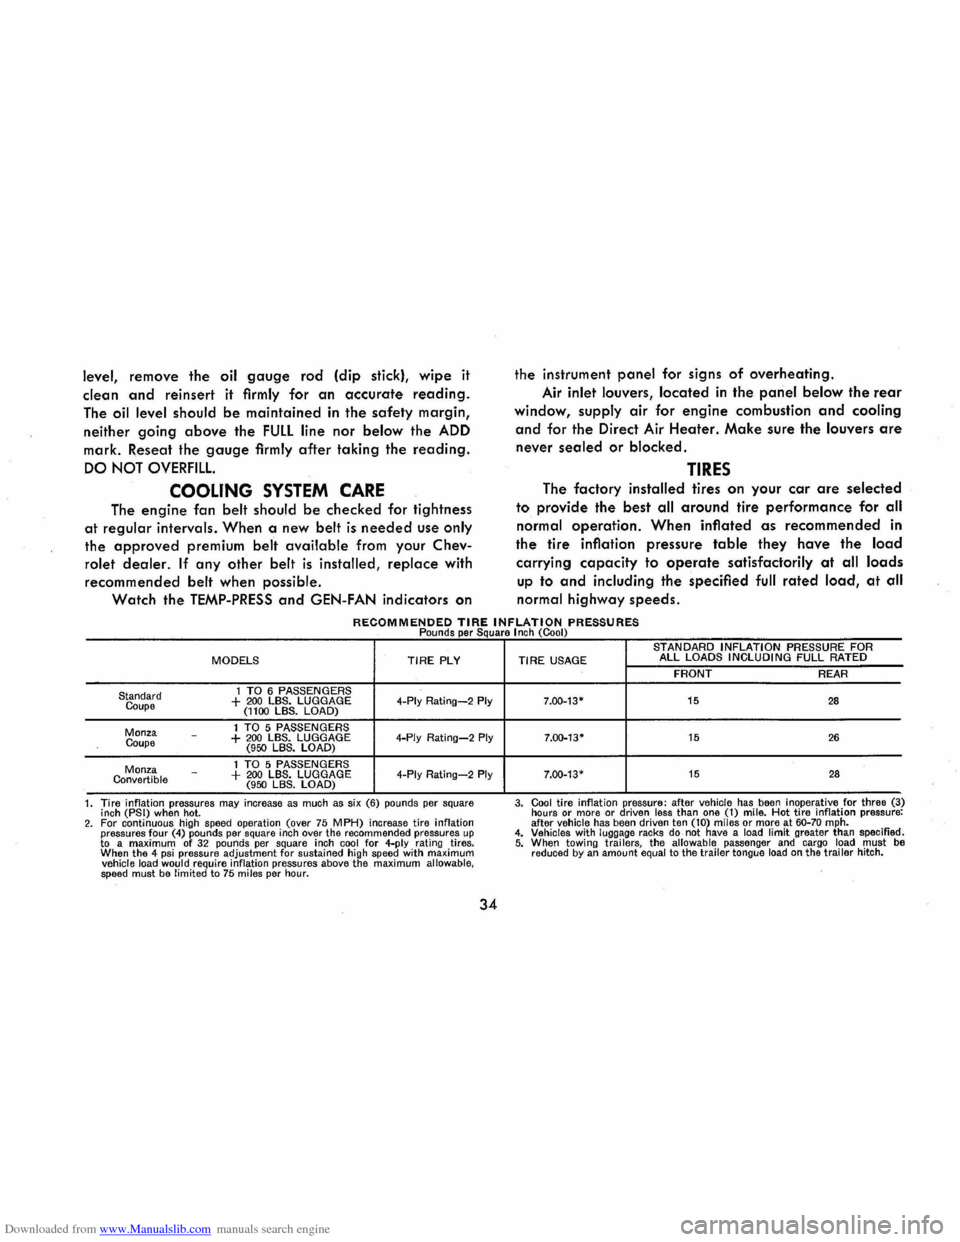
The factory installed tires on your car are selected
to provide the best all around tire performance for all
normal operation. When inflated as recommended in
the
tire inflation pressure table they have the load
carrying capacity to operate satisfactorily at all loads
up to and including the specified full rated load, at all
normal highway speeds.
RECOMMENDED TIRE INFLATION PRESSURES Pounds per Square I nch (Cool)
MODELS TIRE PLY
1 TO 6 PASSENGERS Standard
Coupe + 200 LBS. LUGGAGE 4-Ply Rating-2 Ply (1100 LBS. LOAD)
1 TO 5 PASSENGERS Monza
Coupe -+ 200 LBS. LUGGAGE 4-Ply Rating-2 Ply (950 LBS. LOAD)
1 TO 5 PASSENGERS Monza Convertible -+ 200 LBS. LUGGAGE 4-Ply Rating-2 Ply (950 LBS. LOAD)
1. Tire inflation pressures
may increase as much as six (6) pounds per square
inch (PSI) when hot. 2. For continuous high speed operation (over 75 MPH) increase tire inflation pressures four (4) pounds per square inch over the recommended pressures up to a maximum of 32 pounds per square inch cool for 4-ply rating tires.
When the 4 psi pressure adjustment for sustained high speed with maximum vehicle load would require inflation pressures above the maximum allowable, speed must be limited to 75 miles per hour.
34
STANDARD INFLATION PRESSURE FOR TIRE USAGE ALL LOADS INCLUDING FULL RATED
FRONT REAR
7.00-13-15 28
7.00-13· 15 26
7.00-13· 15 28
3. Cool tire inflation pressure: after vehicle has been inoperative for three (3)
hours or more or driven less than one (1) mile. Hot tire inflation pressure:
after vehicle has been driven ten (10) miles or more at 60-70 mph. 4. Vehicles with luggage racks do not have a load limit greater than specified. 5. When towi ng trai lers, the allowable passenger and cargo load must be reduced by an amount equal to the trailer tongue load on the trailer hitch.