1984 CHEVROLET CAVALIER ECU
[x] Cancel search: ECUPage 6 of 105
Downloaded from www.Manualslib.com manuals search engine SECTION 1
BEFORE DRIVING YOUR CAVALIER
TRANSAXLE
While reading this manual, you will nole many references 10 Ihe "transaxle." The transaxle is a transmission and differential (axle) combined in a singl ,e unit.
To avoid confusion, the word
"transaxle" will be used throughout this manual 10 refer to bolh Ihe transmission and differenlial funclions.
DRIVER DAILY CHECKUST
Be sure you know how to use your vehicle and its equipment before operating it
Before Entering the Vehicle
1. See that windows, mirrors and lights are clean and unobstructed.
2. If any lire does not look normal, check it with a pressure gage.
3. Look for fluid leaks .
4. Be sure everything is properly stowed.
5. Check the area behind the vehicle if you are about to back up.
__ Before Driving Off
1. Lock all doors.
2. Adjust the seat and any movable head restraint
3. Adjust inside and outside mirrors.
4. DO NOT allow anyone to ride where there is no seat belt ; and ALWAYS properly fasten the seat belt.
5. Check that all the warning lights work as the key is turned to "Run" or "Start"
6. Check all gages (including the fuel gage).
7 . Release the parking brake (and make sure the
"BRAKE " light turns .off).
See related topics in this manual
or the Maintenance Schedule folder H problems are found.
STOWING THINGS IN (OR ON) THE VEHICLE
CAUTION: Put luggage or cargo In the trunk, or rea' area if postible. Cargo weight,
whether In the trunk or rear area, should be located as far forward as possible. Cargo weight on the roof Shoukt be positioned .s evenly as possible. Secure all i1ems in place to help keep them -from being thrown about and injuring people during a cot"-ion or sudden maneuver. Do not pile luggage or cargo higher than the seetbaCks. Do not place anything on the filler panel, or any cargo cover between the rear seat~.ck and window.
GUARD AGAINST THEFT
Your new Cava~er has many features to help prevent then of the vehicle, its
equipment, and contents. But these anti-then features
depend upon you to work.
t -1
Page 7 of 105
Downloaded from www.Manualslib.com manuals search engine The time to be most on guard is when leaving the vehicle:
1. Park in a lighted spot when you can, and fully close all windows and
any roof panels.
2 .
Lock the steering column and take the keys:
• Turn the key to "Lock" while depressing the key release lever (if so
equipped) and remove the
key. This locks the ignition and both
steering and shift controls , unless your manual transaxJe vehicle has a key release lever . In thai case . Ihe shiH control is not locked. The key can be removed only when the ignition is locked.
• II you must leave a key wilh the vehicle. leave the square-head key
only. Take the oval-head key with you. This will help prevent unwanted
entry into your vehicle or any locked compartment at a later date. Be
sure to
lock the glove box since the remote release button allows the
hatchback.
tailgate , or trunk to be opened even though the ignition key
has been removed .
3. Keep items that may appear to be of value out of sight and locked up
when possible.
4 .
Lock all doors.
KEYS
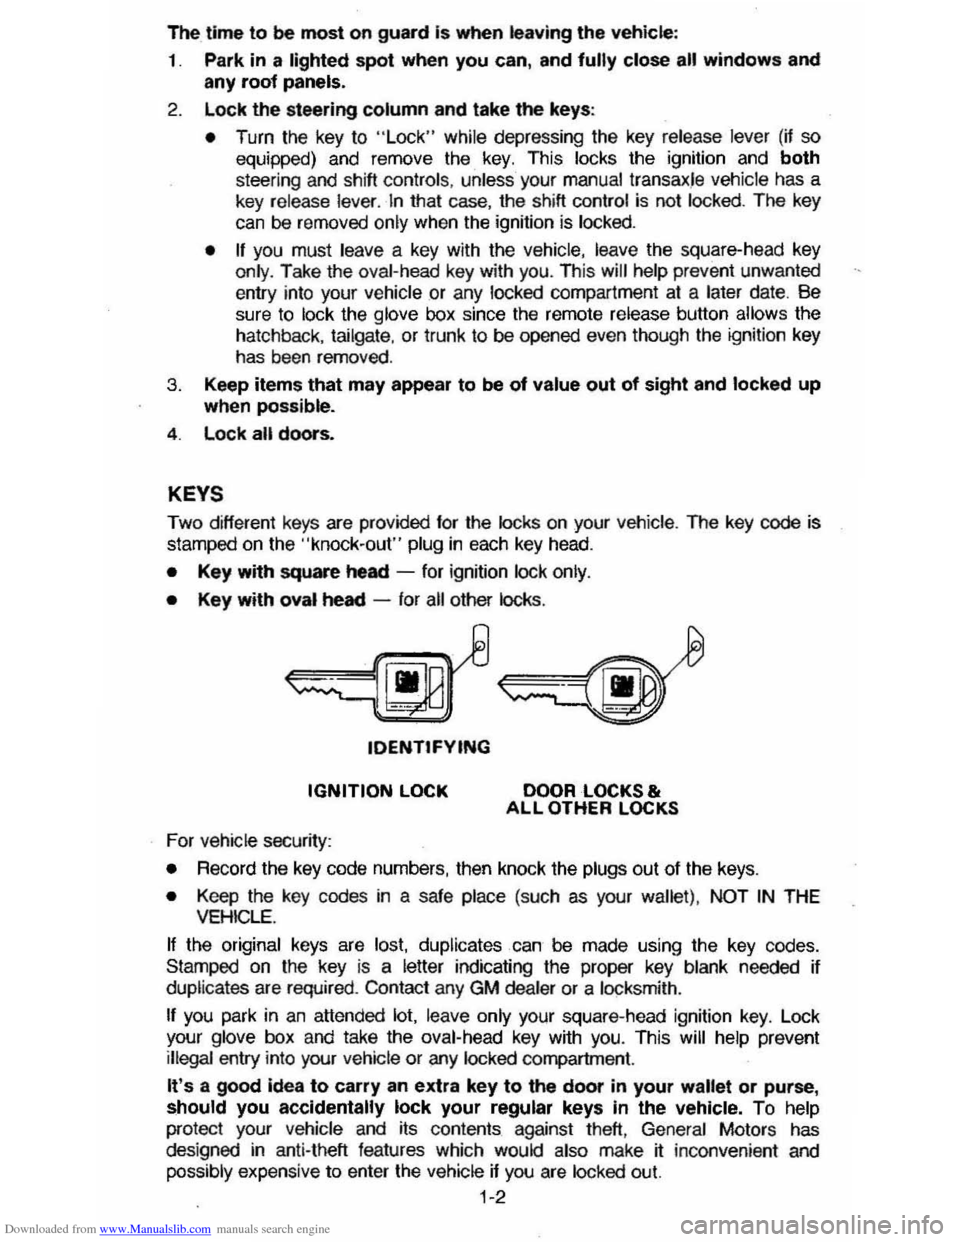
Two different keys are provided for the locks on your vehicte. The key code is
stamped on the "knock-out" plug in each key head.
• Key with square heed -for ignition lock only.
• Key with oval heed -for all other locks .
tDENTtFYING
IGNITION LOCK
For vehicle security:
DOOR LOCKS & ALL OTHER LOCKS
•
Record the key code numbers, then knock the plugs out of the keys.
• Keep the key codes in a safe place (such as your wallet) . NOT IN THE VEHICLE.
If the original keys are lost. duplicates can be made using the key codes.
Stamped on the key
is a letter indicating the proper key blank needed if
duplicates are required . Contact any GM dealer or a locksmith .
If you park in an attended lot. leave only your square-head ignition key. Lock
your glove box and take the oval-head key with you. This will help prevent illegal entry into your vehicle or any locked compartment.
It's a good idea to carry an extra key to the door in your wallet or purse, should you accidentally lock your regular keys In the vehicle. To help
protect your Vehicle and its contents against theft, General Motors has
des igned in anti-theft features which would also make jf: inconvenient and
possibly expensive to enter the vehicle if you are locked out.
1-2
Page 16 of 105
Downloaded from www.Manualslib.com manuals search engine Keep any shoulder belt slack to a minimum. Too much belt slack could
reduce the amount of protection in an accident because the belt is too loose to restrain you properly_
Seat Belt Inspection
Now and Ihen check that belts. buckles, latch plates, retractors, reminder
systems and guide
loops work properly; look for loose parts or damage that
could keep the restraint system from doing its job. Replace a
belt if the
webbing has been cut or otherwise damaged. Replace belts in use during all
but a minor collision; if there is any question, replace the belt.
SEAT BELT LIGHT/BUZZER REMINDER
When the key is turned to "Run" or "Start," a light will come on for four to
eight seconds to remind people to fasten their· seat belts. Unless the driver's
seat
belt is buckled, a buzzer will sound at the same time.
If the seat belt or reminder system does not work as described, see your dealer
for service.
CHILD RESTRAINT
All vehicle occupants and especially children should be restrained
whenever riding
in vehicles. Holding a child in your arms is NOT a substitute for a child restraint system. In an accident, a child held in a person's arms can
be struck or crushed by any unrestrained- rider. An unrestrained child could
also be injured by striking the interior, or by being ejected from the vehicle
during a sudden maneuver or impact. A child restraint system can help
protect a child in a vehicle.
In convertibles, a top-strap-equipped child restraint can only be used in
the Iront seat because there is no appropriate place to aUach a top strap
anchor bracket behind the rear seat in this vehicle. Installing a top strap
anchor bracket behind the rear seat may expose the child to hazards if the top
is raised or lowered with the child restraint occupied,
and, the bracket itself
may damage the convertible top.
In using any child restraint system, be sure to read and follow all instructions on installation and use that come with the system.
Riding Without A Child Restraint
For the best protection in an accident or sudden maneuver, children
small enough lor child restraint systems should be restrained that way.
However, the
following may provide some degree of protection for such children if a child restraint is not used.
• Place an infant who cannot sit up in a baby carrier, preferably covered and
padded. Put it crossways on the vehicle seat and securely restrain it with the vehicle's seat belts. Or, if that is not possible, place it crossways on the floor behind the driver's seat.
• Children who can sit up by themselves should be restrained with a lap belt
when riding in a rear seat. In the front seat a child should wear both lap
and shoulder belt. If the shoulder belt irritates the neck or face move the
child
closer to the center of the vehicle or to the rear seat. Never let a child stand or kneel on any seat. If unusual conditions prevent the use of
restraints, the
child should stand on the floor behind the driver's seat.
1-11
Page 35 of 105
Downloaded from www.Manualslib.com manuals search engine PARKING BRAKE
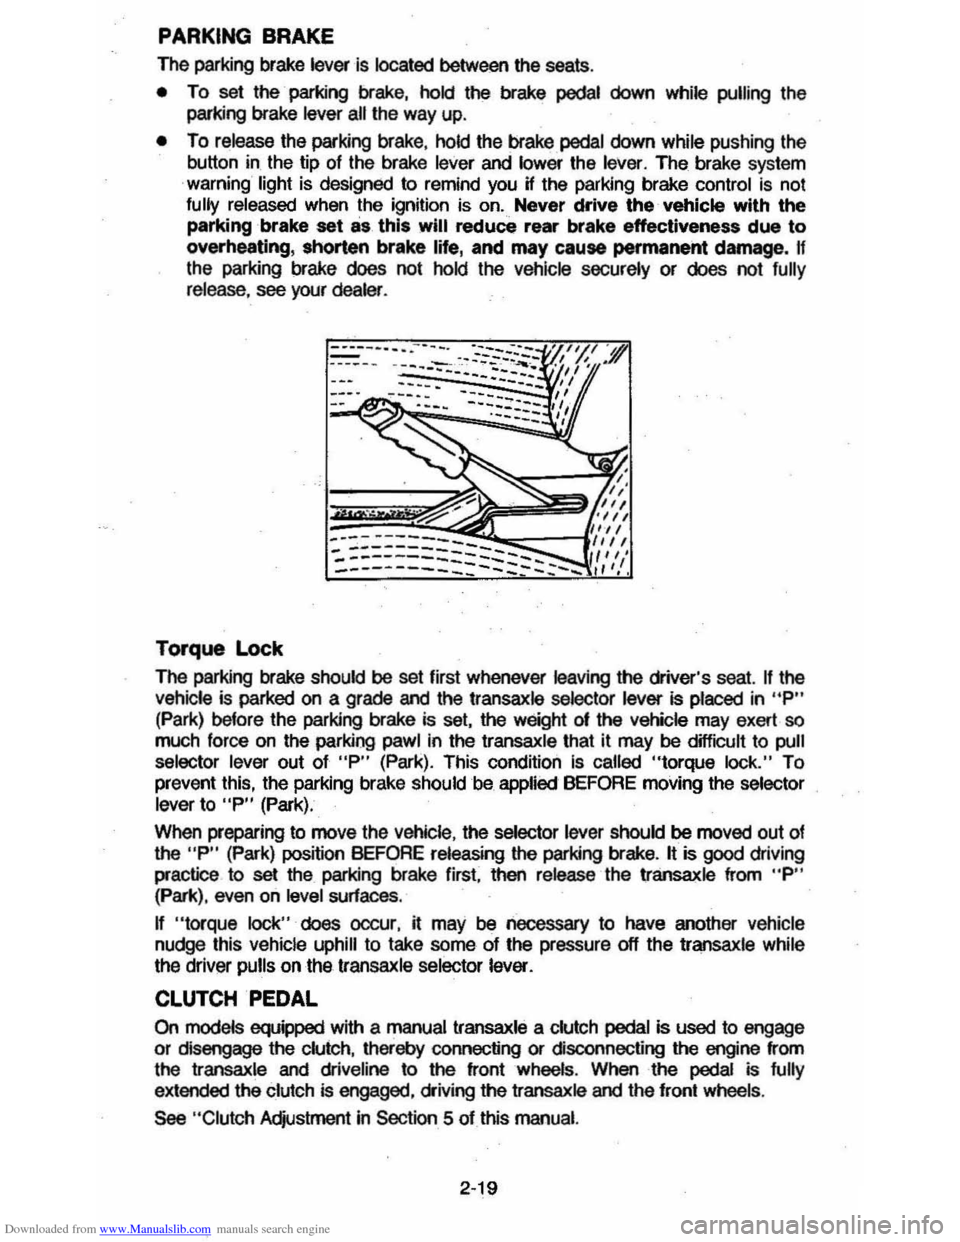
The parking brake lever is located between the seats .
• To set the parking brake, hold the brake pedal down while pulling the
parking brake
lever all the way up.
• To release the parking brake, hold the brake pedal down while pushing the
button in the tip of the brake
lever and lower the lever. The brake system
warning light is designed to remind you H the parking brake control is not fully released when the ignition is on. Never drive the vehicle with the
parking brake set as this will reduce rear brake effectiveness due to
overheating, shorten brake life, and may cause permanent damege, If
the parking brake does not hold the vehicle securely or does not fully release , see your dealer .
Torque Lock
The perking brake should be set first whenever leaving the driver's seat. If the vehicle is parked on a grade and the transaxle selector lever is placed in "P"
(Park) before the parking brake is set, the weight 01 the vehicle may exert so
much force on the parking pawl in the transaxle that it may be difficult to pull
selector lever out of "P" (Park). This condition Is called "torque lock." To
prevent this, the parking brake should be applied BEFORE moving the selector lever to "P" (Park).
When preparing to move the
Vehicle , the selector lever should be moved out of the "P" (Park) position BEFORE releasing the parking brake. It is good driving
practice to
set the parking brake first. then release the transaxle from "P" (Park), even on level surfaces .
n "torque lock" does oocur, it may be necessary to have another vehicle
nudge this vehicle uphill to take some of the pressure off the transaxle while
the driver pulls on the transaxle selector lever.
CLUTCH PEDAL
On models equipped with a manual transaxle a clutch pedal is used to engage
or disengage the clutch, thereby connecting or disconnecting the engine from
the transaxle and dliveline to the front wheels . When the pedal is fully
extended the clutch is engaged, driving the transaxle and the front wheels .
See "Clutch Adjustment in Section 5 of this manual.
2·19
Page 52 of 105
Downloaded from www.Manualslib.com manuals search engine • Adjust the heating or cooWng system to force outside air into the cal as
follows :
1. On cars not equipped with air conditioning , set the fan to high speed
and the upper control lever to any position except "Off."
2 . On cars equipped with air condition ing, set the fan to high speed and
the
upper control lever to any position except "Off" or "Max."
• On cars that have outside air vents in or under the instrument panel, open
vents
fully .
"Gate Ajar" Ught
Station wagons have a "GATE AJAR" warning light located in the instrument
cluster . It is designed to come on ~ the liftgate is not lully closed and the
ignition is on , thus warning against driving with the liftgate even partially open.
See "Engine Exhaust Gas Caution (Carbon Monoxide)" at the beginning 01
"Starting and Operating ," Section 2 of this manual . To test that the ight circuit
is working correctly , start the car and check that the light comes on when the liftgate is open or only partially latched.
Electric Trunk, Hatchback , Or Tailgate Release
An electric release permits opening the trunk, hatchback or station wagon tailgate from inside the car by pressing a release bunon in the instrument panel
glove box. The release lor the hatchback and the station wagon tailgate will
function only II the automatic transaxle is in "P" (Park) or "N" (Neutral) or, on
manual transaxle cars, ~ the parking brake is applied .
SUNSHADE (OPTIONAL)
n your hatchback model is equipped with the optional louvered rear window
sunshade, the
sunshade·is hinged at the top and heid down at the boUom by a
one-quarter tum fastener on each end of the sunshade. This method of
attachment
allows you to raise the sunshade lor cleaning the exterior of the
hatchback glass :
To clean the hatchback lid exterior glass:
1. Using a coin or screwdriver , rotate each lastener one-quarter turn until they pop up; the sunshade is now unlocked .
2. Grasp the lower edge 01 the sunshade approximately in the middle and lift
the sunshade away Irom the hatchback lid.
3. Clean the hatchback glass as desired while holding the sunshade in the
open position.
4 . Lower the sunshade to
its original position and locate the one-quarter turn
fasteners over the holes in the lower bracket assemblies; using a coin or
screwdriver, push the one-quarter turn stud downward
until it engages the
wire bail on the bracket and rotate one-quarter turn to lock. (Make sure the
lastener is
locked to the bracket by. lifting each corner 01 the sunshade.)
NOnCE: DO NOT DRIVE when sunshade is not lOcked in position.
To remove the sunshade from the car, ~ desired , release the sunshade as you would lor cleaning. Then, remove the four nuts which secure the sunshade
hinges to the hinge base
plate on the hatchback lid. Wft the sunshade assembly from the car.
2-36
Page 54 of 105
Downloaded from www.Manualslib.com manuals search engine >1;' l ' "0'
VENT GLASS ~C"rl I / iT'--.... /.1 TO AEMOVE GLASS I,~ATCH ASSEMBlY
PUSH HERE TO ~ / SEPARATE THE @ ':ATCH ASSEM81. Y TRIM LACE~ i VISTA VENT GLASS STOWAGE BAG
/, ---~\~ ~STOWAGEBAG
\~ . ~~ ESCUTCHEON ASSEMBLY S', I I '
" I .,'
OPEN VISTA VENT INTERIOR VIEW VIEWA RETAINER
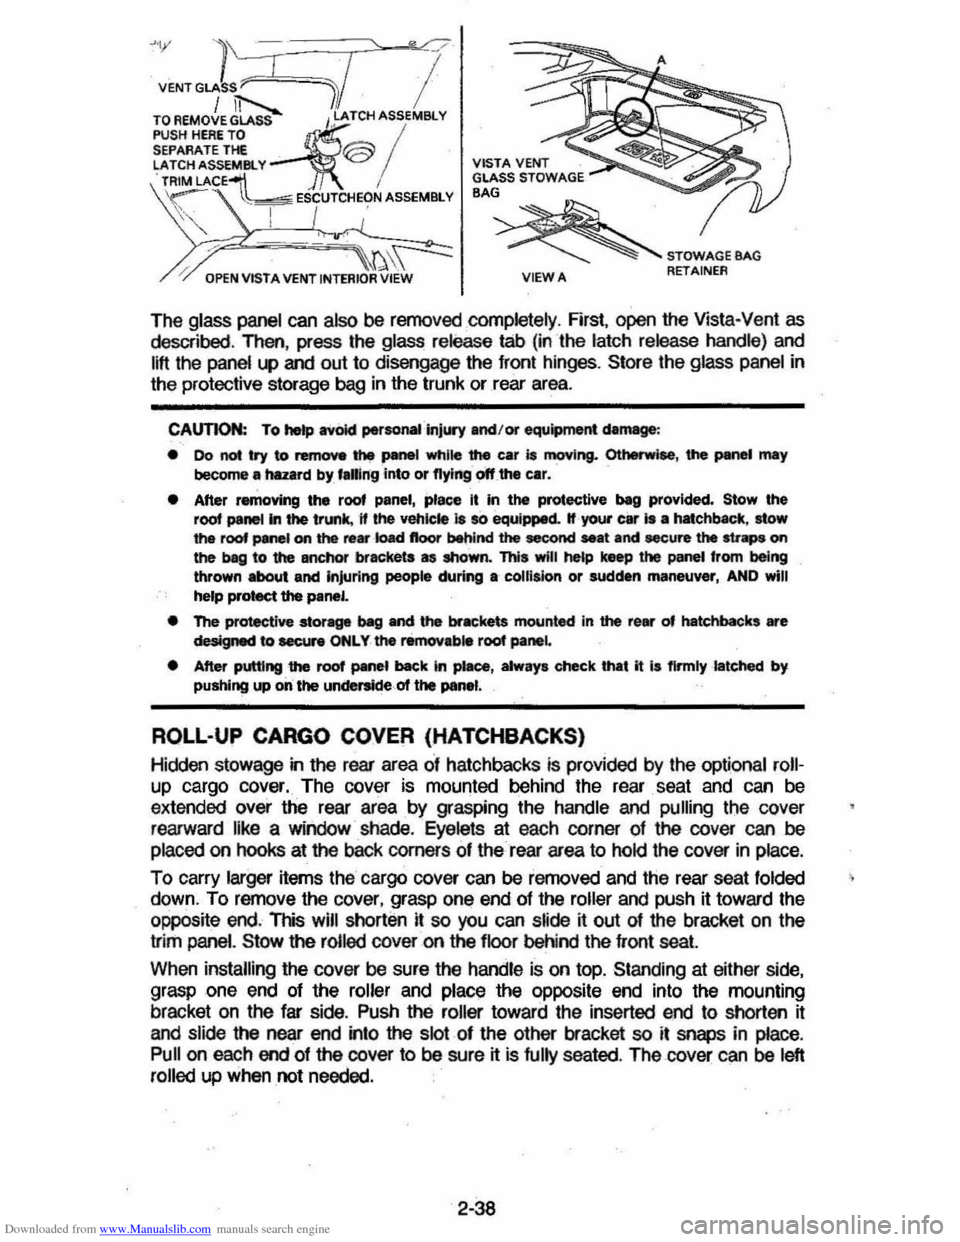
The glass panel can also be removed completely , First, open the Vista-Vent as described , Then, press the glass release tab (in the latch release handle) and
lift the panel
l.P and out to disengage the front hinges, Store the glass panel in
the protective storage bag in the trunk or rear area.
CAUTION: To hetp avoid perso ..... ·injUIY and/or equipment damage :
• 00 not try to remove the panel while the car is moving. Otherwise, the PMWI may become a hazard by, f.ling into or flying off the car.
• After removing the roof panel, place It in the protective beg provided. Stow the root panel In the trunk, 11 the vehicle 18 so equipped. If your car Is • hatchbKk, stow the roof panel on the re ... ·k)ad floor behind the second seat and secure the straps on the beg to the anchor brackets as shown. This will he&p keep the panel from being thrown about and Injuring people during a collision or sudden maneuver, AND will
help protect the panel.
• The protective stor-ve ~ and the brackets mounted in the rear of hatchbacks are designed to eecur. ONLY the removab. root panel
• After putting the roof panel back In piaee, alway. check that it I. flrmlylatehed by pushing up on the underside of the panel.
ROLL-UP CARGO COVER (HATCHBACKS)
Hidclen stowage in the rear area of hatchbacks is provided by the optional roll
up cargo cover. The cover is mounted behind the rear . seat and can be
extended over the rear area by grasping the handle and pulling the cover
rearward like a window shade.
Eyelets at each corner of the cover can be
placed on hooks at the baCk corners of the rear area to hold the cover in place.
To carry larger items the cargo cover can be removed and the rear seat folded
down, To remove the cover, grasp one end of the roller and push it toward the
opposite end. This
will shorten it so you can s~de ~ out of the bracket on the
trim
panel. Stow the rolled cover on the floor behind the front seat
When installing the cover be sure the handle is on top. Standing at either side,
grasp one end of the roller and place the
opPOSite end into the mounting
bracket on the far side . Push the roller toward the inserted end to shorten it
and slide the near
end into the slot of the other bracket so it snaps in place,
Pull on each end of the cover to be sure it is fully seated . The cover can be left
rolled up when not needed.
2-38
Page 57 of 105
Downloaded from www.Manualslib.com manuals search engine OJ ROOF RAIL ASM.
ill CROSSRAI LS
mCRO~RAIL KNOBS
[!)TIE-DOWNS
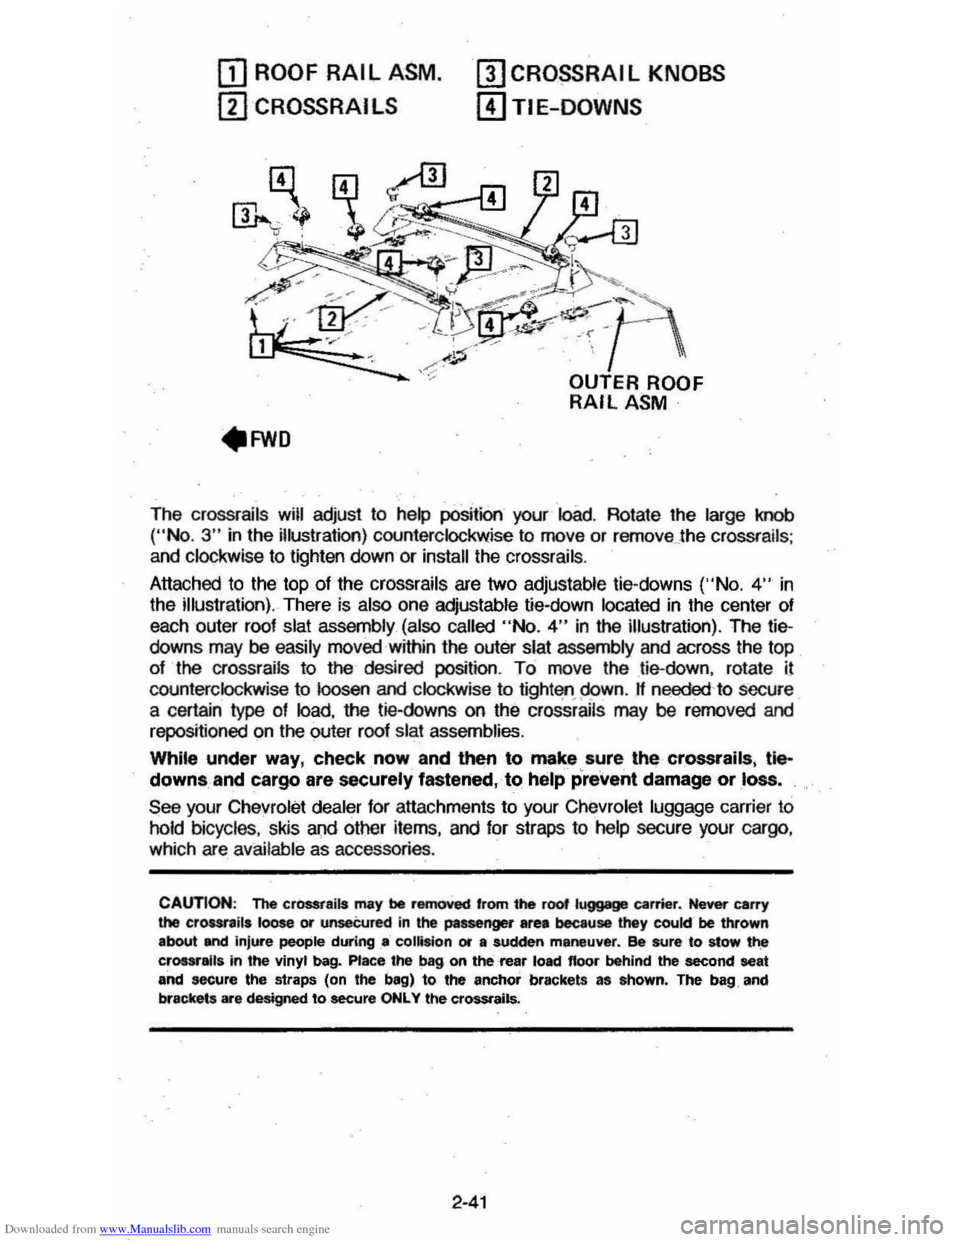
The crossrails will adjust to help position your load. Rotate the large knob ("No.3" in the illustration) counterclockwise to move or remove . the crossrails ;
and clockwise to lighten down or install the crossrails .
Attached to the top
of the crossrails are two adjustable tie-downs ('·No. 4" in
the illustration). There is also one adjustable tie-down located in the center of
each outer roof
slat assembly (also called "No.4" in the illustration). The tiedowns may be easily moved within the outer slat assembly and across the top
of the crossrails to the desired position. To move the tie-down, rotate il
counterclockwise to loosen and clockwise to tight'lfl.95>wn. If needed 'to secure
a certain type of load, the tie-downs on the crossrails may be rerncved and
repositioned on the outer roof slat assemblies.
While under way, check, now and then to make sure, the crossrails, tle~
downs, and cargo are securely fastened, to help prevent damage or loss.
See your Chevrolet dealer for attachments to your Chevrolet luggage carrier to
hold bicycles, skis and other items, and for straps to help secure your cargo ,
which are available as accessories .
CAUTION: The cr0SSt8ils may be removed 'rom the root luggage carrier. Never carry the crour,ils loose or unseCured in the passenger area because they cookr be thrown
about and injure people during .. collision or a sudden maneuver. ee sure to stow t~ crossralla in the vinyl bag. Place the bag on the rea, load floor behind the second seat and secure the straps (on the bag) to the anchor brackets as ahown. The bag, and
brackets are designed to secure ONLY the crossrails.
2-41
Page 62 of 105
Downloaded from www.Manualslib.com manuals search engine coolant level in the see-through recovery tank. The coolant level should be at
or above the
"FULL HOT" mark on the recovery tank.
CAUTION: Keep hand., toots and clothing -away from the engine COOling fa", to help prevent personIl intUry. lhiIlan is electric and can come on whether Or not the engine Is rUnning. 111. tan can start automatically In .respon .. to a heat sensor when the ignition Is in "Run."
Make sure the water pu"",, belts are not broken, or off the pulleys , and that the fan runs when the engine is running and there is an indication on the instrument panel of an overheat condition.
If the coolant level in the recovery tank is low, look for leaks at the radiator
hoses and connections, heater hoses and connections, radiator I and water pump. If you find major leaks, or spot other problems that may have caused
the engine to overheat,
do not run the engine untilthese problems have been
corrected. If you do not find a leak or other problem, caretully add coolant to
the recovery tank. (Coolant is a mixture of ethylene glycol antifreeze and water; see "Engine Cooling System" in "'Service and Maintenance," Section 5, for the proper antifreeze and mixture.) .
CAUTION: Under: some:' conditione, the ethylen~ glycol In engine coolant Is . combustible. -To help avoid being burned, DO NOT spill antifreeze or coolant on the exhauat system or hot engine parts..
If the coolant level in the recovery tank is at the correct level but there is still
an indication on the instrument panel of an overheat condition:
•
You may add coolant directly to the radiator. YOU MUST LET ENGINE COOL FIRST. See "Coolant Replacement" under "Engine Cooling
System"
in Section 5, "Service and Maintenance" in this manual. Follow steps t through 3 for the correct way to remove the radiator
cap
and add coolant.
Once the Engine Coolant Temperature light has gone out (or the Engine Coolant Temperature gage no longer signals an overheat condition), you can
resume
driving at a reduced speed. Return to normal driving after about ten
minutes If the light does not come back on (or the gage pointer does not again
show
ao overheat condition).
tf no cause for the overheat condition was found, see a qualified service technician.
JACKING
CAUTION
To help avoid personal injury:
• FollOW all jacking and stowage instructions .
• Use jack only for lifting this vehicle during wheel change.
• Never get beneath the vehicle, start or run engine while vehicle is
supported by jack.
• Always securely restow spare tire (or flat tire) and all jacking equipment.
3-4