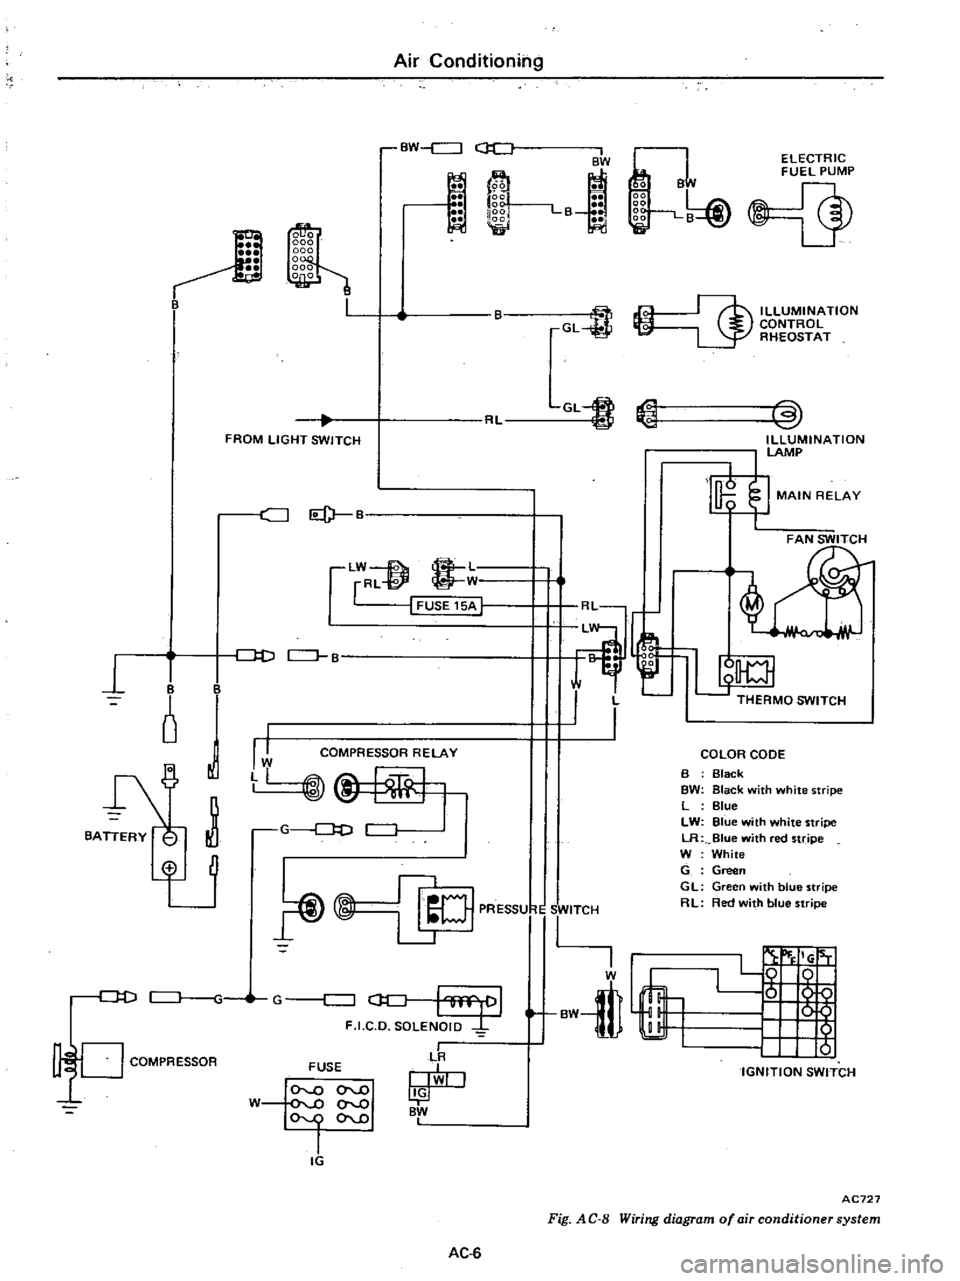
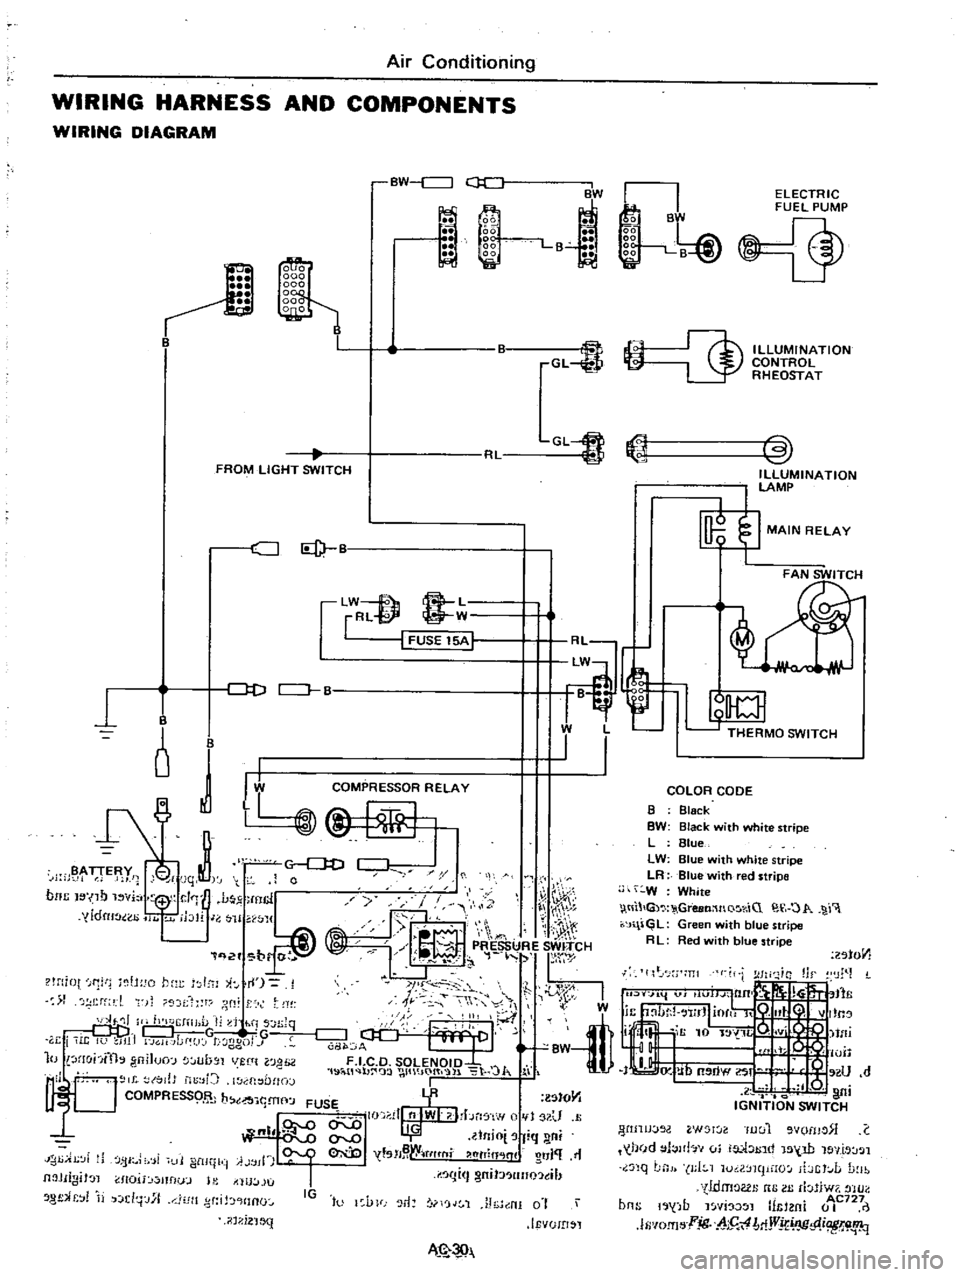
1977 DATSUN PICK-UP wiring diagram
[x] Cancel search: wiring diagramPage 469 of 537

Body
Electrical
System
tive
terminal
or
B
terminal
and
blue
red
wire
terminal
in
wiring
connector
plug
3
To
check
wiper
low
speed
opera
tion
connect
L
terminal
to
ground
with
ground
cable
or
connect
L
termi
nal
to
black
wire
terminal
make
sure
that
wipers
sweep
at
low
speed
4
To
check
wiper
high
speed
opera
tion
connect
ground
cable
to
H
termi
nal
in
the
same
manner
as
in
step
3
make
sure
that
wipers
sweep
fast
5
During
low
speed
operation
con
nect
E
terminal
to
ground
and
conl
ect
P
and
L
terminals
with
lead
wire
as
shown
in
Figure
BE
38
At
this
time
make
sure
that
auto
stop
mechanism
actuates
to
stop
wiper
blade
at
the
specified
position
6
Wiper
is
in
good
condition
if
above
tests
are
made
as
indicated
H
tenninal
Blue
white
o
@
C
BE864A
Fig
BE
38
Wipftrmotor
rt
Cl
Battery
Fusible
link
e
Ignition
witch
Wiper
and
washer
switch
I
D
j
Fuse
box
Y
O
Continuity
test
Remove
wiper
switch
from
vehicle
as
outlined
in
Wiper
Switch
Test
continuity
through
wiper
switch
by
using
test
lamp
or
ohm
meter
WQ5hcr
motor
Wiper
motor
191
LR
y
I
L
I
w
J
Wiper
switch
B
terminal
P
tenninal
L
terminal
E
terminal
H
t
rmjrW
r
21
1
b
I
r
1
I
I
BE865A
Fig
BE
39
Circuit
diagram
of
windshield
wiper
wtUher
sy
te7tl
TERMINAL
I
SlOIT01
POSIl10N
I
I
OFF
2
1
1
2
I
b
ii
4
5
Switch
position
2
I
Z
m
Z
I
I
I
I
I
I
I
10
I
3
2
BE686B
Fig
BE
40
Wi
r
witch
8E
24
Page 494 of 537

The
refrigerant
within
the
thermo
bulb
changes
in
pressure
through
the
super
heat
condition
of
vaporized
re
frigerant
gas
which
comes
out
of
the
evaporator
causing
the
deflection
of
the
diaphragm
The
lift
of
the
ball
valve
attached
to
the
diaphragm
is
changed
by
the
deflection
of
the
dia
phragm
thus
controlling
the
amount
of
refrigerant
passing
the
orifice
ELECTRICAL
CIRCUIT
DESCRIPTION
The
electrical
circuit
of
the
air
conditioner
consists
of
four
switches
two
relays
a
solenoid
valve
a
fan
motor
and
a
compressor
magnetic
clutch
Air
Conditioning
Diaphragm
Orifice
Valve
ball
AC729
4
Sensing
bulb
Fig
A
C
6
Expansion
value
The
following
wiring
diagram
pro
vides
a
complete
description
of
the
whole
circuit
When
the
ignition
switch
and
the
fan
switch
are
ON
the
main
relay
is
activated
causing
battery
power
to
flow
through
the
fan
motor
and
the
magnetic
clutch
The
magnetic
clutch
is
activated
by
the
thermo
switch
AC
5
000
l
1
Motor
2
Fan
3
Lower
case
4
Cooler
duct
5
Evaporator
6
Expansion
valve
7
Upper
case
8
Resistor
9
Main
relay
10
Thermo
switch
II
Cable
clamp
12
Cable
13
Harness
AC725
Fig
AC
7
Cooling
unit
pressure
switch
and
compressor
relay
The
blower
motor
fan
speed
is
con
trolled
by
the
fan
switch
and
resistor
The
solenoid
valve
is
also
activated
This
in
turn
causes
the
fast
idle
control
device
F
l
C
D
to
increase
engine
speed
when
the
vehicle
is
at
rest
with
the
engine
ON
Page 495 of 537

1
I
6
I
BA
RY
i
Air
Conditioning
BW
c
J
BW
n
B
m
00
L
ELECTRIC
FUEL
PUMP
oB
tl
b@
L
t
FROM
LIGHT
SWITCH
c
J
LW
2
L
rRL
fZP
W
I
FUSE
15A
J
D
CJ
B
1
COMPRESSOR
RELAY
B
GL
I
lL
GL1J
ILLUMINATION
CONTROL
RHEOSTAT
3
ILLUMINATION
LAMP
I
I
MAIN
RELAY
FAN
SWITCH
I
r
1
UE
H
I
I
THERMO
SWITCH
COLOR
CODE
@
IC
PRESSU
1
rlTCH
D
D
G
c
J
oc
I
m
f
F
I
C
D
SOLENOID
COMPRESSOR
FUSE
LR
I
BW
O
W
ov
J
I
IG
0
0
OVJ
AC
6
B
BW
L
LW
LR
W
G
GL
RL
Black
Black
with
white
stripe
Blue
Blue
with
white
stripe
Blue
with
red
stripe
White
Green
Green
with
blue
stripe
Red
with
blue
stripe
IG
BW
t
1
n
L
IGNITION
SWITCH
AC727
Fig
A
C
B
Wiring
diagram
of
air
conditioner
system
Page 514 of 537

Air
Conditioning
REMOVAL
AND
INSTALLATION
COMPRESSOR
REMOVAL
INSTALLATION
IDLER
PULLEY
FAN
BELT
TENSION
ADJUSTMENT
REMOVAL
AND
INSTALLATION
INSPECTION
COOLING
UNIT
REMOVAL
AND
INSTALLATION
DISASSEMBLY
AND
ASSEMBLY
INSPECTION
RECEIVER
DRYER
AND
PIPING
COMPRESSOR
REMOVAL
I
Remove
battery
2
Disconnect
compressor
lead
wire
at
connector
3
Loosen
idler
pulley
lock
nut
then
adjusting
bolt
Remove
compressor
drive
belt
from
compressor
pulley
AC477
Fig
AC
28
Removing
drive
belt
4
Discharge
system
Refer
to
Dis
charging
System
under
General
Service
section
CONTENTS
AC
25
AC25
AC26
AC
27
AC
27
AC27
AC
27
AC27
AC
27
AC
2B
AC
29
AC
29
REMOVAL
AND
INSTALLATION
INSPECTION
WIRING
HARNESS
AND
COMPONENTS
WIRING
DIAGRAM
MAINTENANCE
MAIN
RELAY
COMPRESSOR
RELAY
FAN
SWITCH
RESISTOR
FOR
FAN
SWITCH
THERMO
SWITCH
F
I
C
D
SOLENOID
VALVE
AC29
AC29
AC30
AC30
AC31
AC31
AC31
AC31
AC32
AC32
AC
32
5
Remove
flexible
hose
fixing
plate
and
disconnect
low
and
high
pressure
flexible
hoses
from
compressor
Notes
a
Use
two
wrenches
when
disconnect
ing
pipe
joints
b
Plug
flexible
hose
and
compressor
joint
openings
immediately
after
disconnection
to
prevent
entry
of
dust
moisture
laden
air
etc
Fig
AC
29
Disconnecting
ftexible
hoses
from
compressor
6
Remove
bolts
securing
fuel
tube
to
compressor
attachment
AC
25
Y
1
L
AC744
7
Remove
four
bolts
securing
com
pressor
to
its
bracket
Compressor
and
attachment
can
now
be
detached
as
an
assembly
Notes
a
There
are
a
total
of
four
bolts
two
on
upper
side
of
bracket
and
two
on
lower
side
of
compreSsor
Loosen
upper
bolts
and
remove
lower
bolts
When
removing
upper
bolts
securely
hold
compressor
with
one
hand
b
When
installing
temporarily
tighten
upper
bolts
then
tighten
lower
bolts
Page 519 of 537

Ll1
1t
W
l
THERMO
SWITCH
I
I
Air
Conditioning
WIRING
HARNESS
AND
COMPONENTS
WIRING
DIAGRAM
BW
c
J
ii
1
l
BW
La
GL
FROM
LIGHT
SWITCH
CJ
Id
lW
f
8
L
rRl
@
W
I
FUSE
15A
1
J
D
CJ
B
B
o
J
I
B
y
i
jqt
0
noc
I
no
vi
1
J
mcl
y
yldru
ao
11
jblr
J
H
WJ1
q
2f
br
r
t
lH
iot
f1
tH
o
hm
I
l
i
I
1
rf
l
t
f
r
dt
ll
II
h
J
IiJ
l
I
d
hi
s
n
Jq
DDj
G
w
TG
r
i
i
It
U
JI1
GH
Jdf
J
t
ggo
J
10
lHohfth
gniJuo
lUb
Jl
VUlt
l0
H
2
1
19
i
tl
b
wt
IO
t
l
lo
J
I
l
l
to
tJ
b
YR
lStO
Y1
1
t
J
I
FUSE
I
II
nlWI
I
bn
f
w
1
U
QI
llnio
fiq
ni
I
tsH
W
tflt
fli
htTin
lnl
O
J
11
IJ
i
Ji
fjI
i
i
11
i
ltll
ii
A
jll
I
I
I
gm
J
lIno
tl
Jl
JIIgiJ
l
1I0U
mflu
J
l
tllU
lJU
8
f
r
j
d
j
J
l1
Jlt
d
HInO
IG
to
l
VFJ
r1
rjJ
1
J
h
nI
0
i
IEvUID
l
il
1
i2
1
MN
k
B
gg
liii
gg
1
B
J
Ii
i
ELECTRIC
FUEL
PUMP
@
ILLUMINATION
CONTROL
RHEOSTAT
COLOR
CODE
B
Black
BW
Black
with
white
stripe
L
Blue
LW
Blue
with
white
stripe
LR
Blue
with
red
stripe
W
White
tll
G
GreeMnQ
r
iC
O
1
r
J
l
GL
Green
with
blue
stripe
R
L
Red
ith
blue
stripe
201011
lIt
J
m
I
W
tfli
I
o
lUll
IJ
Ub
OW
If
U
d
l
Q
I
ni
IGNITION
SWITCH
WIJIJJOO
W
l
Iuul
vomo
C
held
l
Jlb
vi
ia
1
1
tnd
15
W
le
llt
J
l
nq
LnJ
J
I
1
luil
mpHO
ibGt
L
D
lb
tldmoGl
nG
III
rbliw7
tHO
b
b
1
AC727
ns
1
j
fJ
l
YI
l
mtl
m
0
I
lfi
IO
fI
l
jg
h5
4
MjVj
IJC
p
i
W
i
1q
Page 536 of 537

T
h
M
U
lAIIl
j
ro
o
i
e
w
J
lPUMP
Q
O
WIRING
DIAGRAM
I
IIITSlDl
AI
ij
L
rn
H
r
IJ
rC
jil
11
i
Jl
o
J
11
Il
r
oiiil
IIrTllI
ii
i
t
1
i
U
3
E
1
1
l
r
5
fl
U
Eel
I
k
1
J
l
II
I
L
L
It
1
I
c
1
QbJ
E
f
t
d
E
1
I
it
F
O
SE
FF
l
vIII
i
I
J
t
E
rBtr
irK
nrr
t
UFo1
i
Joftl
u
f
l
1
1
O
tn
L
J
V
L
r
j
I
rmIw
nil
fflI
ml
l
li
JJ
n
E
CC
Mji
i
l
b
WJ
r
D
IIL
I
l
C
II
i
i
L
T
l
L
I
I
r
0
in
i
M
mB
I
llC
OUIOD
1
L
11
I
rL
ii
fH
IURf
L
I
i
J
l
T
SOlENOID
II
f
n
I
r
0
Ol
NOI0
y
lI
Ullt
lt
UIl
ll
ll
Dill
lfT
l
l
MNIMG
P
l
lI
S
r
HOUIUlTON
l
cP
HA
AAD
wd
I
ii
ii
I
r
J
L
P
It
J
1
o
o
I
III
aU
tie
1AN
UNIT
GAUGE
e
l
J
I
L
i
I
L
M
W1
ii
Ir
1
MhROl
IT
I
IllUMINJflON
l
P
I
I
I
I
Ii
r
I
W
IW
JI
t
J
l
1
1
M
I
l
IlJi
i
J
W
rElI
C
rU
T
1
1I0Nr@J
LillI
l
a
J
J
WJ
H
E
Jr
G
j
ONlJ
P
1
L
J
II
IPH
I
1GHl
r
Rl
JILlUMINAlION
r
l
lllU
IM
1I0N
l
L
CON
OllH
OS
Jl
i
P
Fll
S
11lII1T
Gl
0
d1
EI
1
1II0NS
II
g
11
IIO
l
OISlATIO
Alr
tl
SIST
lI1
l
SfJ
II
ITIO
COll
CAlIrCl
IA
I
1l0nfl
J
rm
n
I
L
n
1
t
LI
iElr
I
Ct
@
C
I
l
I
11
l
@
1
1
B
w
l
V
TilBlJ101
r
i
I
J
J
1
D
f
J1J1
mlSl
II1
IQClTIO
ICOIL
QlI
CALlFO
I
1l00ELS
iGI
L
f
w
Ih
rUSE
IOCI
3
1
w
1S1
t
IDA
1
1
e
o
rL
l
r
e
COIl
CT
I
1
ll1t
I
lSII
lo
CIlIr
lSII
WI
aM
ItlII
E
151
ISA
iO
J
r
g
l
l
H
g
I
P
tlII
till
I
PI
to
bo
1Jo
lIool
a
1
ts
lli
lo
Ct
I
Ull
1171
IlCl
lJP
t
J
L1CE
t
rt
VLA1II
W
I
TlIl
IIl
ATIO
1
1
M
JlI
SIOE
lllltlUlAII
lDTF
w
on
LOlTGllI1
r
1
lIOC
JII
tTD
C
lW
tlKlI
CCNlEClD
ORIlAl
ttOSlO
I
IlAL
FIJrNIA
OIHAur
ll
1
1l00m
F
II
OIlATlt
ISIQIj
ll
U
SMI
llO
ItlUlCIJIjQIlICJO
lllOI
fLAlI
UilTIOllS
IIO
IITlOIswntH
U
MTlIlGSWlICH
lUUlJlXtlftO
lIOOISQ
Dll
O
TI
Il
Ult
ll
W
l
UAllD
SWITCH