1974 FORD CAPRI Workshop Manual
[x] Cancel search: 1Page 129 of 205

)
Chapter 7 Propeller shaft
Contents
Cenl,C be"wl(J rCl1<,w,,1 !':HlII d'''!I(lOSIS 1',01'"11,,, Shill, Gel,..,,;!1 li('SCIIIIIIO"
Specifications
Type
Torque wrench settings C{:II(,,, I,/!,,, ,,,! )
(',op"lll:r shall (" "',II i,xlc I I,moO]
Cello!',,1 duscriptioll
3 , ..
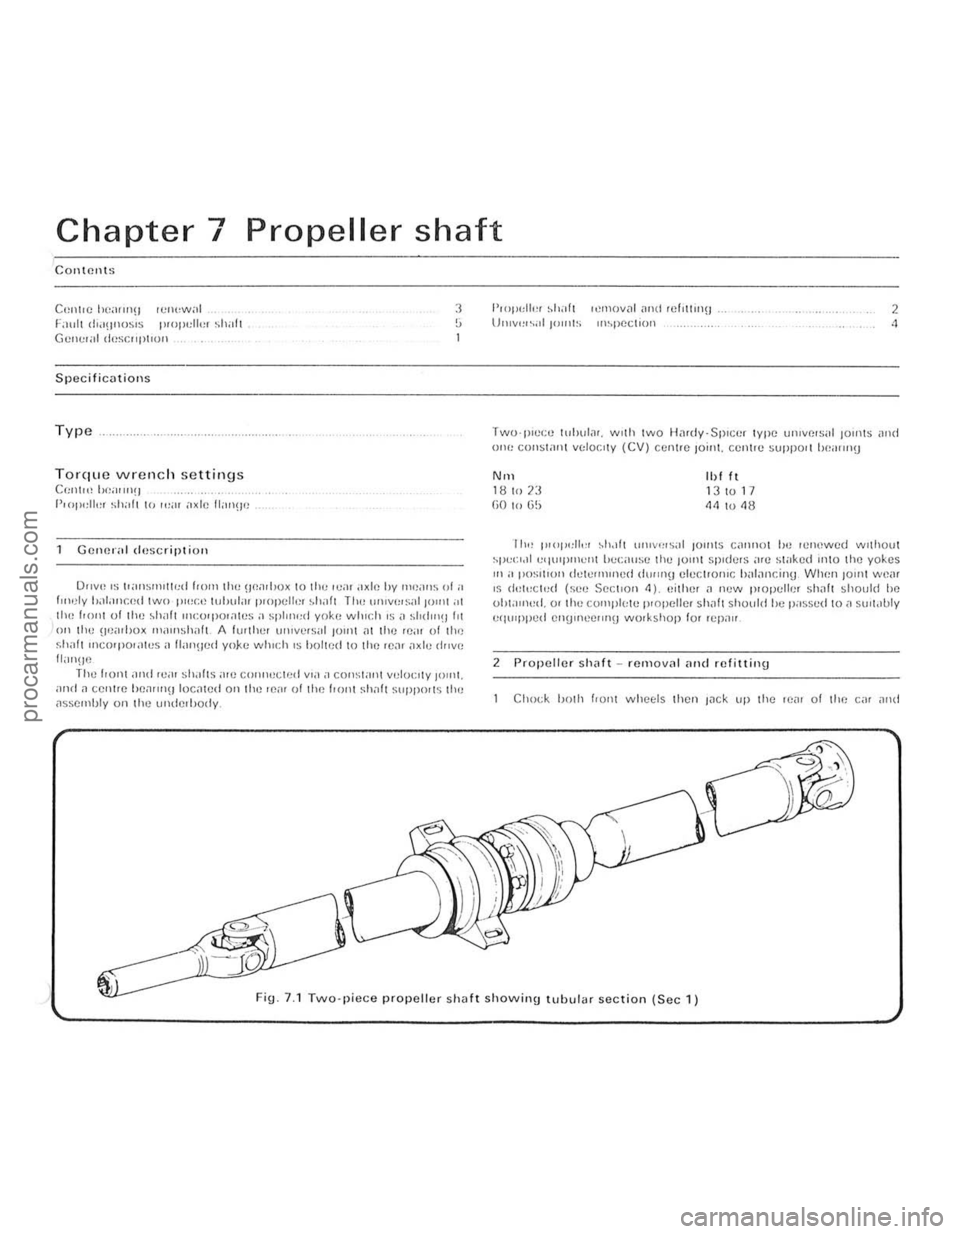
o"V() IS lI"Il~""w,d 110m III!: HP.;uh<)x 10 thCIVill ,"xlc hy mpdns "r " r",,!ly 1)"I,lIlted two 1''',Co) tuhul;1I p,opcli.:r ~hafl The u 'Hv""Si,1 JOlin ;" 1he 1'0111 of tile ,hilh IIH:()rpOI,lICS;) sphno"r yoke winch IS,' ~hd"'!II'1 Oil Iliu \lUilllJu x "''''''SIHlft A (w Illel lIIuvcrs"r lUll)! ,11 11'0 leill uf the f.Il,1f1 IIl(;orpOr;\I(!s iI [lill1lter! yoke which IS holled to the Ie", ,1xle drive !lilll\IC The honl ,111<1 "."" sh"hs illU cOIll"'cl(,d vIa a COI1~1
!'wpldlc, ~h;!h ,ctl1()v;)1 ,md rcf,UIIlU l)n,v,,,,,,II'''''IS '""pectln!) 2 .,
TWO'IHCCll tl1l>\lI., •. w llh lwo HMdy,Splcer type uillvelsitl 10lols an d 01'(' COIISWII1 V"loc,ly (CV) ccnl.e 10"'1. CC"lIC SUppO' 1 IUI;II">!)
NIIl 1 B 10 23 (;0 hI tj~
'1)111 13 10 17 114 10 48
II", 1110) ",11." ,hol!1 ,,,uv,,,s;r ) )OUlls C;IP"lOl hc ICllewed wllhoul ,purloll "'l"'Pllh:ll1 hcciI",e Ihe )01111 s pldels ;IIC sl"ke(1 11110 Ihe yokes ,n i> I'OSl1l011 dUWln)lnud dUlln9 elccl ,olHC h;>l;lI1cin\j When 101111 we;u IS dd,'Cit,d (seu SectIon 11). "ilher .1 new IHopelh;. sh~1t should he ohl;"""d. 01 lilt) cOlllpl{,tc plopelle. shah shQuld he p;rss~d to;> SIIII.IUly
equI pped el1!).necIIt>\j wOlkshop lor I~pn"
2 Propeller sh
ig. 7. 1 Two-piece propeller shaft showing tubular section (Sec 1)
procarmanuals.com
Page 130 of 205

Cllilpter 7 Propeller shaft 129
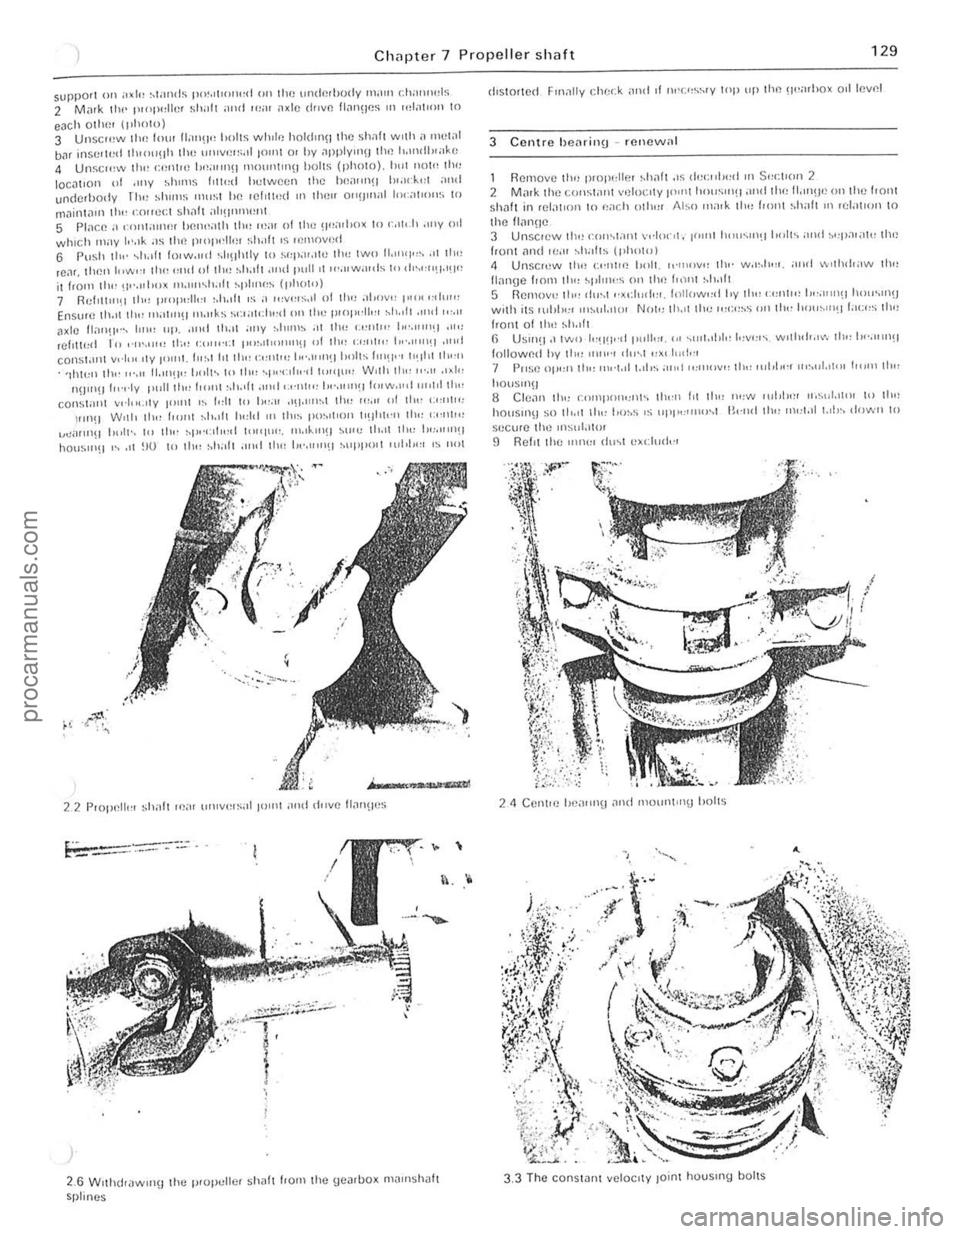
suppOrl 011 ... 1" ~ta"ds P'>'>II'''IIo:d Oil Ihe wldr,hudy m
=----~~.--,--.-,-
)
>
2,6 W 'lhdr
3 Ccntre h C
1,0US"\~1 8 elc,," Ih" r.""'P()"""(~ II",,, 1'1 II", Il"W ,ul,\\,' , 11,,,,,1,11,11 II) II,.,
hOIlSIfl\) so 11r.11 III" Ij(,~s,~ LlPI',,""I)~1 B""d th" "",1., 1 1.1i1" down I" 5,!CWe tho IIlSul,H
procarmanuals.com
Page 131 of 205

130 Chapte r 7 Pro pelle r sh aft
14
. 12 ~
"> ., I>
" 10 11
9 a
·6)6f
. -r 3
~I"")~ 2
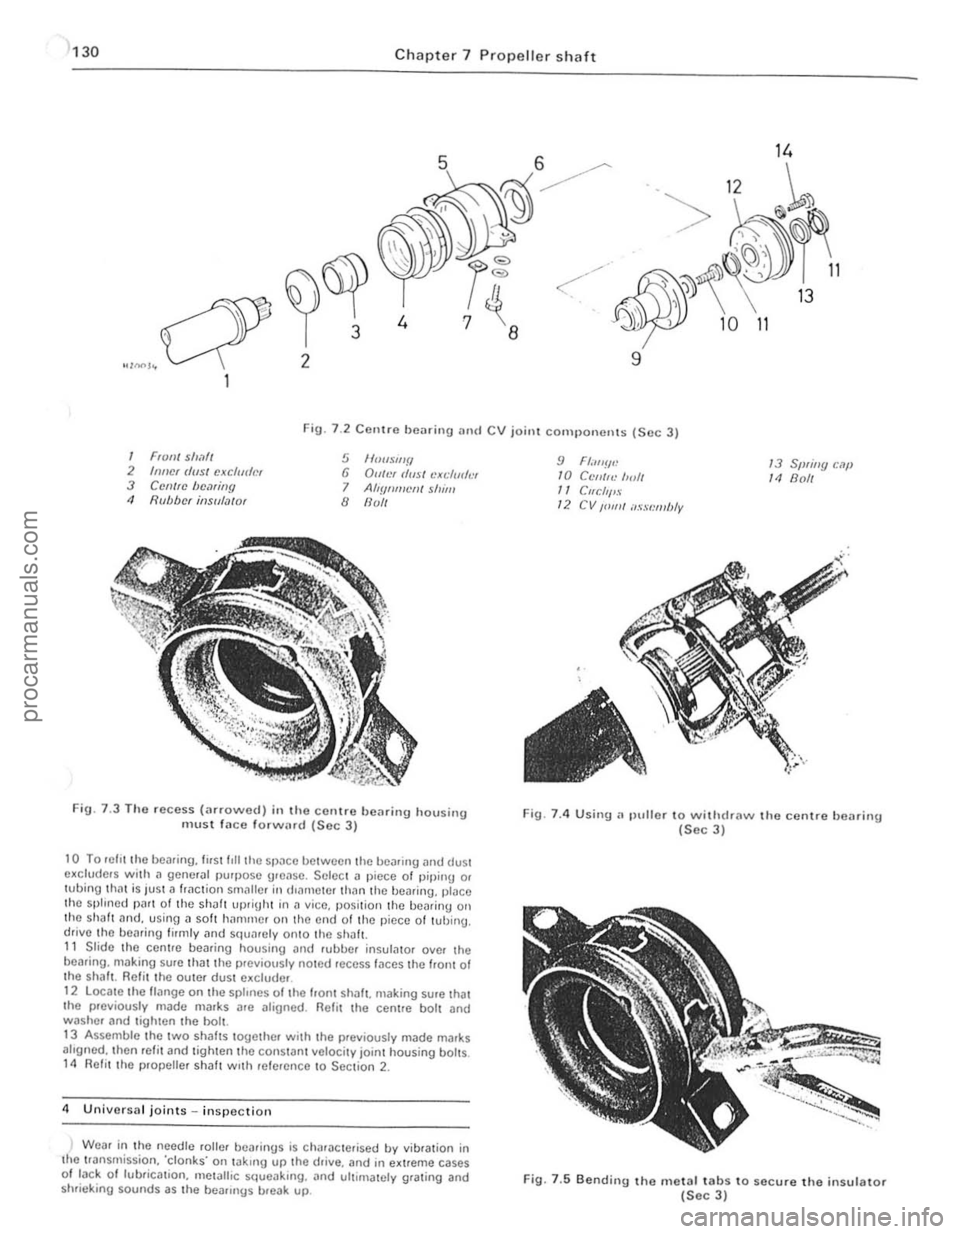
Fig. 7 .2 CCllIre bearing and CV joint cOIll I)onenls (Sec 3)
1 FIO,,/ sll,1// 2 Inncr (/(IS/ cJ(cfudm 3 Cemrc bC.1riny 11 Rubber in$u/.l/(J'
5 1f00wl/f/ 6 Du/!)( rlusl cXl;/mh'I 7 AIlYflml'lJ/ shim 8 flull
FiU · 7.3 T ho recess (;ufo\l\lcd) in the <:orllre bearing housing m ust la ce forw(.rd (Soc J)
10 To lI~fll the bearing. first f,lI the 51)
alrgned. Ihen refit and tighten the constanillclocity joint housing bolts. 14 Refit the propeUef shalt With ,efefcnce to Section 2.
4 U nillorsal joints in sp ectio n
) Weaf in the
needle rollef heafings is Ch,Uoclefi sed by vibfalion in the tfan srnission. 'clonks' on takrng up the drille. and in e~treme cases 01 tack 0 1 lubficat ion. mOlalhc squoaking. and ultimately grating and
shrie king sounds as the bOilflngs breiJk up.
9 Fl.",!!.: /0 C('/IIf<.' 1",11 /1 Cllcllf'S 12 CV /01111 ilssl:mbly
13 Sprillg c.lf' 14 Boll
Fig. 7.4 Using.~ plillor 10 withdraw the centre bClI ring (Sec 3)
Fig. 7.5 Bendi" g the metal tabs to secure the insulator (Sec 3)
procarmanuals.com
Page 132 of 205

fiU!H?oq o,)Uo:! UJoM
slIoq ;;Jfiucl) ;;JII!'P JC;;JI 10 A1130I;;J1I lUI!15UO:! ;;J~001 SW!Or lusWlllun \HM
6U!lc(I{j ;)')U;I:) 110 JOWlnSli1 ,oqqn' P;)lC'O!WWO ;):!uclcq 10 1110 l)cqs ';;JII;)(IOld OUPC;)q (lUU;):! 1 0 SW!ol ICSl;)I\IUn u10M
(S)UOSCOlJ
"dOqS"I'OM fJupaau!fiu;) pa(Wmb(l
AIG{!I!ns e Aq pOlnell,ol\o Ileqs fiU!l slXa (llil ] 0 ' pau!{! )qo aq ISrlUl IJ{!lIS ,allodold M(lU (! 'U'OM" ")CaM ;;JIQel(lpI5uO:! JO al\lle:J iPu! SI s(I~oA lea) aql puc IUO), (lq l pue IJCYS Jallodo,d ;)q l uaoMlo{j LUalU(ll\OIU AuV
poadspco, 1!l'M fiU'SCO,:!UI ,;;JIQUIIlJ. ;;JII!SS;;J:!X ~
;)I\"P dn fiu!'>I!?1 U(lYM ."Iunp. JO "I:!OU)I
UO!le lq!A
lUOldwAS
II'llIS JElIIOdoJd -s!soufJe!p line:!
"P;;J"I:!(llI:J 6U1aq SI leSl;;Jl\lun IUO') (llIl U;;J\jM (I"Io A IUOl, aql puc 'po"l3;)lI 3 6uI;)q 5! ICSI
(ll\lUn I\!(I) a\j l uaqM afiueu alxe ){!;)I (llIl 6u!P104 W410 aql 'pue\( auo ljl!M ljells aql uml 01 6u1A!1 A q 'uO!I!sod U! IJC4S WliodO ld ;)q
l yIIM UIOM a,e s6ulJ{!oq JOIiOl (llpaau a'll " ",:JaY3 01 As{!a 5! 11 l
~£L ljllys J9119dOJd L JaldllY:J
procarmanuals.com
Page 133 of 205

Chapter 8 Rear axle
Contents
Axle rear cover .. lemoval and .etliling Axlosha!! bearing -renewal Adcshah -removal and refltllng . Fnul1 diilgllosis -re3. ,1xle Gcncr
Gel \cra' Axle dcsI\)n
Torqu e w re nch settings Bc,uinu (31) \0 axle Cilsing Cover \0 axle caSing CrOWllwheel Axlcshalt bearmg retainer /backplate . Drove pinion nut ....... ....... .. Rear 51),ing U·boh Stabilise. bar clamp boll _. Propeller shnfl 10 lear
6 !i ,
11 1 10
The rear axle IS of the hypol(f seml·floallnO tYI)oO and is located hy semi·elliptic ro~d springs, In conjunction with a smhlliser har. The dilJerel11inl is intogral Wllh the axle hOUSing and Ihe rear axlo
InuSt he removed to carry out ilny rePil" S to the dll1erellt,,,, wh,ch milY hecorne necessary . J The drive pinion runs in two lapered roller UeiltlllgS, which are "reloaded by a spacer . Early a.l"s have a ',xed lengltl Slh'lcer and I
PUlIon 0.1 so,, , renew"l . fie;]! .1x10 ove.h;wl Ilear axle ,emOYil. and refIlling f1ollll!w 1ll00intCIHlIlCC • Wheel siud renewal,"
() (Sahshury)
7 8 3 2 ,
Ilypo,d. sem,·flo,lIU1!), onteorill dolle/ent",', limited-slip dollelenl,')1 on 28 Speciill 300.1
I I loire (1.0 l)il11) SAE 90 015 mill (0006 'n) 2510 2 7 N,,, (I 8 to 2.0 IIlI tt) 010 to 020 ,nm (0004 to 0008 in)
Nm 60 10 68 35 to 45 801087 27 10 31 100tol20 25 to 36 401050 60 to 65
Ibl It 44 to 50
26 1033 501064 20 to 23 74 to 89 18 to 27 301037 44 10 48
obwined by Ihe use of selected shims inserted belween Ihe pin ion and rear t
procarmanuals.com
Page 134 of 205

1 Chapter 8 Rear axle 133
Fig. 8 .1 CrOSS-Sl!ction o f cnrlv rCilr ;1xlo (Sec 1)
A Fixed /ellglh SIJ.1C(!f B Pinion slum
2 Routino mnintcnoncc
C Dd1clCII1.11 S/II"'$
At lhe uHerv"ls specIfIed 111 the HOlltmc M.111l1cn;mc c SCCllon III the 110111 0 1 the mnnu;1I c""y oul the following p,uccdw(!.
Check fcar axle oil level 1 Jilek lIlllhc IvaI of the Cil! ;uHf suPPOtl on axle ~I"nds T o C!lSI'''') li1,'l Ihe Cilr is lellel ;,150 I
3 R e
posi tioned lIancnlh the sid(Hllemhe.s . Cho ck thc tronl wheels and rcmove the .ear wheelS . 2 Mark thc p.ol>elle. sh;J1! ilnd .eil'
t'ansverse ,od from the .ea. (Ide wl,h refalCnce 10 Chal >!el 9
5 CI
COUAPS'8ll -----i--i!~e"'.!i SPACH'
,
Fig. 6 .2 Cross·sc ction of I"ter rear Ilxle (See 1)
Fig. 6.3 Removing the rear ax le fillo r 1)lug (Sec 2)
Fig. 8.4 Flexible brake hose connection to the .ear axlearrowed (Sec 3 )
procarmanuals.com
Page 135 of 205

1
134 Chapte r 8 Rea r axl e
FiO. 8.5 Discorlllccti!l9 the rcar sI"biliser Iwr (Sec 3)
7 U~"'!I u"ps (FlU 8 5) I)UU rile s1.1h,l,s(lI b.ll 10 lilt:! lCol. while unstocwIIlIJ the mOlllllnlU I)oIIS from the Ie;)' ;l~II!. flcl110vc the C!JIllI'S 8 W,lh the rC:II Ildc sUlt,lbly SUIlI>o.ICd. lIIlSCICW rhe nulS hom the hallom 01 the U-bolts i1rld reOlOlle rhe lowel S I)llrlU p l;lrcs .. ",t! 1115 .. 1<11015. 9 Wllh rhe help of an asslSlilnt. hft the rem a~lc over the "~
Chock Ihe front wheels then jack up the re,lr of the c~r ilnd support with onle stilnds. Remove the .ear wheel 2 Ilelea se the hilndb.nke and .emove Ihe brake drum.
3 USIng a socket through the special holes in the drive lI.::tnge. unsc'ew the bollS secu.ing the b.::tckp late and bearing ,el.::tinor to tho a~le cilSln g (pholo). 11 Withdraw tho a~leshnft. together with the bearing. " it is tight due 10 tho oulor Ir
ig. 8
.6 RelHoving t h o Mdeshalt .e l'l ining hoits (Soc 4)
If
I
/1
II
I
\,
Fig 8 .7 U sing long bolls to ""ithdra"" tho a~leshaft (Sec 4)
cd
procarmanuals.com
Page 136 of 205

m
)
Chapter 8 Rear axle 135
Fig 8 .8 Drilling the beMing rf!t
5 AxlcshiJft homing -renewal
Noto: A SfJL'CI.1f 1001 IS "Hlliller! /0 n'III1:''''''[1 (,0111 lilt' axles/mIl (s,:c Fly 89) 1 Remove the ;,xlushalt as ,h:sG"hcd 1(' St;CIl0n 1 2 Usin\J all 8 mill (0.31 In) dldl, 1Il;,kc a hole III the he,Hlnt! ,etauun\1 119 . t
G Cleiln the l1xlcshnf1. be,non\) ,,,t;WlC' ,Hld "xle C.,1511l\) 7 Locl1le the loe1ll1ll9 HIWlIlel 011 the l1xleshl1lt. followed uy tho new uoa,ing wIth the 001 sel1l [l1CIll\) l1WilY ['om the l1~leshaft Hallge. 8 Slide on the new hea'lIl\) rcta"lIn\) '1119 and pr ess J fully 11\l111l1st tile hearing inner IWck. uSIng a slJItJIJle puller or J ICWlth oftuue. 9 Re fIt Ihe l1xleshalt wllh refe'ence to S ectIon <1
6 Axle reM cover relllov,,1 ilnd refitting
Chock the hont wheels then lilck up the re,l( o f the Cl1r il'l(l SOPPOI1 on axle stands.
2 Cl em1 the reM cover .Jnd surroundIng .Jre" (photo) 3 Remove the hllmlbr"ke relay le ver lind seco nd.Jry cable. or
transverse ,od (as ;;Jpplicilblc) with reletCnce to Ch"pter 9. <1 Place a suitable container helle~th the reM "x Ie to c~tch the oil as the rear cover is removed.
5 Undo and remove t he ten IJOlt s and sprinU washers lhilt securo the reill cover to the llIl,l l drive housillg LIlt aWilY th e re"r cover and its
\Jasko!. ~ Before refitting the ,oar cover Illilke sure thm the mating fJces ilre free of th() old Uaskct or 10nlting compound.
7 FIt a new uasket Jnd then the lea, cover and secure wIth the ten bolts and spring washers. The cover bolts protrude IntO the fillal drive hOUSor1U so it is important that a SUlwble oll·resist.Jr1t scaling
... __ ro*
Fig. 8.9 Usill(J the special Ford tool to removc the axlesllilfl henring (Sec 5)
r;olllpoulid IS SlIll:ilr() d onto lioe Ihro,'ds of each boll bef ore it IS [,twd. 8 TIUhwll tllr: cover secu,,"!.! holls 10 lhe spec,[,ed torque Wfl:IICh
se ttln\)
9 ReCOlillect
Iht! h,lndbr,l~e components with re ference to ChJp ter 9. 10 R efil l ti,e 1e;1I ,ule with the correct 9rJde 01 oil then lower the C,lr to
the UIOUIl(i
G
2 Axle reM cover
7
Pinion oil seal -re"cw,,1
This ope r,ltion may be performed WIth the rear axle in position or on
the benc h
2 Undo ~nd remove the two holts. sprinU Jlld plain washers that secure lhe centre bearing support to the under51(fe of the body (reler to
Chapter 7) 3 With a sc"ber 0' fde. Ill
propeller sha h to ttt() flool I I
J m
procarmanuals.com