1971 CHEVROLET CAMARO light
[x] Cancel search: lightPage 43 of 88

Downloaded from www.Manualslib.com manuals search engine · Changing Tires
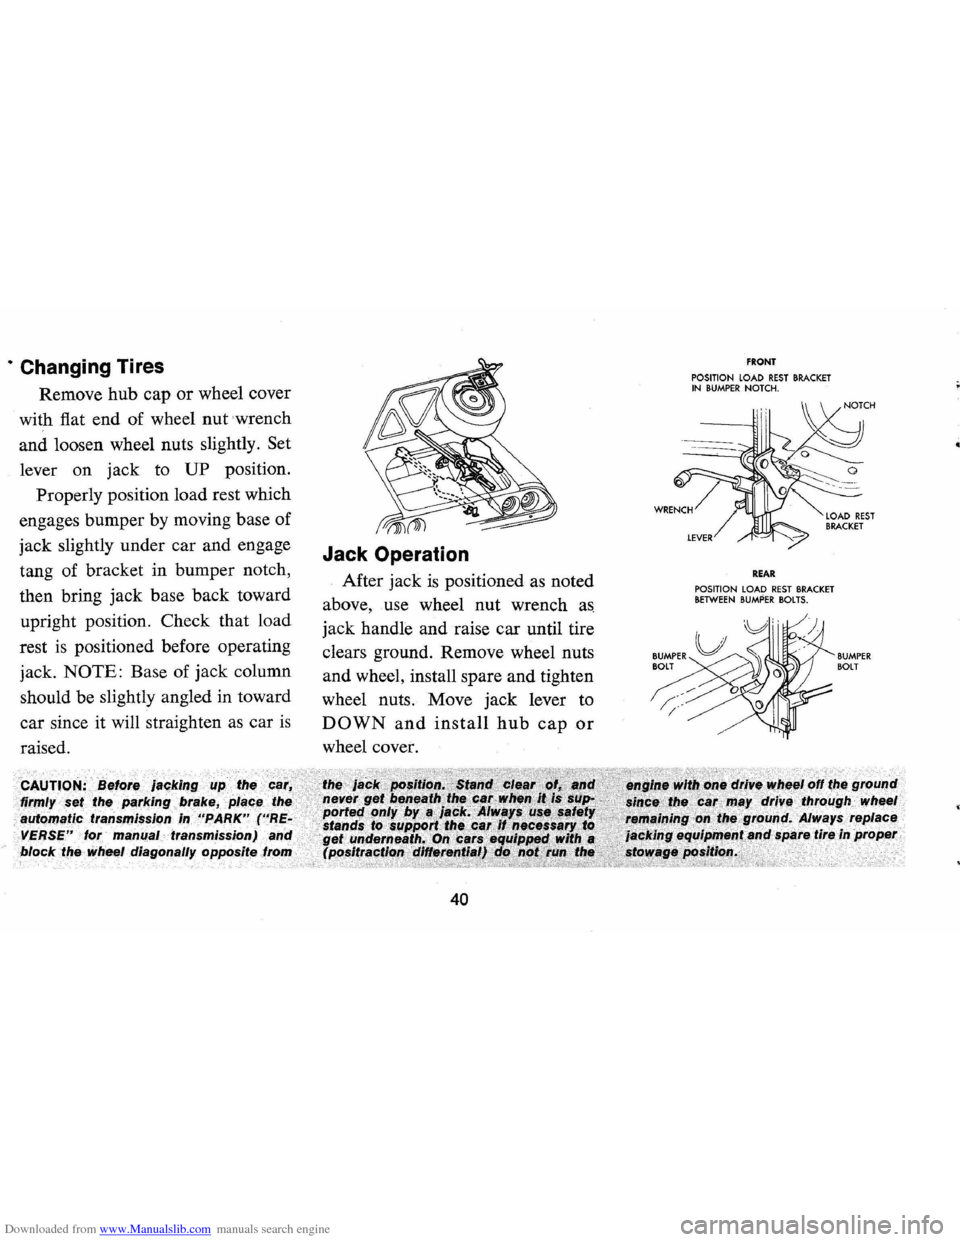
Remove hub cap or wheel cover
with fiat end of wheel
nut wrench
and loosen wheel nuts slightly.
Set
lever on jack to UP position.
Properly position load rest which
engages bumper by moving base of
jack slightly under car and engage
tang of bracket in bumper notch,
then bring jack base back toward
upright position. Check that load
rest is positioned before operating
jack.
NOTE: Base of jack column
should be slightly angled in toward
car since it will straighten as car
is
raised.
firmly
automatic rralrlSOIlSSlon
VERSE" lor manual transmission)
Jack Operation
After jack is positioned as noted
above, use wheel nut wrench
as
jack handle and raise car until tire
clears ground. Remove wheel nuts
and wheel, install spare and tighten
wheel nuts. Move jack lever to
DOWN and install hub cap or
wheel cover.
block the wheel diagonally opposite .. _.... .,.. __
40
FRONT POSITION LOAD REST BRACKET IN BUMPER NOTCH.
REAR POSITION LOAD REST BRACKET BETWEEN BUMPER BOLTS.
BUMPER BOlT
Page 44 of 88

Downloaded from www.Manualslib.com manuals search engine WHAT YOU SHOULD KNOW ABOUT
AIR POLLUTION CONTROL SYSTEMS
AND THE SERVICE THEY REQUIRE
Source of Emissions
During the combustion process in an automotive
engine, some of the fuel (hydrocarbons) fails to
bum
completely and is discharged into the engine crank
case or exhaust system. Additional hydrocarbons are
emitted into the atmosphere through evaporation of
gasoline vapors from the fuel tank and carburetor.
Of the total hydrocarbons coming from uncontrolled
automobiles, about
20% are emitted from the crank
case,
20% from the fuel system and 60% from the
engine exhaust.
In addition to hydrocarbons, carbon monoxide
and oxides of nitrogen are also formed during the
41
combustion process. These are also discharged into
the exhaust system.
What General Motors Has Done
Since research on the control of vehicle emissions
first began some
20 years ago, General Motors has
developed a number of control systems which are
highly effective in reducing undesirable emissions.
(These systems are discussed in some detail in the
following pages of this section). The progress made
is evidenced by a reduction in hydrocarbon emissions
of
80% since 1960. Control of hydrocarbon emis
sions
is important since, when subjected to sunlight
Page 49 of 88

Downloaded from www.Manualslib.com manuals search engine EVAPORATION CONTROL SYSTEM
LIQUID/VAPOR SEPARATOR
OPERATION: All General Motors passenger cars
and light trucks are equipped with an Evaporation
Control
System. This system is designed to minimize
the escape of fuel vapors to the atmosphere. Included
in the system are a special fuel tank, liquid-vapor
separator, carbon canister, canister purge hoses, and
carburetor modifications. Fuel vapors which would
otherwise escape to the atmosphere are directed into
the carbon canister. The carbon adsorbs the vapors
and stores them. The vapor
is removed from the
46
canister during periods of engine operation as mani
fold vacuum draws the vapors into the engine and
burns them.
NOTE: Th. G.n.r.' Motora E".por.tlon Control Sy.t.m I. de.'gn.d to control ."aporatlon 10 •••• trom your c.r und.r normal condition. u.'ng 9 lb. R.ld Vapor Pr ••• ur. tu.' .p.cltl.d by F.d.r.' .nd C.lltorn/a t •• t r.qulr.m.nt •. How.".r, It 'Iou .hould u.. tu.' ot .bnorm.lly high "o/.tlllty tor .x/.tlnll t.mperatur.
condition., you may d.t.ct • ga.olln. odor during or att.r dr/,,· Ing In h •• "y tr.mc. It 'Iou find thl. obJ.ctlonabl., you may pr.t.r to u ••• low.r "o/atlllty tu.'.
MAINTENANCE: For proper system perform
ance, periodic canister tllter servicing II re
quired. Every
12 months or 12,000 miles, which
ever comes first (more often under dusty con
ditions) the filter
In the base of the can liter
should be replaced and the canister Inspected.
NOTE: Should It .".r b. n.c •••• ry to r.pl.c. the tu.' tank cap, u •• only the .peclfl.d c.p.
NOTE: For your convenience, all of the recom
mended services for air pollution control systems
previously discussed are summarized
by time and
mileage intervals in the Maintenance Schedule of
this manual.
Page 51 of 88

Downloaded from www.Manualslib.com manuals search engine Cleaning Fabrics with
Cleaning Fluid
This type of cleaner should be
used for cleaning stains containing
grease, oil
or fats. Excess stain
should be gently scraped off with
a clean dull knife
or scraper. Use
very little cleaner, light pressure,
and clean cloths (preferably cheese
cloths). Cleaning action with cloth
should be from outside of stain to
wards center and constantly chang
ing to a clean section of cloth.
When stain
is cleaned from fabric,
immediately wipe area briskly with
a clean absorbent towel
or cheese
cloth to help dry area and prevent
a cleaning ring.
If ring forms, im
mediately clean entire area
or panel
section of the trim assembly.
NOTE: Sometimes a difficult spot
may require a second application
of cleaning fluid followed immedi
ately by a soft brush to completely
remove the spot.
Cleaning Fabrics with
Detergent Foam
Cleaners
This type of cleaner is excellent
for cleaning general soilage from
fabrics and for cleaning a panel sec
tion where a minor cleaning ring
may be left from spot cleaning.
Vacuum area to remove excess
loose dirt. Always clean at least a
full trim panel
or section of trim.
Mask adjacent trim along stitch
or
weld lines. Mix detergent type foam
cleaners in strict accordance with
directions
on label of container.
Use foam only on a clean sponge or
48
soft bristle brush - Do not wet
fabric excessively or rub harshly
with brush. Wipe clean with a
slightly damp absorbent towel
or
cloth. Immediately after cleaning
fabric, dry fabric with a dry towel
or hair dryer. Rewipe fabric with
dry absorbent towel
or cloth to re
store the luster of the trim and to
eliminate any dried residue.
Removal of Specific Stains
Candy -Chocolate, use cloth
soaked in lukewarm water; other
than chocolate, use very hot water.
Dry.
If necessary, clean lightly with
fabric cleaning fluid.
Chewing Gum-Harden gum with
ice cube and scrape off with dull
knife. Moisten with fabric cleaning
fluid
and scrape again.
Page 52 of 88

Downloaded from www.Manualslib.com manuals search engine Fruit Stains, Coffee, Soft Drinks,
Ice Cream and Milk-Wipe with
cloth soaked in cold water.
If nec
essary clean lightly with fabric
cleaning fluid.
Soap and water is
not recommended as it might set
the stain.
Catsup-Wipe with cloth soaked in
cool water.
If further cleaning is
necessary, use a detergent foam
cleaner.
Grease, Oil, Butter, Margarine
and Crayon -
Scrape off excess
with dull knife.
Use fabric cleaning
fluid.
Exterior Appearance
Your car is finished with General
Motors "Magic-Mirror" acrylic
lacquer. This is a finish of maxi
mum beauty which, in depth of
color, gloss retention and durability
is superior to conventional lacquer
finishes.
Paste or Wax Type Shoe Polish
-Light applications of fabric clean
ing fluid.
Tar -Remove excess with dull
knife, moisten with fabric cleaning
fluid, scrape again, rub lightly with
additional cleaner.
Blood -Wipe with clean cloth
moistened with cold water. Use no
soap.
Urine -Sponge stain with luke
warm soap suds from mild neutral
soap on clean cloth, rinse with cloth
Washing Your Car
The best way to preserve the
finish and maintain original beauty
of appearance
is to keep it clean .
Wash the car in lukewarm
or cold
water. Never use strong soap or
chemical detergents. Cleaning
agents should be quickly flushed
from the surfaces.
49
soaked in cold water, saturate cloth
with one part household ammonia
and 5 parts water, apply for 1 min
ute, rinse with
clean, wet cloth.
Vomitus-Sponge with clean cloth
dipped in clean, cold water. Wash
lightly with lukewarm water and
mild neutral soap.
If odor persists,
treat area with a water-baking soda
solution (1 teaspoon baking soda
to one cup of tepid water). Rub
again with cloth and cold water.
Finally,
if necessary, clean lightly
with fabric cleaning fluid.
Polishing and Waxing
Your Car
Although acrylic paint on your
car
is durable, you may wish to wax
or polish for added protection.
Your Chevrolet Dealer offers many
polishes and waxes now available
which have proven of real value in
maintaining a good paint finish.
Page 62 of 88

Downloaded from www.Manualslib.com manuals search engine Standard Steering Gear
The steering gear is factory
filled with steering gear lubricant.
Seasonal change of this lubricant
should not be performed
and the
housing should
not be drained-no
lubrication
is required for the life
of the steering gear.
Every 36,000 miles, the gear
should be inspected for seal leak
age (actual solid
grease-not just
oily film).
If a seal is replaced or
the gear is overhauled, the gear
housing should be refilled with
Part No. 1051052 (13 oz. con
tainer)
Steering ' Gear Lubricant
which meets
GM Specification GM
4673M, or its equivalent.
NOTE: Do not use EP Chassis
Lube, meeting
GM Specification
GM 6031 M, to lubricate the gear.
DO NOT OVER-FILL the gear
housing.
Power Steering Pump
Every 6,000 miles or 4 months
Check level in pump reservoir. Fill
pump reservoir
as required with
GM Power Steering Fluid or, if
this
is not available, DEXRON®
Automatic Transmission fluid.
Oil
should be at operating tempera
ture
and wheels in straight ahead
position when checking
or filling
operation is performed to ensure
against over-filling.
Hood Latches
Every 4 months or 6,000 miles,
whichever occurs first, lubricate
hood latch assembly
and hood
hinge assembly as follows:
1. Wipe off any accumulation of
dirt
or contamination on latch
parts.
2. Apply Lubriplate
or equivalent
to latch pilot bolts
and latch
locking plate.
3. Apply light engine oil to
all
59
pivot points in release mecha
nism, as well as primary
and sec
ondary latch mechanisms.
4. Lubricate hood hinges.
5. Make hood hinge
and latch
mechanism functional check to
assure the assembly is working
correctly.
Air Conditioning
Have your Chevrolet Dealer
check your Air Conditioning sys
tem at some time during the winter
months to
be sure there has been
no loss in cooling output. During
the summer, see your Chevrolet
Dealer immediately if you suspect
the system is
not performing as it
should.
NOTE: On vehicles equipped with
a
Four Season Air Conditioning
System, the system will not operate
below ambient temperatures of
30oP. regardless of control posi
tion.
Page 70 of 88

Downloaded from www.Manualslib.com manuals search engine Interval
First 12,000 miles Every 12
months
or 12,000 miles
Every
24,000 miles
Service To Be Performed
• Rotate distributor cam lubricator. See 24,000 mile recommendation.
• Insp .ect air cleaner element, if satisfactory
rotate 1800 from original position and reinstall. See 24,000 mile recommendation.
• Inspect brake linings and check system for
leaks
• Inspect parking brake and throttle linkage. • Engine tune-up.
Replace carburetor 'Inlet fuel filter element. • Check emission control items. • Inspect AIR drive belt.
Evaporation Control System-Replace filter in
base of canister and inspect canister. • Check headlamp aiming.
• Repack front wheel bearings.
• Replace distributor cam lubricator. • Drain automatic transmission sump and add
fresh fluid (normal passenger car service).' Adjust Powerglide low band at first fluid
change.
• Replace crankcase ventilation filter (located
within air cleaner).
• Replace Turbo Hydra-Matic sump filter.
Interval Service To Be Performed
Every 2 years • Drain radiator coolant, flush and refill system.
Every
24 months· Replace PCV Valve. Inspect all hoses and or 24,(100 miles fittings.
Every
36,000 • Check steering gear for seal leakage (actual
miles solid grease-not just oily film).
• Lubricate clutch cross shaft (sooner if necessary), remove plug and install lube fittIng.
During Winter
• Check operation of air conditioning system.
months
Periodically • Check battery liquid leve/.
• Inspect seat belts, buckles, retractors and
anchors.
• Check all lights for proper operation.
As Required
• Check wheel alignment and balancing.
'Service more often during severe operating conditions as outlined under Service and Maintenance.
67
Page 72 of 88

Downloaded from www.Manualslib.com manuals search engine The chart on the previous page, and the information on the pages
which
follow, contains information designed to aid the average
driver to discover, and possibly correct, conditions resulting in minor
mechanical
difficulties in his car. The chart, designed to point out
possible solutions to several of the most common automotive mal
functions and point out a logical checking sequence, will lead step
by step to the most likely causes and corrective procedures. If, after
making the checks and adjustments suggested, the source of the
trouble has not been found and corrected, it is strongly recom
mended that an Authorized Chevrolet Dealer inspect the vehicle and
make whatever repairs
or adjustments are necessary.
FUEL SYSTEM AND ENGINE
If the ignition switch will cause the engine to "turn over" or
"crank" but the car will not start, check Steps A through D below.
NOTE:
If continual "Rooding" of the carburetor is evidenced by a
carbur.tor wet with
fuel or black exhaust smoke, perform the
operation suggested in paragraph D only.
(A) The first and most obvious,
and one of the most frequently overlooked, items to check when
you have difficulty in sta rting you r car is the amount . of fuel in the
tank. Make it a habit to check the FUEL GAUGE regularly and most especially at a time when the engine will "turn over" but will not
start.
(8)
If the fuel tank is noi empty,
you may cheek further to see Checking Fllel Flow
69
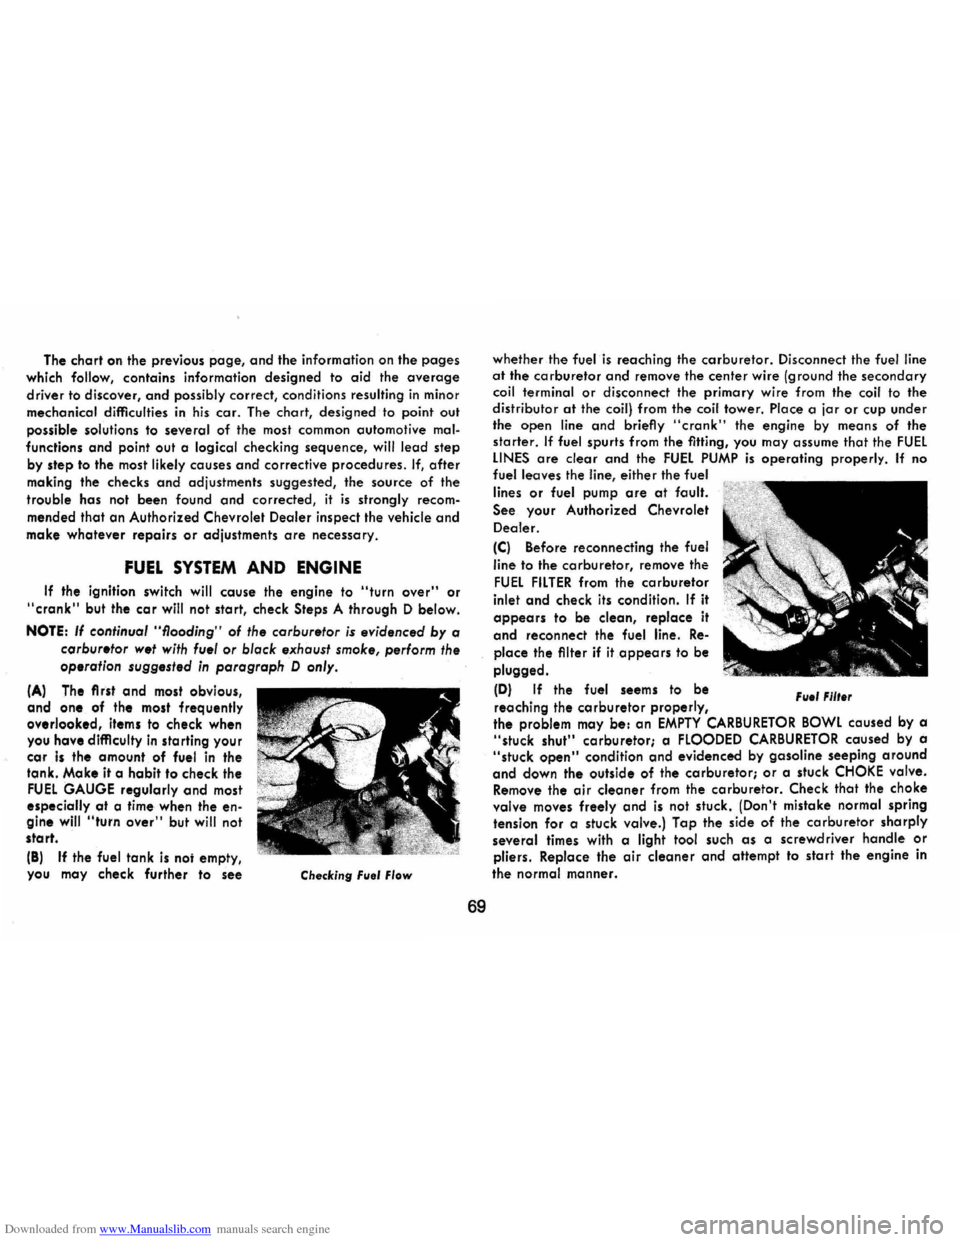
whether the fuel is reaching the carburetor. Disconnect the fuel line at the carburetor and remove the center wire (ground the secondary coil terminal or disconnect the primary wire from the coil to the distributor at the coil) from the coil tower. Place a jar or cup under
the open line and briefly "cronk" the engine by means of the
starter. If fuel spurts from the fitting, you may assume that the FUEL LINES are clear and the FUEL PUMP is operating properly. If no fuel leaves the line, either the fuel
lines
or fuel pump are at fault.
See. your Authorized Chevrolet
Dealer.
(C) Before reconnecting the fuel
line
to the carburetor, remove the
FUEL FILTER from the carburetor
inlet and check its condition. If it
appears to be clean, replace it
and reconnect the fuel line. Re
place the filter if it appears to be
plugged.
(D) If the fuel seems to be
reaching the
carburetor properly, File' Fllt.r
the problem may be: an EMPTY CARBURETOR BOWL caused by a "stuck shut" carburetor; a FLOODED CARBURETOR caused by a "stuck open" condition and evidenced by gasoline seeping around
and down the outside of the carburetor; or a stuck CHOKE valve. Remove the air cleaner from the carburetor. Check that the choke valve moves freely and is not stuck. (Don't mistake normal spring
tension for a stuck valve.) Tap the side of the carburetor sharply
several times with a light tool such as a screwdriver handle or pliers. Replace the air cleaner and attempt to start the engine in
the
normal manner.