1971 CHEVROLET CAMARO transmission
[x] Cancel search: transmissionPage 36 of 88

Downloaded from www.Manualslib.com manuals search engine SAFETY CHECKS
Your Camaro not only conforms to all U.S. Fed
eral Motor Vehicle
Safety Standards applicable at
time of manufacture, but also incorporates other im
portant General Motors safety features. Even with
these safety features, however, continued safe and
dependable operation depends greatly upon regular
vehicle maintenance.
This section discusses the various components and
systems of your vehicle that should be checked regu-
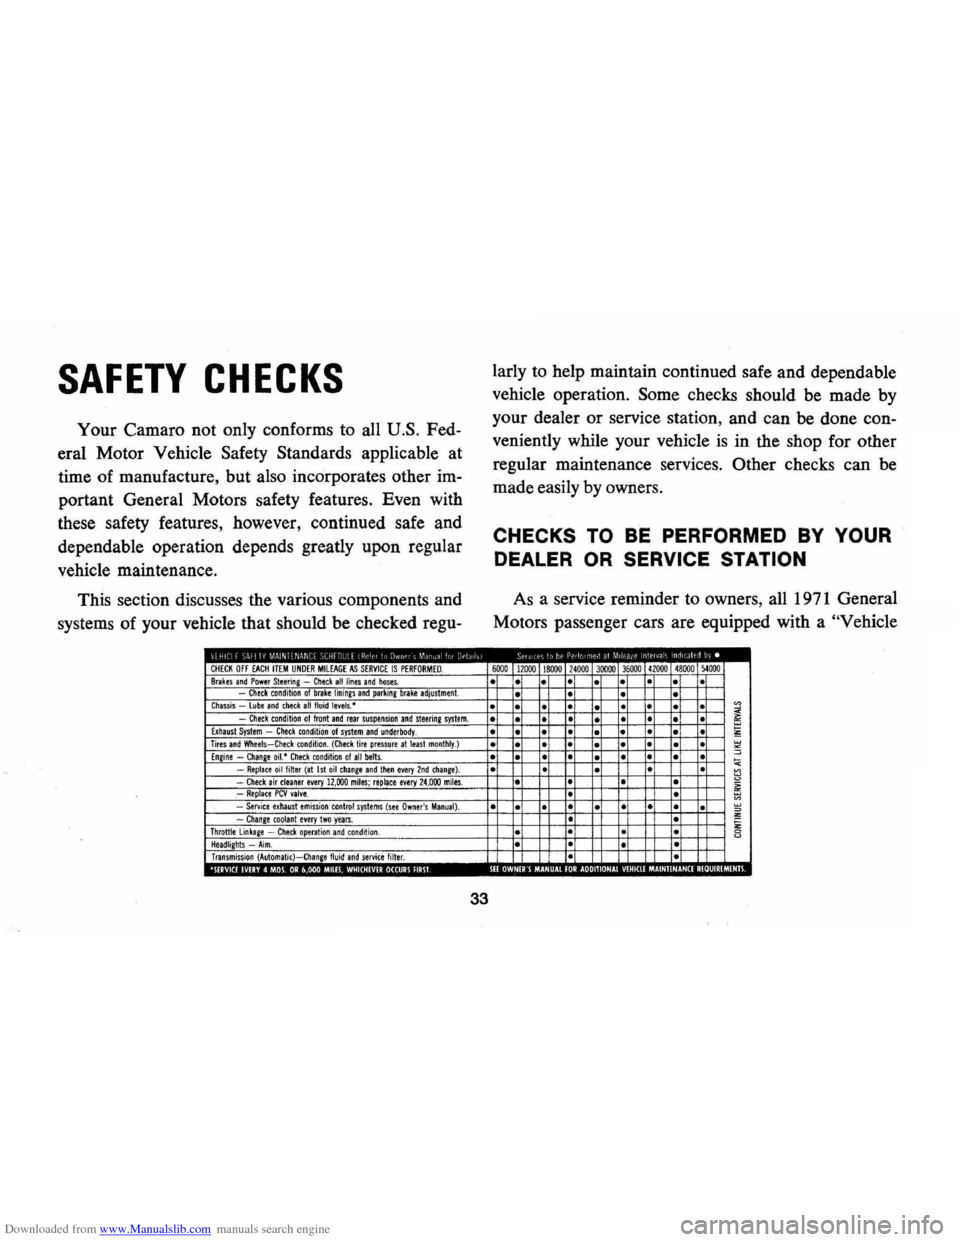
CHECK OFF EACH ITEM UNDER MIlEAGE AS SERVICE IS PERFORMED. Brakes and Power Steering -Check all lines and hoses. Check condition of brake linings and parking brake adjustment. Chassis lube and check all fluid levels,· Check condition of front and rear suspension and steerine system. Exhaust System -Check condition of system and underbody. Tires and Wheels-Check condition. (Check tire pressure at least monthly.) Engine -Change oil.· Check condition 01 all belts. -Replace oil filter (at 1st oil change and tllen every 2nd chanie). -Check air cleaner every 12,000 miles; replace every 24,000 miles. .-Replace PCV valve. -Service exhaust emission control systems (see Owner's Manual). -Change toolanl every Iwo years. Throttle linkage -Check operation and condition . Headlights -Aim. Transmission (Automatic)-Change fluid and service filter. 0 ,', III · 0
33
larly to help maintain continued safe and dependable
vehicle operation.
Some checks should be made by
your dealer or service station, and can be done con
veniently while your vehicle
is in the shop for other
regular maintenance services.
Other checks can be
made easily by owners.
CHECKS TO BE PERFORMED BY YOUR
DEALER OR SERVICE STATION
As a service reminder to owners, all 1971 General
Motors passenger cars are equipped with a
"Vehicle
6000 12000 18000 24000 30000 36000 41000 48000 )4000
• •
• •
• • • •
• • •
• •
• • • • • • •
• • • • • • • • • • •
• • • •
• • •
• •
• • • •
• • • • • • •
• • • • •
• •
• •
• • •
• •
• • • • •
• • • • • •
•
• • •
· • · •
• • • • •
• 0 o· 00 0 ·
0
Page 37 of 88

Downloaded from www.Manualslib.com manuals search engine Safety Maintenance Schedule" on the inside of the
glove box door
as illustrated.
The schedule lists the various safety checks to be
performed at regularly scheduled intervals,
as well
as some of the other important vehicle maintenance
requirements. You are urged to check
off each item
on the schedule after the operation has been per
formed. Following are further details on the safety
check items:
Checks To Be Made At Oil Change Intervals
(4 months or 6,000 miles, whichever comes
first)
• Brake Lines and Hoses -Check for proper at
tachments, leaks, cracks, chafing, deterioration,
etc. Any questionable parts noted should be re
placed or repaired immediately.
• Fluid Levels-Check level of fluid in brake master
cylinder, power steering pump, radiator, engine,
axle and transmission. Any significant
loss could
mean that a malfunction
is developing in the sys
tem and corrective action should be taken imme
diately.
On cars with disc brakes, a low fluid level
in the front brake master cylinder reservoir could
34
also be an indicator that disc brake pads need
replacing.
• Front and Rear Suspension and Steering Sys
tem-Check for damaged or missing parts, or parts
showing visible signs of excessive wear or lack of
lubrication. Questionable parts should be replaced
by a qualified mechanic without delay.
• Exhaust System -Check complete exhaust sys
tem and nearby body areas and trunk lid for
broken, damaged, missing or mispositioned parts,
open seams, holes, loose connections
or other de
terioration which could permit exhaust fumes to
seep into the trunk or passenger compartment. Any
defects should be corrected immediately. To help
insure continued integrity, exhaust system pipes
rearward of the
muffler must be replaced whenever
a new
muffler is installed.
• Tires and Wheels -Check tires for excessive
wear, nails, cuts or other damage. Make certain
wheels are not bent
~nd wheel nuts are tight. Un
even or abnormal tire wear may indicate the need
for alignment service. Check tire inflation pressure
at least monthly, or more often
if daily visual
inspection indicates the need.
Page 39 of 88

Downloaded from www.Manualslib.com manuals search engine For further details on the engine and transmission
items listed on the
"Vehicle Safety Maintenance
Schedule," and for other recommended maintenance,
refer
to the "Service and Maintenance" and "Air
Pollution. Control" Sections of this manual.
CHECKS lOBE PERFORMED
BY OWNER
Listed below are the safety checks that should be
made by the owner . These checks should be made at
least every 4 months or
6,000 miles, whichever occurs
first , or more often when so indicated . Any
deficien
cies should be brought to the attention of your dealer
or service station, so the advice of a qualified mech
anic is available regarding the need for repairs or
replacements.
• Anti-Theft Lock-Check for proper operation by
attempting to turn key to
LOCK position in the
various transmission gears with
car stationary. Key
should
tum to LOCK position only when trans
mission control is in PARK on automatic trans
mission models or in REVERSE on manual trans
mission models.
• Seat Belts-Check lap and shoulder belts as well
as buckles, retractors and anchors for loose con-
36
nections, damage and positive latching action.
• Windshield Wipers and Washers-Check con
dition and alignment of wiper blades. Check
amount and direction of fluid sprayed by washers
during use.
• Defrosters-Check performance by turning con
trols to "de-ice" and "Hi" fan speed and noting
amount of air directed against the windshield.
• Wheel Alignment and Balance-In addition to
abnormal tire wear the need for wheel alignment
service may be indicated by a pull to the right or
left when driving on a straight level road. The need
for wheel balancing may be indicated by a
vibra
tion at the steering wheel while driving.
• Parking Brake and "Park" Mechanism-Check
parking brake holding ability by parking on a fairly
steep hill and restraining the vehicle with the
parking brake only.
On cars with automatic trans
missions, check the holding ability of the "Park"
mechanism by releasing all brakes after the trans
mission selector lever has been placed in the "P"
position.
• Lights -Check license plate lights, side marker
lights , headlamps, parking lamps, tail lamps , brake
Page 40 of 88

Downloaded from www.Manualslib.com manuals search engine lights, turn signals, backup lamps, and hazard
warning flashers. Have someone observe operation
of each light while you activate the controls.
• Starter Safety Switch (Automatic Transmis
sion Cars)
CAUTION: Before making the following check, be sure to have a clear distance ahead and behind the car, set the parking brake and firmly apply the foot brake. Do not depress accelerator pedal. Be prepared to turn ott ignition switch immediately if engine should start.
Check starter safety switch by placing the transmis
sion in each of the driving gears while attempting to
start the engine. The starter should operate only in the
Park ("P") or Neutral ("N") positions.
• Starter Interlock (Manual Transmission Cars)
-To check a manual transmission equipped car,
depress the clutch halfway, place the transmission
in neutral, and attempt to start.
The starter should
operate only when clutch
is fully depressed.
• Transmission Shift Indicator-Check to be sure
shift indicator accurately indicates the shift posi
tion selected.
• Horn-Blow the horn occasionally to be sure that
it works.
37
• Seat Back LatcheS-Check to see that seat bac k
latches are holding by pulling forward on the seat
back top.
• Rearview Mirrors and Sun Visors-Check that
friction joints are properly adjusted so mirrors and
sun visors stay in the selected position.
• Door LatcheS-Check for positive closing, la tch
ing and locking.
• Hood Latches-Check to make sure hood closes
firmly . Check also for broken , d amaged or missing
parts which might prevent secure latching.
• Fluid LeakS-Check for fuel, water, oil or other
fluid leaks by observing the ground beneath the
vehicle after it has been parked for a while . (Water
dripping from air conditioning system after use
is
normal). If gasoline fumes are noticed at any time,
the cause should be determined
and corrected with
out delay because of the possibility of fire.
• Exhaust System-See engine exhaust gas caution
at beginning of starting and operating section of
this manual for suggested driver observations and
checks.
Page 41 of 88

Downloaded from www.Manualslib.com manuals search engine I n Case of Emergency
Four Way Hazard
Warning
Flasher
• Use the warning flasher to warn
other drivers any time your
ve
hicle becomes a traffic hazard,
day or night.
• Avoid stopping on the roadway
if possible.
• Turn on the hazard warning
flasher, with engine ignition off
or on, by pushing in on the but
ton located just below the steer
ing wheel.
• If the brake pedal is depressed,
the lights will not flash
but will
glow continuously instead.
• To cancel the flasher, pull the
button outward.
"Rocking" Car
If it becomes necessary to rock
the car to free it from sand, mud or
snow, move the selector lever
from
"D" to "R" in a repeat pattern
while simultaneously applying
moderate pressure to the accelera
tor. Do not race engine. A void
spinning wheels when trying to free
car.
Towing
Proper lifting or towing equip
ment
is necessary to prevent dam
age to the vehicle during any tow
ing operation. Detailed towing in
formation is available at your
dealer and has been provided to
tow truck operators responsible for
movement of disabled or locked
ve
hicles. State and local laws appli
cable to vehicles in tow must also
be followed.
Your Camaro may be towed on
all four wheels, at speeds of less
than 35 MPH, for distances up to
38
50 miles, provided driveIine, axle
and transmission are otherwise nor
mally operable.
For such towing,
parking brake must be released,
and transmission must be in neu
tral (ignition lock turned to
OFF
position). Attachments must be to
main structural members of the car,
not to bumpers or bracketing,
Safety chains or cables should be
used. Remember that power steer
ing assist will not be available when
engine
is inoperative.
Emergency Starting
• Never tow the car to start
because the surge forward when
the engine starts could cause a
collision with the tow vehicle.
• Engines in vehicles with auto
matic transmissions cannot be
started by pushing the car.
Page 43 of 88

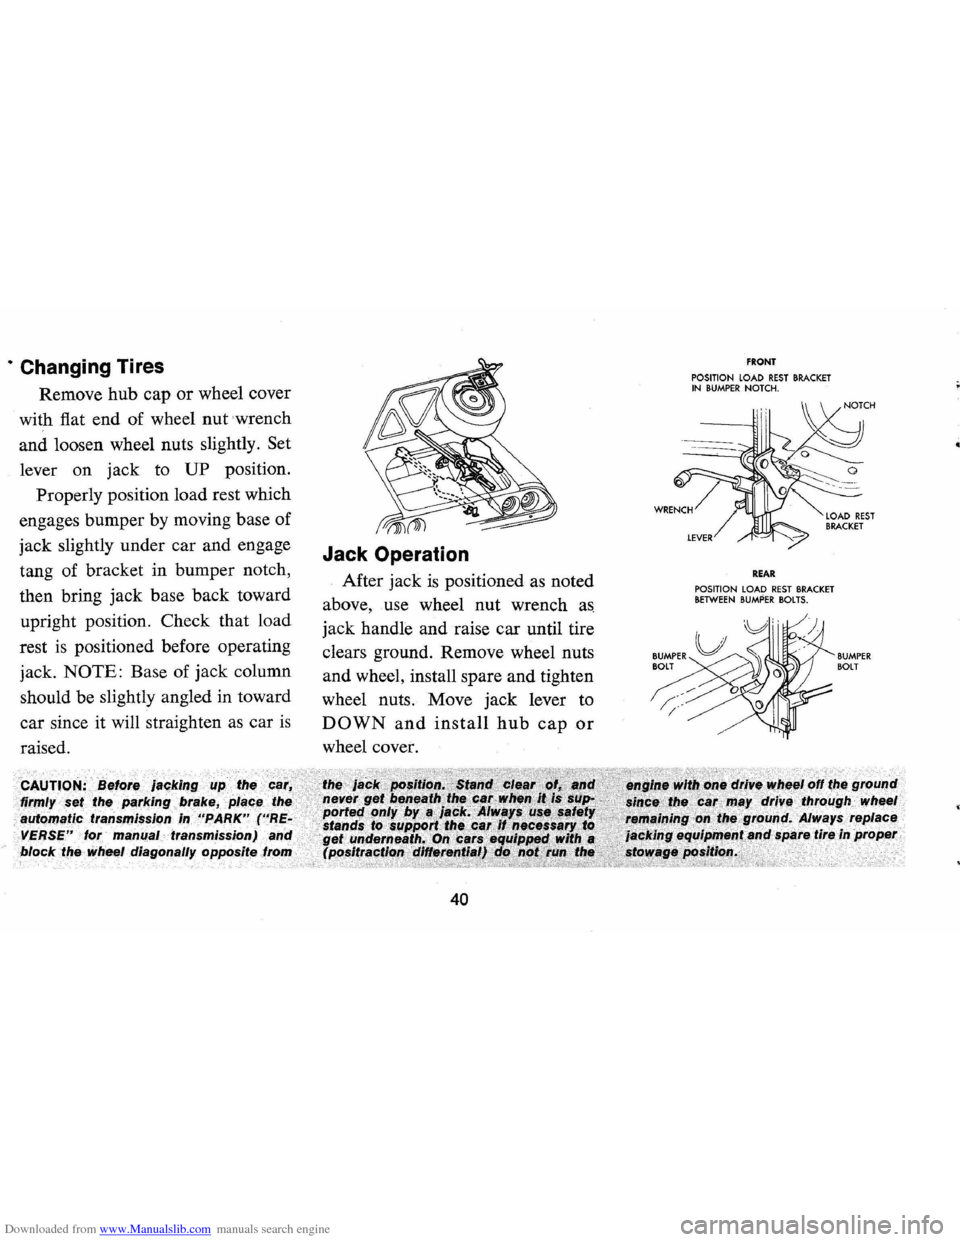
Downloaded from www.Manualslib.com manuals search engine · Changing Tires
Remove hub cap or wheel cover
with fiat end of wheel
nut wrench
and loosen wheel nuts slightly.
Set
lever on jack to UP position.
Properly position load rest which
engages bumper by moving base of
jack slightly under car and engage
tang of bracket in bumper notch,
then bring jack base back toward
upright position. Check that load
rest is positioned before operating
jack.
NOTE: Base of jack column
should be slightly angled in toward
car since it will straighten as car
is
raised.
firmly
automatic rralrlSOIlSSlon
VERSE" lor manual transmission)
Jack Operation
After jack is positioned as noted
above, use wheel nut wrench
as
jack handle and raise car until tire
clears ground. Remove wheel nuts
and wheel, install spare and tighten
wheel nuts. Move jack lever to
DOWN and install hub cap or
wheel cover.
block the wheel diagonally opposite .. _.... .,.. __
40
FRONT POSITION LOAD REST BRACKET IN BUMPER NOTCH.
REAR POSITION LOAD REST BRACKET BETWEEN BUMPER BOLTS.
BUMPER BOlT
Page 59 of 88

Downloaded from www.Manualslib.com manuals search engine Distributor Cam Lubricator
6 Cylinder Engine -Rotate cam
lubricator
1800 at 12,000 mile in
tervals -Replace at
24,000 mile
intervals.
8 Cylinder Engine-Change cam
lubricator end for end at
12,000
mile intervals-Replace at 24,000
mile intervals.
Rear Axle
Standard -Every 4 months or
6,000 miles, whichever occurs
first, check lubricant level and add
lubricant, if necessary, to
fill to
level of filler plug hole.
Use SAE
80 or SAE 90 GL-5 Gear Lubri
cant.
Positraction -Same as standard
axle
but use only the special posi
traction lubricant available from
your Chevrolet Dealer.
Manual Transmissions
3-Speed and 4-Speed -Every
6,000 miles or 4 months-Check
at operating temperature and fill
as necessary to level of filler plug
hole with SAE
80 or SAE 90 GL-
5 Gear Lubricant.
Clutch Cross-Shaft -Every
36,000 miles or sooner if neces
sary -Remove the plug, install a
lubrication fitting
and lubricate
with water resistant
EP Chassis
Lubricant which meets
GM Speci
fication 6031M.
Automatic Transmission
Fluid Recommendations
General Motors DEXRON®
Automatic Transmission Fluid,
part no. 1050568 and United
Delco DEXRON® Automatic
Transmission Fluid, part no. 301-
RD, which have been especially
formulated and tested for use in
your automatic transmission are
recommended.
Other automatic
transmission fluids identified with
the
mark DEXRON@ are also
recommended.
56
Check the fluid level at each
engine oil change period.
To make
an accurate fluid level check:
1. Drive car several miles, making
frequent starts and stops, to
bring transmission up to normal
operating temperature (ap
proximately 180-190 OF) .
2.
Park car on a level surface.
3. Place selector lever
in "Park"
and leave engine running.
4. Remove dipstick and
WIpe
clean.
5. Reinsert dipstick until cap seats.
6. Remove dipstick and note read
ing.
If oil level is at or below the
"ADD" mark on the dipstick, oil
should be added as necessary.
One pint raises the level from ADD
to FULL.
Do not overfill.
Under normal driving condi
tions, the transmission fluid should
Page 60 of 88

Downloaded from www.Manualslib.com manuals search engine be changed every 24,000 miles. If
your car is driven extensively in
heavy city traffic during hot
weather,
or is used to pull a trailer,
change fluid every
12,000 miles.
Changing
Fluid -Remove fluid
from the transmission sump and
add approximately 1
Yz quarts U.S.
Measure ( 1 Y4 quarts Imperial
Measure) of new fluid.
(Power
glide). For Turbo Hydra-matic 350
this fluid amount is 2.5 quarts U.S.
Measure (2.0 quarts Imperial
Measure) . Operate transmission
through all shift ranges and re
check fluid level as described
above.
It is not necessary to remove
the pan because a drain plug
is
provided.
Powerglide Low Band Adjust
ment-At the first transmission
fluid change, have your Chevrolet
Dealer adjust the low band. Turbo
Hydra-Matic
400-Lubri
cation of your Turbo Hydra-matic
400 will, except for fluid capacity
and filter change listed below, fol
low previously stated automatic
transmission recommendations.
After checking transmission fluid
level it is important that the dip
stick be pushed all the way into
the filler tube.
Every
24,000 miles -After re
moving fluid from the transmission
sump, approximately
7Yz pints
U.S. measure (6 pints Imperial
measure) of fresh fluid will be re
quired to return level to proper
mark on the dipstick.
Every
24,000 miles the transmis
sion sump filter should be re
placed.
Transmission
Shift and Back
drive Linkage (Manual and
57
Automatic) -Every 6,000 miles
or 4 months lubricate shift link
age
and on manual transmission
floor controls lever contacting
faces with water resistant
EP chas
sis lubricant which meets GM
Specification 6031M.
If vehicle is equipped with a 6
cylinder engine and
Powerglide
transmission, lubricate the throttle
valve inner lever, outer lever
and
sleeve (linkage) (at inlet mani
fold attachment) on their respec
tive contacting surfaces with water
resistant
EP chassis lubricant
which meets
GM Specification
GM 6031 M. Operate linkage to
evenly distribute lubricant.
Transmission Shift Linkage
(Manual and Automatic)
Every 6,000 miles or 4 months
lubricate shift linkage and
on man
ual transmission floor controls