1960 CHEVROLET CORVAIR check oil
[x] Cancel search: check oilPage 10 of 38

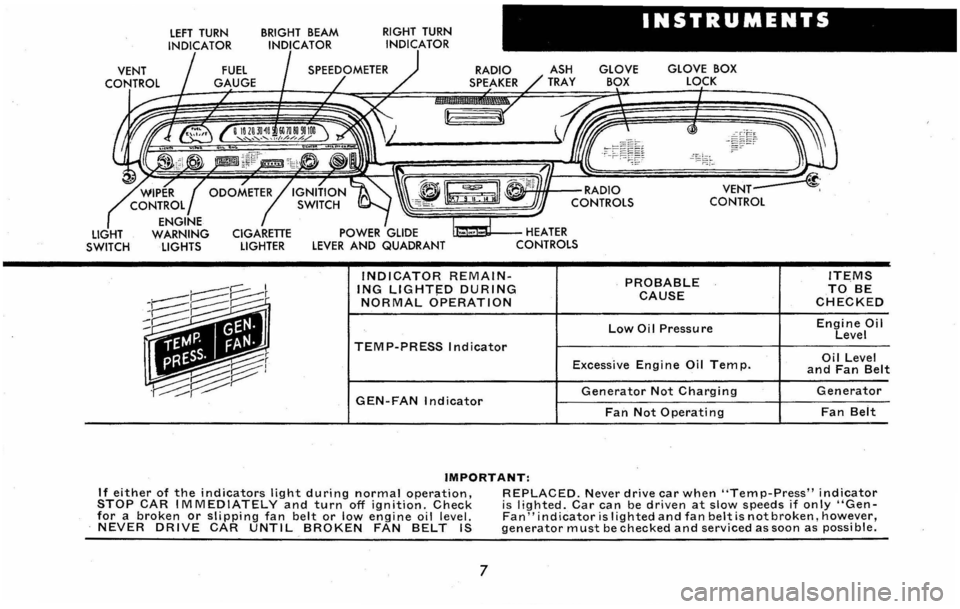
LIGHT SWITCH
LEFT TURN
INDICATOR BRIGHT BEAM INDICATOR RIGHT
TURN
INDICATOR
INSTRUMENTS
RADIO SPEAKER GLOVE BOX
LOCK
~~"-fHIf--RADIO
~~~~~~~&J CONTROLS
U:a~II---HEATER CONTROLS
INDICATOR REMAINING LlGHT~D DURING NORMAL OPERATION
TEMP-PRESS Indicator
PROBABLE CAUSE
Low Oil Pressure
Excessive Engi ne Oil Tem p.
GEN-FAN Indicator Generator Not Charging
Fan Not Operating
IMPORTANT:
ITEMS TO BE CHECKED
Engine Oil Level
Oil Level and Fan Belt
Generator
Fan Belt
If either of the indicators light during normal operation, STOP CAR IMMEDIATELY and turn off ignition. Check for a broken or slipping fan belt or low engine oil level. NEVER DRIVE CAR UNTIL BROKEN FAN BELT IS
REPLACED. Never drive car when "Temp-Press" indicator i s lighted. Car can be driven at slow speeds if only "GenFan" indicator is I ighted and fan belt is not broken, however, generator must be checked and serviced as soon as possi ble.
7
Page 23 of 38

1. CRANKCASE LUBRICATION
First 500 miles (if temperature has been over 60° F.I
Change as per table, on page 16.
First 1000 miles (if-temperature has been below
60°F.1
Change as per table on page 16.
Every 4000 miles thereafte.r during favorab·le driving
conditions (over 10 miles per trip).
Change as per table on page 16.
During adverse driving conditions or short trip driving
(less
than 10 miles per trip).
Winter-Change every month.
Summer-Change every two months.
2. OIL FILTER
Change the filter element after the first 5000 miles
of operation, and every 4000 miles thereafter.
NOT~: When changing the filter element, be care
ful not to drip oil on the engine fan belt.
3. FRONT SUSPENSION
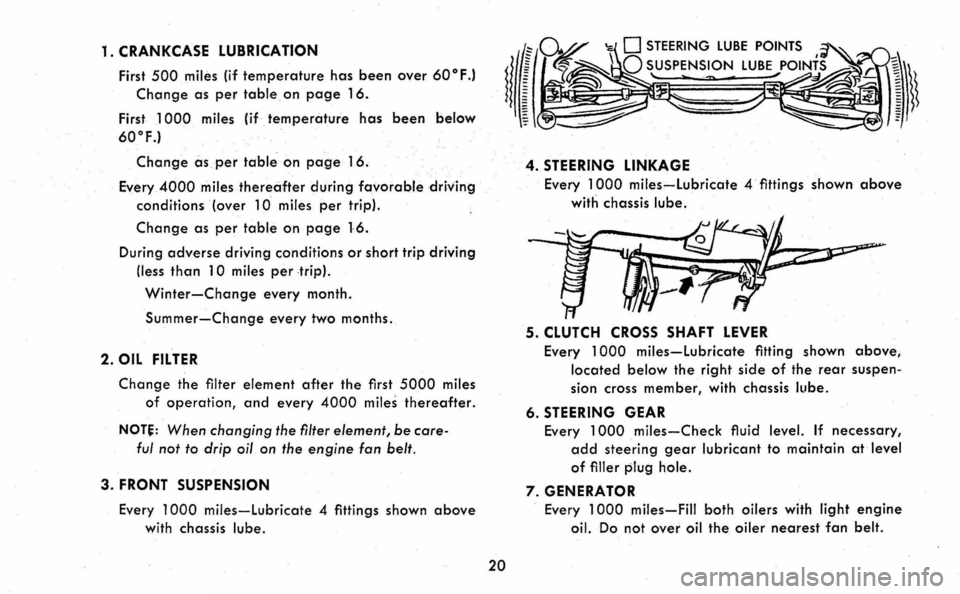
Every 1000 miles-lubricate 4 fittings shown above
with chassis lube.
20
4. STEERING LINKAGE
Every 1000 miles-lubricate 4 fittings shown above
with chassis lube.
5. CLUTCH CROSS SHAFT LEVER
Every 1000 miles-lubricate fitting shown above,
located below the right side of the rear suspen
sion cross member, with chassis lube.
6. STEERING GEAR
Every 1000 miles-Check fluid level. If necessary,
add steering gear lubricant to maintain at level
of filler plug hole.
7. GENERATOR
Every 1000 miles-Fill both oilers with light engine
oil. Do not over oil the oiler nearest fan belt.
Page 24 of 38

8. DISTRIBUTOR
Every 1000 miles-Fill hinged cap oiler with light
engine. oil.
Every 5000 miles-Apply small drop of light engine
oil to breaker lever pivot.
9. AIR CLEANER
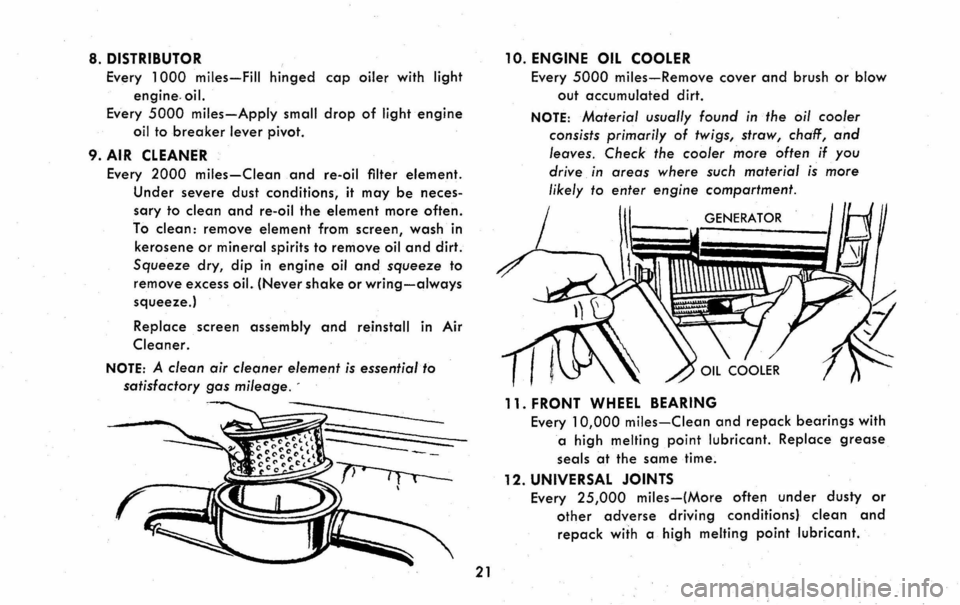
Every 2000 miles-Clean .and re-oil filter element.
Under severe dust conditions, it may be neces
sary to clean and re-oil the element more often.
To clean: remove element from screen, wash in
kerosene
or mineral spirits to remove oil and dirt.
Squeeze dry, dip in engine oil and squeeze to
remove excess oiL (Never shake or wring-always
squeeze.)
Replace screen assembly and reinstall in Air
Cleaner.
NOTE: A clean air cleaner element is essential to
satisfactory gas mileage. -
21
10. ENGINE OIL COOLER
Every 5000 miles-Remove cover and brush or blow
out accumulated dirt.
NOTE: Material usually found in the oil cooler
consists primarily
of twigs, straw, chaff, and
leaves. Check the cooler more often if you
drive
in areas where such material is more
likely to enter engine compartment.
GENERATOR
11. FRONT WHEEL BEARING
Every 10,000 miles-Clean and repack bearings with
a high melting point lubricant. Replace grease
seals at the same time.
12. UNIVERSAL JOINTS
Every 25,000 miles-(More often under dusty or
other adverse driving conditions} clean and
repack with a high melting point lubricant.
Page 25 of 38

13. TRANSMISSION
3-Speed (Transmission and Rear Axle)
First 1'000 miles-Drain and refill with lubricant spe
cified
below.
Every 1000 miles-Check at operating temperature
and keep lubricant at level of the filler plug.
Add SAE-80 multipurpose gear lubricant (G. M.
Part No. 3772661) as required.
Powerglide (Transmission only)
Every 1000 miles-Check fluid level on dipstick with
engine idling, selector lever in NEUTRAL posi
tion,
parking brake set and transmission at
operating temperature. Add Automatic Trans
mission
Fluid Type "A" with an AQ-ATF-A num
ber to full mark on dipstick . Check with engine
idling. DO NOT OVERFILL. Correct oil level must
be established by dipstick measurement.
NOTE: From the "Add Oil" mark to the "Full"
mark
on the dipstick indicates a difference of
only 1 pint of fluid.
22
14. REAR AXLE
First 1000 miles-Drain rear axle and refill with
lubricant specified
below.
Every 1000 miles-Check rear axle at operating tem
perature and keep lubricant at level of filler
plug.
Every 10,000 miles or seasonally-Drain rear axle
and refill with lubricant specified below.
With Powerglide Transmission
Add G. M. No. 3772661 (SAE-80 Multipurpose Gear
Lubricant) or equivalent to rear axle as required.
With 3-Speed Transmission
Add G. M. Part No. 3772661 (SAE-80 Multipurpose
Gear Lubricant) or equivalent to rear axle as
required.
NOTE: if rear axle requires additional lubricant,
be sure that 3-speed transmission is also checked.
Low lubricant in the axle indicates that the trans
mission
may also be low .
15. BATTERY
Every 1000 miles-Check fluid level. Keep filled with
distilled
water to level of the split ring in the
vent tube. Oil battery terminal washer with engine
oil. Clean top of battery regularly with diluted
Page 26 of 38

ammonia or soda solution and flush with clear
water. Check state of charge regularly, espe
cially in freezing weather, for an undercharged
battery may freeze and break.
16. FUEL FILTER
Every 15,000 miles-Replace filters, located in each
carburetor inlet. If flooding occurs, replace more
often.
17. BRAKE MASTER CYLINDER
Check frequently and maintain fluid level at mark
inside reservoir below filler opening, using G. M.
Hydraulic Brake Fluid, Super No. 11. If addition
of fluid is required more often than ·every 1000
miles the entire system should be checked for
leaks.
18. PARKING BRAKE & CLUTCH PULLEYS
AND CABLES
Every 10,000 miles-Lubric.ate pulleys under dash.
Remove the
tunnel cover under vehicle and lubri
cate pulleys and cable bearing points with lub
riplate. lubricate gearshift lever ball and socket
and shift rod universal joint at transmission con
nection with lubriplate.
BODY LUBRICATION POINTS
Most body lube points do not need frequent, heavy
23
lubrication as does the chassis. However, periodic checks
of certain points on the Corvair body, and lubrication
when needed will eliminate annoying squeaks and
noises . Be careful not to over-lubricate. Wipe off all
surplus lubricant.
The following items should be lubricated periodically:
1. DQQr Hinges-Wipe off dirt and apply Lubriplate.
2 . Door Lock
Striker-Wipe off dirt and apply stick type lubricant.
3. Door Bottom Drain Hole Sealing Strip-Apply silicone rub-
ber lubricant.
4. Door Jamb Switch-Apply Lubriplate.
5 .
Rear Door Weatherstrip-Apply silicone rubber, lubricant.
6 . Front
and Rear Compartment Lid Lock-Apply Lubriplate.
7. Front Compartment Lid Torque Rods-Apply dripless oil to bearing points.
8. Gas Tank Filler Door Hinge-Apply dripless oil. 9. Glove Box Door Hinge-Apply dripless oil. 10. Rear Folding Seat Back Support Link Assembly & Filler Panel Hinge-Apply dripless Qil to bearing points.
The following items moy be lubricated whenever
access to the item is availoble:
11. Door Outsi.de Handle Lock Cylinder Shaft-Apply Lubri-
plate. 12. Door Window Regulator and Cams-Apply Lubriplate .
13. Door Lock Parts-Apply Lubriplate . 14. Door Locking Mechanism-Apply Lubriplate .
15. Front and Rear Compartment Hinges-Apply Lubriplate.