1953 JEEP CJ service
[x] Cancel search: servicePage 336 of 376
Q
WHEELS
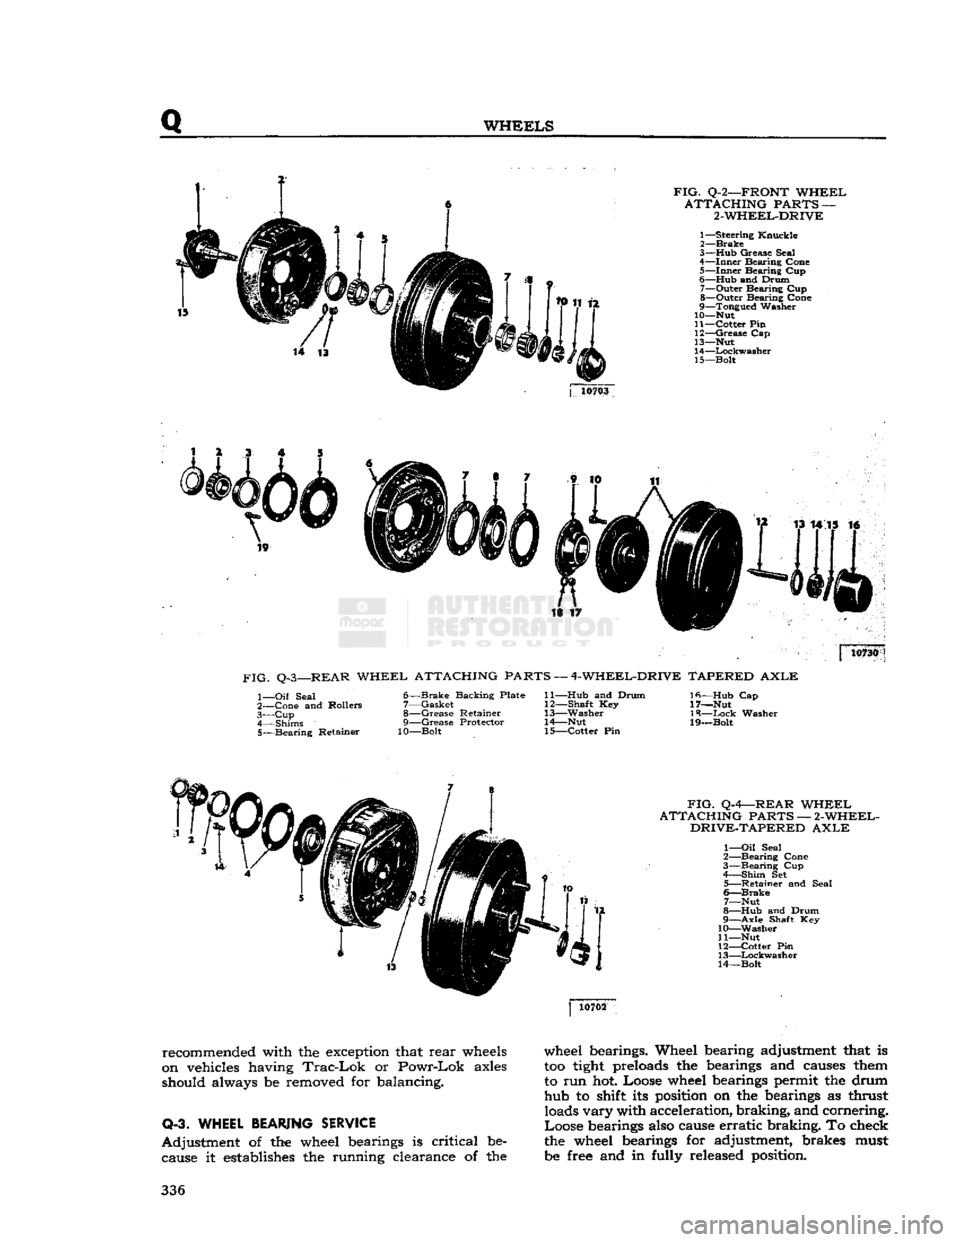
FIG.
Q-2—FRONT
WHEEL
ATTACHING
PARTS —
2-WHEEL-DRIVE
1—
Steering
Knuckle
2—
Brake
3— Hub
Grease
Seal
4—
Inner
Bearing
Cone
5—
Inner
Bearing
Cup
6—
Hub
and
Drum
7—
Outer
Bearing
Cup
8—
Outer
Bearing
Cone
9—
Tongued
Washer
10— Nut
11—
Cotter
Pin
12—
Grease
Cap
13— Nut
14—
Lockwasher
15—
Bolt
j
10703
is ir 10730
FIG.
Q-3—REAR
WHEEL
ATTACHING PARTS —
4-WHEEL-DRIVE
TAPERED
AXLE
1—
Oil
Seal
2—
Cone
and
Rollers
3— Cup
4—
Shims
5—
Bearing
Retainer
6—
Brake
Backing
Plate
7—
Gasket
8—
Grease
Retainer
9—
Grease
Protector
10—Bolt
11— Hub
and
Drum
12—
Shaft
Key
13—
Washer
14—
Nut
15—
Cotter
Pin
Ifi—Hub
Cap
17—Nut
18—
Ixick
Washer
19—Bolt
FIG.
Q-4—REAR
WHEEL
ATTACHING
PARTS —
2-WHEEL-
DRIVE-TAPERED
AXLE
1—
Oil
Seal
2—
Bearing
Cone
3—
Bearing
Cup
4—
Shim
Set
5—
Retainer
and
Seal
6—
Brake
7—
Nut
8—
Hub
and
Drum
9—
Axle
Shaft Key
10—
Washer
11— Nut
12—
Cotter
Pin
13—
Lockwasher
14—
Bolt
recommended with the exception that
rear
wheels
on vehicles having
Trac-Lok
or
Powr-Lok
axles
should always be removed for balancing.
Q-3. WHEEL
BEARING
SERVICE
Adjustment
of the wheel bearings is
critical
be cause it establishes the running clearance of the wheel bearings. Wheel bearing adjustment that is
too
tight
preloads the bearings and causes them
to run hot. Loose wheel bearings permit the drum hub to shift its position on the bearings as thrust loads
vary
with acceleration,
braking,
and cornering.
Loose
bearings also cause
erratic
braking.
To check
the wheel bearings for adjustment, brakes must
be free and in fully released position. 336
Page 337 of 376
'Jeep'
UNIVERSAL
SERIES SERVICE
MANUAL
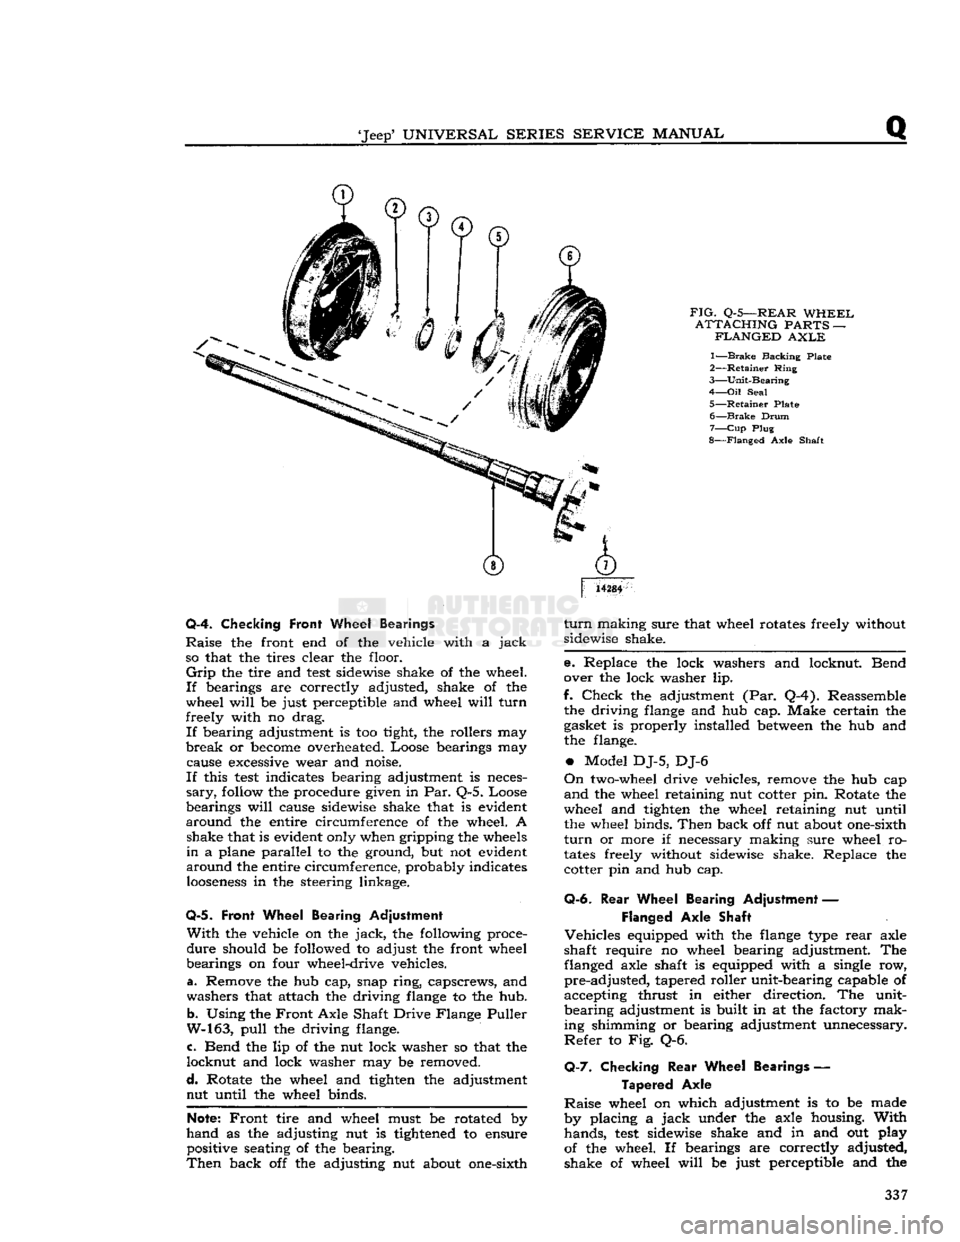
FIG.
Q-5—REAR
WHEEL
ATTACHING
PARTS —
FLANGED
AXLE
1—
Brake
Backing Plate
2—
Retainer
Ring
3—
Unit-Bearing
4—
Oil
Seal
5—
Retainer
Plate 6—
Brake
Drum
7—
Cup
Plug
8—
Flanged
Axle Shaft
14284
Q-4. Checking
Front
Wheel Bearings
Raise
the front end of the vehicle with a
jack
so that the tires clear the floor.
Grip
the tire and
test
sidewise shake of the wheel.
If
bearings are correctly adjusted, shake of the
wheel
will
be just perceptible and wheel
will
turn
freely with no drag.
If
bearing adjustment is too tight, the rollers may
break
or
become
overheated. Loose bearings may cause
excessive
wear and noise.
If
this
test
indicates bearing adjustment is neces
sary,
follow
the procedure given in Par. Q-5. Loose
bearings
will
cause sidewise shake that is evident
around
the entire circumference of the wheel. A shake that is evident only when gripping the
wheels
in
a plane parallel to the ground, but not evident
around
the entire circumference, probably indicates
looseness
in the steering linkage.
Q-5.
Front Wheel Bearing Adjustment
With
the vehicle on the
jack,
the following proce
dure
should be followed to adjust the front wheel
bearings on four wheel-drive vehicles.
a. Remove the hub cap, snap
ring,
capscrews, and
washers that attach the driving
flange
to the hub.
b.
Using the
Front
Axle Shaft Drive Flange Puller
W-163,
pull
the driving flange.
c. Bend the lip of the nut lock washer so that the
locknut
and lock washer may be removed.
d.
Rotate the wheel and tighten the adjustment nut until the wheel binds.
Note:
Front
tire and wheel must be rotated by
hand
as the adjusting nut is
tightened
to ensure positive seating of the bearing.
Then
back off the adjusting nut about one-sixth
turn
making sure that wheel rotates freely without
sidewise shake.
e. Replace the lock washers and locknut. Bend
over the lock washer lip.
f.
Check
the adjustment (Par. Q-4). Reassemble the driving
flange
and hub cap. Make certain the
gasket is properly installed
between
the hub and
the flange.
•
Model DJ-5, DJ-6
On
two-wheel drive vehicles, remove the hub cap
and
the wheel retaining nut cotter pin. Rotate the
wheel and tighten the wheel retaining nut until the wheel binds.
Then
back off nut about one-sixth
turn
or more if necessary making sure wheel ro
tates
freely without sidewise shake. Replace the cotter pin and hub cap.
Q-6.
Rear
Wheel Bearing Adjustment —
Flanged
Axle Shaft
Vehicles
equipped with the
flange
type
rear
axle
shaft require no wheel bearing adjustment. The flanged axle shaft is equipped with a single row,
pre-adjusted,
tapered roller unit-bearing capable of
accepting thrust in either direction. The unit-
bearing
adjustment is built in at the factory mak
ing shimming or bearing adjustment unnecessary.
Refer
to Fig. Q-6.
Q-7.
Checking
Rear
Wheel Bearings —
Tapered
Axle
Raise
wheel on which adjustment is to be made
by placing a
jack
under the axle housing.
With
hands,
test
sidewise shake and in and out play
of the wheel. If bearings are correctly adjusted,
shake of wheel
will
be just perceptible and the 337
Page 338 of 376

Q
WHEELS
FIG.
Q-6—REAR
WHEEL,
FLANGED
AXLE
AND
BEARING
ASSY.
1—
Retainer
Plate
2— Oil
Seal
3—
Unit
Bearing
4—
Retaining
Ring
5—
Axle
Shaft
wheel
will
turn
freely with no drag. If adjustment
is necessary, follow the procedure given in Par. Q-8.
Q-8.
Rear Wheel Bearing Adjustment
—
Tapered Axle
The
bearing adjusting shims are placed
between
the brake backing plate and axle flange as shown
in
Fig. Q-7.
With
wheel raised on
jack,
the following procedure
should be used to make the
rear
wheel bearing
adjustment.
a.
Remove the hub cap with hub cap puller, the
cotter pin, axle shaft nut, and washer. Remove the
wheel hub and drum with a wheel puller.
b.
Disconnect hydraulic brake line at wheel
cylinder.
c.
Remove the
bolts
holding the brake dust shield, grease and bearing retainer, and the brake backing
plate.
d.
Remove or install shims to adjust the bearings
to provide .001" to .006" [0,025 a 0,152 mm.]
end float of the axle shaft.
Note:
Before reassembly of the wheel make certain
the backing plate nuts are tight and torqued at 25 to 35 lb-ft [3,4 a 4,8 kg-m.].
e. Reassemble the wheel, adjust brakes, and check
the bearing adjustment (Par. Q-7).
0-9.
REAR WHEEL MOUNTING
—
TAPERED AXLE
Proper
axle shaft key installation is accomplished by placing the hub and drum on the axle shaft
taper and then inserting the axle shaft key in the
FIG.
Q-7—REAR
WHEEL
AND HUB
BEARING
—
TAPERED
AXLE
SHAFT
1—-Adjusting
Shims
2—Inner
Seal
3—Outer
Seal
keyway.
Never install the key in the keyway before
placing
the hub and drum assembly on the axle
shaft. Be sure that the axle shaft nut is torqued
to a minimum of 150 lb-ft. [20,7 kg-m.].
O-10.
BRAKE
DRUM
SERVICE
On
rear
wheels, the hub fits inside the brake drum
(Fig.
Q-3). On front wheels, the hub is attached
to the outside of the brake drum (Fig. Q-l). The
brake
drums are attached to the wheel hubs by
five serrated bolts. These
bolts
are also used for
mounting the wheels on the hub. To remove a
brake
drum,
press or drive out the serrated
bolts
and
remove the drum from the hub. When placing
the drum on the hub, make sure that the contacting
surfaces are clean and flat.
Line
up the
holes
in
the drum with
those
in the hub and put the drum
over the shoulder on the hub. Insert five new
serrated
bolts
through the drum and hub and drive
the
bolts
into place solidly. Place a round head of the bolt in a vise. Next, place the hub and drum
assembly over it so that the bolt head rests on it.
Then
swage
the bolt into the countersunk section of the hub or drum with a punch. The runout of
the drum face should be within .030" [0,76 mm.]
total indicator reading. If the runout is found to be greater than .030" it
will
be necessary to reset
the
bolts
to correct the condition.
0-11.
TIRE SERVICE
Refer
to Fig. Q-8.
One
of the most important factors of safe vehicle
operation is systematic and correct tire mainte nance.
Tires
must sustain the weight of a loaded vehicle, withstand more than ordinary rough serv- 338
Page 339 of 376
'Jeep'
UNIVERSAL
SERIES
SERVICE
MANUAL
Q
ice, provide maximum safety over all
types
of
terrain,
and furnish the medium on which the
vehicle can be maneuvered with ease. Although
there are other
elements
of tire service, inflation maintenance is the most important and in many
instances the most neglected. The tire pressure should be maintained for safe operation. An under- inflated tire is dangerous as too much flexing can
cause breakage of the casing. Overinflation in time
may
cause a blowout.
Upon
careful inspection of tires, it may be found
that improper wheel alignment, balance, grabbing
brakes,
poor driving habits, fast cornering or other
conditions are the cause of wear. Such conditions
should be corrected.
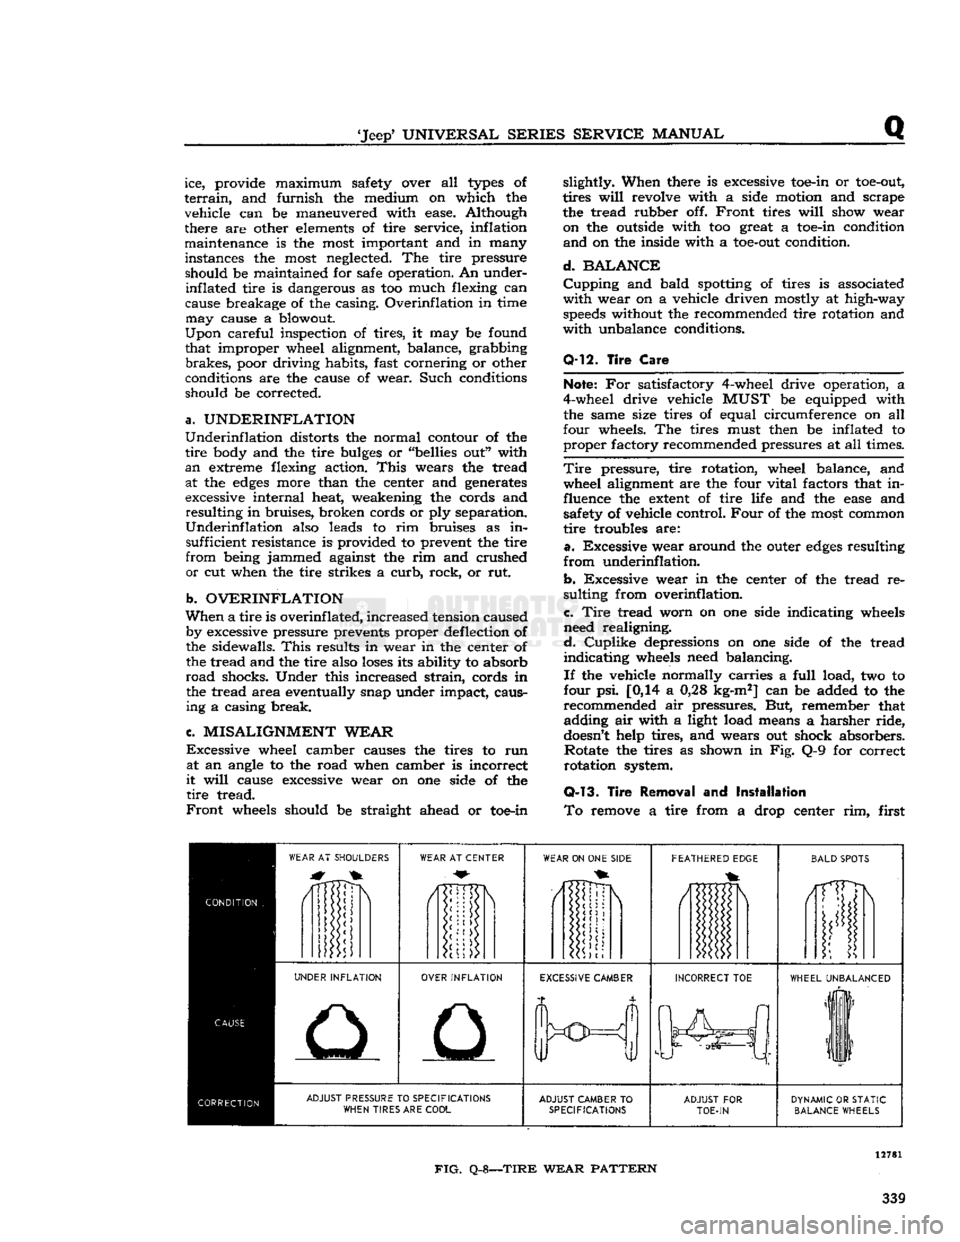
a.
UNDERINFLATION
Underinflation
distorts the normal contour of the
tire
body and the tire
bulges
or "bellies out" with
an
extreme flexing action.
This
wears the tread at the
edges
more than the center and generates
excessive internal heat, weakening the cords and
resulting
in bruises, broken cords or ply separation.
Underinflation
also leads to rim bruises as in sufficient resistance is provided to prevent the tire
from
being jammed against the rim and crushed
or
cut when the tire strikes a
curb,
rock, or rut.
b.
OVERINFLATION
When
a tire is
overinf
lated,
increased tension caused by excessive pressure prevents proper deflection of
the sidewalls.
This
results in wear in the center of the tread and the tire also
loses
its ability to absorb
road
shocks. Under this increased
strain,
cords in the tread area eventually snap under impact, causing a casing break.
c.
MISALIGNMENT
WEAR
Excessive
wheel camber causes the tires to run at an angle to the road when camber is incorrect
it
will
cause excessive wear on one side of the
tire
tread.
Front
wheels should be straight ahead or toe-in slightly. When there is excessive toe-in or
toe-out,
tires
will
revolve with a side motion and scrape
the tread rubber off.
Front
tires
will
show wear on the outside with too great a toe-in condition
and
on the inside with a
toe-out
condition.
d.
BALANCE
Cupping
and bald spotting of tires is associated
with
wear on a vehicle driven mostly at high-way
speeds
without the recommended tire rotation and
with
unbalance conditions.
Q-12.
Tire
Care
Note;
For satisfactory 4-wheel drive operation, a
4-wheel drive vehicle
MUST
be equipped with the same size tires of equal circumference on all
four wheels. The tires must then be inflated to
proper
factory recommended pressures at all times.
Tire
pressure, tire rotation, wheel balance, and wheel alignment are the four vital factors that in
fluence the
extent
of tire life and the
ease
and safety of vehicle control.
Four
of the most common
tire
troubles are:
a.
Excessive wear around the outer
edges
resulting
from
underinflation.
b.
Excessive wear in the center of the tread re
sulting from overinflation.
c.
Tire
tread worn on one side indicating wheels
need realigning.
d.
Cuplike
depressions on one side of the tread
indicating
wheels need balancing.
If
the vehicle normally carries a
full
load, two to
four psi. [0,14 a 0,28 kg-m2] can be added to the
recommended air pressures. But, remember that adding air with a light load means a harsher ride,
doesn't
help tires, and wears out shock absorbers. Rotate the tires as shown in Fig. Q-9 for correct
rotation system.
Q-13.
Tire
Removal
and
Installation
To
remove a tire from a drop center rim, first
WEAR
AT SHOULDERS
WEAR
AT CENTER
WEAR
ON ONE
SIDE
FEATHERED
EDGE
BALD
SPOTS
/1TTDN
i
UNDER
INFLATION
OVER
INFLATION
EXCESSIVE
CAMBER
INCORRECT
TOE
WHEEL
UNBALANCED
liF
11
ADJUST
PRESSURE TO
SPECIFICATIONS
WHEN
TIRES ARE
COOL
ADJUST
CAMBER
TO
SPECIFICATIONS
ADJUST
FOR
TOE-IN
DYNAMIC
OR
STATIC
BALANCE
WHEELS
FIG.
Q-8—TIRE
WEAR
PATTERN
339
Page 341 of 376

'Jeep'
UNIVERSAL
SERIES
SERVICE
MANUAL
R
FRAME
Contents
SUBJECT
PAR.
Draw
Bar
R-6
Frame
Alignment
.R-2
Frame
Dimensions
.R-3
Front
Axle Alignment.
R-5
Straightening
Frame
R-4
R-1.
GENERAL
equipped with V6 engines, refer
to
measurements
The
frame
is the
structural center
of
the vehicle,
B£?wn
in
FiB-
R"f
, _ , r' .
for in addition
to
carrying
the load,
it
provides and The inost convenient method
of
making this check,
maintains
correct relationship
between
other units
Particularly
when
the
body
is on the
chassis,
is by
to assure their normal functioning. marking
on the
floor
all
dimensional points from
Of
rugged design, the frame
is
constructed of heavy
fhlch
measurements should
be
taken.
This
is
channel
steel side
rails
and cross-members.
Brack-
known
a\
Plumb-bobbing
the
frame Select
a
ets and diagonal braces
are
used
to
maintain
the
?Pace
on the
floof
^hlch
»
extr«nely
level If
work-
proper
longitudinal position
of the
side
rails
rela-
ing Pn
a.,fPen^
c*ean
* s°
that
the fha*k
tive
to
each other, and
at the
same time provide
*****
Jl!*
be
vJs.lble
underneath
the
frame
to be
additional
resistance
to
torsional strains. Fig. R-1, checked
If
workmg
on a
wooden
floor
it is ad-
R-2,
and R-3 illustrate
the
subject models. disable
la^
f f * V
Underneath
*he ve"
Vehicles
that have been
in an
accident
of any
hide
and
carefully tack them
m
place. Drop
a
nature,
which
may
result
in a
swayed
or
sprung gumb-bob from each point indicated
in
Figures
frame,
should always
be
carefully checked
for ^
an?
L'maJkl?g the uflo?r
Meetly underneath
proper
frame alignment, steering geometry,
and the
point. Satisfactory checking depends entirely
axle alignment.
on the
accuracy
of the
marks
in
relation
to the
frame.
To
check points that have been marked, carefully
move
the vehicle away from the layout on the floor,
R-2.
Checking
Frame
Alignment
anci
proceed
as
follows:
The
most efficient
and
satisfactory method
of a.
Check
the
frame
at
front
and
rear
end
using
checking
frame alignment
is
with
a
frame aligning corresponding marks
on the
floor.
If
widths
cor-
fixture
which
is
equipped with bending
tools
for
respond
to
frame specifications, draw
a
center line
straightening frame parts. In the absence
of
such
a the
full
length
of
the vehicle, halfway
between
the
fixture,
frame
alignment
may be
determined
by
marks indicating front and
rear
widths.
If
frame
using the
"X"
or diagonal method of checking from width
is not
correct and
the
center line cannot
be
given points
on
each side
rail.
Figs.
R-1 and R-2
laid
out
from checking points
at the
end
of
frame,
illustrate
this method
of
checking
the
frame.
it
can
be
drawn through intersections
of
any
two
When
checking frame alignment
on
vehicles
pair
of
equal diagonals.
FIG.
R-1—FRAME
ASSEMBLY
—
MODEL
CJ-3B
341
Page 343 of 376

'Jeep*
UNIVERSAL
SERIES
SERVICE
MANUAL
R
frame.
This
could cause the already aligned sec
tions of the frame to
become
misaligned or weak ened.
R-3.
Frame Dimensions
Points for measuring frame alignment on vehicles
equipped with the F4
engine
are shown in
Fig.
R-l
and
R-2.
The correct measurements for each model
are
given in the table. Point A is at the front of the
frame.
A-B
and C-D are the distances
between
spring
shackle
bolt and spring pivot bolt frame centers
measured
on a line parallel with the frame center-
line.
E and F show the shackle bolt centers in
rela
tion (above or below) to the pivot bolt centers.
On
vehicles equipped with V6
engines
the frame dimensions are shown in Fig. R-3.
CJ-3B
A-B
44.31"
[112,55
cm.]
C-D
. . . . . .48.48"
[123,14
cm.]
Width
Front
29%" [74,3 cm.]
Width
Rear
29M" [74,3 cm.]
"E"
above .3W [8,18 cm.]
"F"
above 4%* [10,56 cm.]
CJ-5,
CJ-5A,
CJ-6,
CJ-6A,
DJ-5, DJ-6
A-B
.47.08"
[119,58
cm.]
C-D.
52.37"
[133,02
cm.]
Width
Front
2934"
[74,3 cm.]
Width
Rear
29j|" [74,3 cm.]
"E"
above 3%" [8,18 cm.]
"F"
above. .5%" [15,0 cm.]
R-4.
Straightening Frame
In
case the bending or twisting of the frame is not
excessive, it may be straightened.
This
should be
done
cold, as excessive heat applied to the frame
will
weaken it. For this reason it is recommended that badly damaged frame parts be replaced.
Note:
A technique known as "controlled heat" can
be utilized where a frame section is "squashed" and must be brought out without "tearing" or excessive
stretch
to the metal.
R-5.
Front
Axle
Alignment
After
it has been determined that the frame is prop
erly
aligned, the front axle alignment with the
frame
can be checked. The front axle is square
with
the frame if the distance
between
the front
and
rear
axle is the same on both sides. The dis
tance from the spring upper bushings to the front
axle on both sides should be equal.
Note:
Always inspect the springs for broken spring
center
bolts
when checking the frame and axle
alignment.
R-6. Draw Bar
Fig.
R-4, shows method of attachment and bracing of the Jeep draw bar. The braces and the reinforce
ment installed in the frame
rear
cross-member
channel
provide even distribution of the stresses
when moving a heavy load.
The
draw bar plate may be shifted to any one of
nine positions for alignment on the draw bar and
may
be used with the
offset
up or down to change
the height of attachment.
Check
the attaching
bolts
periodically to be sure they are tight at all
times.
FIG.
R-4—DRAW
BAR
MOUNTING
R-7.
FRflME
SPECIFICATIONS
Type
— All Models j
Ladder
with Steel
Channel
Side
Members
Vehicle
Number
of
Cross
Members
Overall
Length
Width
Front
Rear
Section
Modulus
CJ-3B
i
CJ-5,
CJ-5A,
DJ-5 1
j
4 Intermediate j
•
Front
Bumper Bar
Rear
K-member 122%'
[311,55 cm.]
128%'
[326,23
cm.] 29^*
[74,3 cm.]
[74,3 cm.]
29M'
[74,3 cm.]
[74,3 cm.] 1.493 in. cu.
1.493 in. cu.
CJ-6,
CJ-6A,
DJ-6
|
J
1
I
r
\mw t
[377,03
cm.]
29M'
[74,3 cm.]
29M'
[74,3 cm.] 1.493 in. cu.
343
Page 345 of 376
'Jeep'
UNIVERSAL
SERIES
SERVICE
MANUAL
s
SPRINGS
AND
SHOCK
ABSORBERS
Contents
SUBJECT
PAR. SUBJECT PAR.
Pivot Bolts S-3 Spring Removal S-4
Shock
Absorbers S-7 Spring Shackles S-2
Spring
Installation S-5 U-Shackles S-6
S-1.
GENERAL
Semielliptical
leaf springs are used for all models.
The
springs are hung longitudinally from the frame
side rails by means of brackets welded to the
rails.
All
axles are firmly attached to the springs by U-
bolts
(spring clips), spring saddles welded to the
underside of the axles, and spring plates under the
springs.
Early
model DJ-5 and DJ-6 front axles (I beam) are attached to the springs with conven
tional
bolts
and spring plates. Spring center
bolts
are
inserted in the axle spring saddles to prevent
shifting of the axle.
All
front springs, except as noted below, are provided with shackles at the front ends of the springs
and
pivot
bolts
at the
rear
ends of the springs. Model CJ-5 up to
Serial
No. 44437 and Model
CJ-6
up to
Serial
No. 11981 are provided with shackles at the
rear
ends of the front springs, and
pivot
bolts
at the front ends.
Note:
Models
CJ-5A
and
CJ-6A
are equipped with
the two
stage
type front and
rear
spring.
All
rear
springs are provided with shackles at the
rear
end and pivot
bolts
at the front end.
Springs
should be examined periodically for broken
or
shifted leaves,
loose
or missing rebound clips,
angle of spring shackles, and position of springs
on the saddles. Springs with shifted leaves do not have their normal strength. Missing rebound clips may permit the spring leaves to fan out or break
on rebound. Broken leaves may make the vehicle
hard
to handle or permit the axle to shift out of
line.
Weakened springs may break causing difficulty
in
steering. Spring attaching clips or
bolts
must be tight. It is
suggested
that they be checked at each
vehicle inspection and torqued 45 to 55 lb-ft. [6,2 a 7,6 kg-m.].
S-2.
Spring Shackles
Rubber-bushed
shackles are provided on all current
production vehicles. The steel-backed rubber (silent bloc) bushings are pressed into the spring
eyes
and mounting brackets. The shackle
bolts
tighten the side plates against the inner steel back
ing of the bushings. Oscillation of the springs is
taken in the rubber bushings.
All
vehicles produced before early 1957 were
equipped with U-shackles and threaded core bush-
*3(
21-
to It is
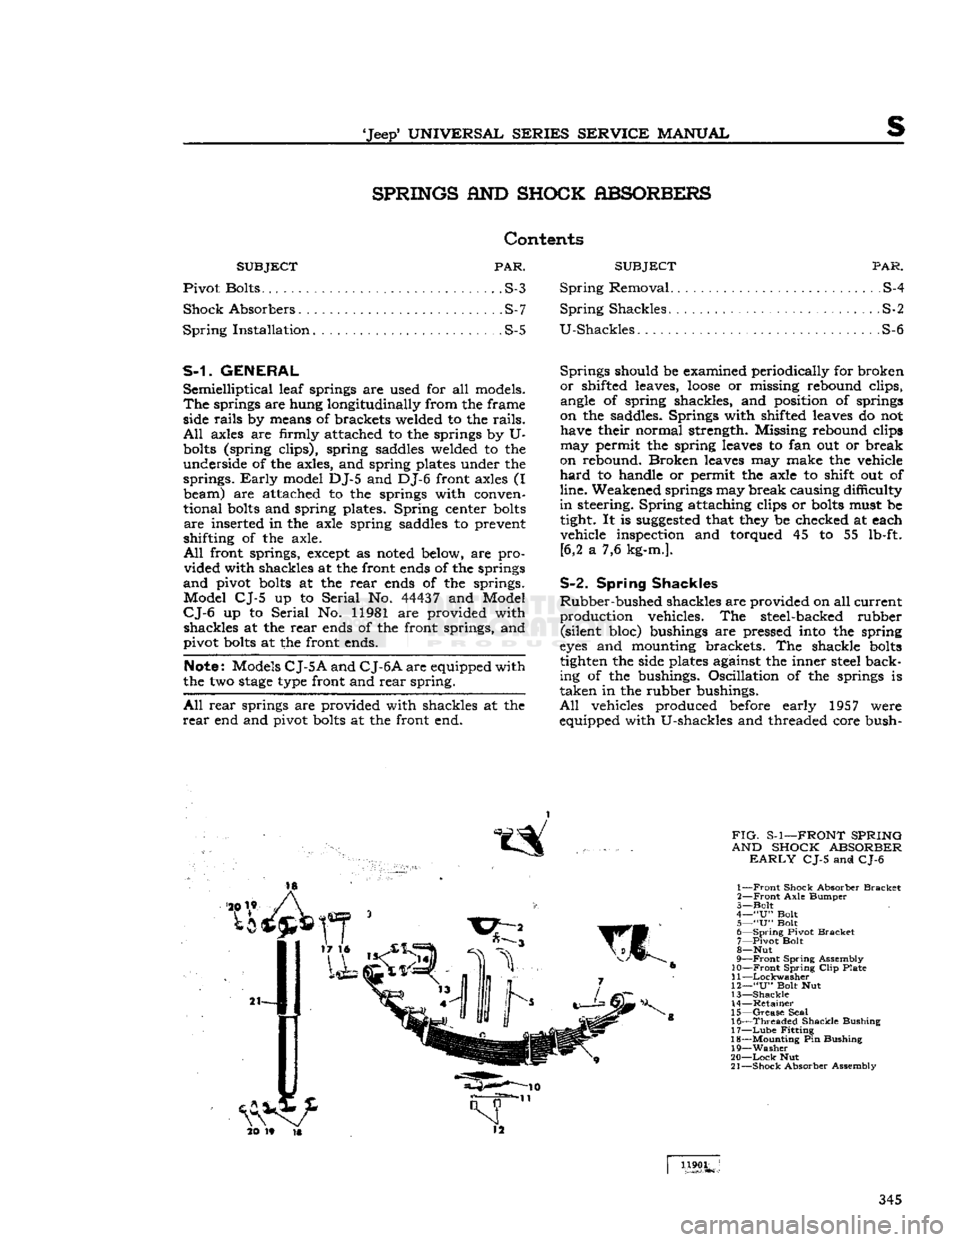
FIG-
S-1—FRONT SPRING
AND SHOCK ABSORBER
EARLY
CJ-5 and CJ-6
1—
Front
Shock Absorber
Bracket
2—
Front
Axle
Bumper
3—
Bolt
4—
"U"
Bolt
5—
"U"
Bolt
6—
Spring
Pivot
Bracket
7—
Pivot
Bolt
8—
Nut
9—
Front
Spring
Assembly
10—Front
Spring
Clip
Plate
11
—Lockwasher
12—
"U"
Bolt Nut
13—
Shackle
14—
Retainer
15—
Grease
Seal
16—
Threaded
Shackle
Bushing
17—
Lube
Fitting
18—
Mounting
Pin Bushing
19—
Washer
20—
Lock
Nut
21—
Shock
Absorber Assembly
1190L
345
Page 346 of 376
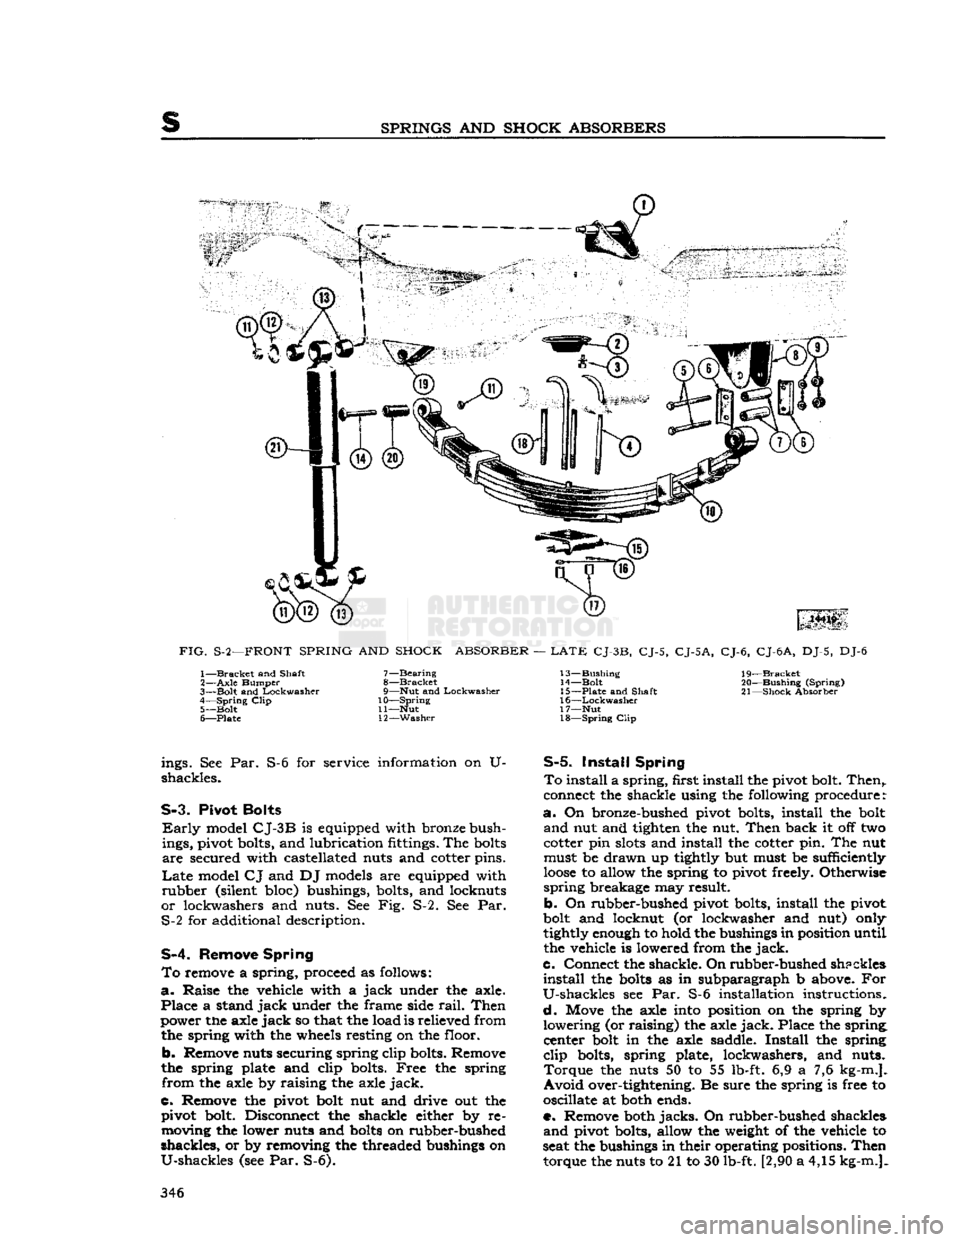
SPRINGS
AND
SHOCK
ABSORBERS
FIG.
S-2—FRONT
SPRING
AND
SHOCK
ABSORBER
—
LATE
CJ-3B,
CJ-5,
CJ-5A,
CJ-6,
CJ-6
A,
DJ-5, DJ-6 1—
Bracket
and Shaft
2—
Axle
Bumper
3—
Bolt
and
Lockwasher
4—
Spring
Clip
5—
Bolt
6—
Plate
7—
Bearing
8—
Bracket
9—
Nut
and
Lockwasher
10—
Spring
11—
Nut
12—
Washer
13—
Bushing
14—
Bolt
15—
Plate
and Shaft
16—
Lockwasher
17—
Nut
18—
Spring
Clip
19—
Bracket
20—
Bushing
(Spring)
21—
Shock
Absorber ings. See Par.
shackles.
S-6 for service information on U-
S-3.
Pivot
Bolts
Early
model
CJ-3B
is equipped with bronze bush
ings, pivot bolts, and lubrication fittings. The
bolts
are
secured with castellated nuts and cotter pins.
Late
model
CJ
and DJ models are equipped with
rubber
(silent bloc) bushings, bolts, and locknuts
or
lockwashers and nuts. See Fig. S-2. See Par. S-2 for additional description.
S-4.
Remove
Spring
To
remove a spring, proceed as follows:
a.
Raise
the vehicle with a
jack
under the axle.
Place
a stand
jack
under the frame side
rail.
Then
power the axle
jack
so that the load is relieved from the spring with the wheels resting on the floor.
b.
Remove nuts securing spring clip bolts. Remove
the spring plate and clip bolts.
Free
the spring
from
the axle by raising the axle
jack.
C.
Remove the pivot bolt nut and drive out the pivot bolt. Disconnect the shackle either by removing the lower nuts and
bolts
on rubber-bushed
shackles,
or by removing the threaded bushings on
U-shackles
(see Par. S-6).
S-5.
Install
Spring
To
install a
spring,
first install the pivot bolt.
Then,,
connect the shackle using the following procedure:
a.
On bronze-bushed pivot bolts, install the bolt
and
nut and tighten the nut.
Then
back it off two
cotter pin
slots
and install the cotter pin. The nut must be
drawn
up tightly but must be sufficiently
loose
to allow the spring to pivot freely. Otherwise
spring
breakage may result.
b.
On rubber-bushed pivot bolts, install the pivot
bolt and locknut (or lockwasher and nut) only
tightly enough to hold the bushings in position until
the vehicle is lowered from the
jack.
c.
Connect the shackle. On
rubber-bushed
shpckles
install
the
bolts
as in subparagraph b above. For
U-shackles
see Par. S-6 installation instructions.
d.
Move the axle into position on the spring by
lowering
(or raising) the axle
jack.
Place the spring, center bolt in the axle saddle.
Install
the spring
clip
bolts, spring plate, lockwashers, and nuts.
Torque
the nuts 50 to 55 lb-ft. 6,9 a 7,6 kg-m.].
Avoid
over-tightening. Be sure the spring is free to
oscillate at both ends.
e. Remove both
jacks.
On rubber-bushed shackles
and
pivot bolts, allow the weight of the vehicle to
seat the bushings in their operating positions.
Then
torque the nuts to 21 to 30 lb-ft. [2,90 a 4,15 kg-m.]. 346