Page 107 of 360

107
Lighting and visibility
4
Rear wiper
Off.
Intermittent wipe.
Wash-wipe (set duration).
Reverse gear
When reverse gear is engaged, the rear wiper will come into operation automatically if the windscreen wipers are operating.
Activation/Deactivation
With audio system or touch screen
The system's settings are adjusted via the vehicle configuration menu.
NOTIC E
This function is activated by default.
WARNI NG
In the event of accumulation of snow or hard frost or if a bicycle carrier is fitted to the tailgate, deactivate the automatic rear wiper via the vehicle configuration menu.
Rear screenwash
► Turn the ring all the way towards the dashboard and hold.The screenwash and the wiper operate for as long as the ring remains turned.A final wiping cycle is performed when screenwashing ends.
Special position of the
windscreen wipers
This maintenance position is used while cleaning or replacing the wiper blades. It can also be useful, in wintry weather (ice, snow), to release the wiper blades from the windscreen.
NOTIC E
To maintain the effectiveness of the flat wiper blades, it is advisable to:– handle them with care.
– clean them regularly using soapy water.– avoid using them to hold cardboard on the windscreen.– replace them at the first signs of wear.
Before removing a windscreen wiper blade
► Operating the wiper control stalk within one minute after switching off the ignition will place the wiper blades in a vertical position.► Proceed with the desired operation or the replacement of the wiper blades.
After refitting a windscreen wiper blade
► To return the wiper blades to their initial position, switch on the ignition and operate the wiper control stalk.
Page 146 of 360

146
Manual child lock
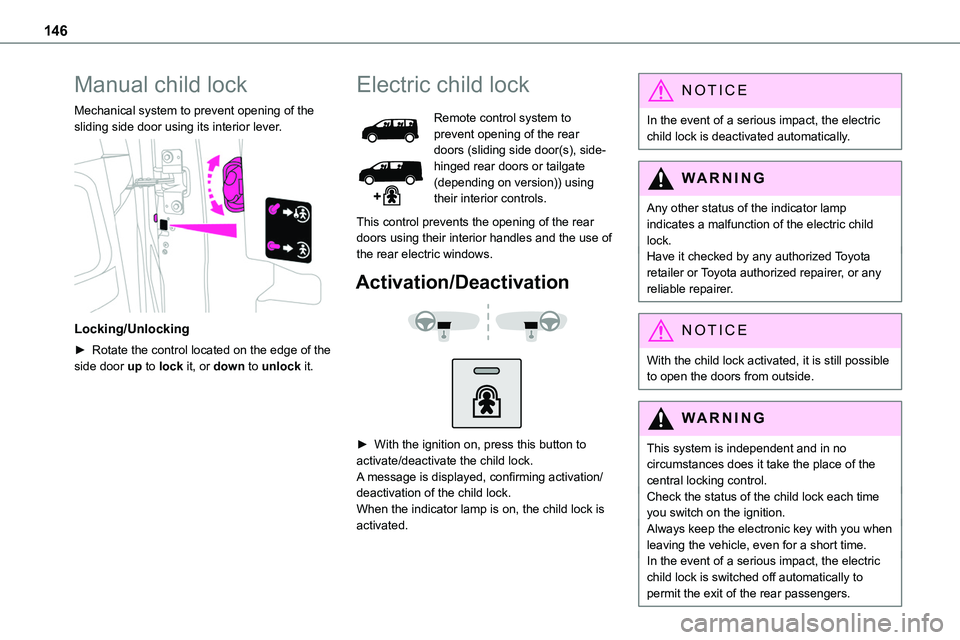
Mechanical system to prevent opening of the sliding side door using its interior lever.
Locking/Unlocking
► Rotate the control located on the edge of the side door up to lock it, or down to unlock it.
Electric child lock
Remote control system to prevent opening of the rear doors (sliding side door(s), side-hinged rear doors or tailgate (depending on version)) using their interior controls.
This control prevents the opening of the rear
doors using their interior handles and the use of the rear electric windows.
Activation/Deactivation
► With the ignition on, press this button to activate/deactivate the child lock.A message is displayed, confirming activation/deactivation of the child lock.When the indicator lamp is on, the child lock is activated.
NOTIC E
In the event of a serious impact, the electric child lock is deactivated automatically.
WARNI NG
Any other status of the indicator lamp indicates a malfunction of the electric child lock.Have it checked by any authorized Toyota retailer or Toyota authorized repairer, or any reliable repairer.
NOTIC E
With the child lock activated, it is still possible to open the doors from outside.
WARNI NG
This system is independent and in no circumstances does it take the place of the central locking control.Check the status of the child lock each time you switch on the ignition.Always keep the electronic key with you when leaving the vehicle, even for a short time.In the event of a serious impact, the electric child lock is switched off automatically to permit the exit of the rear passengers.
Page 192 of 360

192
Malfunction
In the event of a malfunction when changing into reverse gear, this warning lamp lights up on the instrument panel, accompanied by the display of a message and an audible signal (short beep).Have it checked by any authorized Toyota retailer or Toyota authorized repairer, or any reliable repairer.
VisioPark Light
WARNI NG
Refer to the General recommendations on the use of driving and manoeuvring aids.
The visual reversing assistance camera is activated automatically when reverse gear is engaged.The function may be supplemented by parking sensors.The image is displayed in the screen.
The blue lines (1) represent the width of the vehicle including the mirrors.The red line (2) represents a distance of 30 cm from the rear bumper and the thin blue lines 1 m (A) and 2 m (B) respectively.
WARNI NG
They are represented as lines marked "on the ground" and do not indicate the position of the vehicle in relation to tall obstacles (e.g. other vehicles).Some distortion of the image is normal.It is normal to have a part of the number plate showing at the bottom of the screen.
NOTIC E
Opening the tailgate or rear door (depending on equipment) can interfere with the display.If a side-hinged door is open, allow for the space it occupies.
WARNI NG
Check the cleanliness of the camera lens regularly.Clean the reversing camera regularly using a soft, dry cloth.
Top Rear Vision
WARNI NG
Refer to the General recommendations on the use of driving and manoeuvring aids.
As soon as reverse gear is engaged with the engine running, this system displays views of your vehicle’s close surroundings on the touch screen using a camera located at the rear of the vehicle.
Page 234 of 360

234
Access to the spare wheel
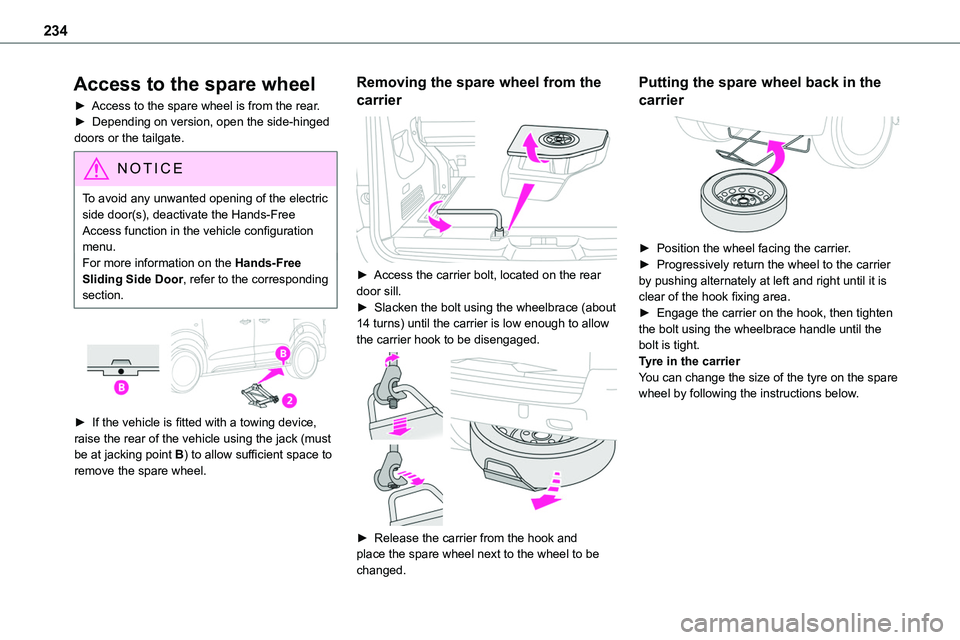
► Access to the spare wheel is from the rear.► Depending on version, open the side-hinged doors or the tailgate.
NOTIC E
To avoid any unwanted opening of the electric side door(s), deactivate the Hands-Free Access function in the vehicle configuration menu.For more information on the Hands-Free Sliding Side Door, refer to the corresponding section.
► If the vehicle is fitted with a towing device,
raise the rear of the vehicle using the jack (must be at jacking point B) to allow sufficient space to remove the spare wheel.
Removing the spare wheel from the
carrier
► Access the carrier bolt, located on the rear door sill.► Slacken the bolt using the wheelbrace (about 14 turns) until the carrier is low enough to allow the carrier hook to be disengaged.
► Release the carrier from the hook and place the spare wheel next to the wheel to be changed.
Putting the spare wheel back in the
carrier
► Position the wheel facing the carrier.► Progressively return the wheel to the carrier by pushing alternately at left and right until it is clear of the hook fixing area.► Engage the carrier on the hook, then tighten the bolt using the wheelbrace handle until the bolt is tight.Tyre in the carrierYou can change the size of the tyre on the spare wheel by following the instructions below.
Page 241 of 360

241
In the event of a breakdown
8
Rear lamps
1.Brake lamps/Sidelamps (P21/5W-21/5W)
2.Direction indicators (PY21W-21W amber)
3.Reversing lamps (P21W-21W)
4.Foglamps/Sidelamps (P21/4W-21/4W)
NOTIC E
For vehicles with interior trim, contact any authorized Toyota retailer or Toyota authorized repairer, or any reliable repairer to have the work done.
► Identify the defective lamp and then, depending on the version, open the rear doors or
the tailgate.
► With side-hinged doors, unscrew the 2 fixing screws from the outside.► With the tailgate, unclip the plastic trim from the outside and then tilt it outwards to remove it. Then unscrew the 2 fixing screws.
► From the inside, and depending on the version, remove the ventilation grille.► While holding the lamp in place, press the clip on the inside then carefully remove the lamp.► Disconnect the electrical connector.
► Spread the 3 lugs slightly, then extract the bulb holder.► Remove the faulty bulb by pressing lightly on it, then turning it a quarter turn clockwise.► Replace the bulb.
Third brake lamp (W5W - 5W)
► Depending on version, open the rear left-hand door or tailgate.
Page 242 of 360

242
► With side-hinged doors, remove the plastic cover with the aid of a screwdriver.► With a tailgate, unclip the trim at each end, rotating it from bottom to top, then unclip the centre clips to remove it.► Using a screwdriver through the aperture, push the lamp towards the outside.► Disconnect the electrical connector and then remove the lamp.► Unscrew the bulb holder a quarter turn anti-clockwise and replace the faulty bulb.To refit, press on the lamp to clip it into place.
Number plate lamps (W5W-W)
► Insert a thin screwdriver into one of the cut-outs on the exterior of the lens.► Push it outwards to unclip it.► Remove the lens and replace the faulty bulb.To refit, press the lens to clip it in.
Courtesy lamps (front and
rear)
LED courtesy lamps
For the replacement of these bulbs, contact any authorized Toyota retailer or Toyota authorized repairer, or any reliable repairer.A replacement kit for the LEDs is available from any authorized Toyota retailer or Toyota authorized repairer, or any reliable repairer.
Courtesy lamps with bulb
W5W-5W
► Unclip the lens by inserting a thin screwdriver into the slots at each side of the courtesy lamp.► Remove the bulb and change it.To refit, clip the lens in place and ensure that it is secure.
Page 249 of 360

249
In the event of a breakdown
8
WARNI NG
If this label is present, use only a 12 V charger to avoid causing irreversible damage to the electrical components.
24V
12V
WARNI NG
Never try to charge a frozen battery - risk of explosion!If the battery has frozen, have it checked by any authorized Toyota retailer or Toyota authorized repairer, or any reliable repairer who will verify that the internal components have not been damaged and that the case
has not cracked, which would mean a risk of toxic and corrosive acid leaking.
Disconnecting the battery
In order to maintain an adequate state of charge for starting the engine, we recommend disconnecting the battery if the vehicle is to be unused for an extended period.Before disconnecting the battery:► Close all openings (doors, tailgate, windows).► Switch off all electricity-consuming devices (audio system, wipers, lamps, etc.).
► Switch off the ignition and wait for 4 minutes.After accessing the battery, it is only necessary to disconnect the (+) terminal.
Quick-release terminal clamp
Disconnecting the (+) terminal
► Depending on equipment, lift the plastic cover
on the (+) terminal.► Raise lever A fully to release clamp B.► Remove clamp B by lifting it off.
Reconnecting the (+) terminal
► Raise lever A fully.► Refit open clamp B on the (+) terminal.► Push clamp B fully down.► Lower lever A to lock clamp B.► Depending on equipment, lower the plastic cover on the (+) terminal.
WARNI NG
Do not force the lever, as it will not lock in place if the clamp is not positioned correctly; start the procedure again.
Page 260 of 360
260
Dimensions (mm)
These dimensions have been measured on an unladen vehicle.
Mirrors folded
Side-hinged doors
Tailgate
Medium
Long
* Increased payload.
** Increased payload with high body.*** Depending on country of sale.
Medium