2024 PEUGEOT 308 steering wheel
[x] Cancel search: steering wheelPage 154 of 280

152
Driving
detection signal is given directly instead of the
audible confirmation signal.
If no audible signal is given, the display
indication is not shown or a warning message
appears, the system has a failure.
Audible assistance
The system signals the presence of obstacles
which are both within the sensors’ detection zone
and in the vehicle path defined by the direction of
the steering wheel.
Depending on version, in the example shown,
only the obstacles present in the shaded area
will be signalled by the audible assistance.
The proximity information is given by an
intermittent audible signal, the frequency of
which increases as the vehicle approaches the
obstacle.
When the distance between the vehicle and
the obstacle becomes less than about thirty
centimetres, the audible signal becomes
continuous.
The sound emitted by the speaker (right or
left) indicates the side on which the obstacle is
located.
The audible signal is automatically suspended
when the vehicle is stationary for a few seconds.
The audible signal is automatically restored
when the vehicle is moving again or if the
obstacle approaches the vehicle.
Adjusting the audible detection signalPressing this button opens the
window for adjusting the volume
of the audible signal.
Pressing this button mutes/unmutes
the audible signal.
Visual assistance
This supplements the audible signal, without
taking account of the vehicle's trajectory, by
displaying bars on the screen whose location
represents the distance between the obstacle
and the vehicle (white: more distant, orange:
close, red: very close).
When the obstacle is very close, the " Danger"
symbol is displayed on the screen.
Closing the system display windowPressing this button closes the
system display window.
This warning lamp flashes during obstacle detection on the instrument panel.
Muting the audible assistance /
Closing the visual assistance
If the audible detection signal is muted or
the system display window is closed by the
driver during the obstacle detection, only
the warning lamp continues to flash on the
instrument panel.
Front parking sensors
Supplementing the rear parking sensors, the
front parking sensors are triggered when an
obstacle is detected in front and the speed of the
vehicle is below 6 mph (10
km/h).
Front parking sensor operation is suspended if
the vehicle stops for more than three seconds in
forward gear, if an obstacle is no longer detected
or the vehicle speed exceeds 6
mph (10 km/h).
The sound emitted by the speaker (front or rear) locates the obstacle relative to
the vehicle, whether in front of or behind it on
its path.
Page 157 of 280

155
Driving
6Obstacles may appear further away than
they actually are.
It is important to monitor the sides of the
vehicle during the manoeuvre, using the
mirrors.
Parking sensors also provide additional
information about the area around the vehicle.
Standard view
The area behind the vehicle is displayed on the
screen.
The blue lines 1 represent the width of your
vehicle, with the mirrors unfolded; their direction
changes according to the position of the steering
wheel.
The red line 2 represents a distance of 30
cm
from the rear bumper; the two blue lines 3 and 4
represent 1
m and 2 m, respectively.
This view is available automatically or by
selection in the side menu.
Panoramic view
The panoramic view allows you to leave, in
reverse, a parking space by anticipating the
arrival of vehicles, pedestrians or cyclists.
This view is not recommended for carrying out a
complete manoeuvre.
This view is only available by selection in the
side menu.
Visiopark 3
For more information, refer to the
General recommendations on the use
of driving and manoeuvring aids .
This system allows you to view your vehicle's
close surroundings
on the touch screen using
cameras, located at the front and rear of the
vehicle, as well as under the door mirrors.
The screen is divided into 4 parts with two side
menus, a contextual view and a view from above
the vehicle in its close surroundings.
The parking sensors supplement the information
in the view from above the vehicle.
Depending on the view angle chosen in the
left-hand side menu, the system provides
specific visual assistance in particular driving
conditions, such as entering a blind intersection
or manoeuvring in areas with reduced visibility.
Different contextual views are available for the
rear or for the front:
–
Automatic zoom view
.
–
Standard view
.
–
Panoramic view
.
Depending on the context, the system chooses
the best view to display (standard or automatic
zoom).
The view type can be changed at any time
during the manoeuvre.
The system status is not saved when the ignition
is switched off.
Page 159 of 280

157
Driving
6Standard view
Depending on the context, the area behind or in
front of your vehicle is displayed on the screen.
The blue lines (at the rear)/orange lines (at the
front) 1 represent the width of your vehicle, with
the mirrors unfolded; their direction changes
according to the position of the steering wheel.
The red line 2 represents a distance of 30 cm
from the rear or front bumper; the two blue lines
(at the rear)/orange lines (at the front)
3
and
4
represent 1 m and 2 m respectively.
This view is available automatically or by
selection in the left-hand side menu.
Panoramic view
The rear or front panoramic view allows you to
leave a parking space by anticipating the arrival
of vehicles, pedestrians or cyclists.
This view is not recommended for carrying out a
complete manoeuvre.
This view is only available by selection in the left-
hand side menu.
Side views
The left-hand/right-hand side view allows you to
view the surroundings of each side of the vehicle
(e.g.
pavement, low wall, other vehicle parked
next to it).
► Select the relevant view in the view from
above the vehicle.
The selected area turns yellow and the side view
appears in the middle of the screen.
This view is not recommended for carrying out a
complete manoeuvre.
Rear cross traffic alert
For more information, refer to the
General recommendations on the use
of driving and manoeuvring aids .
When engaging reverse gear with the engine
running, or when reversing at up to 6 mph
(10
km/h), this system warns of approaching
obstacles (e.g.
pedestrian, cyclist, vehicle, truck,
motorcycle) in the rear blind spots of the vehicle,
using the radars installed in the bumper.
The system detects obstacles moving more than
2 mph (3
km/h) at a maximum distance of 40 m.
The system operates in addition to the Parking
sensors, Visiopark 1 or Visiopark 3 functions
(depending on version).
For more information about the Parking
sensors, Visiopark 1 or Visiopark 3 functions,
refer to the corresponding sections.
The driver must monitor their surroundings before and during the
whole manoeuvre. Drive slowly and carefully
in reverse gear in case of reduced or no
visibility.
Page 219 of 280
217
In the event of a breakdown
8
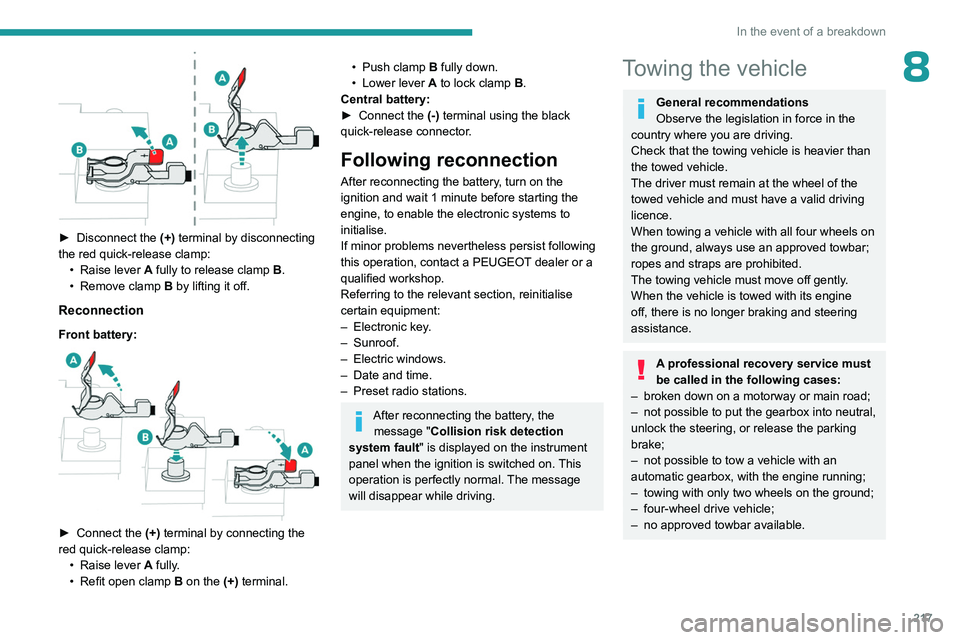
► Disconnect the (+) terminal by disconnecting
the red quick-release clamp: •
Raise lever
A
fully to release clamp
B
.
•
Remove clamp
B
by lifting it off.
Reconnection
Front battery:
► Connect the (+) terminal by connecting the
red quick-release clamp: •
Raise lever
A
fully.
•
Refit open clamp
B
on the (+) terminal.
• Push clamp B fully down.
• Lower lever A to lock clamp B.
Central battery:
►
Connect the
(-) terminal using the black
quick-release connector.
Following reconnection
After reconnecting the battery, turn on the
ignition and wait 1 minute before starting the
engine, to enable the electronic systems to
initialise.
If minor problems nevertheless persist following
this operation, contact a PEUGEOT dealer or a
qualified workshop.
Referring to the relevant section, reinitialise
certain equipment:
–
Electronic key
.
–
Sunroof.
–
Electric windows.
–
Date and time.
–
Preset radio stations.
After reconnecting the battery, the message "Collision risk detection
system fault" is displayed on the instrument
panel when the ignition is switched on. This
operation is perfectly normal. The message
will disappear while driving.
Towing the vehicle
General recommendations
Observe the legislation in force in the
country where you are driving.
Check that the towing vehicle is heavier than
the towed vehicle.
The driver must remain at the wheel of the
towed vehicle and must have a valid driving
licence.
When towing a vehicle with all four wheels on
the ground, always use an approved towbar;
ropes and straps are prohibited.
The towing vehicle must move off gently.
When the vehicle is towed with its engine
off, there is no longer braking and steering
assistance.
A professional recovery service must
be called in the following cases:
–
broken down on a motorway or main road;
–
not possible to put the gearbox into neutral,
unlock the steering, or release the parking
brake;
–
not possible to tow a vehicle with an
automatic gearbox, with the engine running;
–
towing with only two wheels on the ground;
–
four-wheel drive vehicle;
–
no approved towbar available.
Page 221 of 280
219
In the event of a breakdown
82WD: 2-wheel drive.
In case of battery or electric parking brake failure, it is essential to call a professional using flatbed recovery vehicles (excluding manual gearbox).
Accessing the tools
For more information on accessing the Tool kit,
refer to the corresponding section.
Towing your vehicle
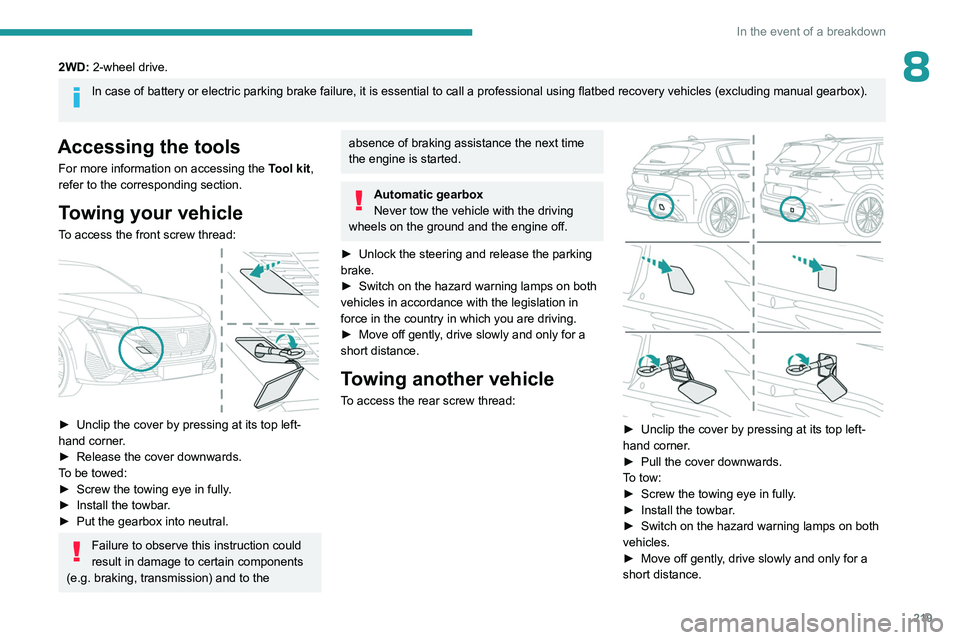
To access the front screw thread:
► Unclip the cover by pressing at its top left-
hand corner .
►
Release the cover downwards.
T
o be towed:
►
Screw the towing eye in fully
.
►
Install the towbar
.
►
Put the gearbox into neutral.
Failure to observe this instruction could
result in damage to certain components
(e.g. braking, transmission) and to the
absence of braking assistance the next time
the engine is started.
Automatic gearbox
Never tow the vehicle with the driving
wheels on the ground and the engine off.
►
Unlock the steering and release the parking
brake.
►
Switch on the hazard warning lamps on both
vehicles in accordance with the legislation in
force in the country in which you are driving.
►
Move off gently
, drive slowly and only for a
short distance.
Towing another vehicle
To access the rear screw thread:
► Unclip the cover by pressing at its top left-
hand corner .
►
Pull the cover downwards.
T
o tow:
►
Screw the towing eye in fully
.
►
Install the towbar
.
►
Switch on the hazard warning lamps on both
vehicles.
►
Move off gently
, drive slowly and only for a
short distance.
Page 237 of 280
235
PEUGEOT i-Connect Advanced - PEUGEOT i-Connect
10Activate/Deactivate:
–
"Detect (Wake up Word)": to invoke the voice
recognition using the keyword " OK Peugeot".
–
"Data Usage ": to authorise our supplier to
re-use your data in order to let him globally
improve its capabilities in term of voice
recognition and voice assistance.
Voice Assistant/Data usage
Vehicle's location and voice recordings
are not concerned; only textual transcriptions
of your conversations with the voice assistant
are kept after to be pseudonymised.
Opening voice recognition
Voice commands can be used on any
screen page, provided there are no other
sources which take priority in use (reverse,
emergency or assistance call, telephone call,
other smartphone voice recognition already
launched).
Choice of opening voice recognition:
►
Say
"OK Peugeot".
or
►
Press the button located on the steering
wheel.
or
►
Press the touch screen button.
To ensure that voice commands are always recognised by the system, please
follow these recommendations:
–
Use natural language in a normal tone
without breaking up words or raising your
voice.
–
After opening voice recognition with the
steering wheel-mounted button or the button
on the touch screen, always wait for the
"beep" (audible signal) before talking. No
"beep" sounds when voice recognition is
opened using " OK Peugeot
".
–
For optimal operation, it is recommended
that you close the windows and the sunroof
(depending on equipment) to avoid any
external interference, and switch the
ventilation off.
–
Before speaking the voice commands, ask
the other passengers not to speak.
Voice command example for air
conditioning:
"raise the fan speed"
"Turn on air conditioning"
"i'm too hot"
Voice command example for radio and
media:
"I want to listen to michael jackson"
"switch to radio"
"tune to 88.5"
Media voice commands are only
available with an USB connection.
Voice command example for navigation:
"navigate home"
"Navigate me to gabrielle's house"
"search for public parking nearby"
Depending on the country, give
destination (address) instructions in the
language configured for the system.
Voice command example for telephone:
"Call Matthew's mobile"
"call 0113 345 9869"
"Call jonathan"
If there is no telephone connected by
Bluetooth®, a pop-up window appears:
"Connect a telephone by Bluetooth®", and
the voice session will be closed.
Voice command example for the weather:
"do i need a raincoat"
"how is the weather tonight"
"what is today's humidity level"
Page 248 of 280
246
Vehicle data recording and privacy
Comfort and infotainment
functions
Comfort settings and personalised settings
may be saved in the vehicle and modified or
reinitialised at any time.
Depending on the vehicle's equipment level,
this
may
include:
–
Seat and steering wheel position settings.
–
Chassis and air conditioning settings.
–
Personalised settings such as the interior
lighting.
Y
ou can enter your own data into the functions
of your vehicle's audio and telematic system, as
part of the selected functionalities.
Depending on the vehicle's equipment level,
this
may
include:
–
Multimedia data such as music, videos or
photos to be read by an integrated multimedia
system.
–
Address book data to be used with an
integrated hands-free system or with an
integrated navigation system.
–
Entered destinations.
–
Data regarding the use of online services.
This data for the comfort and infotainment
functions may be stored locally in the vehicle
or saved to a device that you have connected
to the vehicle (e.g.
smartphone, USB memory
stick or MP3 player). Data that you have entered
yourself may be deleted at any time.
This data may also be transmitted outside the
vehicle at your request, particularly when using online services in line with the settings that you
have selected. Smartphone integration
(e.g.
Android
Auto
® or
Apple
®CarPlay®)
If your vehicle is equipped accordingly, you can
connect your smartphone or another mobile
device to the vehicle in order to operate it using
the vehicle's integrated controls. Images and
sounds from the smartphone can be transmitted
through the audio and telematics system.
Specific information is simultaneously sent
to your smartphone. Depending on the type
of
integration, this includes data such as location,
day/night mode and other general information
about the vehicle. For more information, please
refer to the user instructions for the vehicle or the
audio and telematics system.
Integrating a smartphone allows you to use
its applications, such as a navigation app or
music player. No other
integration between
the smartphone and the vehicle is possible, in
particular active access to vehicle data. How the
data is processed subsequently is determined
by the supplier of the application being used.
The ability the change settings depends on the
application in question and on the operating
system installed on your smartphone.
Online services
If your vehicle is connected to a wireless
network, data can be exchanged between
your vehicle and other systems. Connection
to a wireless network is made possible
via a
transmitter located in your vehicle or a mobile
device that you have provided (e.g.
smartphone).
The online services can be used via this wireless
connection.
These include online services and
applications (apps) provided to you by the
Manufacturer or other suppliers.
Exclusive services
As regards the Manufacturer's online services,
the corresponding functions are described by
the Manufacturer in an appropriate medium
(e.g.
handbook, Manufacturer's website) and the
information about data protection is provided.
Personal data may be used for online services.
The exchange of data for this purpose takes
place over a secure connection, using for
example the Manufacturer's dedicated computer
systems. The collection, processing and use of
personal data for the development of services
are carried out solely on the basis of a legal
authorisation, for example in the case of a
legal emergency call system or a contractual
agreement or else under a consent agreement.
You can activate or deactivate the services and
functions (some may be chargeable) and, in
some cases, the vehicle's entire connection to
the wireless network. This does not include the
Page 250 of 280
248
Alphabetical index
A
ABS 84
Accelerated charging unit
(Wallbox)
168–169, 175
Accessories
80
Accessories, electrical
80
Active LED Vision
71, 73
Active Safety Brake
142–145
AdBlue®
21, 193
AdBlue® tank
195
Additive, Diesel
192
Adjusting headlamps
70
Adjusting head restraints
47
Adjusting seat
47–48
Adjusting the air distribution
56–57
Adjusting the air flow
56–57
Adjusting the headlamp beam height
70
Adjusting the height and reach of
the steering wheel
51
Adjusting the lumbar support
48
Adjusting the seat angle
48
Adjusting the temperature
56
Adjusting the time
243
Advice on care and
maintenance
163–164, 196
Advice on driving
9, 98–99
Airbags
88, 90, 92
Airbags, curtain
89–90
Airbags, front
89–90, 92
Airbags, lateral
89–90
Air conditioning
55–56, 58
Air conditioning, automatic 59
Air conditioning, dual-zone automatic
56
Air intake
58
Air vents
55
Alarm
41–42
Amplifier, audio
63
Anti-lock braking system (ABS)
84
Antitheft / Immobiliser
32
Applications
27, 29
Armrest, front
63
Armrest, rear
64
Assistance call
81–82
Assistance, emergency braking
84, 144
Audio streaming (Bluetooth)
241
B
Battery, 12 V 187, 192, 209–216
Battery, 48 V
163, 214
Battery, ancillaries
209–210
Battery, charging
210–211, 213–215
Battery, remote control
35–36
Blanking screen (snow shield)
185
Blind
44
BlueHDi
21, 191, 199
Bluetooth (hands-free)
237
Bluetooth (telephone)
237–238
Bodywork
197
Bonnet
188–189
Boot
37, 40, 68
Brake discs
193
Brake lamps 208–209
Brakes
193
Braking
110, 112
Braking assistance system
84
Braking, automatic emergency
142–145
Braking, dynamic emergency
103–104
Bulbs (changing)
207–209
C
Capacity, fuel tank 160
Care of the bodywork
197
Central locking
33–34
Changing a bulb
207–209
Changing a fuse
209
Changing a wheel
200, 204
Changing a wiper blade
78
Changing the remote control battery
35
Changing to free-wheeling
195, 218
Charge level indicator (Rechargeable
hybrid)
24
Charger, induction
62
Charger, wireless
62
Charging cable
165
Charging cable (Electric)
175
Charging cable (Rechargeable
hybrid)
168–169, 172
Charging connector (Electric)
174, 177, 179–180
Charging connector (Rechargeable
hybrid)
168, 170, 172–173