2024 PEUGEOT 308 belt
[x] Cancel search: beltPage 93 of 280
91
Safety
5It is recommended that children travel
on the rear seats of the vehicle:
–
"rearward facing" up to the age of 3.
–
"forward facing" over the age of 3.
Make sure that the seat belt is correctly
positioned and tightened.
For child seats with a support leg, ensure that
the support leg is in firm and steady contact
with the floor.
An incorrectly installed child seat in a vehicle compromises the child's safety in
the event of an accident.
Ensure that there is no seat belt or seat belt
buckle under the child seat, as this could
destabilise it.
Remember to fasten the seat belts or the
child seat harness keeping the slack relative
to the child's body to a minimum, even for
short journeys.
When installing a child seat using the seat
belt, ensure that the seat belt is tightened
correctly on the child seat and that it secures
the child seat firmly on the vehicle seat. If
the passenger seat is adjustable, move it
forwards if necessary.
Remove the head restraint before
installing a child seat with a backrest on a
passenger seat.
Ensure that the head restraint is stored or
attached securely to prevent it from being
thrown around the vehicle in the event of
sharp braking. Refit the head restraint once
the child seat has been removed.
Installing a booster seat
The chest part of the seat belt must be
positioned on the child's shoulder without
touching the neck.
Ensure that the lap part of the seat belt
passes correctly over the child's thighs.
Use a booster seat with a backrest, equipped
with a belt guide at shoulder level.
Additional protections
To prevent accidental opening of the
doors and rear windows, use the "Child lock".
Take care not to open the rear windows by
more than one third.
To protect young children from the sun's rays,
fit side blinds on the rear windows.
As a safety measure, do not leave:
–
A
child alone and unsupervised inside a
vehicle.
–
A
child or an animal in a vehicle which is
exposed to the sun, with the windows closed.
–
The keys within reach of children inside the
vehicle.
Child seat at the rear
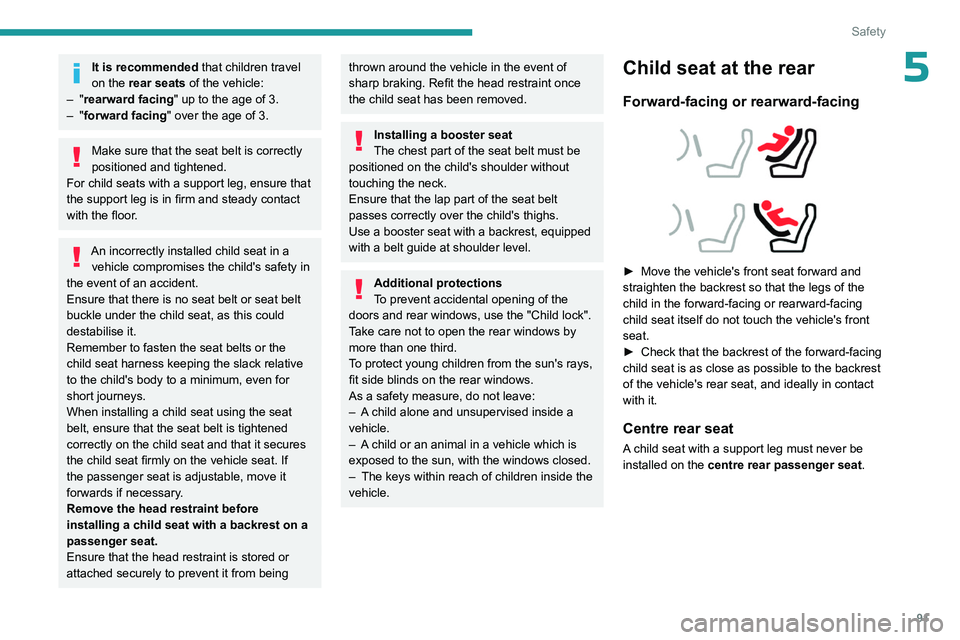
Forward-facing or rearward-facing
► Move the vehicle's front seat forward and
straighten the backrest so that the legs of the
child in the forward-facing or rearward-facing
child seat itself do not touch the vehicle's front
seat.
►
Check that the backrest of the forward-facing
child seat is as close as possible to the backrest
of the vehicle's rear seat, and ideally in contact
with it.
Centre rear seat
A child seat with a support leg must never be
installed on the centre rear passenger seat .
Page 95 of 280
93
Safety
5
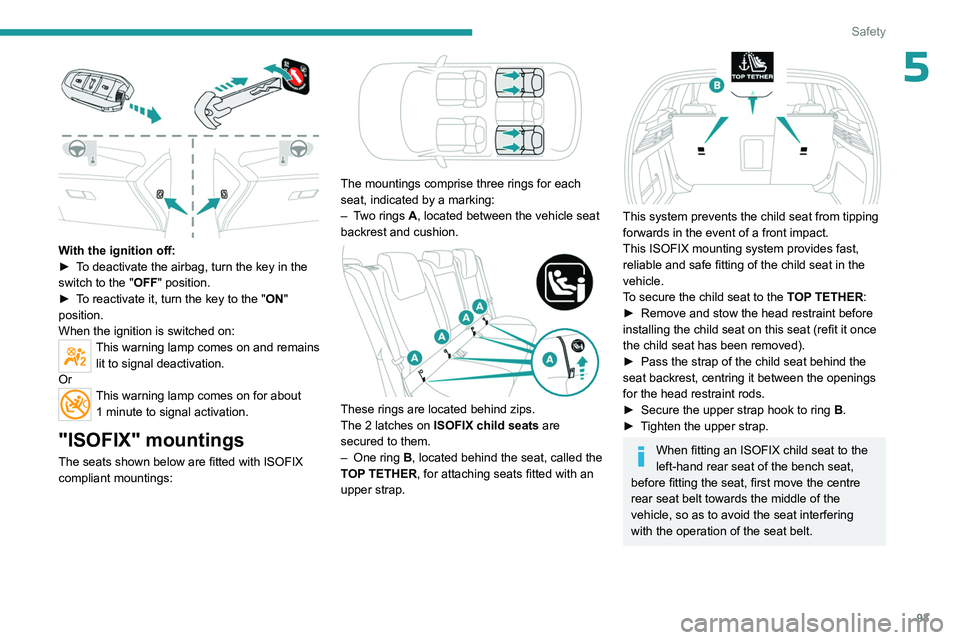
With the ignition off:
► T o deactivate the airbag, turn the key in the
switch to the "OFF " position.
►
T
o reactivate it, turn the key to the "ON"
position.
When the ignition is switched on:
This warning lamp comes on and remains lit to signal deactivation.
Or
This warning lamp comes on for about 1 minute to signal activation.
"ISOFIX" mountings
The seats shown below are fitted with ISOFIX
compliant mountings:
The mountings comprise three rings for each
seat, indicated by a marking:
–
T
wo rings A, located between the vehicle seat
backrest and cushion.
These rings are located behind zips.
The 2 latches on ISOFIX child seats are
secured to them.
–
One ring
B, located behind the seat, called the
TOP TETHER, for attaching seats fitted with an
upper strap.
This system prevents the child seat from tipping
forwards in the event of a front impact.
This ISOFIX mounting system provides fast,
reliable and safe fitting of the child seat in the
vehicle.
To secure the child seat to the TOP TETHER:
►
Remove and stow the head restraint before
installing the child seat on this seat (refit it once
the child seat has been removed).
►
Pass the strap of the child seat behind the
seat backrest, centring it between the openings
for the head restraint rods.
►
Secure the upper strap hook to ring
B
.
►
T
ighten the upper strap.
When fitting an ISOFIX child seat to the
left-hand rear seat of the bench seat,
before fitting the seat, first move the centre
rear seat belt towards the middle of the
vehicle, so as to avoid the seat interfering
with the operation of the seat belt.
Page 96 of 280
94
Safety
An incorrectly installed child seat in a vehicle compromises the child's safety in
the event of an accident.
Strictly observe the fitting instructions
provided in the user guide supplied with the
child seat.
For information about the options for
fitting ISOFIX child seats in your vehicle,
refer to the summary table.
i-Size child seats
i-Size child seats have two latches that are
anchored to the two rings A.
These i-Size child seats also have:
–
either an upper strap that is attached to ring B
.
–
or a support leg that rests on the vehicle
floor
, compatible with the approved i-Size seat
position.
Their role is to prevent the child seat from tipping
forward in the event of a collision.
For more information on the ISOFIX mountings,
refer to the corresponding section.
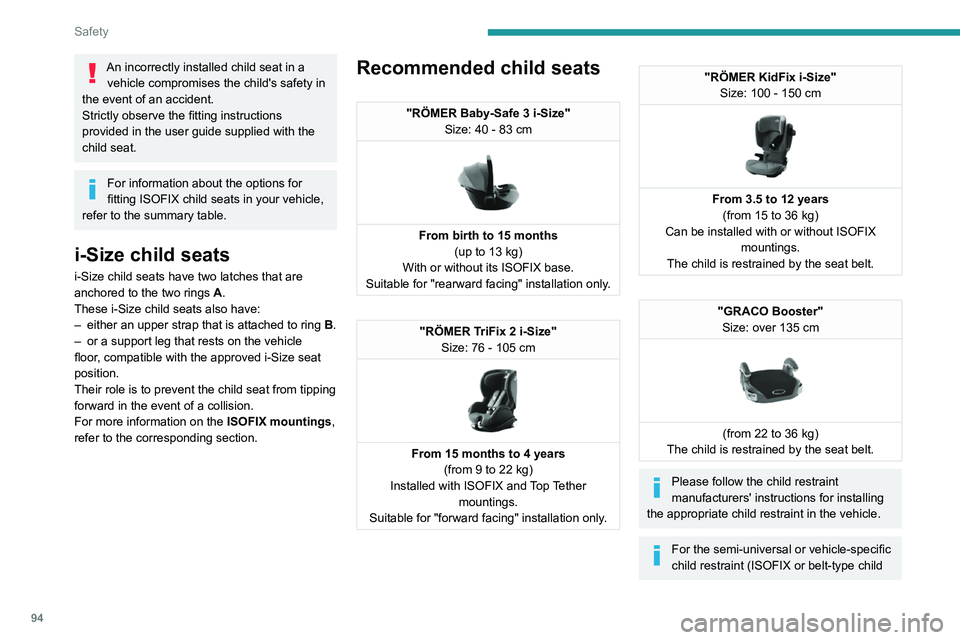
Recommended child seats
"RÖMER Baby-Safe 3 i-Size" Size: 40 - 83 cm
From birth to 15 months(up to 13 kg)
With or without its ISOFIX base.
Suitable for "rearward facing" installation only.
"RÖMER TriFix 2 i-Size" Size: 76 - 105 cm
From 15 months to 4 years (from 9 to 22 kg)
Installed with ISOFIX and Top Tether mountings.
Suitable for "forward facing" installation only.
"RÖMER KidFix i-Size" Size: 100 - 150 cm
From 3.5 to 12 years(from 15 to 36 kg)
Can be installed with or without ISOFIX mountings.
The child is restrained by the seat belt.
"GRACO Booster" Size: over 135 cm
(from 22 to 36 kg)
The child is restrained by the seat belt.
Please follow the child restraint
manufacturers' instructions for installing
the appropriate child restraint in the vehicle.
For the semi-universal or vehicle-specific
child restraint (ISOFIX or belt-type child
Page 97 of 280
95
Safety
5restraint), refer to the list of vehicles provided
in the child restraint user manual.Ensure that the installation location of the
child restraint system inside the vehicle is
correct.
Refer to the summary table for the installation
of child seats.
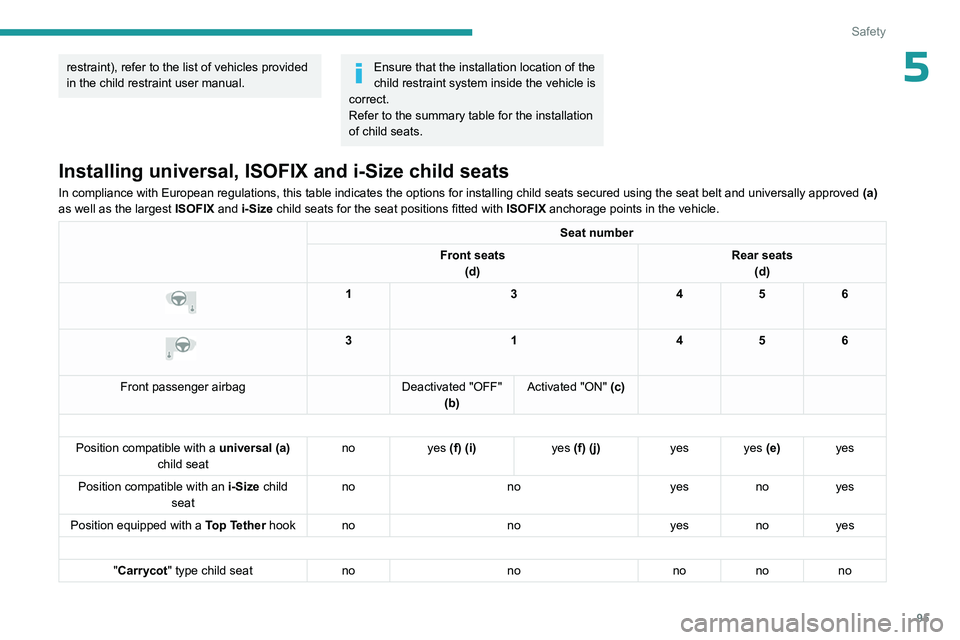
Installing universal, ISOFIX and i-Size child seats
In compliance with European regulations, this table indicates the option\
s for installing child seats secured using the seat belt and universally\
approved (a)
as well as the largest ISOFIX and i-Size child seats for the seat positions fitted with ISOFIX anchorage points in the vehicle.
Seat number
Front seats (d) Rear seats
(d)
1 3456
3 1456
Front passenger airbag Deactivated "OFF"
(b) Activated "ON" (c)
Position compatible with a universal (a)
child seat no
yes (f) (i) yes (f) (j)yes yes (e) yes
Position compatible with an i-Size child
seat no
noyesnoyes
Position equipped with a Top Tether hook no noyesnoyes
"Carrycot " type child seat nonononono
Page 98 of 280
96
Safety
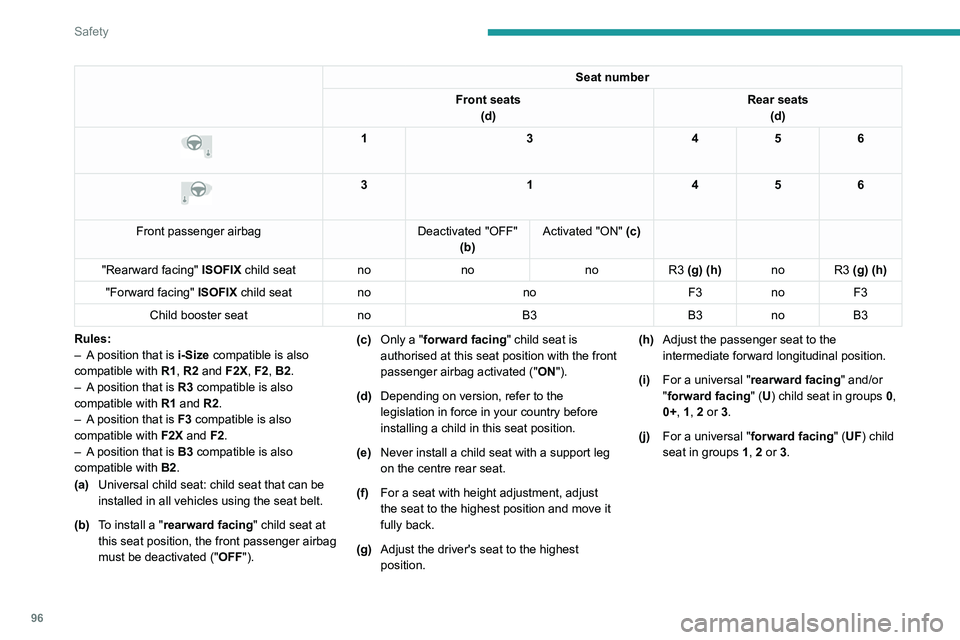
Seat number
Front seats (d) Rear seats
(d)
1 3456
3 1456
Front passenger airbag Deactivated "OFF"
(b) Activated "ON" (c)
"Rearward facing" ISOFIX child seat nono noR3 (g) (h) no R3 (g) (h)
"Forward facing" ISOFIX child seat no noF3noF3
Child booster seat noB3 B3noB3
Rules:
–
A
position that is i-Size compatible is also
compatible with R1, R2 and F2X, F2, B2.
–
A
position that is R3 compatible is also
compatible with R1 and R2.
–
A
position that is F3 compatible is also
compatible with F2X and F2.
–
A
position that is B3 compatible is also
compatible with B2.
(a) Universal child seat: child seat that can be
installed in all vehicles using the seat belt.
(b) To install a "rearward facing" child seat at
this seat position, the front passenger airbag
must be deactivated ("OFF"). (c)
Only a "forward facing" child seat is
authorised at this seat position with the front
passenger airbag activated (" ON").
(d) Depending on version, refer to the
legislation in force in your country before
installing a child in this seat position.
(e) Never install a child seat with a support leg
on the centre rear seat.
(f) For a seat with height adjustment, adjust
the seat to the highest position and move it
fully back.
(g) Adjust the driver's seat to the highest
position. (h)
Adjust the passenger seat to the
intermediate forward longitudinal position.
(i) For a universal " rearward facing" and/or
"forward facing" (U) child seat in groups 0,
0+, 1, 2 or 3.
(j) For a universal " forward facing" (UF) child
seat in groups 1, 2 or 3.
Page 99 of 280

97
Safety
5
KeySeat position where the installation of a
child seat is forbidden.
Front passenger airbag
deactivated.
Front passenger airbag activated.
Seat position suitable for the installation
of a child seat secured using the seat belt and universally approved "rearward facing"
and/or "forward facing"
(U) for all sizes and
weight groups.
Seat position suitable for the installation
of a child seat secured using the seat belt
and universally approved "forward facing"
(UF) for groups 1, 2 and 3, or dedicated to
children between 76 and 150
cm in size only.
Seat position authorised for the
installation of an i-Size child seat.
Seat position not suitable for the
installation of a child seat with support
leg.
Presence of a Top Tether anchorage
point at the rear of the backrest,
authorising the installation of an universal
ISOFIX child seat .
"Rearward facing" ISOFIX child seat:
–
R1
: ISOFIX child seat for a baby.
–
R2
: ISOFIX reduced size child seat.
–
R3
: ISOFIX large size child seat.
"Forward facing" ISOFIX child seat:
–
F2X
: ISOFIX child seat for toddlers.
–
F2
: ISOFIX reduced height child seat.
–
F3
: ISOFIX full height child seat.
Booster child seat:
–
B2
: reduced width booster seat.
–
B3
: full width booster seat.
Seat position where the installation of an
ISOFIX child seat is forbidden. For seat adjustments, refer to the summary table
"Installing universal, ISOFIX and i-Size child
seats
".
Manual child lock
The system prevents a rear door from being
opened using its interior handle.
The control is located on the edge of each rear
door (indicated by a marking on the bodywork).
Activation/Deactivation
► To activate, turn the built-in key fully:
• T o the right on the left-hand rear door.
•
T
o the left on the right-hand rear door.
►
T
o deactivate, turn it in the opposite direction.
Page 118 of 280
11 6
Driving
exhaust emissions as well as the noise level
when stationary.
The function does not affect the functionalities of
the vehicle, in particular the braking.
Deactivation/Reactivation
By default, the function is activated when the
ignition is switched on.
It is configured in the ADAS touch screen
application.
or
Direct access to the Shortcuts for driving aids .
The display of a message on the instrument
panel confirms the change of state.
If the function is deactivated while the engine is
in STOP mode, it will restart immediately.
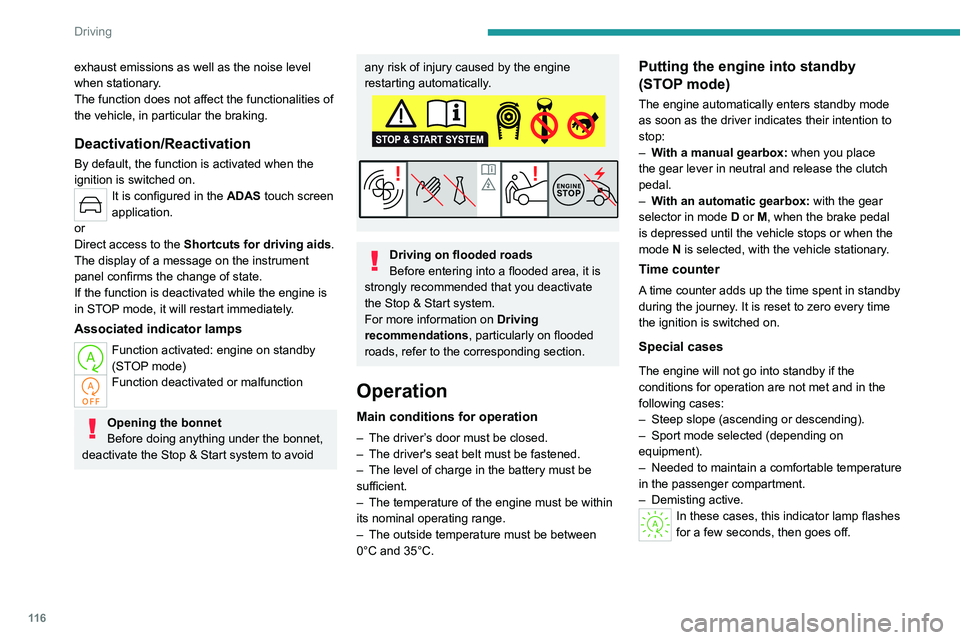
Associated indicator lamps
Function activated: engine on standby
(STOP mode)
Function deactivated or malfunction
Opening the bonnet
Before doing anything under the bonnet,
deactivate the Stop & Start system to avoid
any risk of injury caused by the engine
restarting automatically.
Driving on flooded roads
Before entering into a flooded area, it is
strongly recommended that you deactivate
the Stop & Start system.
For more information on Driving
recommendations, particularly on flooded
roads, refer to the corresponding section.
Operation
Main conditions for operation
– The driver ’s door must be closed.
– The driver's seat belt must be fastened.
–
The level of charge in the battery must be
sufficient.
–
The temperature of the engine must be within
its nominal operating range.
–
The outside temperature must be between
0°C and 35°C.
Putting the engine into standby
(STOP mode)
The engine automatically enters standby mode
as soon as the driver indicates their intention to
stop:
–
W
ith a manual gearbox: when you place
the gear lever in neutral and release the clutch
pedal.
–
W
ith an automatic gearbox: with the gear
selector in mode D or M, when the brake pedal
is depressed until the vehicle stops or when the
mode N is selected, with the vehicle stationary.
Time counter
A time counter adds up the time spent in standby
during the journey. It is reset to zero every time
the ignition is switched on.
Special cases
The engine will not go into standby if the
conditions for operation are not met and in the
following cases:
–
Steep slope (ascending or descending).
–
Sport mode selected (depending on
equipment).
–
Needed
to maintain a comfortable temperature
in the passenger compartment.
–
Demisting active.
In these cases, this indicator lamp flashes
for a few seconds, then goes off.
Page 119 of 280
11 7
Driving
6After the engine has restarted, STOP mode is not available until the vehicle
has reached a speed of 5 mph (8
km/h).
During parking manoeuvres, STOP mode
is not available for a few seconds after
coming out of reverse gear or turning the
steering wheel.
Restarting the engine (START mode)
The engine automatically restarts as soon as the
driver indicates the intention of moving off again:
With a manual gearbox: when the clutch pedal
is fully depressed.
With an automatic gearbox:
–
With the selector in mode
D or M: when the
brake pedal is released.
–
With the selector in mode
N and the brake
pedal released: when the mode D or M is
selected.
–
With the selector in mode
P and the brake
pedal depressed: when the mode R, N, D or M
is selected.
–
When the reverse gear is engaged.
Special cases
The engine will restart automatically if the
conditions for operation are met again and in the
following cases:
–
Deselecting the Sport mode (depending on
equipment).
– With a manual gearbox: vehicle speed
exceeds 2.5 mph (4 km/h).
–
With an automatic gearbox, in mode N
, vehicle
speed exceeds 0.6 mph (1
km/h).
In these cases, this indicator lamp flashes
for a few seconds, then goes off.
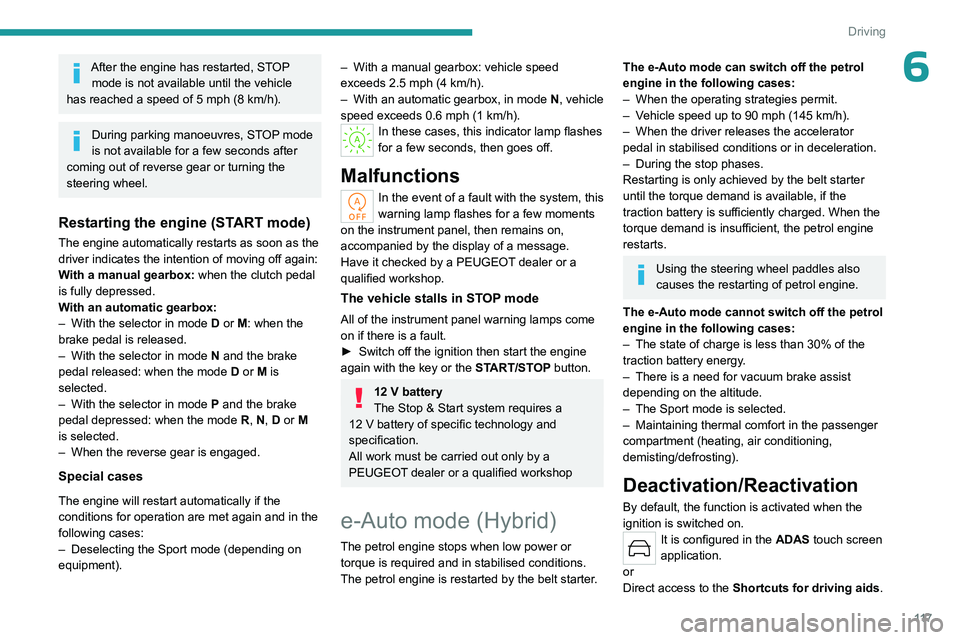
Malfunctions
In the event of a fault with the system, this
warning lamp flashes for a few moments
on the instrument panel, then remains on,
accompanied by the display of a message.
Have it checked by a PEUGEOT dealer or a
qualified workshop.
The vehicle stalls in STOP mode
All of the instrument panel warning lamps come
on if there is a fault.
►
Switch off the ignition then start the engine
again with the key or the ST
ART/STOP button.
12 V battery
The Stop & Start system requires a
12 V battery of specific technology and
specification.
All work must be carried out only by a
PEUGEOT
dealer or a qualified workshop
e-Auto mode (Hybrid)
The petrol engine stops when low power or torque is required and in stabilised conditions.
The petrol engine is restarted by the belt starter.
The e-Auto mode can switch off the petrol
engine in the following cases:
–
When the operating strategies permit.
–
V
ehicle speed up to 90 mph (145 km/h).
–
When the driver releases the accelerator
pedal in stabilised conditions or in deceleration.
–
During the stop phases.
Restarting is only achieved by the belt starter
until the torque demand is available, if the
traction battery is sufficiently charged. When the
torque demand is insufficient, the petrol engine
restarts.
Using the steering wheel paddles also
causes the restarting of petrol engine.
The e-Auto mode cannot switch off the petrol
engine in the following cases:
–
The state of charge is less than 30% of the
traction battery energy
.
–
There is a need for vacuum brake assist
depending on the altitude.
–
The Sport mode is selected.
–
Maintaining thermal comfort in the passenger
compartment (heating, air conditioning,
demisting/defrosting).
Deactivation/Reactivation
By default, the function is activated when the
ignition is switched on.
It is configured in the ADAS touch screen
application.
or
Direct access to the Shortcuts for driving aids .