2024 PEUGEOT 308 instrument panel
[x] Cancel search: instrument panelPage 162 of 280
160
Practical information
Compatibility of fuels
Petrol fuels conforming to the EN228 standard
containing up to 5% and 10% ethanol
respectively.
Diesel fuels conforming to the EN590, EN16734
and EN16709 standards and containing up to
7%, 10%, 20% and 30% fatty acid methyl ester
respectively. The use of B20 or B30 fuels, even
occasionally, imposes special maintenance
conditions referred to as "Arduous conditions".
Paraffinic Diesel fuel conforming to the EN15940
standard.
The use of any other type of (bio) fuel (e.g. pure or diluted vegetable or animal
oils, domestic fuel) is strictly prohibited - risk
of damaging the engine and fuel system!
The only fuel additives authorised for use are those that meet the B715001 (Petrol)
or B715000 (Diesel) standards.
Diesel at low temperature
At temperatures below 0 °C (+32 °F), the
formation of paraffins in summer-type Diesel fuels could prevent the engine from operating
correctly
. In these temperature conditions, use
winter-type Diesel fuel and keep the fuel tank
more than 50 % full.
At temperatures below -15 °C (+5 °F) to avoid
problems starting, it is best to park the vehicle
under shelter (heated garage).
Travelling abroad
Certain fuels could damage your vehicle’s
engine.
In certain countries, the use of a particular
fuel may be required (specific octane rating,
specific trade name, etc.) to ensure correct
operation of the engine.
For all additional information, consult a dealer.
Refuelling
Fuel tank capacity: approximately 52
litres (Petrol, Diesel or Hybrid) or 40 litres
(Rechargeable hybrid).
Reserve level: approximately 6 litres.
Low fuel level
When the low fuel level is reached, this
warning lamp lights up on the instrument
panel, accompanied by the display of a message
and an audible signal. When it first comes on,
about 6 litres of fuel remain.
Until sufficient fuel is added, this warning lamp
appears every time the ignition is switched on,
accompanied by the message and the audible
signal. When driving, this message and audible
signal are repeated with increasing frequency as
the fuel level drops towards 0.
You must refuel as soon as possible to avoid
running out of fuel.
For more information on Running out of fuel
(Diesel), refer to the corresponding section.
A small arrow by the warning lamp indicates which side of the vehicle the
fuel filler flap is located on.
Stop & Start / e-Auto mode
Never refuel with the engine in STOP
mode or in stand-by; you must switch off the
ignition.
Refuelling
Any addition of fuel must be in quantities of at
least 10 litres, in order to be registered by the
fuel gauge.
Opening the filler flap may create a noise caused
by an inrush of air. This vacuum is entirely
normal, resulting from the sealing of the fuel
system.
To refuel in complete safety:
►
Always switch off the engine.
Page 172 of 280
170
Practical information
Cable typeCompatibilitySpecifications
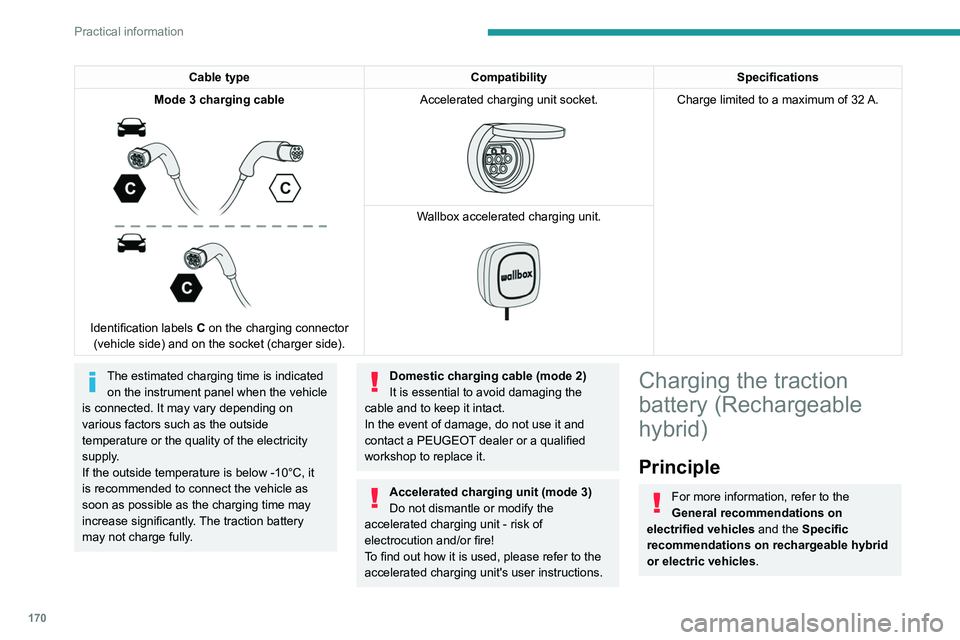
Mode
3 charging cable
Identification labels C on the charging connector
(vehicle side) and on the socket (charger side). Accelerated charging unit socket.
Charge limited to a maximum of 32 A.
W
allbox accelerated charging unit.
The estimated charging time is indicated on the instrument panel when the vehicle
is connected. It may vary depending on
various factors such as the outside
temperature or the quality of the electricity
supply.
If the outside temperature is below -10°C, it
is recommended to connect the vehicle as
soon as possible as the charging time may
increase significantly. The traction battery
may not charge fully.Domestic charging cable (mode 2)
It is essential to avoid damaging the
cable and to keep it intact.
In the event of damage, do not use it and
contact a PEUGEOT
dealer or a qualified
workshop to replace it.
Accelerated charging unit (mode 3)
Do not dismantle or modify the
accelerated charging unit - risk of
electrocution and/or fire!
T
o find out how it is used, please refer to the
accelerated charging unit's user instructions.
Charging the traction
battery (Rechargeable
hybrid)
Principle
For more information, refer to the
General recommendations on
electrified vehicles and the Specific
recommendations on rechargeable hybrid
or electric vehicles.
Page 173 of 280
171
Practical information
7For a full charge, follow the charging procedure
without interrupting it, until it stops automatically.
Charging may be performed either immediately
(by default) or deferred.
Deferred charging is set via the touch
screen or the MYPEUGEOT APP
application.
When the vehicle is connected, the following
information is displayed on the instrument panel:
–
T
raction battery charge status (%).
–
Remaining range (miles or km).
–
Estimated charging time (calculation may take
a few seconds).
–
Charging speed (miles or km gained per hour).
After the instrument panel has been put into
standby mode, this information can be displayed
again by unlocking the vehicle or opening a door
.
It is also possible to monitor the charging
progress using the MYPEUGEOT APP
application.
For more information on Remotely
operable additional functions , refer to the
corresponding section.
Lounge mode
When the vehicle is connected, it is
possible to switch on the ignition and use
certain functions such as the audio and
telematics system and the air conditioning
system for several hours.
Low charging / Driving
Driving when the charge level of the
traction battery is too low can lead to the
vehicle breaking down and can lead to
accidents or serious injuries. ALWAYS make
sure the traction battery has a sufficient
charge level.
Low charging / Parking
If the outside temperature is negative,
it is recommended not to park your vehicle
outside for several hours at a low charging
(less than 20%).
Vehicle in storage for more than
1 month
In the event of a long period of non-use of
the vehicle (beyond 4
weeks) without the
possibility of charging when restarting, the
self-discharge may make it impossible to
restart if the traction battery charge level
is a low or very low, especially at negative
ambient temperatures. ALWAYS make sure
that the traction battery has a charge between
20% and 40% if you do not plan to use your
vehicle for several weeks.
Do not connect the charging cable.
Always park the vehicle in a place with
temperatures between -10°C and 30°C
(parking in a place with extreme temperatures
can damage the traction battery).
Refer to the 12 V battery/Accessory
batteries section for the battery disconnection
procedure.
Precautions
Before charging
Depending on the context:
►
Have a professional check that the
electrical system to be used complies with
applicable standards and is compatible with
the vehicle.
►
Have a professional electrician install
a dedicated domestic power socket or
accelerated charging unit (W
allbox)
compatible with the vehicle.
Use the charging cable supplied with the
vehicle.
For more information, contact a PEUGEOT
dealer or a qualified workshop.
During charging
As a safety measure, the engine will
not start if the charging cable is plugged into
the connector on the vehicle. A warning is
displayed on the instrument panel.
While charging is in progress, unlocking the
vehicle will cause the charging to stop.
If no action is taken on one of the openings
(door or boot) or on the charging nozzle, the
vehicle will lock again after 30 seconds and
charging will resume automatically.
Page 179 of 280
177
Practical information
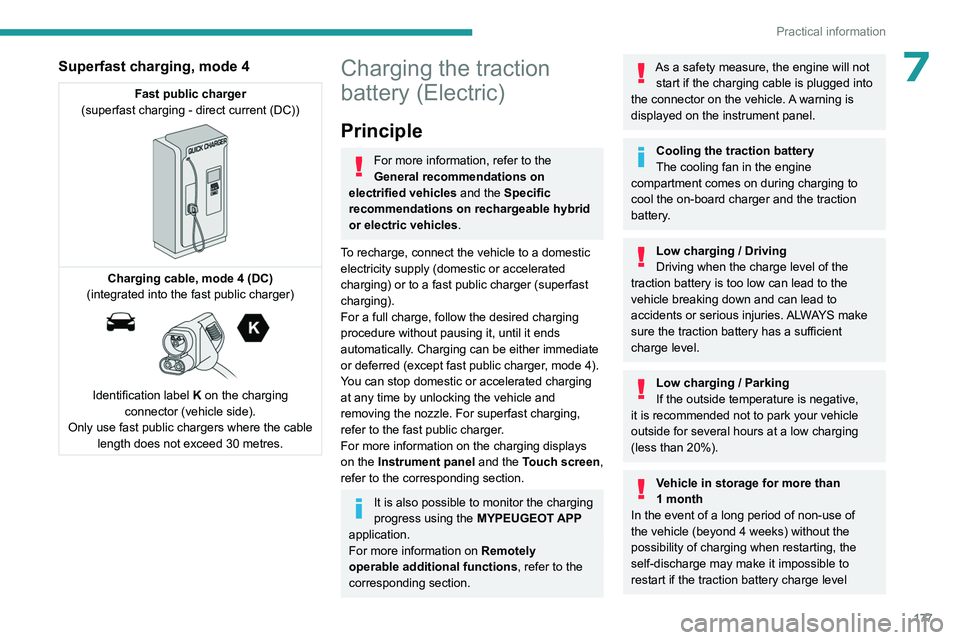
7Superfast charging, mode 4
Fast public charger
(superfast charging - direct current (DC))
Charging cable, mode 4 (DC)
(integrated into the fast public charger)
Identification label K on the charging
connector (vehicle side).
Only use fast public chargers where the cable length does not exceed 30 metres.
Charging the traction
battery (Electric)
Principle
For more information, refer to the
General recommendations on
electrified vehicles and the Specific
recommendations on rechargeable hybrid
or electric vehicles.
To recharge, connect the vehicle to a domestic
electricity supply (domestic or accelerated
charging) or to a fast public charger (superfast
charging).
For a full charge, follow the desired charging
procedure without pausing it, until it ends
automatically. Charging can be either immediate
or deferred (except fast public charger, mode 4).
You can stop domestic or accelerated charging
at any time by unlocking the vehicle and
removing the nozzle. For superfast charging,
refer to the fast public charger.
For more information on the charging displays
on the Instrument panel and the Touch screen,
refer to the corresponding section.
It is also possible to monitor the charging
progress using the MYPEUGEOT APP
application.
For more information on Remotely
operable additional functions , refer to the
corresponding section.
As a safety measure, the engine will not start if the charging cable is plugged into
the connector on the vehicle. A warning is
displayed on the instrument panel.
Cooling the traction battery
The cooling fan in the engine
compartment comes on during charging to
cool the on-board charger and the traction
battery.
Low charging / Driving
Driving when the charge level of the
traction battery is too low can lead to the
vehicle breaking down and can lead to
accidents or serious injuries. ALWAYS make
sure the traction battery has a sufficient
charge level.
Low charging / Parking
If the outside temperature is negative,
it is recommended not to park your vehicle
outside for several hours at a low charging
(less than 20%).
Vehicle in storage for more than
1 month
In the event of a long period of non-use of
the vehicle (beyond 4
weeks) without the
possibility of charging when restarting, the
self-discharge may make it impossible to
restart if the traction battery charge level
Page 181 of 280
179
Practical information
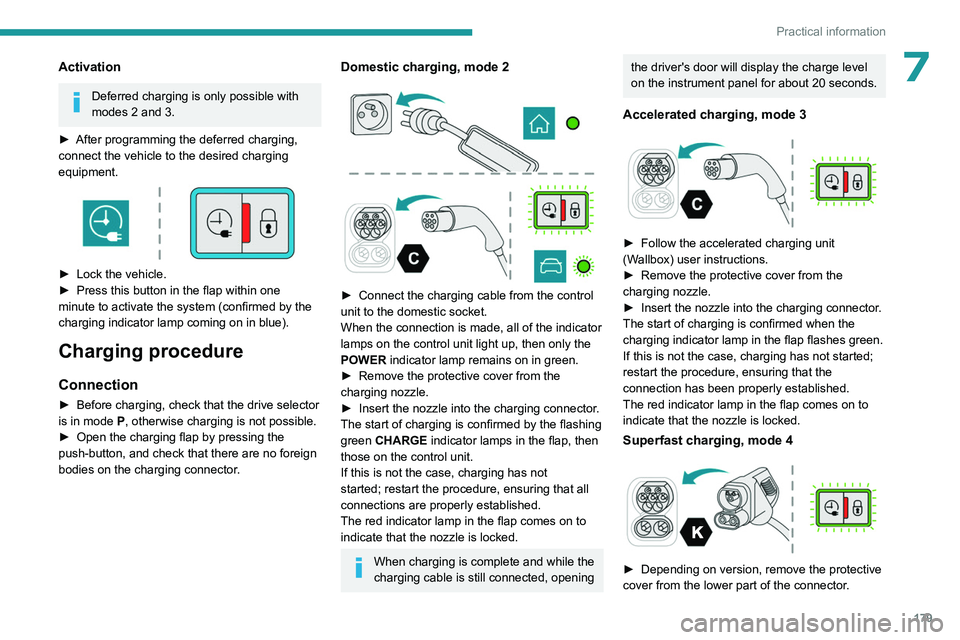
7Activation
Deferred charging is only possible with
modes 2 and 3.
►
After programming the deferred charging,
connect the vehicle to the desired charging
equipment.
► Lock the vehicle.
► Press this button in the flap within one
minute to activate the system (confirmed by the
charging indicator lamp coming on in blue).
Charging procedure
Connection
► Before charging, check that the drive selector
is in mode P, otherwise charging is not possible.
►
Open the charging flap by pressing the
push-button, and check that there are no foreign
bodies on the charging connector
.
Domestic charging, mode 2
► Connect the charging cable from the control
unit to the domestic socket.
When the connection is made, all of the indicator
lamps on the control unit light up, then only the
POWER
indicator lamp remains on in green.
►
Remove the protective cover from the
charging nozzle.
►
Insert the nozzle into the charging connector
.
The start of charging is confirmed by the flashing
green CHARGE indicator lamps in the flap, then
those on the control unit.
If this is not the case, charging has not
started; restart the procedure, ensuring that all
connections are properly established.
The red indicator lamp in the flap comes on to
indicate that the nozzle is locked.
When charging is complete and while the
charging cable is still connected, opening
the driver's door will display the charge level
on the instrument panel for about 20 seconds.
Accelerated charging, mode 3
► Follow the accelerated charging unit
(W allbox) user instructions.
►
Remove the protective cover from the
charging nozzle.
►
Insert the nozzle into the charging connector
.
The start of charging is confirmed when the
charging indicator lamp in the flap flashes green.
If this is not the case, charging has not started;
restart the procedure, ensuring that the
connection has been properly established.
The red indicator lamp in the flap comes on to
indicate that the nozzle is locked.
Superfast charging, mode 4
► Depending on version, remove the protective
cover from the lower part of the connector .
Page 182 of 280
180
Practical information
► Follow the instructions for use of the fast
public charger and connect the cable from the
fast public charger
to the vehicle's connector.
The start of charging is confirmed by the flashing
green charging indicator lamp in the flap.
If this is not the case, charging has not started;
restart the procedure, ensuring that the
connection is properly established.
The red indicator lamp in the flap comes on to
indicate that the nozzle is locked.
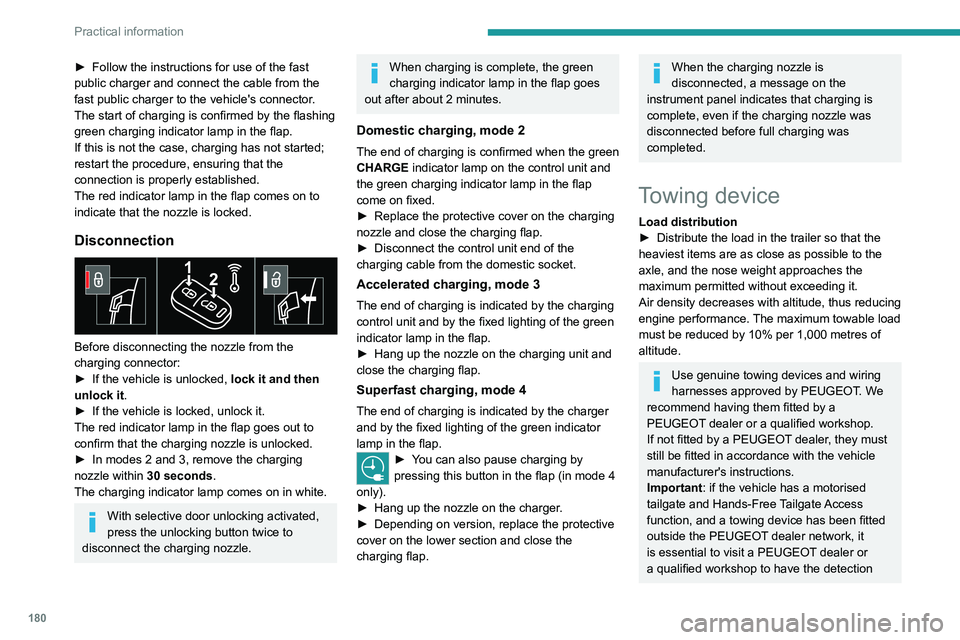
Disconnection
Before disconnecting the nozzle from the
charging connector:
►
If the vehicle is unlocked, lock it and then
unlock it .
►
If the vehicle is locked, unlock it.
The red indicator lamp in the flap goes out to
confirm that the charging nozzle is unlocked.
►
In modes 2 and 3, remove the charging
nozzle within 30 seconds
.
The charging indicator lamp comes on in white.
With selective door unlocking activated,
press the unlocking button twice to
disconnect the charging nozzle.
When charging is complete, the green
charging indicator lamp in the flap goes
out after about 2 minutes.
Domestic charging, mode 2
The end of charging is confirmed when the green
CHARGE indicator lamp on the control unit and
the green charging indicator lamp in the flap
come on fixed.
►
Replace the protective cover on the charging
nozzle and close the charging flap.
►
Disconnect the control unit end of the
charging cable from the domestic socket.
Accelerated charging, mode 3
The end of charging is indicated by the charging
control unit and by the fixed lighting of the green
indicator lamp in the flap.
►
Hang up the nozzle on the charging unit and
close the charging flap.
Superfast charging, mode 4
The end of charging is indicated by the charger
and by the fixed lighting of the green indicator
lamp in the flap.
► You can also pause charging by
pressing this button in the flap (in mode 4
only).
►
Hang up the nozzle on the charger
.
►
Depending on version, replace the protective
cover on the lower section and close the
charging flap.
When the charging nozzle is
disconnected, a message on the
instrument panel indicates that charging is
complete, even if the charging nozzle was
disconnected before full charging was
completed.
Towing device
Load distribution
► Distribute the load in the trailer so that the
heaviest items are as close as possible to the
axle, and the nose weight approaches the
maximum permitted without exceeding it.
Air density decreases with altitude, thus reducing
engine performance.
The maximum towable load
must be reduced by 10% per 1,000
metres of
altitude.
Use genuine towing devices and wiring
harnesses approved by PEUGEOT. We
recommend having them fitted by a
PEUGEOT dealer or a qualified workshop.
If not fitted by a PEUGEOT dealer, they must
still be fitted in accordance with the vehicle
manufacturer's instructions.
Important: if the vehicle has a motorised
tailgate and Hands-Free Tailgate Access
function, and a towing device has been fitted
outside the PEUGEOT dealer network, it
is essential to visit a PEUGEOT dealer or
a qualified workshop to have the detection
Page 190 of 280
188
Practical information
Load reduction mode
This system manages the use of certain
functions according to the level of charge
remaining in the battery.
When the vehicle is being driven, the load
reduction function temporarily deactivates certain
functions, such as the air conditioning and the
heated rear screen.
The deactivated functions are reactivated
automatically as soon as conditions permit.
Bonnet
Work in the engine compartment
Take care with objects or clothing that
could be caught in the blades of the cooling
fan or in certain moving components
- risk of
strangulation and serious injury!
Petrol, Diesel or Hybrid vehicles (Stop &
Start/e-Auto mode)
Before doing anything under the bonnet, it is
essential to switch off the ignition to avoid any
risk of the engine restarting automatically.
Rechargeable hybrid or electric vehicles
Before any work is carried out under the
bonnet, it is essential to switch off the ignition,
check that the READY indicator lamp is off on
the instrument panel, disconnect the charging
connector nozzle if it is connected and wait
for 4 minutes - risk of serious injury!
The location of the interior bonnet release lever prevents the bonnet being
opened when the left-hand front door is
closed.
When the engine is hot, handle the
exterior safety catch and the bonnet stay
with care (risk of burns), using the protected
area.
When the bonnet is open, take care not to
damage the safety catch.
Do not open the bonnet under very windy
conditions.
Cooling of the engine when stopped
The engine cooling fan may start after
the engine has been switched off.
Take care with objects or clothing that
could be caught in the blades of the fan!
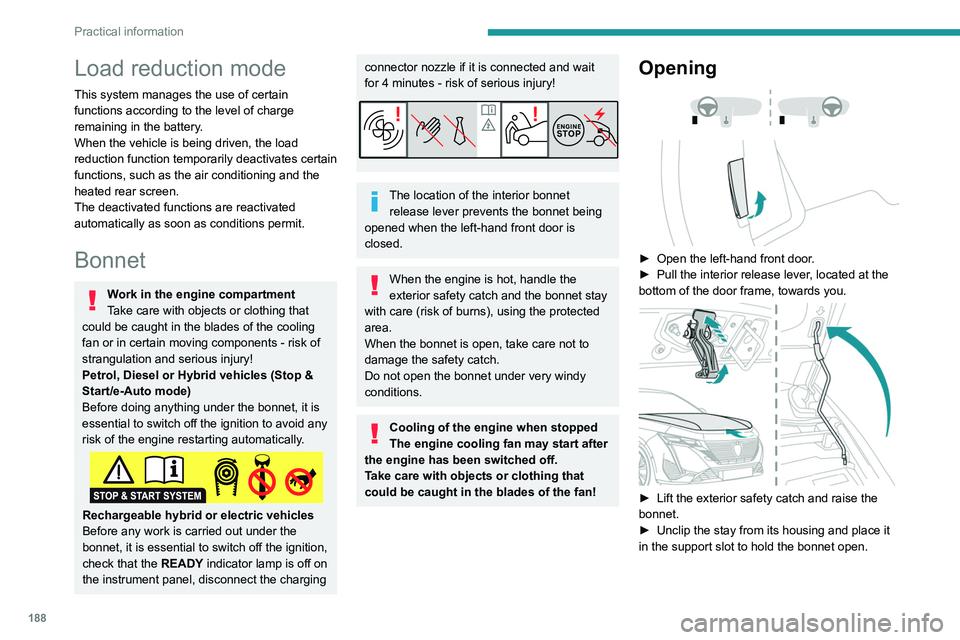
Opening
► Open the left-hand front door .
► Pull the interior release lever , located at the
bottom of the door frame, towards you.
► Lift the exterior safety catch and raise the
bonnet.
►
Unclip the stay from its housing and place it
in the support slot to hold the bonnet open.
Page 192 of 280
190
Practical information
The fluids must comply with the Manufacturer's requirements and with
the vehicle's engine.
Take care when working under the bonnet, as certain areas of the engine
may be extremely hot (risk of burns) and the
cooling fan could start at any time (even with
the ignition off).
Used products
Avoid prolonged contact of used oil or fluids with the skin.
Most of these fluids are harmful to health and
very corrosive.
Do not discard used oil or fluids into
sewers or onto the ground.
Empty used oil into the containers reserved
for this purpose at a PEUGEOT dealer or a
qualified workshop.
Engine oil
The level is checked, with the engine having been switched off for at least 30
minutes and on level ground, either using the oil
level indicator in the instrument panel when the
ignition is switched on (for vehicles equipped
with an electric gauge), or using the dipstick.
It is normal to top up the oil level between two
services (or oil changes). It is recommended
that you check the level, and top up if necessary,
every 3,000 miles (5,000 km).
In order to maintain the reliability of the
engine and emissions control system,
never use additives in the engine oil.
Checking using the dipstick
For the location of the dipstick, please refer
to the illustration of the corresponding engine
compartment.
►
Grasp the dipstick by its coloured grip and
pull it out completely
.
►
Wipe the end of the dipstick using a clean,
lint-free cloth.
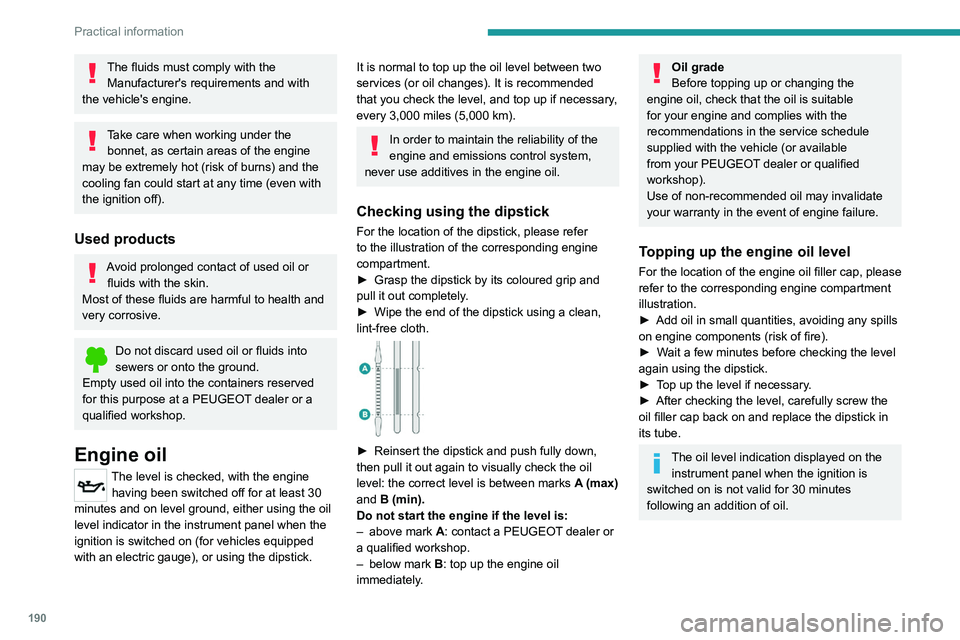
► Reinsert the dipstick and push fully down,
then pull it out again to visually check the oil
level: the correct level is between marks
A
(max)
and
B (min).
Do not start the engine if the level is:
–
above mark
A: contact a PEUGEOT dealer or
a qualified workshop.
–
below mark
B
: top up the engine oil
immediately.
Oil grade
Before topping up or changing the
engine oil, check that the oil is suitable
for your engine and complies with the
recommendations in the service schedule
supplied with the vehicle (or available
from your PEUGEOT dealer or qualified
workshop).
Use of non-recommended oil may invalidate
your warranty in the event of engine failure.
Topping up the engine oil level
For the location of the engine oil filler cap, please
refer to the corresponding engine compartment
illustration.
►
Add oil in small quantities, avoiding any spills
on engine components (risk of fire).
►
W
ait a few minutes before checking the level
again using the dipstick.
►
T
op up the level if necessary.
►
After checking the level, carefully screw the
oil filler cap back on
and replace the dipstick in
its tube.
The oil level indication displayed on the instrument panel when the ignition is
switched on is not valid for 30 minutes
following an addition of oil.