2024 GMC SIERRA DENALI steering
[x] Cancel search: steeringPage 229 of 440
GMC Sierra/Sierra Denali 2500 HD/3500 HD Owner Manual (GMNA-
Localizing-U.S./Canada-16908340) - 2024 - CRC - 12/13/22
Driving and Operating 227
10-Speed Automatic TransmissionGear before shifting from D (Drive) to L (Manual Mode) 10th 9th 8th 7th 6th 5th 4th 3rd 2nd 1st
Range after shifting from D (Drive) to L (Manual
Mode) –Tow/Haul not engaged L7 L7 L7 L6 L5 L4 L3 L3 L2 L1
Range after shifting from D (Drive) to L (Manual
Mode) –Tow/Haul engaged L7 L7 L6 L5 L4 L3 L3 L3 L2 L1
Tow/Haul Mode
The Tow/Haul Mode adjusts the
transmission shift pattern to reduce shift
cycling. This provides increased performance,
vehicle control, and enhanced transmission
and engine cooling when driving down steep
hills or mountain grades, when towing,
or when hauling heavy loads. See
Driver
Mode Control 0238 to activate Tow/
Haul Mode.
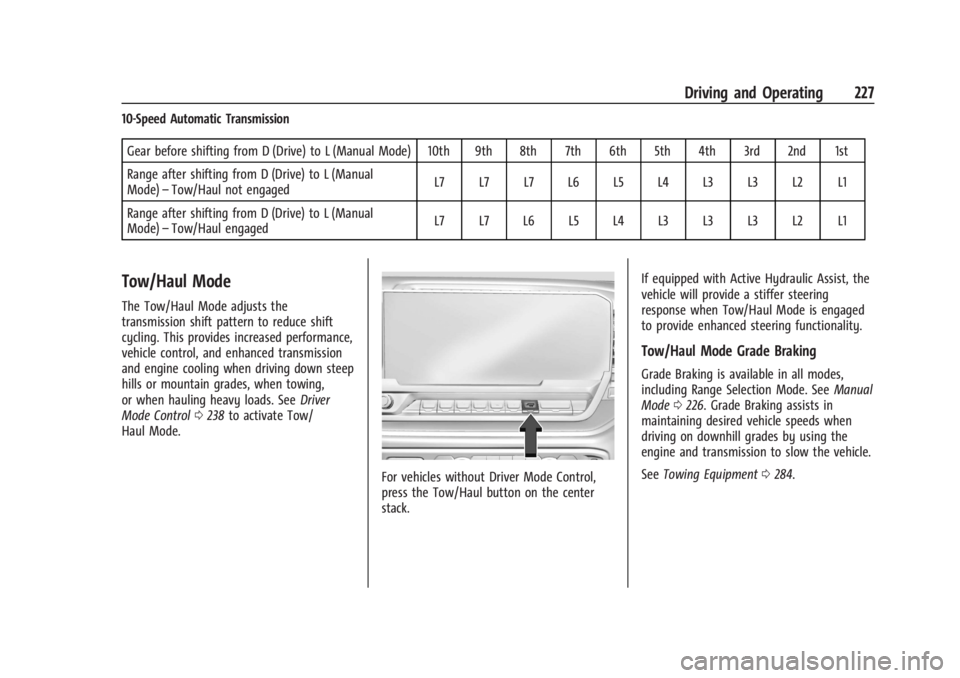
For vehicles without Driver Mode Control,
press the Tow/Haul button on the center
stack. If equipped with Active Hydraulic Assist, the
vehicle will provide a stiffer steering
response when Tow/Haul Mode is engaged
to provide enhanced steering functionality.
Tow/Haul Mode Grade Braking
Grade Braking is available in all modes,
including Range Selection Mode. See
Manual
Mode 0226. Grade Braking assists in
maintaining desired vehicle speeds when
driving on downhill grades by using the
engine and transmission to slow the vehicle.
See Towing Equipment 0284.
Page 230 of 440
GMC Sierra/Sierra Denali 2500 HD/3500 HD Owner Manual (GMNA-
Localizing-U.S./Canada-16908340) - 2024 - CRC - 12/13/22
228 Driving and Operating
Drive Systems
Four-Wheel Drive
If equipped, four-wheel drive engages the
front axle for extra traction. The transfer
case control panel is to the left of the
instrument panel. SeeInstrument Panel
Overview 05.
Read the appropriate section for transfer
case operation before using.
Caution
Do not drive on clean, dry pavement in
4
mand 4n(if equipped) for an extended
period of time. These conditions may
cause premature wear on the vehicle’s
powertrain.
Driving on clean, dry pavement in 4
mor
4
nmay:
.Cause a vibration to be felt in the
steering system.
.Cause tires to wear faster.
{Warning
If equipped with four-wheel drive, the
vehicle will be free to roll if the transfer
case is in N (Neutral), even when the shift
lever is in P (Park). You or someone else
could be seriously injured. Be sure the
transfer case is in a drive gear —2
m, 4m,
or 4
n— or set the parking brake before
placing the transfer case in N (Neutral).
See Shifting Into Park 0220.
Caution
Extended high-speed operation in 4n
may damage or shorten the life of the
drivetrain.
An engagement noise and bump is normal
when shifting between 4
nand 4mor
N (Neutral), with the engine running.
Shifting into 4
nwill turn Traction Control
and StabiliTrak/Electronic Stability Control
(ESC) off. See Traction Control/Electronic
Stability Control 0236.
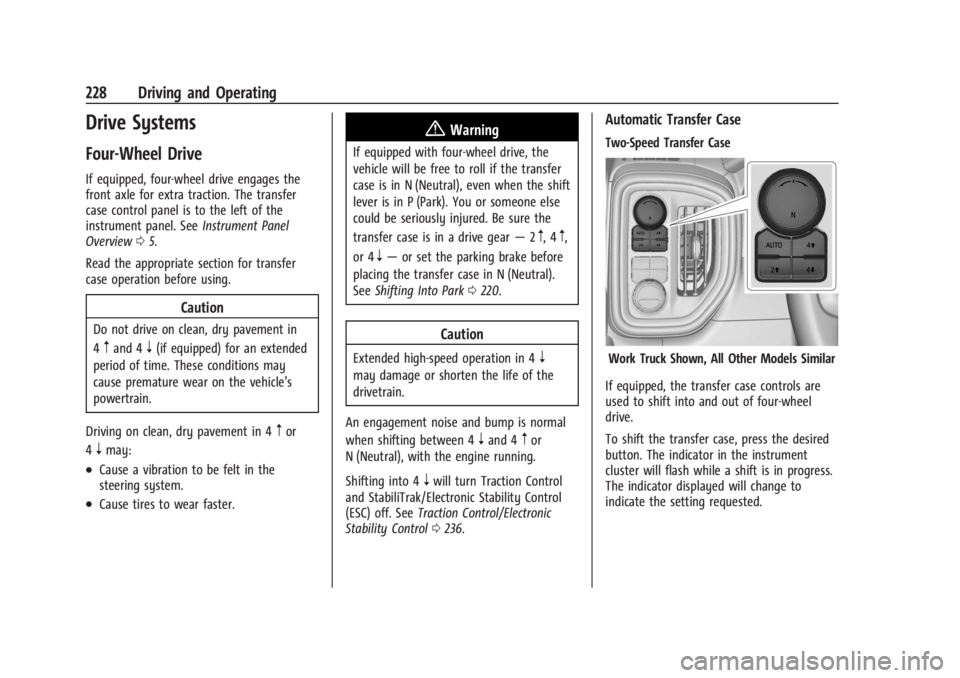
Automatic Transfer Case
Two-Speed Transfer Case
Work Truck Shown, All Other Models Similar
If equipped, the transfer case controls are
used to shift into and out of four-wheel
drive.
To shift the transfer case, press the desired
button. The indicator in the instrument
cluster will flash while a shift is in progress.
The indicator displayed will change to
indicate the setting requested.
Page 235 of 440
GMC Sierra/Sierra Denali 2500 HD/3500 HD Owner Manual (GMNA-
Localizing-U.S./Canada-16908340) - 2024 - CRC - 12/13/22
Driving and Operating 233
flashing until the shift request has
completed. A DIC message displays to
indicate the state of the request.
Once the 4x4 shift has completed, the
DIC message disappears, the
4x4 indicator stops flashing, and the
current setting is indicated.
If vehicle speed is higher when shift
request occurs, a DIC message displays.
Reduce vehicle speed.
If the transmission is not in N (Neutral)
when shift request occurs, DIC messages will
display. The vehicle will allow 20 seconds for
this shift to occur. After this time, a
indicator in the instrument cluster will
indicate that the transfer case is in 4
n.
Caution
Shifting the transmission into gear before
the requested mode indicator light has
stopped flashing could damage the
transfer case.
If the transmission is not shifted into
N (Neutral) or the vehicle has not slowed to
5 km/h (3 mph) within 20 seconds, the
transfer case will remain in its original state.
This will be indicated in the instrument
cluster. With the vehicle moving less than 5 km/h
(3 mph), and the transmission in N (Neutral),
attempt the shift again.
Shifting Into N (Neutral)
To shift into N (Neutral):
1. Start the vehicle.
2. Shift the transmission to N (Neutral).
3. Shift the transfer case to 2
m.
4. Apply the parking brake and/or brake pedal.
5. Press 2
mfive times in 10 seconds until
the N (Neutral) indicator starts flashing in
the instrument cluster. When the shift is
complete, the indicator stops flashing.
If the parking brake and/or brake pedal
is not applied within 20 seconds, the
transfer case will remain in the original
state.
6. If the transmission is not shifted into N (Neutral) or the vehicle has not slowed
to 5 km/h (3 mph) within 20 seconds,
the transfer case will remain in its
original state. This will be indicated in
the instrument cluster. Shifting Out of N (Neutral)
To shift out of N (Neutral):
1. Turn the ignition on with the engine off. See Ignition Positions 0216.
2. Set the parking brake. See Electric
Parking Brake 0234.
3. Shift the transmission to N (Neutral).
4. Shift the transfer case to 2
m. Transfer
case shifts out of N (Neutral) can only be
made into 2
m. When the shift to 2mis
complete, the indicator in the instrument
cluster will stop flashing. If the transfer
case cannot complete a shift, the
indicator will return to the previously
selected setting.
Brakes
Antilock Brake System (ABS)
The Antilock Brake System (ABS) helps
prevent a braking skid and maintain steering
while braking hard.
ABS performs a system check when the
vehicle is first driven. A momentary motor
or clicking noise may be heard while this
test is going on, and the brake pedal may
move slightly. This is normal.
Page 236 of 440
GMC Sierra/Sierra Denali 2500 HD/3500 HD Owner Manual (GMNA-
Localizing-U.S./Canada-16908340) - 2024 - CRC - 12/13/22
234 Driving and Operating
If there is a problem with ABS, this warning
light stays on. SeeAntilock Brake System
(ABS) Warning Light 0125.
ABS does not change the time needed to
get a foot on the brake pedal and does not
always decrease stopping distance. If you
get too close to the vehicle ahead, there will
not be enough time to apply the brakes if
that vehicle suddenly slows or stops. Always
leave enough room ahead to stop, even
with ABS.
Using ABS
Do not pump the brakes. Just hold the brake
pedal down firmly. Hearing or feeling ABS
operate is normal.
Braking in Emergencies
ABS allows steering and braking at the same
time. In many emergencies, steering can
help even more than braking.
Electric Parking Brake
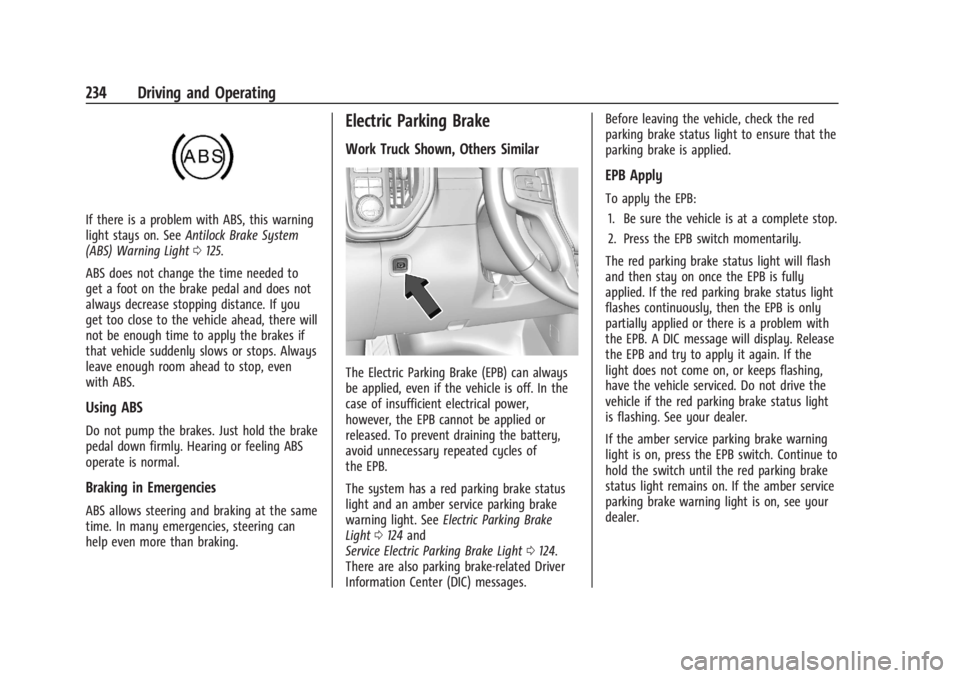
Work Truck Shown, Others Similar
The Electric Parking Brake (EPB) can always
be applied, even if the vehicle is off. In the
case of insufficient electrical power,
however, the EPB cannot be applied or
released. To prevent draining the battery,
avoid unnecessary repeated cycles of
the EPB.
The system has a red parking brake status
light and an amber service parking brake
warning light. See Electric Parking Brake
Light 0124 and
Service Electric Parking Brake Light 0124.
There are also parking brake-related Driver
Information Center (DIC) messages. Before leaving the vehicle, check the red
parking brake status light to ensure that the
parking brake is applied.
EPB Apply
To apply the EPB:
1. Be sure the vehicle is at a complete stop.
2. Press the EPB switch momentarily.
The red parking brake status light will flash
and then stay on once the EPB is fully
applied. If the red parking brake status light
flashes continuously, then the EPB is only
partially applied or there is a problem with
the EPB. A DIC message will display. Release
the EPB and try to apply it again. If the
light does not come on, or keeps flashing,
have the vehicle serviced. Do not drive the
vehicle if the red parking brake status light
is flashing. See your dealer.
If the amber service parking brake warning
light is on, press the EPB switch. Continue to
hold the switch until the red parking brake
status light remains on. If the amber service
parking brake warning light is on, see your
dealer.
Page 240 of 440
GMC Sierra/Sierra Denali 2500 HD/3500 HD Owner Manual (GMNA-
Localizing-U.S./Canada-16908340) - 2024 - CRC - 12/13/22
238 Driving and Operating
Noise from the Electronic Brake Control
Module (EBCM) is normal when HDC is
active.
When HDC is activated, the initial HDC
speed is set to the current driving speed.
It can be increased or decreased by pressing
+RES or SET- on the steering wheel, or by
applying the accelerator or brake pedal. This
adjusted speed becomes the new set speed.
HDC will remain enabled between 30 and
60 km/h (19 and 37 mph); however, vehicle
speed cannot be set or maintained in this
range. HDC will automatically disable if the
vehicle speed is above 80 km/h (50 mph) or
above 60 km/h (37 mph) for at least
30 seconds.
5must be pressed again to re-enable HDC.
HDC may disable after an extended period
of use. If this happens, HDC will require
time to cool down. The length of time HDC
remains active depends on road conditions,
grade, set speed, vehicle loading, and
outside temperature.
When enabled, if the vehicle speed is above
30 km/h (19 mph) and below 60 km/h
(37 mph), a DIC message will display.
Driver Mode Control
Driver Mode Control (DMC) allows the driver
to adjust the overall driving experience to
better suit preference by adjusting multiple
systems to fit specific driving needs. Drive
mode availability and affected vehicle
subsystems are dependent upon vehicle trim
level, region, and optional features.
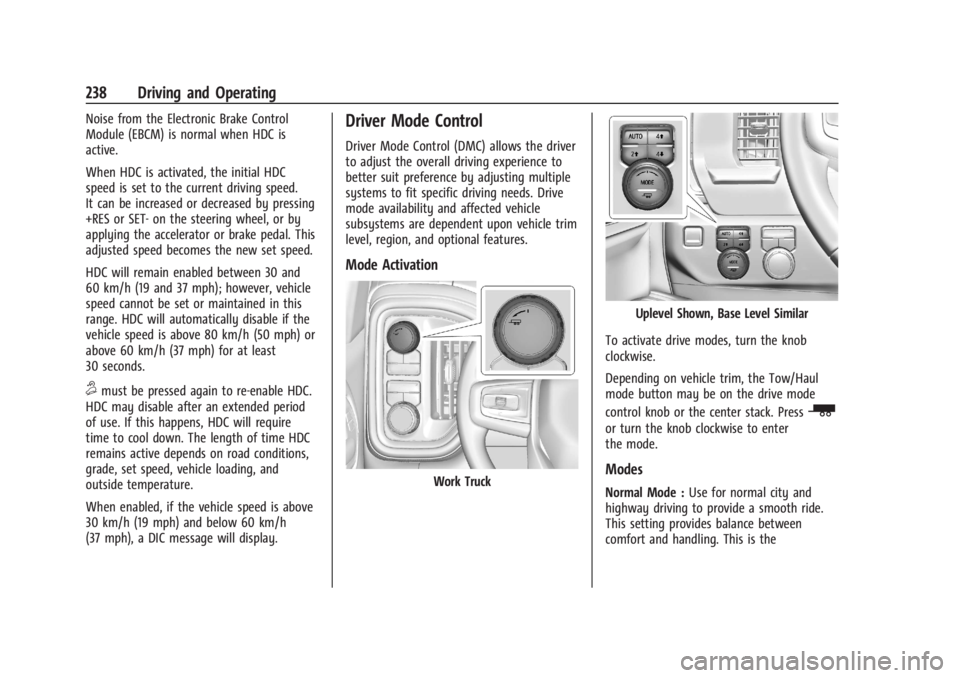
Mode Activation
Work Truck
Uplevel Shown, Base Level Similar
To activate drive modes, turn the knob
clockwise.
Depending on vehicle trim, the Tow/Haul
mode button may be on the drive mode
control knob or the center stack. Press
_
or turn the knob clockwise to enter
the mode.
Modes
Normal Mode : Use for normal city and
highway driving to provide a smooth ride.
This setting provides balance between
comfort and handling. This is the
Page 241 of 440
GMC Sierra/Sierra Denali 2500 HD/3500 HD Owner Manual (GMNA-
Localizing-U.S./Canada-16908340) - 2024 - CRC - 12/13/22
Driving and Operating 239
standard/default mode. There is no
persistent indicator in the instrument cluster
for this mode.
6Snow/Ice Mode :Snow/Ice Mode
improves vehicle acceleration on snow and
ice covered roads. When active, Snow/Ice
Mode will adjust acceleration to optimize
traction on slippery surfaces. This can
compromise the acceleration on dry asphalt.
This feature is not intended for use when
the vehicle is stuck in sand, mud, ice, snow,
or gravel. If the vehicle becomes stuck, see If
the Vehicle Is Stuck 0209.
7Off-Road Mode : Use this mode for
off-road recreational driving. Off-Road Mode
should be used to improve driving at
moderate speeds, on grass, gravel, dirt,
unpaved roads, or snow-covered roads. The
accelerator pedal is tuned for off-road use.
This mode modifies pedal mapping,
transmission shift pattern, Antilock Brake
System (ABS), StabiliTrak/Electronic Stability
Control (ESC), and Traction Control System
(TCS) performance.
For more information on off-road driving see
Off-Road Driving 0203.
_Tow/Haul Mode : Use this mode
when hauling heavy loads to provide
increased performance and vehicle control.
Tow/Haul Mode adjusts the transmission
shift pattern, trailer sway, and steering.
If the vehicle is turned off with Tow/Haul
Mode active and then restarted within four
hours or less, Tow/Haul will remain active.
Otherwise, the vehicle will start in
Normal Mode.
If the vehicle has a diesel engine, exhaust
braking is automatically activated when
Tow/Haul Mode is selected. It maintains
vehicle speed by automatically
implementing a shift pattern that uses the
engine and the transmission to slow the
vehicle. The system will command
downshifts and use the turbocharger on the
engine to reduce vehicle speed when the
brake is applied. The normal tow/haul shift
pattern will return once the vehicle is on a
low grade or when the accelerator pedal is
pressed.
While in the Electronic Range Select (ERS)
Mode, grade breaking is deactivated,
allowing the driver to select a range and
limiting the highest gear available. See
Manual Mode 0226. For more information on trailer weight
specifications, see
Towing Equipment 0284.
Locking Rear Axle
Vehicles with a locking rear axle can give
more traction on snow, mud, ice, sand,
or gravel. It works like a standard axle most
of the time, but when traction is low, this
feature will allow the rear wheel with the
most traction to move the vehicle.
Cruise Control
If equipped, cruise control allows the vehicle
to maintain a set speed of 40 km/h
(25 mph) or more without active
acceleration. Cruise control does not work at
speeds below about 40 km/h (25 mph).
{Warning
Cruise control can be dangerous where
you cannot drive safely at a steady
speed. Do not use cruise control on
winding roads or in heavy traffic.
Cruise control can be dangerous on
slippery roads. On such roads, fast
changes in tire traction can cause
(Continued)
Page 247 of 440
GMC Sierra/Sierra Denali 2500 HD/3500 HD Owner Manual (GMNA-
Localizing-U.S./Canada-16908340) - 2024 - CRC - 12/13/22
Driving and Operating 245
Reducing Speed While ACC Is at a Set Speed
If ACC is already activated, do one of the
following:
.Use the brake to get to the desired lower
speed. Release the brake and press SET–.
The vehicle will now cruise at the lower
speed.
.Press and hold SET–until the desired
lower speed is reached, then release it.
.To decrease the vehicle speed in smaller
increments, press SET− briefly. For each
press, the vehicle goes about 1 km/h
(1 mph) slower.
.To decrease the vehicle speed in larger
increments, hold SET−. While holding
SET−, the vehicle speed decreases to the
next 5 km/h (5 mph) step, then continues
to decrease by 5 km/h (5 mph) at a time.
The set speed can also be decreased while
the vehicle is stopped.
.If stopped with the brake applied, press
or hold SET− until the desired set speed is
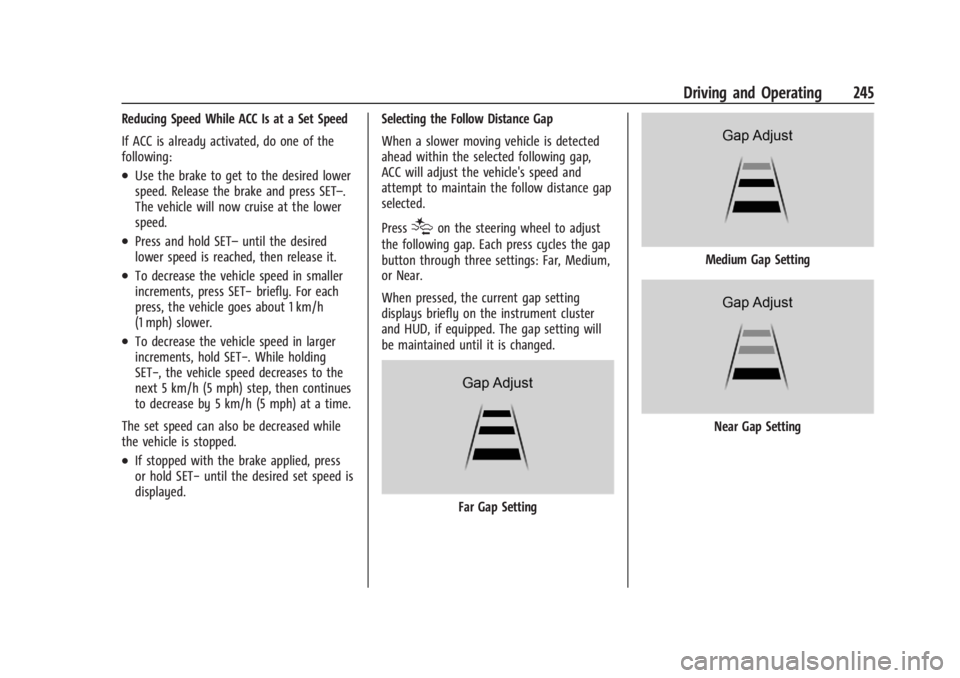
displayed. Selecting the Follow Distance Gap
When a slower moving vehicle is detected
ahead within the selected following gap,
ACC will adjust the vehicle's speed and
attempt to maintain the follow distance gap
selected.
Press
[on the steering wheel to adjust
the following gap. Each press cycles the gap
button through three settings: Far, Medium,
or Near.
When pressed, the current gap setting
displays briefly on the instrument cluster
and HUD, if equipped. The gap setting will
be maintained until it is changed.
Far Gap Setting
Medium Gap Setting
Near Gap Setting
Page 248 of 440
GMC Sierra/Sierra Denali 2500 HD/3500 HD Owner Manual (GMNA-
Localizing-U.S./Canada-16908340) - 2024 - CRC - 12/13/22
246 Driving and Operating
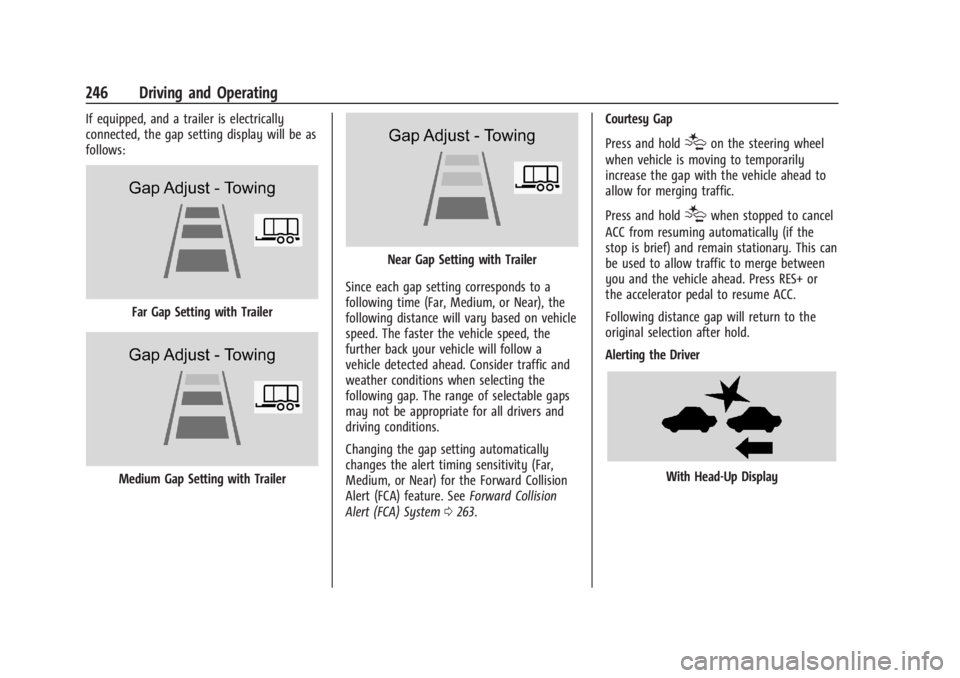
If equipped, and a trailer is electrically
connected, the gap setting display will be as
follows:
Far Gap Setting with Trailer
Medium Gap Setting with Trailer
Near Gap Setting with Trailer
Since each gap setting corresponds to a
following time (Far, Medium, or Near), the
following distance will vary based on vehicle
speed. The faster the vehicle speed, the
further back your vehicle will follow a
vehicle detected ahead. Consider traffic and
weather conditions when selecting the
following gap. The range of selectable gaps
may not be appropriate for all drivers and
driving conditions.
Changing the gap setting automatically
changes the alert timing sensitivity (Far,
Medium, or Near) for the Forward Collision
Alert (FCA) feature. See Forward Collision
Alert (FCA) System 0263. Courtesy Gap
Press and hold
[on the steering wheel
when vehicle is moving to temporarily
increase the gap with the vehicle ahead to
allow for merging traffic.
Press and hold
[when stopped to cancel
ACC from resuming automatically (if the
stop is brief) and remain stationary. This can
be used to allow traffic to merge between
you and the vehicle ahead. Press RES+ or
the accelerator pedal to resume ACC.
Following distance gap will return to the
original selection after hold.
Alerting the Driver
With Head-Up Display