2024 GMC SIERRA DENALI instrument panel
[x] Cancel search: instrument panelPage 294 of 440

GMC Sierra/Sierra Denali 2500 HD/3500 HD Owner Manual (GMNA-
Localizing-U.S./Canada-16908340) - 2024 - CRC - 12/13/22
292 Driving and Operating
Warning (Continued)
injury, death, or property damage. Only
use the ITBC system with electric or
electric over hydraulic trailer brake
systems.
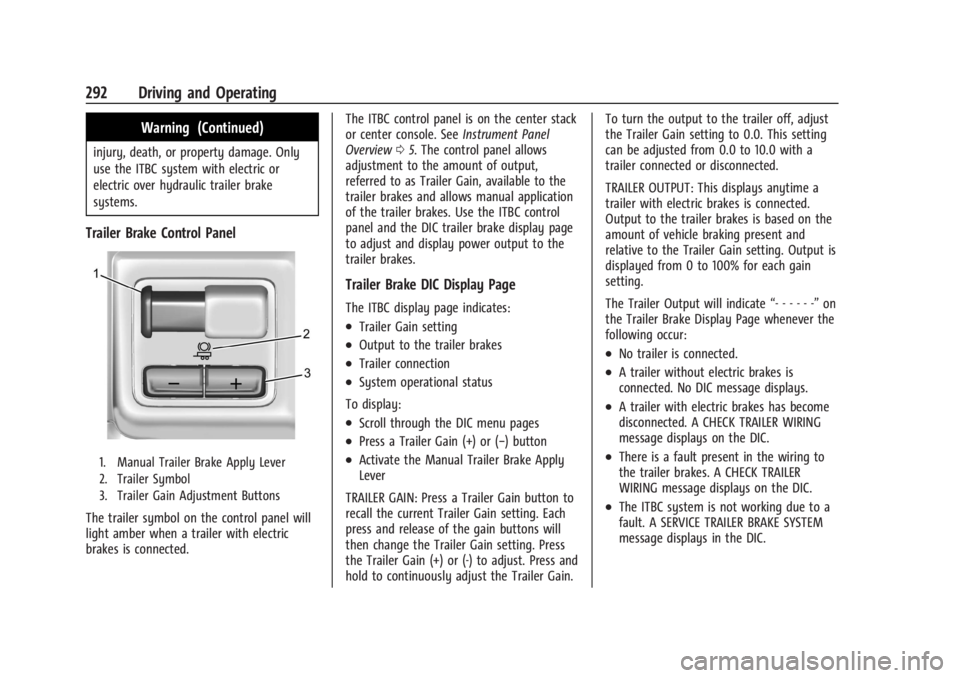
Trailer Brake Control Panel
1. Manual Trailer Brake Apply Lever
2. Trailer Symbol
3. Trailer Gain Adjustment Buttons
The trailer symbol on the control panel will
light amber when a trailer with electric
brakes is connected.The ITBC control panel is on the center stack
or center console. See
Instrument Panel
Overview 05. The control panel allows
adjustment to the amount of output,
referred to as Trailer Gain, available to the
trailer brakes and allows manual application
of the trailer brakes. Use the ITBC control
panel and the DIC trailer brake display page
to adjust and display power output to the
trailer brakes.
Trailer Brake DIC Display Page
The ITBC display page indicates:
.Trailer Gain setting
.Output to the trailer brakes
.Trailer connection
.System operational status
To display:
.Scroll through the DIC menu pages
.Press a Trailer Gain (+) or (−) button
.Activate the Manual Trailer Brake Apply
Lever
TRAILER GAIN: Press a Trailer Gain button to
recall the current Trailer Gain setting. Each
press and release of the gain buttons will
then change the Trailer Gain setting. Press
the Trailer Gain (+) or (-) to adjust. Press and
hold to continuously adjust the Trailer Gain. To turn the output to the trailer off, adjust
the Trailer Gain setting to 0.0. This setting
can be adjusted from 0.0 to 10.0 with a
trailer connected or disconnected.
TRAILER OUTPUT: This displays anytime a
trailer with electric brakes is connected.
Output to the trailer brakes is based on the
amount of vehicle braking present and
relative to the Trailer Gain setting. Output is
displayed from 0 to 100% for each gain
setting.
The Trailer Output will indicate
“- - - - - -”on
the Trailer Brake Display Page whenever the
following occur:
.No trailer is connected.
.A trailer without electric brakes is
connected. No DIC message displays.
.A trailer with electric brakes has become
disconnected. A CHECK TRAILER WIRING
message displays on the DIC.
.There is a fault present in the wiring to
the trailer brakes. A CHECK TRAILER
WIRING message displays on the DIC.
.The ITBC system is not working due to a
fault. A SERVICE TRAILER BRAKE SYSTEM
message displays in the DIC.
Page 311 of 440

GMC Sierra/Sierra Denali 2500 HD/3500 HD Owner Manual (GMNA-
Localizing-U.S./Canada-16908340) - 2024 - CRC - 12/7/22
Vehicle Care 309
Vehicle Care
General Information
General Information . . . . . . . . . . . . . . . . . . . 310
California Perchlorate MaterialsRequirements . . . . . . . . . . . . . . . . . . . . . . . . 310
Accessories and Modifications . . . . . . . . . 310
Vehicle Checks
Doing Your Own Service Work . . . . . . . . . 311
Hood . . . . . . . . . . . . . . . . . . . . . . . . . . . . . . . . . . 312
Engine Compartment Overview . . . . . . . . 313
Engine Oil . . . . . . . . . . . . . . . . . . . . . . . . . . . . . 314
Engine Oil Life System . . . . . . . . . . . . . . . . . 316
Automatic Transmission Fluid . . . . . . . . . . 317
Engine Air Filter Life System . . . . . . . . . . . 317
Engine Air Cleaner/Filter . . . . . . . . . . . . . . . 318
Cooling System . . . . . . . . . . . . . . . . . . . . . . . . 319
Engine Overheating . . . . . . . . . . . . . . . . . . . . 321
Overheated Engine Protection Operating Mode . . . . . . . . . . . . . . . . . . . . . 323
Engine Fan . . . . . . . . . . . . . . . . . . . . . . . . . . . . 323
Power Steering Fluid . . . . . . . . . . . . . . . . . . 323
Washer Fluid . . . . . . . . . . . . . . . . . . . . . . . . . . 324
Brakes . . . . . . . . . . . . . . . . . . . . . . . . . . . . . . . . . 325
Brake Pad Life System . . . . . . . . . . . . . . . . . 325
Brake Fluid . . . . . . . . . . . . . . . . . . . . . . . . . . . . 326
Battery - North America . . . . . . . . . . . . . . . 327
Four-Wheel Drive . . . . . . . . . . . . . . . . . . . . . . 329
Front Axle . . . . . . . . . . . . . . . . . . . . . . . . . . . . . 329 Rear Axle . . . . . . . . . . . . . . . . . . . . . . . . . . . . . . 329
Noise Control System . . . . . . . . . . . . . . . . . 329
Automatic Transmission Shift Lock
Control Function Check (Mechanical
Shifter) . . . . . . . . . . . . . . . . . . . . . . . . . . . . . . 330
Park Brake and P (Park) Mechanism Check . . . . . . . . . . . . . . . . . . . . . . . . . . . . . . . . 331
Wiper Blade Replacement . . . . . . . . . . . . . . 331
Glass Replacement . . . . . . . . . . . . . . . . . . . . . 331
Windshield Replacement . . . . . . . . . . . . . . . 332
Gas Strut(s) . . . . . . . . . . . . . . . . . . . . . . . . . . . . 332
Headlamp Aiming
Front Headlamp Aiming . . . . . . . . . . . . . . . 333
Bulb Replacement
Bulb Replacement . . . . . . . . . . . . . . . . . . . . . 333
Halogen Bulbs . . . . . . . . . . . . . . . . . . . . . . . . . 333
LED Lighting . . . . . . . . . . . . . . . . . . . . . . . . . . . 333
Headlamps, Front Turn Signal, Sidemarker, and Parking Lamps . . . . . . 333
Taillamps, Turn Signal, Stoplamps, and Back-Up Lamps . . . . . . . . . . . . . . . . . . . . . . 334
Center High-Mounted Stoplamp (CHMSL) and Cargo Lamp . . . . . . . . . . . . 335
License Plate Lamp . . . . . . . . . . . . . . . . . . . . 335
Electrical System
Electrical System Overload . . . . . . . . . . . . . 335
Fuses and Circuit Breakers . . . . . . . . . . . . . 337
Engine Compartment Fuse Block . . . . . . . 337 Instrument Panel Fuse Block (Left) . . . . . 341
Instrument Panel Fuse Block (Right) . . . 342
Wheels and Tires
Tires . . . . . . . . . . . . . . . . . . . . . . . . . . . . . . . . . . . 345
All-Season Tires . . . . . . . . . . . . . . . . . . . . . . . . 345
Winter Tires . . . . . . . . . . . . . . . . . . . . . . . . . . . 346
All-Terrain Tires . . . . . . . . . . . . . . . . . . . . . . . 346
Tire Sidewall Labeling . . . . . . . . . . . . . . . . . 346
Tire Designations . . . . . . . . . . . . . . . . . . . . . . 347
Tire Terminology and Definitions . . . . . . 348
Tire Pressure . . . . . . . . . . . . . . . . . . . . . . . . . . 350
Tire Pressure Monitor System . . . . . . . . . . 351
Tire Pressure Monitor Operation . . . . . . . 351
Tire Inspection . . . . . . . . . . . . . . . . . . . . . . . . 356
Tire Rotation . . . . . . . . . . . . . . . . . . . . . . . . . . 357
When It Is Time for New Tires . . . . . . . . 359
Buying New Tires . . . . . . . . . . . . . . . . . . . . . 360
Different Size Tires and Wheels . . . . . . . . 361
Uniform Tire Quality Grading . . . . . . . . . . 361
Wheel Alignment and Tire Balance . . . . 362
Wheel Replacement . . . . . . . . . . . . . . . . . . . 362
Tire Chains . . . . . . . . . . . . . . . . . . . . . . . . . . . . 363
If a Tire Goes Flat . . . . . . . . . . . . . . . . . . . . . 364
Tire Changing . . . . . . . . . . . . . . . . . . . . . . . . . 365
Full-Size Spare Tire . . . . . . . . . . . . . . . . . . . . . 375
Jump Starting
Jump Starting - North America . . . . . . . . 376
Page 314 of 440

GMC Sierra/Sierra Denali 2500 HD/3500 HD Owner Manual (GMNA-
Localizing-U.S./Canada-16908340) - 2024 - CRC - 12/7/22
312 Vehicle Care
Hood
{Warning
Turn the vehicle off before opening the
hood. If the engine is running with the
hood open, you or others could be
injured.
{Warning
Components under the hood can get hot
from running the engine. To help avoid
the risk of burning unprotected skin,
never touch these components until they
have cooled, and always use a glove or
towel to avoid direct skin contact.
Clear any snow from the hood before
opening.
To open the hood: 1. Pull the hood release lever with the
isymbol. It is on the lower left side
of the instrument panel.
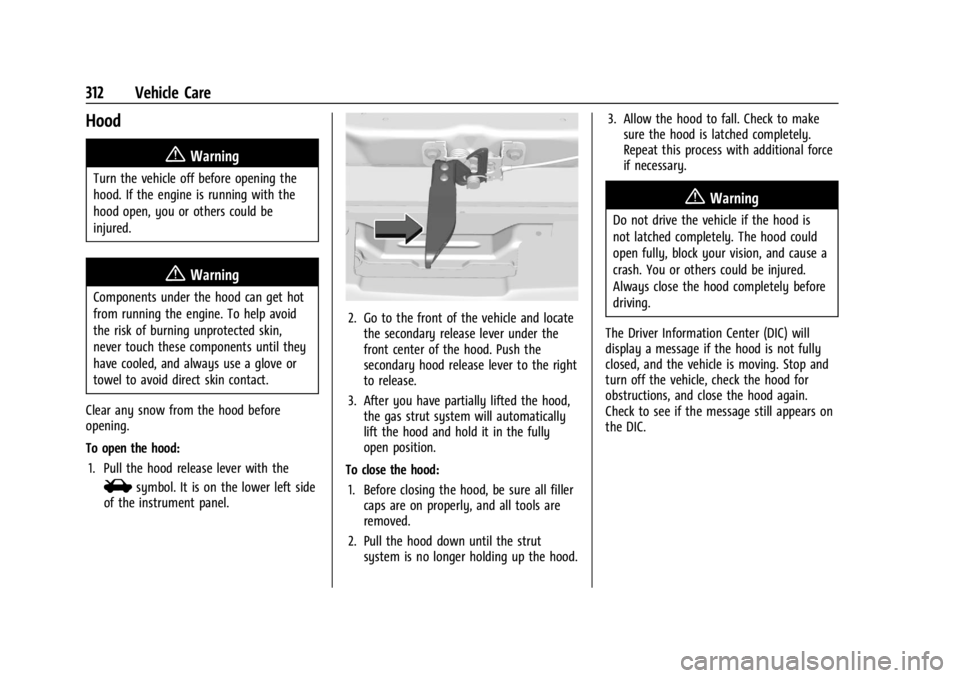
2. Go to the front of the vehicle and locate the secondary release lever under the
front center of the hood. Push the
secondary hood release lever to the right
to release.
3. After you have partially lifted the hood, the gas strut system will automatically
lift the hood and hold it in the fully
open position.
To close the hood: 1. Before closing the hood, be sure all filler caps are on properly, and all tools are
removed.
2. Pull the hood down until the strut system is no longer holding up the hood. 3. Allow the hood to fall. Check to make
sure the hood is latched completely.
Repeat this process with additional force
if necessary.
{Warning
Do not drive the vehicle if the hood is
not latched completely. The hood could
open fully, block your vision, and cause a
crash. You or others could be injured.
Always close the hood completely before
driving.
The Driver Information Center (DIC) will
display a message if the hood is not fully
closed, and the vehicle is moving. Stop and
turn off the vehicle, check the hood for
obstructions, and close the hood again.
Check to see if the message still appears on
the DIC.
Page 338 of 440

GMC Sierra/Sierra Denali 2500 HD/3500 HD Owner Manual (GMNA-
Localizing-U.S./Canada-16908340) - 2024 - CRC - 12/7/22
336 Vehicle Care
Fuses and circuit breakers protect the wires
that provide the power to the devices in
your vehicle.
If there is a problem on the road and a fuse
needs to be replaced, the same amperage
fuse can be borrowed. Choose some feature
of the vehicle that is not needed to use and
replace it as soon as possible.
To check a fuse, look at the band inside the
fuse. If the band is broken or melted,
replace the fuse. Be sure to replace a bad
fuse with a fuse of the identical size and
rating.
Replacing a Blown Fuse
1. Turn off the vehicle.
2. Locate the fuse puller on the instrumentpanel end cap. See the Instrument Panel
Fuse Block (Left) 0341 or
Instrument Panel Fuse Block (Right)
0 342.
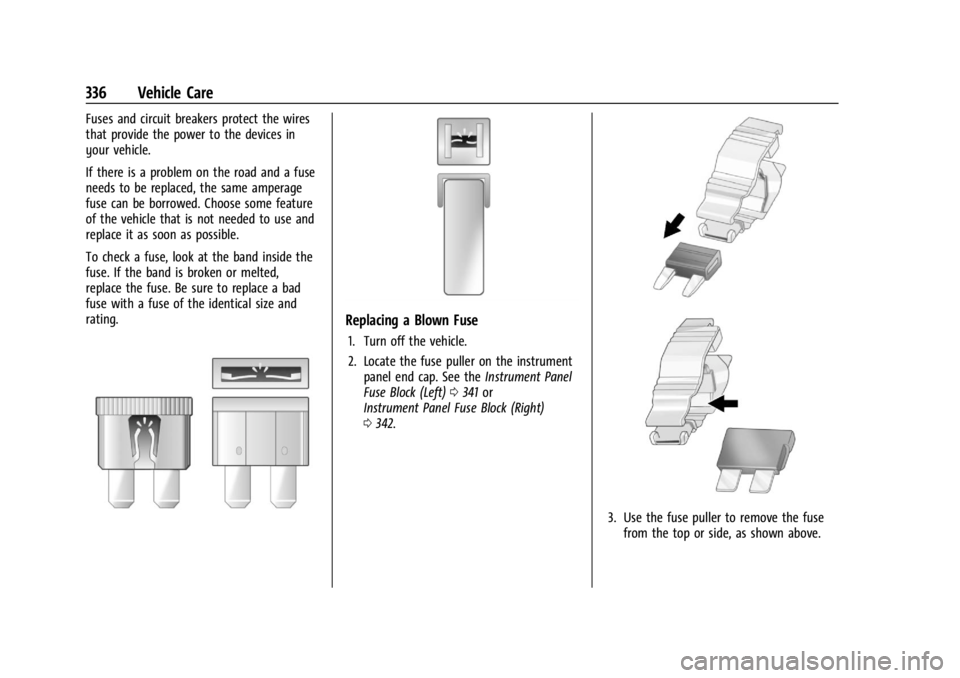
3. Use the fuse puller to remove the fuse
from the top or side, as shown above.
Page 339 of 440

GMC Sierra/Sierra Denali 2500 HD/3500 HD Owner Manual (GMNA-
Localizing-U.S./Canada-16908340) - 2024 - CRC - 12/7/22
Vehicle Care 337
4. If the fuse must be replacedimmediately, spare fuses are also
provided on the instrument panel end
cap or borrow a replacement fuse with
the same amperage from the fuse block.
Choose a vehicle feature that is not
needed to safely operate the vehicle.
Repeat Steps 2-3.
5. Insert the replacement fuse into the empty slot of the blown fuse.
At the next opportunity, see your dealer to
replace the blown fuse.
Headlamp Wiring
An electrical overload may cause the lamps
to go on and off, or in some cases to
remain off. Have the headlamp wiring
checked right away if the lamps go on and
off or remain off.
Windshield Wipers
If the wiper motor overheats due to heavy
snow or ice, the windshield wipers will stop
until the motor cools and will then restart.
Although the circuit is protected from
electrical overload, overload due to heavy
snow or ice may cause wiper linkage damage. Always clear ice and heavy snow
from the windshield before using the
windshield wipers.
If the overload is caused by an electrical
problem and not snow or ice, be sure to get
it fixed.
Fuses and Circuit Breakers
The wiring circuits in the vehicle are
protected from short circuits by a
combination of fuses and circuit breakers.
This greatly reduces the chance of damage
caused by electrical problems.
{Danger
Fuses and circuit breakers are marked
with their ampere rating. Do not exceed
the specified amperage rating when
replacing fuses and circuit breakers. Use
of an oversized fuse or circuit breaker can
result in a vehicle fire. You and others
could be seriously injured or killed.
{Warning
Installation or use of fuses that do not
meet GM’s original fuse specifications is
dangerous. The fuses could fail, and result
in a fire. You or others could be injured
or killed, and the vehicle could be
damaged.
See Accessories and Modifications 0310 and
General Information 0310.
To check or replace a blown fuse, see
Electrical System Overload 0335.
Engine Compartment Fuse Block
If the vehicle has a diesel engine, see the
Duramax diesel supplement.
The engine compartment fuse block is in the
engine compartment on the driver side of
vehicle.
Page 340 of 440

GMC Sierra/Sierra Denali 2500 HD/3500 HD Owner Manual (GMNA-
Localizing-U.S./Canada-16908340) - 2024 - CRC - 12/7/22
338 Vehicle Care
Lift the cover to access the fuse block.
Caution
Spilling liquid on any electrical
component on the vehicle may damage
it. Always keep the covers on any
electrical component.
A fuse puller is available in the left
instrument panel end cap.
The vehicle may not be equipped with all of
the fuses, relays, and features shown.
Fuses Usage
1 –
2 – Fuses
Usage
3 Headlamp Left
4 Headlamp Right
Page 343 of 440

GMC Sierra/Sierra Denali 2500 HD/3500 HD Owner Manual (GMNA-
Localizing-U.S./Canada-16908340) - 2024 - CRC - 12/7/22
Vehicle Care 341
Instrument Panel Fuse Block (Left)
The left instrument panel fuse block access
door is on the driver side edge of the
instrument panel.
The vehicle may not be equipped with all of
the fuses, relays, and features shown.
Pull off the cover to access the fuse block.
A fuse puller is available on the left
instrument panel end cap.
The vehicle may not be equipped with all of
the fuses, relays, and features shown.Fuses Usage
F1 Rear Heated Seats Left/ Right
F3 –
F4 –
F5 Spare/MFEG –
Multifunction End Gate
F6 Heated and Ventilated Seats Left/Right
F8 –
F9 Passive Entry Passive Start/ Spare
F10 –
F11 –
F12 Passenger Power Seat
F13 Export Power Take Off/ Special Equipment Option 1
F14 –
F15 –
F16 AMP –Amplifier
F17 –
F18 –
Page 344 of 440

GMC Sierra/Sierra Denali 2500 HD/3500 HD Owner Manual (GMNA-
Localizing-U.S./Canada-16908340) - 2024 - CRC - 12/7/22
342 Vehicle Care
FusesUsage
F20 Endgate F22 Rear Sliding Window
F23 –
F24 –
F25 –
F26 –
F27 –
Circuit
Breakers Usage
CB1 –
Relays Usage
K1 Rear Sliding Window Open
K2 Rear sliding Window Close
K3 MFEG Major 1 –
Multifunction End Gate
Major 1
K4 MFEG Minor 1 –
Multifunction End Gate
Minor 1 Relays
Usage
K5 MFEG Minor 2 –
Multifunction End Gate
Minor 2
K6 MFEG Major 2 –
Multifunction End Gate
Major 2
K7 –
K8 –Instrument Panel Fuse Block
(Right)
The right instrument panel fuse block access
door is on the passenger side edge of the
instrument panel.
Pull off the cover to access the front of the
fuse block.