2024 GMC SIERRA DENALI four wheel drive
[x] Cancel search: four wheel drivePage 282 of 440
GMC Sierra/Sierra Denali 2500 HD/3500 HD Owner Manual (GMNA-
Localizing-U.S./Canada-16908340) - 2024 - CRC - 12/13/22
280 Driving and Operating
5. Gradually release the brake pedal toallow the chocks to absorb the load of
the trailer.
6. Reapply the brake pedal. Then, apply the parking brake and shift into P (Park).
7. Release the brake pedal.
Pulling the Trailer from the Water
To pull the trailer out of the water: 1. Press and hold the brake pedal.
2. Start the engine and shift into gear.
3. Release the parking brake.
4. Let up on the brake pedal.
5. Drive slowly until the tires are clear of the chocks.
6. Stop and have someone pick up and store the chocks.
7. Slowly pull the trailer from the water.
8. Once the vehicle and trailer have been driven from the sloped part of the boat
ramp, the vehicle can be shifted from
four-wheel-drive high. Shift into the drive
mode that is appropriate for the road
conditions.Caution
If the vehicle tires begin to spin and the
vehicle begins to slide toward the water,
remove your foot from the accelerator
pedal and apply the brake pedal. Seek
help to have the vehicle towed up
the ramp.
Maintenance when Trailer Towing
The vehicle needs service more often when
used to tow trailers. See Maintenance
Schedule 0394. It is especially important to
check the engine oil, axle lubricant, belts,
cooling system, and brake system before
and during each trip.
Check periodically to see that all nuts and
bolts on the trailer hitch are tight.
Engine Cooling When Trailer Towing
The cooling system may temporarily
overheat during severe operating conditions.
See Engine Overheating 0321.
Trailer Towing
If equipped with a diesel engine, see the
Duramax diesel supplement.
Caution
Towing a trailer improperly can damage
the vehicle and result in costly repairs
not covered by the vehicle warranty. To
tow a trailer correctly, follow the
directions in this section and see your
dealer for important information about
towing a trailer with the vehicle.
Trailering is different than just driving the
vehicle by itself. Trailering means changes in
handling, acceleration, braking, and
durability. Successful, safe trailering takes
correct equipment, and it has to be used
properly.
The following information has many
time-tested, important trailering tips and
safety rules. Many of these are important
for your safety and that of your passengers.
Read this section carefully before pulling a
trailer.
Page 311 of 440

GMC Sierra/Sierra Denali 2500 HD/3500 HD Owner Manual (GMNA-
Localizing-U.S./Canada-16908340) - 2024 - CRC - 12/7/22
Vehicle Care 309
Vehicle Care
General Information
General Information . . . . . . . . . . . . . . . . . . . 310
California Perchlorate MaterialsRequirements . . . . . . . . . . . . . . . . . . . . . . . . 310
Accessories and Modifications . . . . . . . . . 310
Vehicle Checks
Doing Your Own Service Work . . . . . . . . . 311
Hood . . . . . . . . . . . . . . . . . . . . . . . . . . . . . . . . . . 312
Engine Compartment Overview . . . . . . . . 313
Engine Oil . . . . . . . . . . . . . . . . . . . . . . . . . . . . . 314
Engine Oil Life System . . . . . . . . . . . . . . . . . 316
Automatic Transmission Fluid . . . . . . . . . . 317
Engine Air Filter Life System . . . . . . . . . . . 317
Engine Air Cleaner/Filter . . . . . . . . . . . . . . . 318
Cooling System . . . . . . . . . . . . . . . . . . . . . . . . 319
Engine Overheating . . . . . . . . . . . . . . . . . . . . 321
Overheated Engine Protection Operating Mode . . . . . . . . . . . . . . . . . . . . . 323
Engine Fan . . . . . . . . . . . . . . . . . . . . . . . . . . . . 323
Power Steering Fluid . . . . . . . . . . . . . . . . . . 323
Washer Fluid . . . . . . . . . . . . . . . . . . . . . . . . . . 324
Brakes . . . . . . . . . . . . . . . . . . . . . . . . . . . . . . . . . 325
Brake Pad Life System . . . . . . . . . . . . . . . . . 325
Brake Fluid . . . . . . . . . . . . . . . . . . . . . . . . . . . . 326
Battery - North America . . . . . . . . . . . . . . . 327
Four-Wheel Drive . . . . . . . . . . . . . . . . . . . . . . 329
Front Axle . . . . . . . . . . . . . . . . . . . . . . . . . . . . . 329 Rear Axle . . . . . . . . . . . . . . . . . . . . . . . . . . . . . . 329
Noise Control System . . . . . . . . . . . . . . . . . 329
Automatic Transmission Shift Lock
Control Function Check (Mechanical
Shifter) . . . . . . . . . . . . . . . . . . . . . . . . . . . . . . 330
Park Brake and P (Park) Mechanism Check . . . . . . . . . . . . . . . . . . . . . . . . . . . . . . . . 331
Wiper Blade Replacement . . . . . . . . . . . . . . 331
Glass Replacement . . . . . . . . . . . . . . . . . . . . . 331
Windshield Replacement . . . . . . . . . . . . . . . 332
Gas Strut(s) . . . . . . . . . . . . . . . . . . . . . . . . . . . . 332
Headlamp Aiming
Front Headlamp Aiming . . . . . . . . . . . . . . . 333
Bulb Replacement
Bulb Replacement . . . . . . . . . . . . . . . . . . . . . 333
Halogen Bulbs . . . . . . . . . . . . . . . . . . . . . . . . . 333
LED Lighting . . . . . . . . . . . . . . . . . . . . . . . . . . . 333
Headlamps, Front Turn Signal, Sidemarker, and Parking Lamps . . . . . . 333
Taillamps, Turn Signal, Stoplamps, and Back-Up Lamps . . . . . . . . . . . . . . . . . . . . . . 334
Center High-Mounted Stoplamp (CHMSL) and Cargo Lamp . . . . . . . . . . . . 335
License Plate Lamp . . . . . . . . . . . . . . . . . . . . 335
Electrical System
Electrical System Overload . . . . . . . . . . . . . 335
Fuses and Circuit Breakers . . . . . . . . . . . . . 337
Engine Compartment Fuse Block . . . . . . . 337 Instrument Panel Fuse Block (Left) . . . . . 341
Instrument Panel Fuse Block (Right) . . . 342
Wheels and Tires
Tires . . . . . . . . . . . . . . . . . . . . . . . . . . . . . . . . . . . 345
All-Season Tires . . . . . . . . . . . . . . . . . . . . . . . . 345
Winter Tires . . . . . . . . . . . . . . . . . . . . . . . . . . . 346
All-Terrain Tires . . . . . . . . . . . . . . . . . . . . . . . 346
Tire Sidewall Labeling . . . . . . . . . . . . . . . . . 346
Tire Designations . . . . . . . . . . . . . . . . . . . . . . 347
Tire Terminology and Definitions . . . . . . 348
Tire Pressure . . . . . . . . . . . . . . . . . . . . . . . . . . 350
Tire Pressure Monitor System . . . . . . . . . . 351
Tire Pressure Monitor Operation . . . . . . . 351
Tire Inspection . . . . . . . . . . . . . . . . . . . . . . . . 356
Tire Rotation . . . . . . . . . . . . . . . . . . . . . . . . . . 357
When It Is Time for New Tires . . . . . . . . 359
Buying New Tires . . . . . . . . . . . . . . . . . . . . . 360
Different Size Tires and Wheels . . . . . . . . 361
Uniform Tire Quality Grading . . . . . . . . . . 361
Wheel Alignment and Tire Balance . . . . 362
Wheel Replacement . . . . . . . . . . . . . . . . . . . 362
Tire Chains . . . . . . . . . . . . . . . . . . . . . . . . . . . . 363
If a Tire Goes Flat . . . . . . . . . . . . . . . . . . . . . 364
Tire Changing . . . . . . . . . . . . . . . . . . . . . . . . . 365
Full-Size Spare Tire . . . . . . . . . . . . . . . . . . . . . 375
Jump Starting
Jump Starting - North America . . . . . . . . 376
Page 331 of 440
GMC Sierra/Sierra Denali 2500 HD/3500 HD Owner Manual (GMNA-
Localizing-U.S./Canada-16908340) - 2024 - CRC - 12/7/22
Vehicle Care 329
Four-Wheel Drive
Transfer Case
When to Check Lubricant
Refer toMaintenance Schedule 0394 to
determine when to check the lubricant.
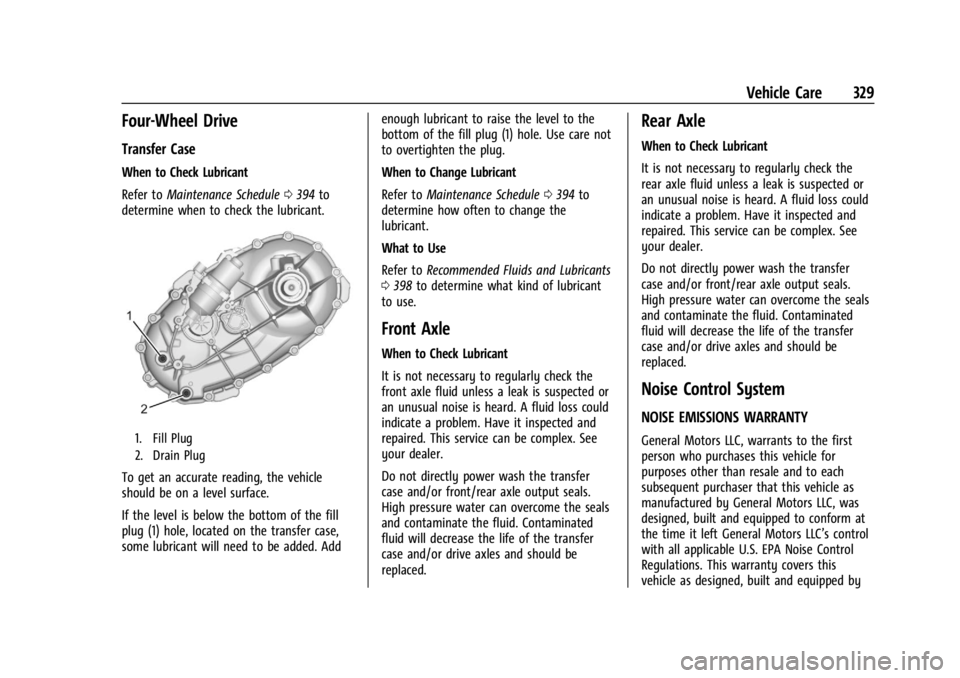
1. Fill Plug
2. Drain Plug
To get an accurate reading, the vehicle
should be on a level surface.
If the level is below the bottom of the fill
plug (1) hole, located on the transfer case,
some lubricant will need to be added. Add enough lubricant to raise the level to the
bottom of the fill plug (1) hole. Use care not
to overtighten the plug.
When to Change Lubricant
Refer to
Maintenance Schedule 0394 to
determine how often to change the
lubricant.
What to Use
Refer to Recommended Fluids and Lubricants
0 398 to determine what kind of lubricant
to use.
Front Axle
When to Check Lubricant
It is not necessary to regularly check the
front axle fluid unless a leak is suspected or
an unusual noise is heard. A fluid loss could
indicate a problem. Have it inspected and
repaired. This service can be complex. See
your dealer.
Do not directly power wash the transfer
case and/or front/rear axle output seals.
High pressure water can overcome the seals
and contaminate the fluid. Contaminated
fluid will decrease the life of the transfer
case and/or drive axles and should be
replaced.
Rear Axle
When to Check Lubricant
It is not necessary to regularly check the
rear axle fluid unless a leak is suspected or
an unusual noise is heard. A fluid loss could
indicate a problem. Have it inspected and
repaired. This service can be complex. See
your dealer.
Do not directly power wash the transfer
case and/or front/rear axle output seals.
High pressure water can overcome the seals
and contaminate the fluid. Contaminated
fluid will decrease the life of the transfer
case and/or drive axles and should be
replaced.
Noise Control System
NOISE EMISSIONS WARRANTY
General Motors LLC, warrants to the first
person who purchases this vehicle for
purposes other than resale and to each
subsequent purchaser that this vehicle as
manufactured by General Motors LLC, was
designed, built and equipped to conform at
the time it left General Motors LLC’s control
with all applicable U.S. EPA Noise Control
Regulations. This warranty covers this
vehicle as designed, built and equipped by
Page 357 of 440

GMC Sierra/Sierra Denali 2500 HD/3500 HD Owner Manual (GMNA-
Localizing-U.S./Canada-16908340) - 2024 - CRC - 12/7/22
Vehicle Care 355
8. Proceed to the passenger side front tire,and repeat the procedure in Step 7.
9. Proceed to the passenger side outer rear tire, and repeat the procedure in Step 7.
10. Proceed to the passenger side inner rear tire, and repeat the procedure in Step 7.
11. Proceed to the driver side outer rear tire, and repeat the procedure in Step 7.
12. Proceed to the driver side inner rear tire, and repeat the procedure in Step 7. The
horn sounds two times to indicate the
sensor identification code has been
matched to the driver side inner rear
tire, and the TPMS sensor matching
process is no longer active. The TIRE
LEARNING ACTIVE message on the DIC
display screen goes off.
13. Turn the vehicle off.
14. Set all six tires to the recommended air pressure level as indicated on the Tire
and Loading Information label.
TPMS Sensor Matching Process –Auto
Learn Function
Use this TPMS Sensor Matching Process if
your vehicle is equipped with single rear
wheels: Each TPMS sensor has a unique
identification code. The identification code
needs to be matched to a new tire/wheel
position after rotating the tires or replacing
one or more of the TPMS sensors. When a
tire is installed, the vehicle must be
stationary for about 20 minutes before the
system recalculates. The following relearn
process takes up to 10 minutes, driving at a
minimum speed of 20 km/h (12 mph).
A dash (-) or pressure value will display in
the DIC. See
Driver Information Center (DIC)
(Base Level) 0131 or
Driver Information Center (DIC) (Uplevel)
0 133. A warning message displays in the
DIC if a problem occurs during the relearn
process.
Trailer Tire Pressure Monitoring
Operation
If equipped, the Trailer Tire Pressure
Monitoring System (TTPMS) is designed to
monitor the pressure of the trailer tires and
warn the driver when a low pressure
condition exists. TTPMS sensors for four tires
are provided. The system can accommodate
a trailer with up to six tires if additional
sensors are purchased from the dealer. Also,
the system can be paired with up to five
individual trailers. Prior to use, the vehicle must learn the
sensors by following the learning process.
See
Trailering App 0296.
Contact your trailer service center or tire
service center to have the pressure sensors
installed inside the trailer tires. The
technician should insert the sensor stem
through the hole in the trailer wheel. When
the sensor is correctly positioned, the nut on
the sensor stem should be tightened to
8Y (6 lb ft). When mounting the trailer
tire onto the trailer wheel be careful not to
damage the sensor.
The Trailering App can be used to view the
tire pressures after the recommended trailer
tire pressures have been entered. Refer to
Page 367 of 440
GMC Sierra/Sierra Denali 2500 HD/3500 HD Owner Manual (GMNA-
Localizing-U.S./Canada-16908340) - 2024 - CRC - 12/7/22
Vehicle Care 365
If a tire goes flat, avoid further tire and
wheel damage by driving slowly to a level
place, well off the road, if possible. Turn on
the hazard warning flashers. SeeHazard
Warning Flashers 0146.
If your vehicle is loaded at or near
maximum cargo capacity, it may be difficult
to fit the jack under the vehicle due to the
environment (shoulder slope, road debris,
etc.). Removal of some weight may improve
the ability to fit the jack under the vehicle
at the correct jacking location.
{Warning
Changing a tire can be dangerous. The
vehicle can slip off the jack and roll over
or fall causing injury or death. Find a
level place to change the tire. To help
prevent the vehicle from moving:
1. Set the parking brake firmly.
2. Shift the vehicle to P (Park).
3. For vehicles with four-wheel drive with an N (Neutral) transfer case
position, be sure the transfer case is
in a drive gear —not in N (Neutral).
(Continued)
Warning (Continued)
4. Turn off the engine and do notrestart while the vehicle is raised.
5. Do not allow passengers to remain in the vehicle.
6. Place wheel blocks, if equipped, on both sides of the tire at the opposite
corner of the tire being changed.
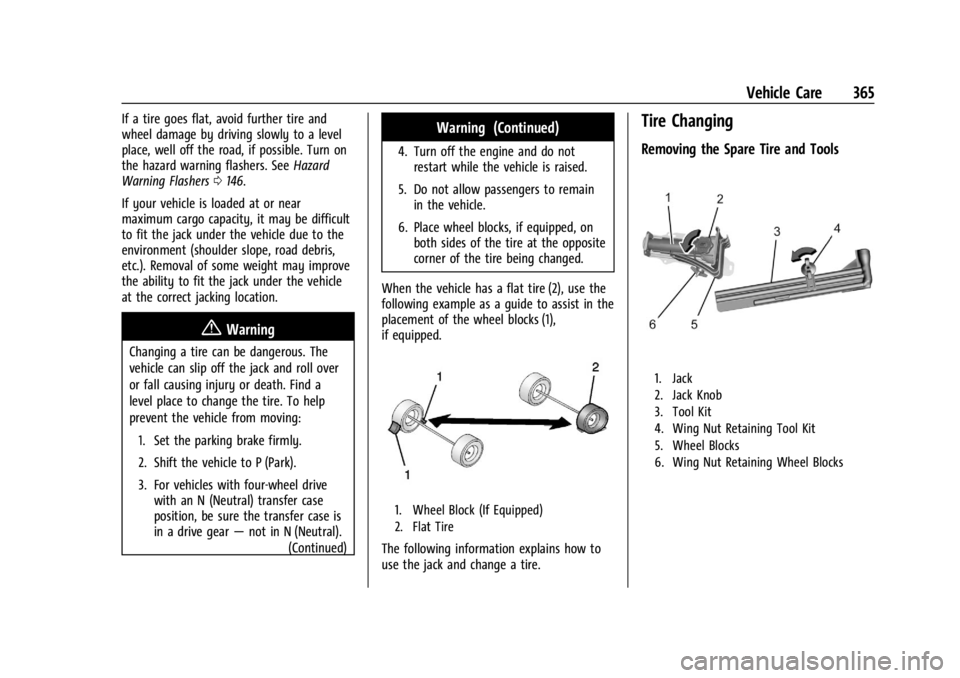
When the vehicle has a flat tire (2), use the
following example as a guide to assist in the
placement of the wheel blocks (1),
if equipped.
1. Wheel Block (If Equipped)
2. Flat Tire
The following information explains how to
use the jack and change a tire.
Tire Changing
Removing the Spare Tire and Tools
1. Jack
2. Jack Knob
3. Tool Kit
4. Wing Nut Retaining Tool Kit
5. Wheel Blocks
6. Wing Nut Retaining Wheel Blocks
Page 378 of 440

GMC Sierra/Sierra Denali 2500 HD/3500 HD Owner Manual (GMNA-
Localizing-U.S./Canada-16908340) - 2024 - CRC - 12/7/22
376 Vehicle Care
Caution
If the vehicle has four-wheel drive and a
different size spare tire is installed, do
not drive in four-wheel drive until the flat
tire is repaired and/or replaced. The
vehicle could be damaged and the repairs
would not be covered by the warranty.
Never use four-wheel drive when a
different size spare tire is installed on the
vehicle.
The vehicle may have a different size spare
tire than the road tires originally installed
on the vehicle. This spare tire was developed
for use on this vehicle, so it is all right to
drive on it. If the vehicle has four-wheel
drive and a different size spare tire is
installed, drive only in two-wheel drive.
If the vehicle has a spare tire that does not
match the vehicle’s original road tires and
wheels, in size and type, do not include the
spare in the tire rotation.
Jump Starting
Jump Starting - North America
For more information about the vehicle
battery, see Battery - North America 0327.
If the vehicle's battery (or batteries) has run
down, you may want to use another vehicle
and some jumper cables to start your
vehicle. Be sure to use the following steps
to do it safely.
{Warning
WARNING: Battery posts, terminals and
related accessories can expose you to
chemicals including lead and lead
compounds, which are known to the
State of California to cause cancer and
birth defects or other reproductive harm.
Wash hands after handling. For more
information go to
www.P65Warnings.ca.gov.
See California Proposition 65 Warning 01.
{Warning
Batteries can hurt you. They can be
dangerous because:
.They contain acid that can burn you.
.They contain gas that can explode or
ignite.
.They contain enough electricity to
burn you.
If you do not follow these steps exactly,
some or all of these things can hurt you.
Caution
Ignoring these steps could result in costly
damage to the vehicle that would not be
covered by the vehicle warranty. Trying
to start the vehicle by pushing or pulling
it will not work, and it could damage the
vehicle.
Caution
If the jumper cables are connected or
removed in the wrong order, electrical
shorting may occur and damage the
vehicle. The repairs would not be covered
(Continued)
Page 379 of 440
GMC Sierra/Sierra Denali 2500 HD/3500 HD Owner Manual (GMNA-
Localizing-U.S./Canada-16908340) - 2024 - CRC - 12/7/22
Vehicle Care 377
Caution (Continued)
by the vehicle warranty. Always connect
and remove the jumper cables in the
correct order, making sure that the cables
do not touch each other or other metal.
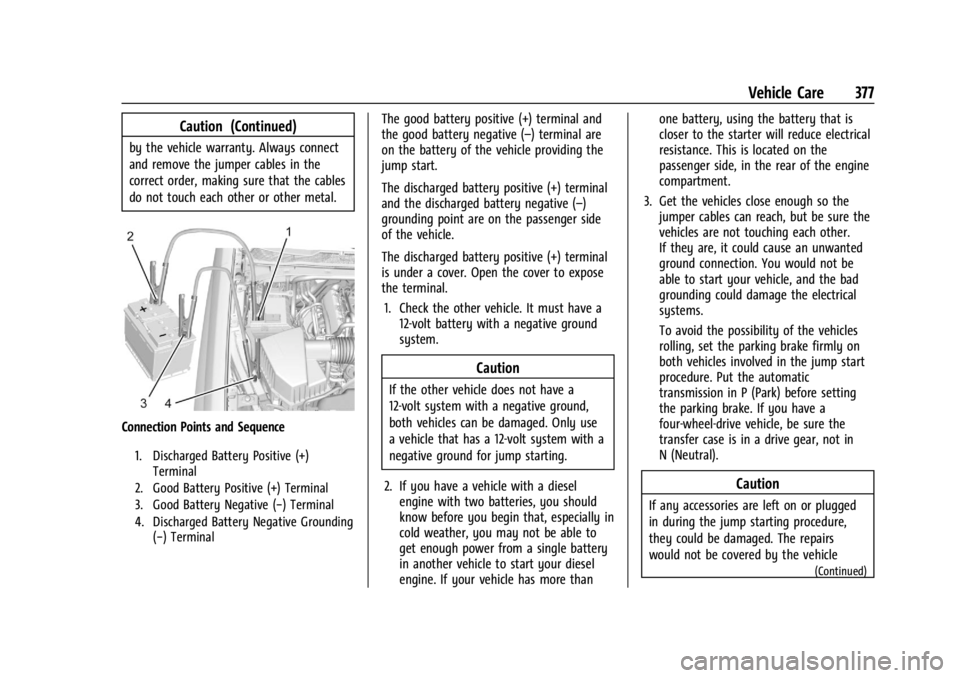
Connection Points and Sequence
1. Discharged Battery Positive (+)Terminal
2. Good Battery Positive (+) Terminal
3. Good Battery Negative (−) Terminal
4. Discharged Battery Negative Grounding (−) Terminal
The good battery positive (+) terminal and
the good battery negative (–) terminal are
on the battery of the vehicle providing the
jump start.
The discharged battery positive (+) terminal
and the discharged battery negative (–)
grounding point are on the passenger side
of the vehicle.
The discharged battery positive (+) terminal
is under a cover. Open the cover to expose
the terminal.
1. Check the other vehicle. It must have a 12-volt battery with a negative ground
system.
Caution
If the other vehicle does not have a
12-volt system with a negative ground,
both vehicles can be damaged. Only use
a vehicle that has a 12-volt system with a
negative ground for jump starting.
2. If you have a vehicle with a diesel engine with two batteries, you should
know before you begin that, especially in
cold weather, you may not be able to
get enough power from a single battery
in another vehicle to start your diesel
engine. If your vehicle has more than one battery, using the battery that is
closer to the starter will reduce electrical
resistance. This is located on the
passenger side, in the rear of the engine
compartment.
3. Get the vehicles close enough so the jumper cables can reach, but be sure the
vehicles are not touching each other.
If they are, it could cause an unwanted
ground connection. You would not be
able to start your vehicle, and the bad
grounding could damage the electrical
systems.
To avoid the possibility of the vehicles
rolling, set the parking brake firmly on
both vehicles involved in the jump start
procedure. Put the automatic
transmission in P (Park) before setting
the parking brake. If you have a
four-wheel-drive vehicle, be sure the
transfer case is in a drive gear, not in
N (Neutral).
Caution
If any accessories are left on or plugged
in during the jump starting procedure,
they could be damaged. The repairs
would not be covered by the vehicle
(Continued)
Page 383 of 440
GMC Sierra/Sierra Denali 2500 HD/3500 HD Owner Manual (GMNA-
Localizing-U.S./Canada-16908340) - 2024 - CRC - 12/7/22
Vehicle Care 381
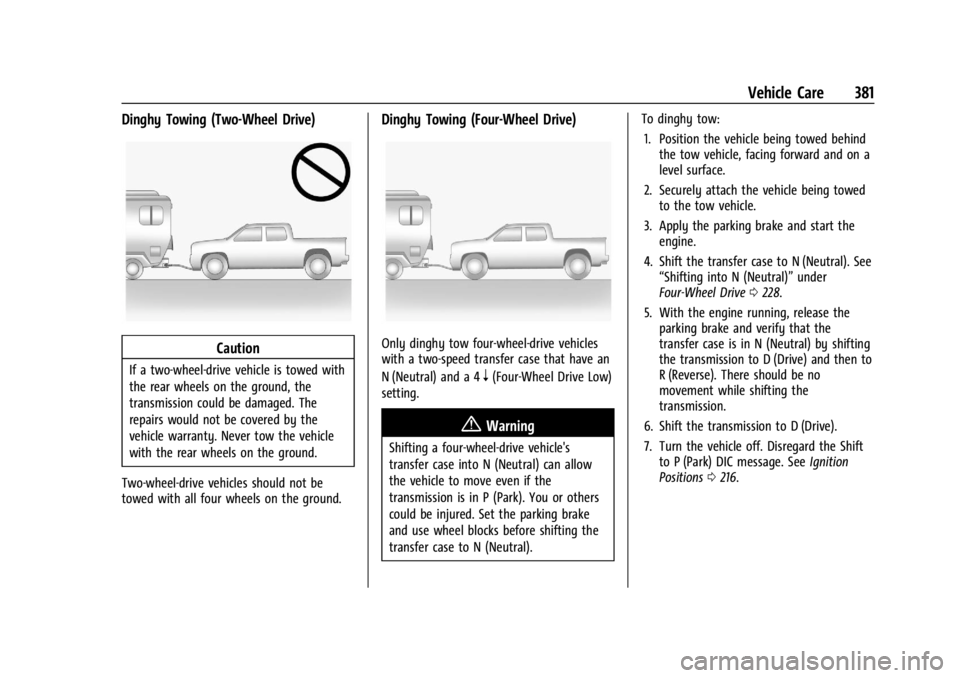
Dinghy Towing (Two-Wheel Drive)
Caution
If a two-wheel-drive vehicle is towed with
the rear wheels on the ground, the
transmission could be damaged. The
repairs would not be covered by the
vehicle warranty. Never tow the vehicle
with the rear wheels on the ground.
Two-wheel-drive vehicles should not be
towed with all four wheels on the ground.
Dinghy Towing (Four-Wheel Drive)
Only dinghy tow four-wheel-drive vehicles
with a two-speed transfer case that have an
N (Neutral) and a 4
n(Four-Wheel Drive Low)
setting.
{Warning
Shifting a four-wheel-drive vehicle's
transfer case into N (Neutral) can allow
the vehicle to move even if the
transmission is in P (Park). You or others
could be injured. Set the parking brake
and use wheel blocks before shifting the
transfer case to N (Neutral). To dinghy tow:
1. Position the vehicle being towed behind the tow vehicle, facing forward and on a
level surface.
2. Securely attach the vehicle being towed to the tow vehicle.
3. Apply the parking brake and start the engine.
4. Shift the transfer case to N (Neutral). See “Shifting into N (Neutral)” under
Four-Wheel Drive 0228.
5. With the engine running, release the parking brake and verify that the
transfer case is in N (Neutral) by shifting
the transmission to D (Drive) and then to
R (Reverse). There should be no
movement while shifting the
transmission.
6. Shift the transmission to D (Drive).
7. Turn the vehicle off. Disregard the Shift to P (Park) DIC message. See Ignition
Positions 0216.