2024 FORD F650/750 check engine light
[x] Cancel search: check engine lightPage 239 of 386
3.Rotate the drain counterclockwise untilthe O-ring is visible. Allow the dieselfuel conditioner module to drain forapproximately 25 seconds or untilclean fuel is observed. Rotate the drainclockwise to tighten it. If no liquiddrains, there may be a clog in the drain.Have the conditioner module servicedby an authorized dealer.
4.Make sure that you fully tighten thedrain valve and then remove thecontainer from under your vehicle.
5.Restart the engine. If the Water in FuelDrain Filter message and lightcontinues to illuminate, have the fuelsystem checked and repaired.
ENGINE COOLANT CHECK -
6.7L DIESEL
WARNING: Do not remove thecoolant reservoir cap when the engine ison or the cooling system is hot. Wait 10minutes for the cooling system to cooldown. Cover the coolant reservoir capwith a thick cloth to prevent thepossibility of scalding and slowly removethe cap. Failure to follow this instructioncould result in personal injury.
WARNING: To reduce the risk ofpersonal injury, make sure the engine iscool before unscrewing the coolantpressure relief cap. The cooling systemis under pressure. Steam and hot liquidcan come out forcefully when you loosenthe cap slightly.
When the engine is cold, check theconcentration and level of the coolant atthe intervals listed in the scheduledmaintenance information. See ScheduledMaintenance (page 325).
Note:Make sure that the coolant level isbetween the MIN and the MAX marks onthe coolant reservoir.
Note: Coolant expands when it is hot. Thelevel may extend beyond the MAX mark.
Maintain coolant concentration within48% to 50%, which equates to a freezepoint between -30°F (-34°C) and -34°F(-37°C). Coolant concentration should bechecked using a refractometer. We do notrecommend the use of hydrometers orcoolant test strips for measuring coolantconcentration.
Adding Coolant
WARNING: Do not put coolant inthe windshield washer reservoir. Ifsprayed on the windshield, coolant couldmake it difficult to see through thewindshield.
WARNING: Do not add coolantfurther than the MAX mark.
WARNING: Do not add coolantwhen the vehicle is on or the coolingsystem is hot. Failure to follow thisinstruction could result in personal injury.
WARNING: Do not remove thecoolant reservoir cap when the engine ison or the cooling system is hot. Wait 10minutes for the cooling system to cooldown. Cover the coolant reservoir capwith a thick cloth to prevent thepossibility of scalding and slowly removethe cap. Failure to follow this instructioncould result in personal injury.
Note: Automotive fluids are notinterchangeable. Do not use coolant orwindshield washer fluid outside of itsspecified function and vehicle location.
235
2024 F-650/750 (TBC) , enUSA, Edition date: 202210, First-PrintingMaintenance
Page 240 of 386
Note: Do not use stop leak pellets, coolingsystem sealants, or non-specified additivesas they can cause damage to the enginecooling or heating systems. Resultingcomponent damage may not be covered bythe vehicle warranty.
It is very important to use predilutedcoolant approved to the correctspecification to avoid plugging the smallpassageways in the engine cooling system.See Cooling System Capacity andSpecification (page 301). Do not mixdifferent colors or types of coolant in yourvehicle. Mixing of engine coolants or usingan incorrect coolant may harm the engineor cooling system components and maynot be covered by the vehicle warranty.
Note: Coolants marketed for all makes andmodels may not be approved to Fordspecifications and may cause damage tothe cooling system. Resulting componentdamage may not be covered by the vehicleWarranty.
If the coolant level is at or below theminimum mark, add prediluted coolantimmediately.
For vehicles with overflow coolant systemswith a non-pressurized cap on the coolantrecovery system, add coolant to thecoolant recovery reservoir when the engineis cool. Add prediluted coolant to themaximum level. For all vehicles which havea coolant degas system with a pressurizedcap, or if it is necessary to remove thecoolant pressure relief cap on the radiator,follow these steps to add engine coolant:
1.Turn the engine off and let it cool.
2.Unscrew the cap slowly. Any pressureescapes as you unscrew the cap.
3.Fill the coolant reservoir slowly withprediluted engine coolant to within theminimum and maximum range on theengine coolant reservoir. If youremoved the radiator cap in anoverflow system, fill the radiator until
the coolant is visible and the radiatoris almost full. If coolant is added tobring the level within the minimum andmaximum range when the engine is notcold, the system may remain underfilled.
4.Replace the coolant reservoir cap, turnit clockwise until you feel a strongresistance.
5.Check the coolant level in the coolantreservoir the next few times you driveyour vehicle. If necessary, add enoughprediluted engine coolant to bring thecoolant level to the proper level.
Note:If prediluted coolant is not available,use the approved antifreeze concentratediluting it to 50/50 with distilled water. SeeCooling System Capacity andSpecification (page 301). Using water thathas not been deionized may contribute todeposit formation, corrosion or plugging ofthe small cooling system passageways.
If you have to add more than 1.1 qt (1 L) ofengine coolant per month, have yourvehicle checked as soon as possible.Operating an engine with a low level ofcoolant can result in engine overheatingand possible engine damage.
Note:During normal vehicle operation, thecoolant may change color from orange topink or light red. As long as the coolant isclear and uncontaminated, this color changedoes not indicate the coolant has degradednor does it require the coolant to be drained,the system to be flushed, or the coolant tobe replaced.
In case of emergency, you can add a largeamount of water without predilutedcoolant to reach a vehicle service location.On arrival do the following:
1.Drain the cooling system.
2.Chemically clean the cooling system.We recommend Motorcraft PremiumCooling System Flush.
236
2024 F-650/750 (TBC) , enUSA, Edition date: 202210, First-PrintingMaintenance
Page 243 of 386
WARNING: To reduce the risk ofpersonal injury, make sure the engine iscool before unscrewing the coolantpressure relief cap. The cooling systemis under pressure. Steam and hot liquidcan come out forcefully when you loosenthe cap slightly.
WARNING: Do not add coolantfurther than the MAX mark.
When the engine is cold, check theconcentration and level of the coolant atthe intervals listed in the scheduledmaintenance information. See ScheduledMaintenance (page 325).
Note:Make sure that the coolant level isbetween the MIN and MAX marks on thecoolant reservoir.
Note: Coolant expands when it is hot. Thelevel may extend beyond the MAX mark.
Maintain coolant concentration within48% to 50%, which equates to a freezepoint between -30°F (-34°C) and -34°F(-37°C). Check the coolant concentrationusing a refractometer. We do notrecommend the use of hydrometers orcoolant test strips for measuring coolantconcentration.
Adding Coolant
WARNING: Do not add enginecoolant when the engine is on or thecooling system is hot. Failure to followthis instruction could result in personalinjury.
WARNING: Do not remove thecoolant reservoir cap when the engine ison or the cooling system is hot. Wait 10minutes for the cooling system to cooldown. Cover the coolant reservoir capwith a thick cloth to prevent thepossibility of scalding and slowly removethe cap. Failure to follow this instructioncould result in personal injury.
Note: Automotive fluids are notinterchangeable. Do not use coolant orwindshield washer fluid outside of itsspecified function and vehicle location.
Note: Do not use stop leak pellets, coolingsystem sealants, or non-specified additivesas they can cause damage to the enginecooling or heating systems. Resultingcomponent damage may not be covered bythe vehicle Warranty.
It is very important to use predilutedcoolant approved to the correctspecification in order to avoid plugging thesmall passageways in the engine coolingsystem. See Cooling System Capacityand Specification (page 302). Do not mixdifferent colors or types of coolant in yourvehicle. Mixing of engine coolants or usingan incorrect coolant may harm the engineor cooling system components and maynot be covered by the vehicle Warranty.
Note: Coolants marketed for all makes andmodels may not be approved to ourspecifications and may cause damage tothe cooling system. Resulting componentdamage may not be covered by the vehicleWarranty.
If the coolant level is at or below theminimum mark, add prediluted coolantimmediately.
239
2024 F-650/750 (TBC) , enUSA, Edition date: 202210, First-PrintingMaintenance
Page 244 of 386
For vehicles with overflow coolant systemswith a non-pressurized cap on the coolantrecovery system, add coolant to thecoolant recovery reservoir when the engineis cool. Add prediluted coolant to themaximum level. For all vehicles which havea coolant degas system with a pressurizedcap, or if it is necessary to remove thecoolant pressure relief cap on the radiator,follow these steps to add engine coolant:
1.Turn the engine off and let it cool.
2.Unscrew the cap slowly. Any pressureescapes as you unscrew the cap.
3.Fill the coolant reservoir slowly withprediluted engine coolant to within theminimum and maximum range on theengine coolant reservoir. If youremoved the radiator cap in anoverflow system, fill the radiator untilthe coolant is visible and the radiatoris almost full. If coolant is added tobring the level within the minimum andmaximum range when the engine is notcold, the system may remainunderfilled.
4.Replace the coolant reservoir cap. Turnthe cap clockwise until it contacts thehard stop.
5.Check the coolant level in the coolantreservoir the next few times you driveyour vehicle. If necessary, add enoughprediluted engine coolant to bring thecoolant level to the proper level.
Note:If prediluted coolant is not available,use the approved antifreeze concentratediluting it to 50/50 with distilled water. SeeCooling System Capacity andSpecification (page 302). Using water thathas not been deionized may contribute todeposit formation, corrosion or plugging ofthe small cooling system passageways.
If you have to add more than 1.1 qt (1 L) ofengine coolant per month, have yourvehicle checked as soon as possible.Operating an engine with a low level ofcoolant can result in engine overheatingand possible engine damage.
Note:During normal vehicle operation, thecoolant may change color from orange topink or light red. As long as the coolant isclear and uncontaminated, this color changedoes not indicate the coolant has degradednor does it require the coolant to be drained,the system to be flushed, or the coolant tobe replaced.
Note:In case of emergency, you can add alarge amount of water without coolant inorder to reach a vehicle service location.Water alone, without coolant, can causeengine damage from corrosion, overheatingor freezing. When you reach a servicelocation, you must have the cooling systemdrained, flushed and refilled using thecorrect specification prediluted coolant orantifreeze concentrate. See CoolingSystem Capacity and Specification (page302).
Do not use the following as a coolantsubstitute:
•Alcohol.
•Methanol.
•Brine.
•Any coolant mixed with alcohol ormethanol antifreeze.
Alcohol and other liquids can cause enginedamage from overheating or freezing.
Do not add extra inhibitors or additives tothe coolant. These can be harmful andcompromise the corrosion protection ofthe coolant.
Recycled Coolant
We do not recommend the use of recycledcoolant as an approved recycling processis not yet available.
240
2024 F-650/750 (TBC) , enUSA, Edition date: 202210, First-PrintingMaintenance
Page 250 of 386
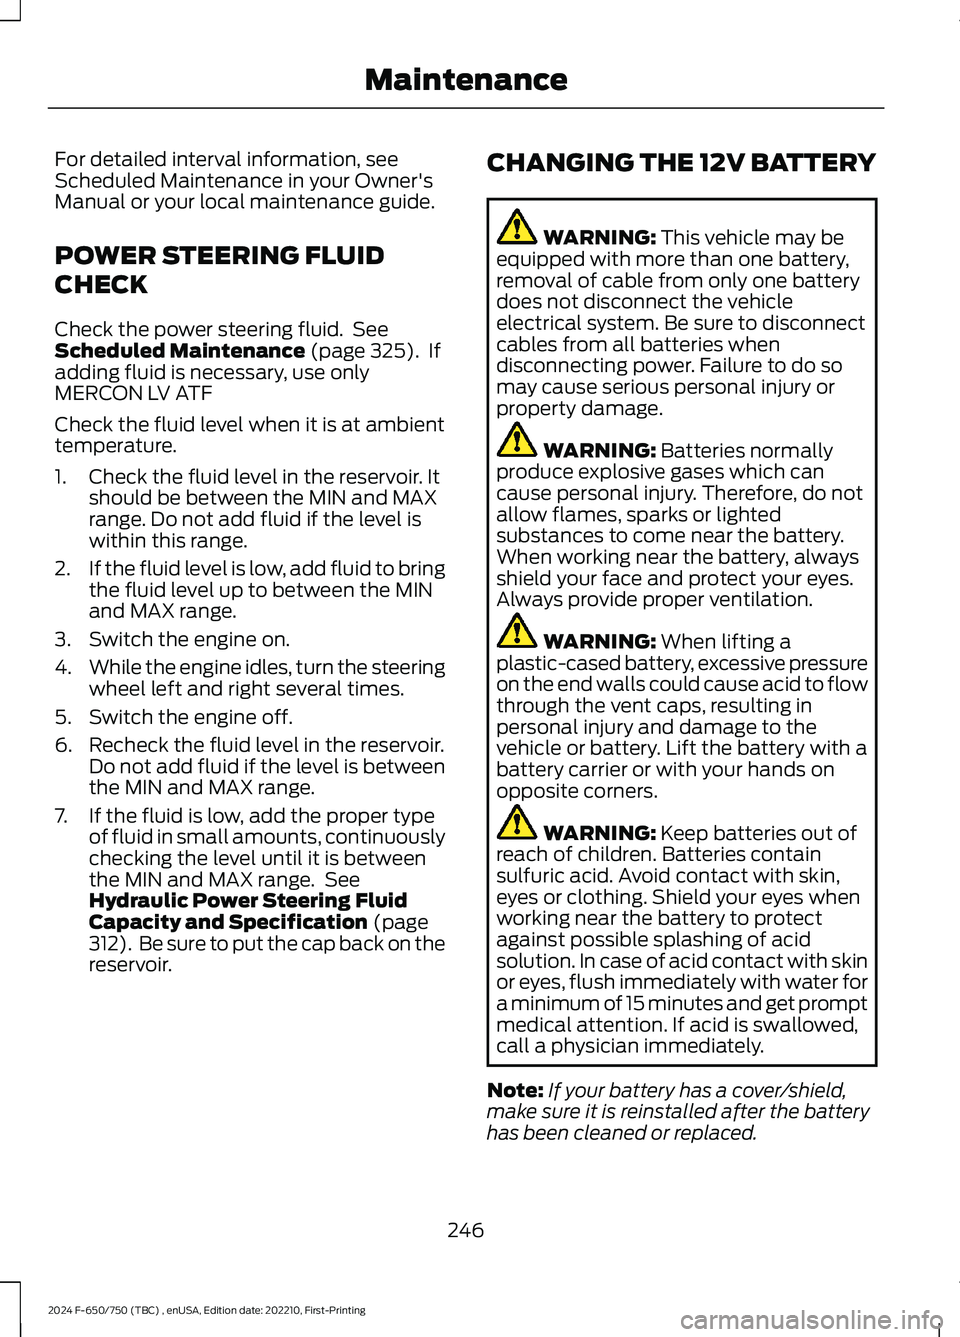
For detailed interval information, seeScheduled Maintenance in your Owner'sManual or your local maintenance guide.
POWER STEERING FLUID
CHECK
Check the power steering fluid. SeeScheduled Maintenance (page 325). Ifadding fluid is necessary, use onlyMERCON LV ATF
Check the fluid level when it is at ambienttemperature.
1.Check the fluid level in the reservoir. Itshould be between the MIN and MAXrange. Do not add fluid if the level iswithin this range.
2.If the fluid level is low, add fluid to bringthe fluid level up to between the MINand MAX range.
3.Switch the engine on.
4.While the engine idles, turn the steeringwheel left and right several times.
5.Switch the engine off.
6.Recheck the fluid level in the reservoir.Do not add fluid if the level is betweenthe MIN and MAX range.
7.If the fluid is low, add the proper typeof fluid in small amounts, continuouslychecking the level until it is betweenthe MIN and MAX range. SeeHydraulic Power Steering FluidCapacity and Specification (page312). Be sure to put the cap back on thereservoir.
CHANGING THE 12V BATTERY
WARNING: This vehicle may beequipped with more than one battery,removal of cable from only one batterydoes not disconnect the vehicleelectrical system. Be sure to disconnectcables from all batteries whendisconnecting power. Failure to do somay cause serious personal injury orproperty damage.
WARNING: Batteries normallyproduce explosive gases which cancause personal injury. Therefore, do notallow flames, sparks or lightedsubstances to come near the battery.When working near the battery, alwaysshield your face and protect your eyes.Always provide proper ventilation.
WARNING: When lifting aplastic-cased battery, excessive pressureon the end walls could cause acid to flowthrough the vent caps, resulting inpersonal injury and damage to thevehicle or battery. Lift the battery with abattery carrier or with your hands onopposite corners.
WARNING: Keep batteries out ofreach of children. Batteries containsulfuric acid. Avoid contact with skin,eyes or clothing. Shield your eyes whenworking near the battery to protectagainst possible splashing of acidsolution. In case of acid contact with skinor eyes, flush immediately with water fora minimum of 15 minutes and get promptmedical attention. If acid is swallowed,call a physician immediately.
Note:If your battery has a cover/shield,make sure it is reinstalled after the batteryhas been cleaned or replaced.
246
2024 F-650/750 (TBC) , enUSA, Edition date: 202210, First-PrintingMaintenance
Page 332 of 386
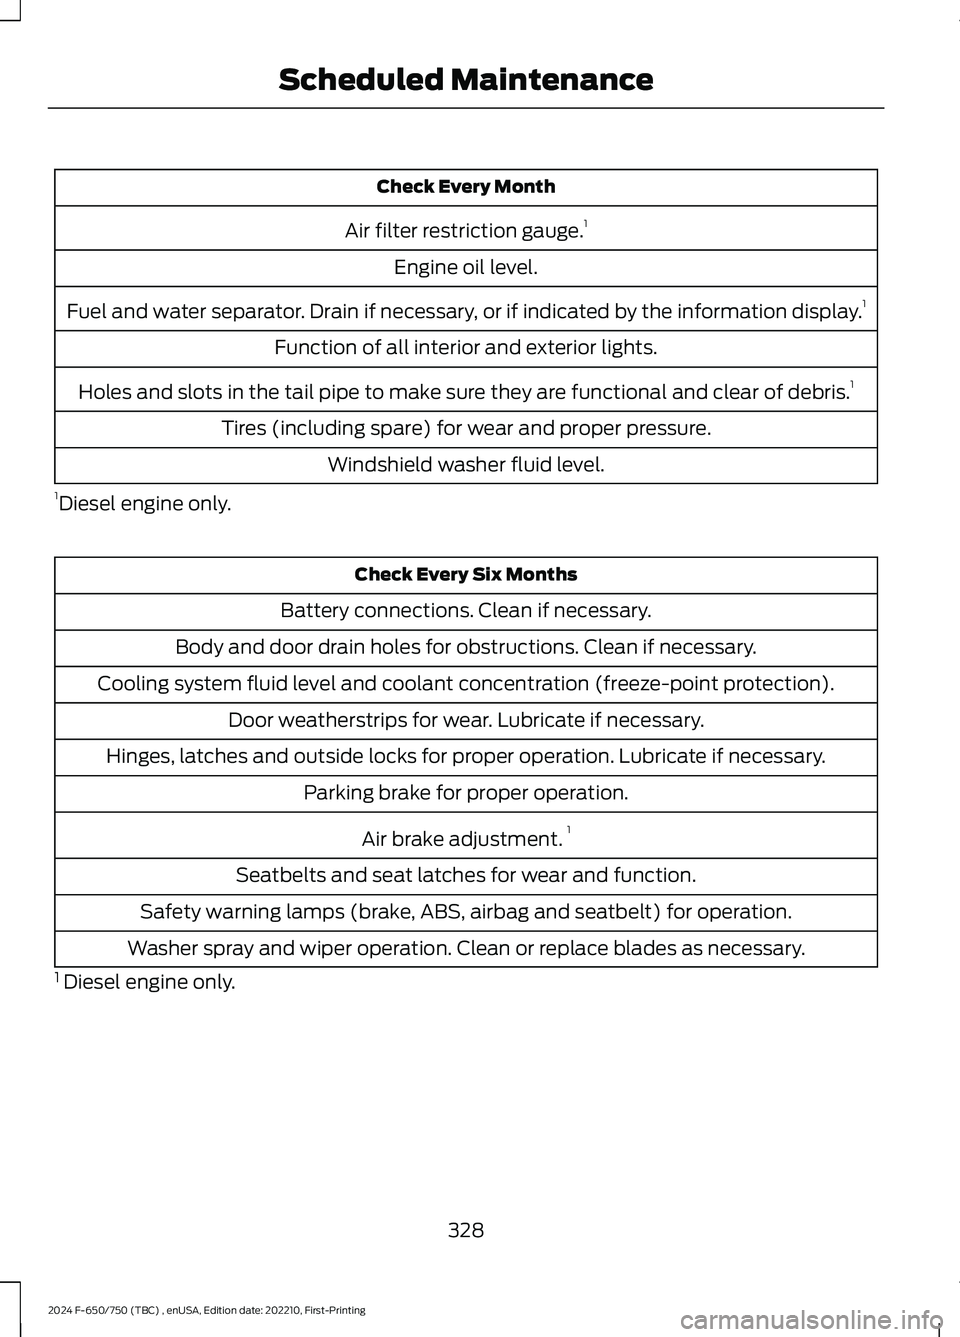
Check Every Month
Air filter restriction gauge.1
Engine oil level.
Fuel and water separator. Drain if necessary, or if indicated by the information display.1
Function of all interior and exterior lights.
Holes and slots in the tail pipe to make sure they are functional and clear of debris.1
Tires (including spare) for wear and proper pressure.
Windshield washer fluid level.
1Diesel engine only.
Check Every Six Months
Battery connections. Clean if necessary.
Body and door drain holes for obstructions. Clean if necessary.
Cooling system fluid level and coolant concentration (freeze-point protection).
Door weatherstrips for wear. Lubricate if necessary.
Hinges, latches and outside locks for proper operation. Lubricate if necessary.
Parking brake for proper operation.
Air brake adjustment.1
Seatbelts and seat latches for wear and function.
Safety warning lamps (brake, ABS, airbag and seatbelt) for operation.
Washer spray and wiper operation. Clean or replace blades as necessary.
1 Diesel engine only.
328
2024 F-650/750 (TBC) , enUSA, Edition date: 202210, First-PrintingScheduled Maintenance
Page 348 of 386
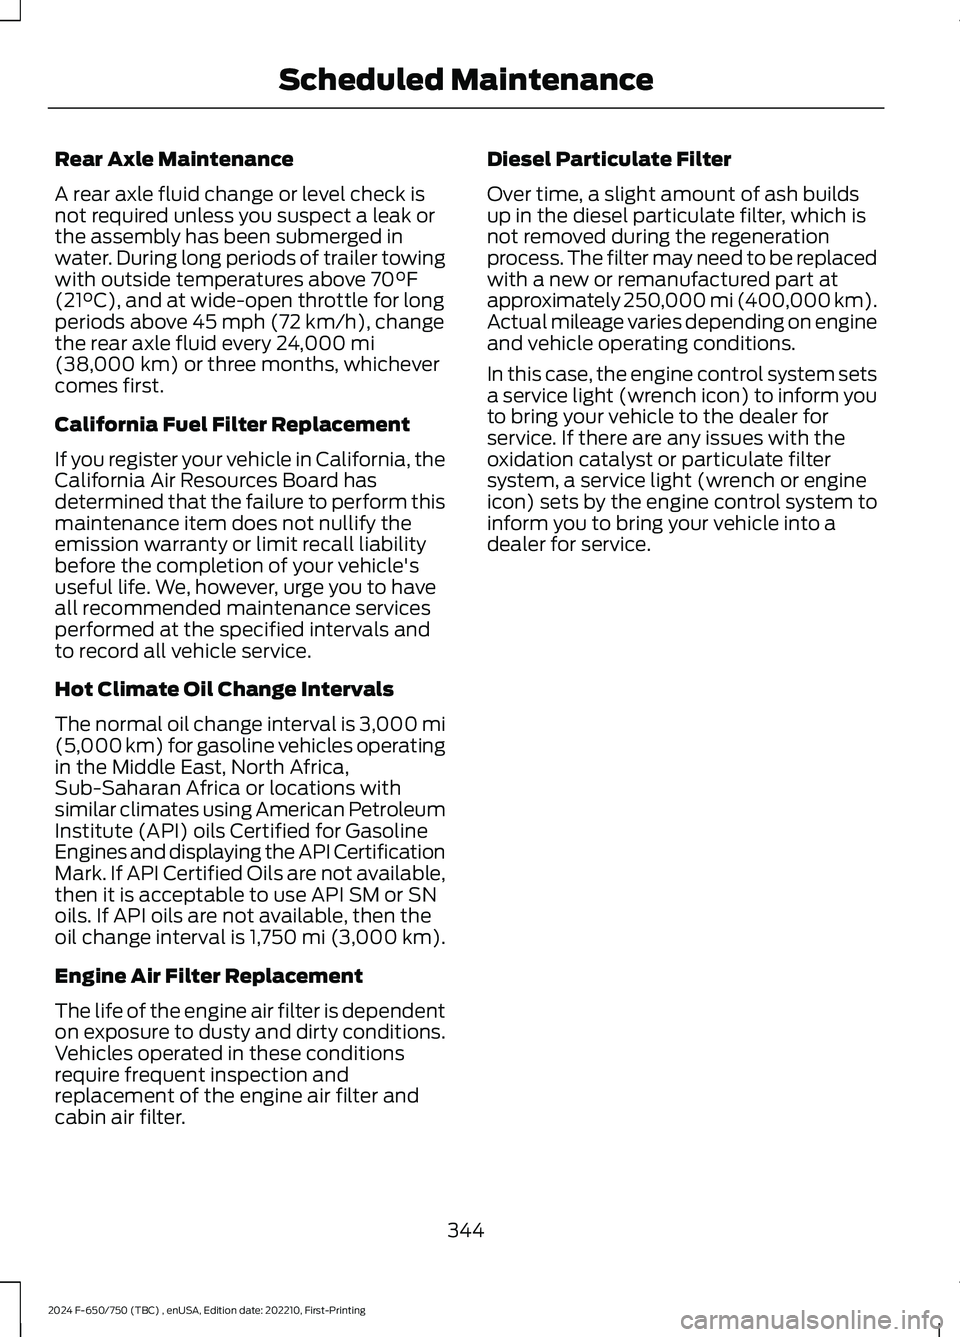
Rear Axle Maintenance
A rear axle fluid change or level check isnot required unless you suspect a leak orthe assembly has been submerged inwater. During long periods of trailer towingwith outside temperatures above 70°F(21°C), and at wide-open throttle for longperiods above 45 mph (72 km/h), changethe rear axle fluid every 24,000 mi(38,000 km) or three months, whichevercomes first.
California Fuel Filter Replacement
If you register your vehicle in California, theCalifornia Air Resources Board hasdetermined that the failure to perform thismaintenance item does not nullify theemission warranty or limit recall liabilitybefore the completion of your vehicle'suseful life. We, however, urge you to haveall recommended maintenance servicesperformed at the specified intervals andto record all vehicle service.
Hot Climate Oil Change Intervals
The normal oil change interval is 3,000 mi(5,000 km) for gasoline vehicles operatingin the Middle East, North Africa,Sub-Saharan Africa or locations withsimilar climates using American PetroleumInstitute (API) oils Certified for GasolineEngines and displaying the API CertificationMark. If API Certified Oils are not available,then it is acceptable to use API SM or SNoils. If API oils are not available, then theoil change interval is 1,750 mi (3,000 km).
Engine Air Filter Replacement
The life of the engine air filter is dependenton exposure to dusty and dirty conditions.Vehicles operated in these conditionsrequire frequent inspection andreplacement of the engine air filter andcabin air filter.
Diesel Particulate Filter
Over time, a slight amount of ash buildsup in the diesel particulate filter, which isnot removed during the regenerationprocess. The filter may need to be replacedwith a new or remanufactured part atapproximately 250,000 mi (400,000 km).Actual mileage varies depending on engineand vehicle operating conditions.
In this case, the engine control system setsa service light (wrench icon) to inform youto bring your vehicle to the dealer forservice. If there are any issues with theoxidation catalyst or particulate filtersystem, a service light (wrench or engineicon) sets by the engine control system toinform you to bring your vehicle into adealer for service.
344
2024 F-650/750 (TBC) , enUSA, Edition date: 202210, First-PrintingScheduled Maintenance
Page 384 of 386

Information Displays......................................71General Information.............................................71Information Messages..................................75Installing Child Restraints............................27Instrument Cluster........................................64Instrument Lighting Dimmer.....................56Instrument Panel............................................24Interior Lamps.................................................58Interior Mirror...................................................63Introduction.........................................................7
J
Jump Starting the Vehicle.........................190
K
Keys and Remote Controls........................46
L
Lane Keeping System..................................167Lighting Control..............................................55Lighting..............................................................55General Information............................................55Load Carrying.................................................178Load Limit........................................................178Locating the USB Ports...............................98Locking and Unlocking.................................49Lug NutsSee: Changing a Road Wheel........................287
M
Maintenance..................................................222General Information..........................................222Manual Climate Control..............................86Manual Seats....................................................91Message CenterSee: Information Displays..................................71MirrorsSee: Windows and Mirrors...............................60Mobile Communications Equipment.......17Motorcraft Parts - 6.7L Diesel.................293Motorcraft Parts - 7.3L...............................295
N
Noise Pollution Control................................22Normal Scheduled Maintenance..........330
O
Oil Change Indicator Reset......................229Oil CheckSee: Engine Oil Check.......................................227Opening and Closing the Hood..............223Ordering Additional Owner'sLiterature.....................................................200Overhead Console.......................................100
P
Parking Aids....................................................157Parking Brake.................................................140Passive Anti-Theft System..........................51PATSSee: Passive Anti-Theft System......................51Perchlorate........................................................15Playing Media From a USB Device.........318Playing Media Using the USB Port..........98Pneumatic Locking DifferentialIndicators......................................................138Pneumatic Locking Differential...............137Pneumatic Locking DifferentialPrecautions..................................................137Power Door LocksSee: Locking and Unlocking.............................49Power Seats.....................................................92Power Steering Fluid Check....................246Power Take-Off.............................................135Power Windows.............................................60Pre-Collision Assist - Vehicles With: AirBrakes.............................................................170Pre-Collision Assist - Vehicles With:Hydraulic Brakes.........................................173Protecting the Environment.......................22PunctureSee: Changing a Road Wheel........................287
380
2024 F-650/750 (TBC) , enUSA, Edition date: 202210, First-PrintingIndex