2024 FORD F650/750 oil change
[x] Cancel search: oil changePage 192 of 386
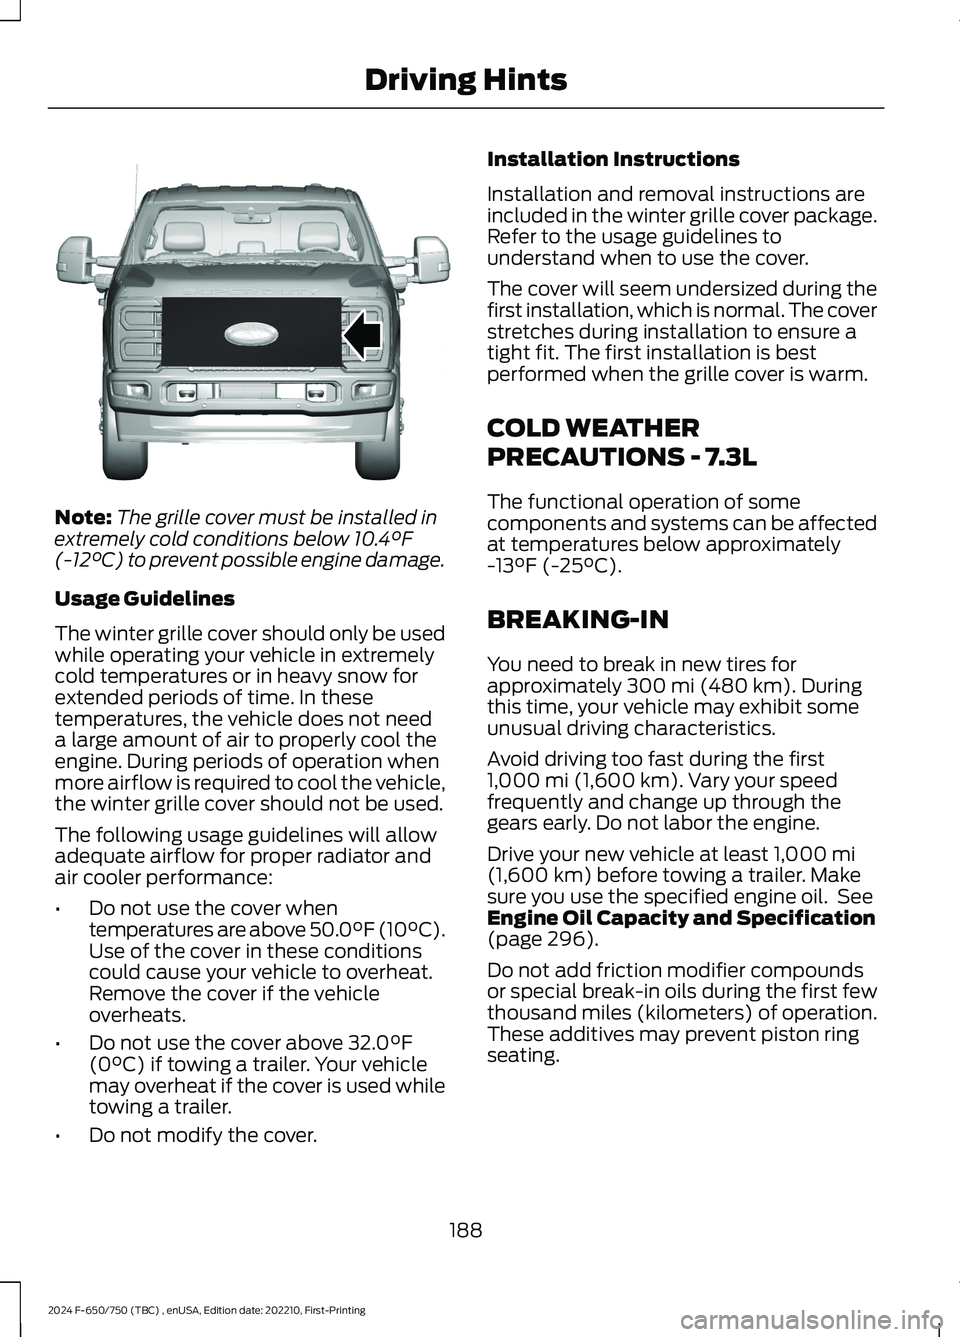
Note:The grille cover must be installed inextremely cold conditions below 10.4°F(-12°C) to prevent possible engine damage.
Usage Guidelines
The winter grille cover should only be usedwhile operating your vehicle in extremelycold temperatures or in heavy snow forextended periods of time. In thesetemperatures, the vehicle does not needa large amount of air to properly cool theengine. During periods of operation whenmore airflow is required to cool the vehicle,the winter grille cover should not be used.
The following usage guidelines will allowadequate airflow for proper radiator andair cooler performance:
•Do not use the cover whentemperatures are above 50.0°F (10°C).Use of the cover in these conditionscould cause your vehicle to overheat.Remove the cover if the vehicleoverheats.
•Do not use the cover above 32.0°F(0°C) if towing a trailer. Your vehiclemay overheat if the cover is used whiletowing a trailer.
•Do not modify the cover.
Installation Instructions
Installation and removal instructions areincluded in the winter grille cover package.Refer to the usage guidelines tounderstand when to use the cover.
The cover will seem undersized during thefirst installation, which is normal. The coverstretches during installation to ensure atight fit. The first installation is bestperformed when the grille cover is warm.
COLD WEATHER
PRECAUTIONS - 7.3L
The functional operation of somecomponents and systems can be affectedat temperatures below approximately-13°F (-25°C).
BREAKING-IN
You need to break in new tires forapproximately 300 mi (480 km). Duringthis time, your vehicle may exhibit someunusual driving characteristics.
Avoid driving too fast during the first1,000 mi (1,600 km). Vary your speedfrequently and change up through thegears early. Do not labor the engine.
Drive your new vehicle at least 1,000 mi(1,600 km) before towing a trailer. Makesure you use the specified engine oil. SeeEngine Oil Capacity and Specification(page 296).
Do not add friction modifier compoundsor special break-in oils during the first fewthousand miles (kilometers) of operation.These additives may prevent piston ringseating.
188
2024 F-650/750 (TBC) , enUSA, Edition date: 202210, First-PrintingDriving HintsE391665
Page 217 of 386
VEHICLE INSPECTION
INFORMATION
To make sure your vehicle is ready tooperate, conduct a pre-trip inspection atthe beginning of each work period. Followthe steps listed in this section to verify aproper vehicle inspection procedure.
WARNING: Exercise great cautionwhen working on a vehicle equipped withan automatic fan clutch. The fan startsin motion only after the engine coolantreaches a predetermined temperatureor the refrigerant pressure (if equippedwith air conditioning) reaches apredetermined setting. The fan starts atthis point with no advance warning.Never reach near, or permit objects toprotrude into, the fan blade radius whilethe engine is running as this could resultin vehicle damage, personal injury ordeath.
WARNING: Do not operate thevehicle if any suspension conditionslisted in the following charts are evident.Loss of steering or suspension couldresult in property damage, personal injuryor death.
WARNING: If a wheel must bechanged, obtain expert tire service help.Mounting and un-mounting of tiresshould only be performed by a qualifiedtechnician using necessary safetyprocedures and equipment, otherwisethe result could be property damage,personal injury or death.
Note:Always make sure you apply theparking brake before starting the engine.
Engine compartment (with engine off)
Use the dipstick to verify the oil level is in the proper operatingrange. See Engine Oil Dipstick (page 227).Engine oil
Look through the plastic reservoir and verify the coolant levelis within the proper operating range. Do not remove thepressure cap until the coolant has cooled. See EngineCoolant Check (page 238).
Engine coolant
Verify that the fluid level is in the proper operating range. SeePower Steering Fluid Check (page 246).Power steering fluid
Remove the master cylinder caps and inspect the fluid level.See Brake Fluid Check (page 245).Brake fluid
213
2024 F-650/750 (TBC) , enUSA, Edition date: 202210, First-PrintingVehicle Inspection Guide
Page 232 of 386

Do not use supplemental engine oiladditives because they are unnecessaryand could lead to engine damage that thevehicle warranty may not cover.
1.Clean the area surrounding the engineoil filler cap before you remove it.
2.Remove the engine oil filler cap.
3.Add engine oil that meets ourspecifications. See Capacities andSpecifications (page 291).
4.Reinstall the engine oil filler cap. Turnit clockwise until you feel a strongresistance.
Note: Do not add oil further than themaximum mark. Oil levels above themaximum mark may cause engine damage.
Note:Immediately soak up any oil spillagewith an absorbent cloth.
Engine Oil Pressure Warning Lamp
WARNING: If it illuminates whenyou are driving do not continue yourjourney, even if the oil level is correct.Have your vehicle checked.
It illuminates when you switchthe ignition on.
If it illuminates when the engineis running this indicates a malfunction.Stop your vehicle as soon as it is safe todo so and switch the engine off. Check theengine oil level. If the oil level is sufficient,this indicates a system malfunction. Haveyour vehicle checked as soon as possible.
CHANGING THE ENGINE OIL
AND OIL FILTER
WARNING: Do not add engine oilwhen the engine is hot. Failure to followthis instruction could result in personalinjury.
Your vehicle has an Intelligent Oil LifeMonitor™ that calculates the proper oilchange service interval. When theinformation display indicates: OIL CHANGEREQUIRED, change the engine oil and oilfilter. See Information Displays (page71).
The engine oil filter protects your engineby filtering harmful, abrasive or sludgeparticles and particles significantly smallerthan most available will-fit filters. SeeMotorcraft Parts (page 293).
1.Unscrew the oil filter and oil pan drainplug and wait for the oil to drain.
2.Replace the filter.
3.Reinstall the oil pan drain plug.
4.Refill the engine with new oil. SeeEngine Oil Capacity andSpecification (page 299).
5.Reset the Intelligent Oil Life Monitor™.See Information Displays (page 71).
Engine Lubrication for SevereService Operation
The following conditions define severeoperation:
•Frequent or extended idling such asover 10 minutes per hour of normaldriving.
•Low-speed operation or stationary use.
•If the vehicle is operated in sustained,ambient temperatures below -9°F(-23°C) or above 100°F (38°C).
228
2024 F-650/750 (TBC) , enUSA, Edition date: 202210, First-PrintingMaintenanceE67022
Page 233 of 386
•Frequent low-speed operation, orconsistent heavy traffic less than25 mph (40 km/h).
•Operating in severe dust conditions.
•Operating the vehicle off road.
•Towing a trailer over 1,000 mi(1,600 km).
•Sustained, high-speed driving at thegross vehicle weight rating.
•Use of fuels with sulfur content otherthan ultra-low sulfur diesel (ULSD).
•Use of high-sulfur diesel fuel.
Only use engine oil that meets ourspecifications. See Capacities andSpecifications (page 291).
OIL CHANGE INDICATOR
RESET
Base Cluster
Use the information display controls onthe steering wheel to reset the oil changeindicator.
From the main menu scroll to:
Action and DescriptionMessage
Press the right arrow button,then from this menu scrollto the following message.
Settings
Press the down arrowbutton, then from this menuscroll to the followingmessage.
Vehicle
Press the right arrow button,then from this menu scrollto the following message.
Oil LifeReset
Press and hold the OKbutton until the instrumentcluster displays thefollowing message.
Oil LifeHold toReset
Action and DescriptionMessage
Press and hold the OKbutton until the instrumentcluster displays thefollowing message.
Oil LifeHold OKto Reset
Reset Complete
If the instrument clusterdisplays the followingmessage, repeat theprocess.
Reset Cancelled
High Series Cluster
Use the information display controls onthe steering wheel to reset the oil changeindicator.
From the main menu scroll to:
Action and DescriptionMessage
Press the down arrowbutton, then from this menuscroll to the followingmessage.
Truck Info
Press the OK button.Mainten-anceMonitor
Press the down arrowbutton, then from this menuscroll to the followingmessage.
Oil Life:xxx%
Press the OK button.Oil Life
Press and hold the OKbutton until the instrumentcluster displays thefollowing message.
Oil LifeHold OK toReset
229
2024 F-650/750 (TBC) , enUSA, Edition date: 202210, First-PrintingMaintenance
Page 234 of 386
Action and DescriptionMessage
Oil Life: 100%
When the oil change indic-ator resets, the instrumentcluster displays 100%.
Repeat the process if the oilchange indicator does notreset.
CHANGING THE ENGINE AIR
FILTER - 6.7L DIESEL
Air Filter Restriction Gauge
WARNING: To reduce the risk ofvehicle damage and personal burninjuries, do not start your engine with theair cleaner removed and do not removeit while the engine is running.
Note:Operating your vehicle in heavysnowfall or extreme rain conditions mayallow excessive amounts of snow or waterinto the air intake system. This could plugor soak the air filter and cause the engine tolose power or shut down.
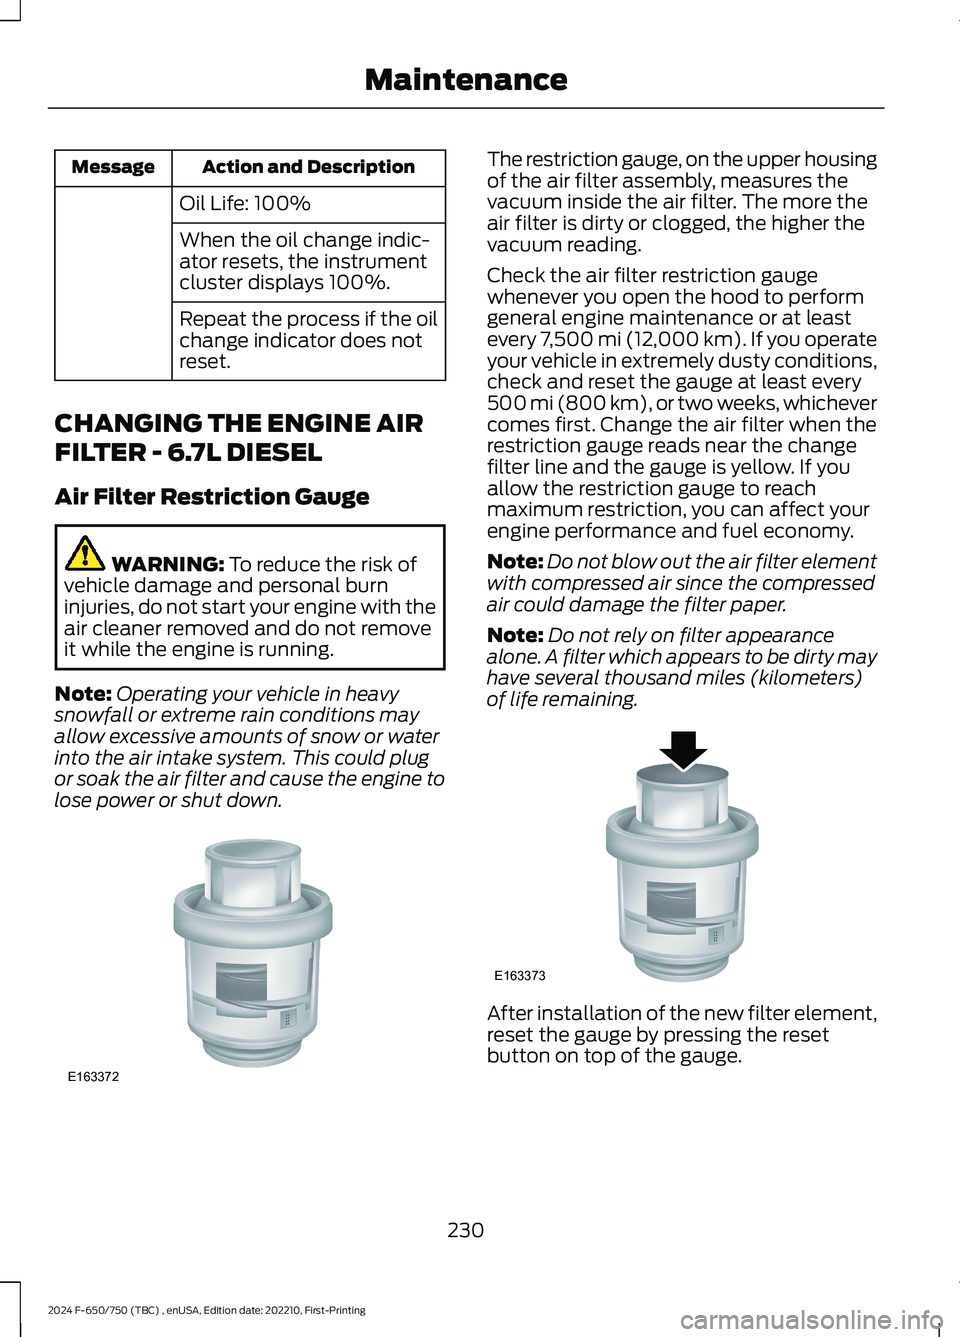
The restriction gauge, on the upper housingof the air filter assembly, measures thevacuum inside the air filter. The more theair filter is dirty or clogged, the higher thevacuum reading.
Check the air filter restriction gaugewhenever you open the hood to performgeneral engine maintenance or at leastevery 7,500 mi (12,000 km). If you operateyour vehicle in extremely dusty conditions,check and reset the gauge at least every500 mi (800 km), or two weeks, whichevercomes first. Change the air filter when therestriction gauge reads near the changefilter line and the gauge is yellow. If youallow the restriction gauge to reachmaximum restriction, you can affect yourengine performance and fuel economy.
Note:Do not blow out the air filter elementwith compressed air since the compressedair could damage the filter paper.
Note:Do not rely on filter appearancealone. A filter which appears to be dirty mayhave several thousand miles (kilometers)of life remaining.
After installation of the new filter element,reset the gauge by pressing the resetbutton on top of the gauge.
230
2024 F-650/750 (TBC) , enUSA, Edition date: 202210, First-PrintingMaintenanceE163372 E163373
Page 264 of 386

•Maintaining proper steering gear andpower steering pump lubricant levels.
•Checking steering column joint boltsand steering linkage, particularly forbody-to-chassis clearance.
Steering Column Joint Bolts
As a good maintenance practice, checksteering column joint bolt tightness every60,000 mi (96,000 km) or annually,whichever occurs first. Do not overtightenthe bolts.
Hydraulic System
Whenever draining and refilling the powersteering's hydraulic system for any reason,bleed air from the system before returningthe vehicle to service. Failure to bleed thehydraulic system properly can result indegradation of power system performance.
Consult an authorized dealer who is awareof the proper procedures for filling andbleeding the system.
SUSPENSION SYSTEM
INSPECTION (IF EQUIPPED)
Note:Do not adjust air suspension heightto any setting other than the specifiedsetting. Altering the height setting changesthe driveline angle and may result inunwarrantable component damage, suchas transmission component damage.
Verify drive axle air suspension height andheight control valve performance at engineoil change intervals.
Periodically check:
•Condition of spring leaves for evidenceof fatigue, bending or breakage.
•Condition of suspension mountingbrackets and bushings.
•Torque rod mounting fasteners fortightness.
•For proper suspension alignment.Maintain proper alignment at all times.
•U-bolts. After the chassis has beenoperating under load for 1,000 mi(1,600 km) or six months (whichevercomes first), the U-bolt nuts must bere-torqued. Re-torque the U-bolt nutsevery 37,000 mi (60,000 km)thereafter. Clean and lubricate theU-bolt and nut threads and seats tomake sure a like new condition whenre-torqueing. See Spring U-BoltCheck (page 261).
FRAME AND TOW HOOK
INSPECTION
Your vehicle's chassis is manufacturedwith frame rails of either HSLA steel orheat-treated steel. Handle each in aspecific manner to make sure maximumservice life. Consult the service manual oran authorized dealer before attemptingframe repair or modification.
It is important, particularly on vehicles thatuse tow hooks frequently, to inspect thefront and rear tow hooks for damage or aloose mounting.
REAR AXLE FLUID CHECK
Your rear axle may have an optionalsynthetic lubricant that allows the use ofextended service intervals. A tag on thefiller plug identifies the use of the syntheticlubricant.
Only use a lubricant that meetsmanufacturer specifications. Use of anon-approved rear axle lubricant maycause internal axle component damage.See Rear Axle Fluid Capacity andSpecification (page 311).
Checking the Fluid Level
1.Park your vehicle on level ground.
260
2024 F-650/750 (TBC) , enUSA, Edition date: 202210, First-PrintingMaintenance
Page 271 of 386
3.Remove tar and grease with a bug andtar remover. We recommend that youuse Ford approved bug and tar removerif available.
4.Thoroughly rinse the wheels with waterafter cleaning.
If you intend on parking your vehicle for anextended period after cleaning the wheelswith a wheel cleaner, drive your vehicle fora few minutes before doing so. Thisreduces the risk of corrosion of the brakediscs, brake pads and linings.
Do not clean the wheels when they are hot.
Note: Some car washes could damagewheel rims and covers.
Note: Using non-recommended cleaners,harsh cleaning products, chrome wheelcleaners or abrasive materials coulddamage wheel rims, covers and bolts.
VEHICLE STORAGE
If you plan on storing your vehicle for 30days or more, read the followingmaintenance recommendations to makesure your vehicle stays in good operatingcondition.
We engineer and test all motor vehiclesand their components for reliable, regulardriving. Under various conditions,long-term storage may lead to degradedengine performance or failure unless youuse specific precautions to preserve enginecomponents.
General
•Store all vehicles in a dry, ventilatedplace.
•Protect from sunlight, if possible.
•If vehicles are stored outside, theyrequire regular maintenance to protectagainst rust and damage.
Body
•Wash your vehicle thoroughly toremove dirt, grease, oil, tar or mud fromexterior surfaces, rear-wheel housingand the underside of front fenders.
•Periodically wash your vehicle if it isstored in exposed locations.
•Touch-up exposed or primed metal toprevent rust.
•Cover chrome and stainless steel partswith a thick coat of auto wax to preventdiscoloration. Re-wax as necessarywhen you wash your vehicle.
•Lubricate all hood, door and luggagecompartment hinges and latches witha light grade oil.
•Cover interior trim to prevent fading.
•Keep all rubber parts free from oil andsolvents.
Engine
•Change the engine oil and filter prior tostorage because used engine oilcontains contaminates which maycause engine damage.
•Start the engine every 15 days for aminimum of 15 minutes. Run at fastidle with the climate controls set todefrost until the engine reaches normaloperating temperature.
•With your foot on the brake, shiftthrough all the gears while the engineis running.
•We recommend that you change theengine oil before you use your vehicleagain.
Fuel system
•Fill the fuel tank with high-quality fueluntil the first automatic shutoff of thefuel pump nozzle.
267
2024 F-650/750 (TBC) , enUSA, Edition date: 202210, First-PrintingVehicle Care
Page 329 of 386
GENERAL MAINTENANCE
INFORMATION
Why Maintain Your Vehicle?
Carefully following the maintenanceschedule helps protect against major repairexpenses resulting from neglect orinadequate maintenance and may help toincrease the value of your vehicle whenyou sell or trade it. Keep all receipts forcompleted maintenance with your vehicle.
We have established regular maintenanceintervals for your vehicle based uponrigorous testing. It is important that youhave your vehicle serviced at the propertimes. These intervals serve two purposes;one is to maintain the reliability of yourvehicle and the second is to keep your costof owning your vehicle down.
It is your responsibility to have allscheduled maintenance performed and tomake sure that the materials used meetthe specifications identified in this owner'smanual. See Engine Specifications(page 291).
Failure to perform scheduled maintenanceinvalidates warranty coverage on partsaffected by the lack of maintenance.
Why Maintain Your Vehicle at YourDealership?
Factory-trained Technicians
Service technicians participate in extensivefactory-sponsored certification training tohelp them become experts on theoperation of your vehicle. Ask yourdealership about the training andcertification their technicians havereceived.
Genuine Ford and MotorcraftReplacement Parts
Dealerships stock Ford, Motorcraft andFord-authorized branded re-manufacturedreplacement parts. These parts meet orexceed our specifications. Parts installedat your dealership carry a nationwide12-month or 12,500 mi (20,000 km) partsand labor limited warranty.
If you do not use Ford authorized parts theymay not meet our specifications anddepending on the part, it could affectemissions compliance.
Convenience
Many dealerships have extended eveningand Saturday hours to make your servicevisit more convenient and they offer onestop shopping. They can perform anyservices that are required on your vehicle,from general maintenance to collisionrepairs.
Note:Not all dealers have extended hoursor body shops. Please contact your dealerfor details.
Protecting Your Investment
Maintenance is an investment that paysdividends in the form of improvedreliability, durability and resale value. Tomaintain the proper performance of yourvehicle and its emission control systems,make sure you have scheduledmaintenance performed at the designatedintervals.
Your vehicle is equipped with theIntelligent Oil-Life Monitor system, whichdisplays a message in the instrumentcluster display at the proper oil changeinterval. This interval may be up to one yearor 10,000 mi (16,000 km) for gas enginesand up to one year or 15,000 mi(24,000 km) for diesel engines.
325
2024 F-650/750 (TBC) , enUSA, Edition date: 202210, First-PrintingScheduled Maintenance