2024 CHEVROLET SILVERADO Oil cap
[x] Cancel search: Oil capPage 114 of 433

Chevrolet Silverado 2500 HD/3500 HD Owner Manual (GMNA-Localizing-U.
S./Canada/Mexico-16908339) - 2024 - CRC - 12/15/22
112 Instruments and Controls
The fuel gauge may:
.Take a little more, or less fuel to fill up
than it indicates. For example, the gauge
may have indicated the tank is half full,
but it actually takes a little more, or less
than half the tank's capacity to fill
the tank.
.Moves a little while turning a corner,
speeding up, or braking.
.Takes a few seconds to stabilize after the
ignition is turned on and goes back to
empty when the ignition is turned off.
These are normal conditions, none of which
indicate a problem with the fuel gauge.
Fuel Range
The uplevel instrument cluster has a
estimated fuel range located in the bottom
center of the display. The fuel range is
displayed with the approximate distance the
vehicle can be driven without refueling. The
fuel range estimate is based on an average
of the vehicle’s fuel economy over recent
driving history and the amount of fuel
remaining in the fuel tank.
When the estimated fuel range is low, the
range shows LOW and a message may also
display in the Driver Information
Center (DIC).
Engine Oil Pressure Gauge
Metric Base Level
English Base Level
Metric Uplevel
English Uplevel
The engine oil pressure gauge shows the
engine oil pressure in kPa (kilopascals)
or psi (pounds per square inch) when the
engine is running.
Oil pressure can vary with engine speed,
outside temperature, coolant temperature,
and oil viscosity.
On some models, the oil pump will vary
engine oil pressure according to engine
needs. Oil pressure may change quickly as
the engine speed or load varies. This is
normal. If the oil pressure warning light or
Driver Information Center (DIC) message
Page 276 of 433
Chevrolet Silverado 2500 HD/3500 HD Owner Manual (GMNA-Localizing-U.
S./Canada/Mexico-16908339) - 2024 - CRC - 12/12/22
274 Driving and Operating
Pulling the Trailer from the Water
To pull the trailer out of the water:1. Press and hold the brake pedal.
2. Start the engine and shift into gear.
3. Release the parking brake.
4. Let up on the brake pedal.
5. Drive slowly until the tires are clear of the chocks.
6. Stop and have someone pick up and store the chocks.
7. Slowly pull the trailer from the water.
8. Once the vehicle and trailer have been driven from the sloped part of the boat
ramp, the vehicle can be shifted from
four-wheel-drive high. Shift into the drive
mode that is appropriate for the road
conditions.
Caution
If the vehicle tires begin to spin and the
vehicle begins to slide toward the water,
remove your foot from the accelerator
pedal and apply the brake pedal. Seek
help to have the vehicle towed up
the ramp.
Maintenance when Trailer Towing
The vehicle needs service more often when
used to tow trailers. See Maintenance
Schedule 0388. It is especially important to
check the engine oil, axle lubricant, belts,
cooling system, and brake system before
and during each trip.
Check periodically to see that all nuts and
bolts on the trailer hitch are tight.
Engine Cooling When Trailer Towing
The cooling system may temporarily
overheat during severe operating conditions.
See Engine Overheating 0315.
Trailer Towing
If equipped with a diesel engine, see the
Duramax diesel supplement.
Caution
Towing a trailer improperly can damage
the vehicle and result in costly repairs
not covered by the vehicle warranty. To
tow a trailer correctly, follow the
directions in this section and see your
dealer for important information about
towing a trailer with the vehicle. Trailering is different than just driving the
vehicle by itself. Trailering means changes in
handling, acceleration, braking, and
durability. Successful, safe trailering takes
correct equipment, and it has to be used
properly.
The following information has many
time-tested, important trailering tips and
safety rules. Many of these are important
for your safety and that of your passengers.
Read this section carefully before pulling a
trailer.
Trailer Weight
{Warning
Never exceed the towing capacity for
your vehicle.
Safe trailering requires monitoring the
weight, speed, altitude, road grades, outside
temperature, and how frequently the vehicle
is used to tow a trailer.
Trailer Weight Ratings
When towing a trailer, the combined weight
of the vehicle, vehicle contents, trailer, and
trailer contents must be below all of the
maximum weight ratings for the vehicle,
including:
Page 310 of 433
Chevrolet Silverado 2500 HD/3500 HD Owner Manual (GMNA-Localizing-U.
S./Canada/Mexico-16908339) - 2024 - CRC - 12/5/22
308 Vehicle Care
1. Remote Negative (–) Location. SeeJump
Starting - North America 0370.
2. Positive (+) Terminal (Under Cover). See Jump Starting - North America 0370.
3. Battery - North America 0321.
4. Engine Air Cleaner/Filter 0312.
5. Engine Oil Dipstick. See “Checking Engine
Oil” under Engine Oil 0308.
6. Engine Cooling Fan (Out of View). See Cooling System 0313.
7. Power Steering Fluid Reservoir. See Power Steering Fluid 0317.
8. Engine Oil Fill Cap. See “When to Add
Engine Oil” underEngine Oil 0308.
9. Auxiliary Battery. Battery - North
America 0321.
10. Brake Fluid Reservoir. See Brake Fluid
0 320.
11. Engine Compartment Fuse Block 0332.
12. Coolant Surge Tank and Pressure Cap. SeeCooling System 0313.
13. Windshield Washer Fluid Reservoir. See “Adding Washer Fluid” underWasher
Fluid 0318.
If the vehicle has a diesel engine, see the
Duramax diesel supplement.Engine Oil
For diesel engine vehicles, see “Engine Oil”
in the Duramax diesel supplement.
To ensure proper engine performance and
long life, careful attention must be paid to
engine oil. Following these simple, but
important steps will help protect your
investment:
.Use engine oil approved to the proper
specification and of the proper viscosity
grade. See “Selecting the Right Engine
Oil” in this section.
.Check the engine oil level regularly and
maintain the proper oil level. See
“Checking Engine Oil” and“When to Add
Engine Oil” in this section.
.Change the engine oil at the appropriate
time. SeeEngine Oil Life System 0310.
.Always dispose of engine oil properly. See
“What to Do with Used Oil” in this
section.
Checking Engine Oil
Check the engine oil level regularly, every
650 km (400 mi), especially prior to a long
trip. The engine oil dipstick handle is a loop.
See Engine Compartment Overview 0307 for
the location.
{Warning
The engine oil dipstick handle may be
hot; it could burn you. Use a towel or
glove to touch the dipstick handle.
If a low oil Driver Information Center (DIC)
message displays, check the oil level.
Follow these guidelines:
.To get an accurate reading, park the
vehicle on level ground. Check the engine
oil level after the engine has been off for
at least two hours. Checking the engine
oil level on steep grades or too soon after
engine shutoff can result in incorrect
readings. Accuracy improves when
checking a cold engine prior to starting.
Remove the dipstick and check the level.
.If unable to wait two hours, the engine
must be off for at least 15 minutes if the
engine is warm, or at least 30 minutes if
the engine is not warm. Pull out the
dipstick, wipe it with a clean paper towel
or cloth, then push it back in all the way.
Remove it again, keeping the tip down,
and check the level.
Page 311 of 433
Chevrolet Silverado 2500 HD/3500 HD Owner Manual (GMNA-Localizing-U.
S./Canada/Mexico-16908339) - 2024 - CRC - 12/5/22
Vehicle Care 309
When to Add Engine Oil
If the oil is below the cross-hatched area at
the tip of the dipstick and the engine has
been off for at least 15 minutes, add 1 L (1
qt) of the recommended oil and then
recheck the level. See“Selecting the Right
Engine Oil” later in this section for an
explanation of what kind of oil to use. For
engine oil crankcase capacity, see Capacities
and Specifications 0396.
Caution
Do not add too much oil. Oil levels above
or below the acceptable operating range
shown on the dipstick are harmful to the
engine. If the oil level is above the
operating range (i.e., the engine has so
much oil that the oil level gets above the
cross-hatched area that shows the proper
operating range), the engine could be
(Continued)
Caution (Continued)
damaged. Drain the excess oil or limit
driving of the vehicle, and seek a service
professional to remove the excess oil.
See Engine Compartment Overview 0307 for
the location of the engine oil fill cap.
Add enough oil to put the level somewhere
in the proper operating range. Push the
dipstick all the way back in when through.
Selecting the Right Engine Oil
Selecting the right engine oil depends on
both the proper oil specification and
viscosity grade. See Recommended Fluids
and Lubricants 0392.
Specification
Use full synthetic engine oils that meet the
dexos1 specification. Engine oils that have
been approved by GM as meeting the
dexos1 specification are marked with the
dexos1 approved logo.
Caution
Failure to use the recommended engine
oil or equivalent can result in engine
damage not covered by the vehicle
warranty.
Viscosity Grade
Use SAE 5W-30 viscosity grade engine oil.
Cold Temperature Operation: In an area of
extreme cold, where the temperature falls
below −29 °C (−20 °F), use SAE 0W-30 oil. An
oil of this viscosity grade will provide easier
cold starting for the engine at extremely
low temperatures.
When selecting an oil of the appropriate
viscosity grade, it is recommended to select
an oil of the correct specification. See
“Specification” earlier in this section.
Page 315 of 433
Chevrolet Silverado 2500 HD/3500 HD Owner Manual (GMNA-Localizing-U.
S./Canada/Mexico-16908339) - 2024 - CRC - 12/5/22
Vehicle Care 313
Caution
If the air cleaner/filter is off, dirt can
easily get into the engine, which could
damage it. Always have the air cleaner/
filter in place when driving.
Cooling System
If the vehicle has the Duramax diesel
engine, see the Duramax diesel supplement.
The cooling system allows the engine to
maintain the correct working temperature.
{Warning
An underhood electric fan can start up
even when the engine is not running and
can cause injury. Keep hands, clothing,
and tools away from any underhood
electric fan.
1. Engine Cooling Fan (Out of View)
2. Coolant Surge Tank and Pressure Cap
{Warning
Do not touch heater, radiator, a/c pipes
or hoses, or other engine parts. They can
be very hot and can burn you. Do not
run the engine if there is a leak; all
coolant could leak out. That could cause
an engine fire and can burn you. Fix any
leak before driving the vehicle.
Engine Coolant
The cooling system in the vehicle is filled
with DEX-COOL engine coolant. This coolant
is designed to remain in the vehicle for
5 years or 240 000 km (150,000 mi),
whichever occurs first.
The following explains the cooling system
and how to check and add coolant when it
is low. If there is a problem with engine
overheating, seeEngine Overheating 0315.
What to Use
{Warning
Plain water, or other liquids such as
alcohol, can boil before the proper
coolant mixture will. With plain water or
the wrong mixture, the engine could get
too hot but there would not be an
overheat warning. The engine could catch
fire and you or others could be burned.
Use a 50/50 mixture of clean, drinkable
water and DEX-COOL coolant. This mixture:
.Gives freezing protection down to −37 °C
(−34 °F), outside temperature.
.Gives boiling protection up to 129 °C
(265 °F), engine temperature.
Page 368 of 433
Chevrolet Silverado 2500 HD/3500 HD Owner Manual (GMNA-Localizing-U.
S./Canada/Mexico-16908339) - 2024 - CRC - 12/5/22
366 Vehicle Care
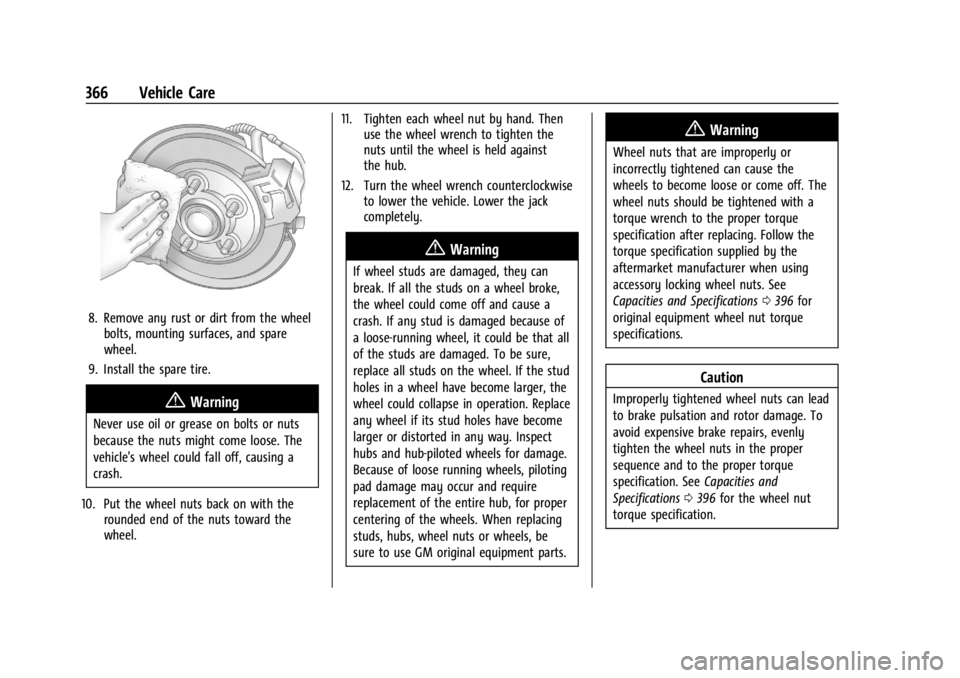
8. Remove any rust or dirt from the wheelbolts, mounting surfaces, and spare
wheel.
9. Install the spare tire.
{Warning
Never use oil or grease on bolts or nuts
because the nuts might come loose. The
vehicle's wheel could fall off, causing a
crash.
10. Put the wheel nuts back on with the rounded end of the nuts toward the
wheel. 11. Tighten each wheel nut by hand. Then
use the wheel wrench to tighten the
nuts until the wheel is held against
the hub.
12. Turn the wheel wrench counterclockwise to lower the vehicle. Lower the jack
completely.
{Warning
If wheel studs are damaged, they can
break. If all the studs on a wheel broke,
the wheel could come off and cause a
crash. If any stud is damaged because of
a loose-running wheel, it could be that all
of the studs are damaged. To be sure,
replace all studs on the wheel. If the stud
holes in a wheel have become larger, the
wheel could collapse in operation. Replace
any wheel if its stud holes have become
larger or distorted in any way. Inspect
hubs and hub‐piloted wheels for damage.
Because of loose running wheels, piloting
pad damage may occur and require
replacement of the entire hub, for proper
centering of the wheels. When replacing
studs, hubs, wheel nuts or wheels, be
sure to use GM original equipment parts.
{Warning
Wheel nuts that are improperly or
incorrectly tightened can cause the
wheels to become loose or come off. The
wheel nuts should be tightened with a
torque wrench to the proper torque
specification after replacing. Follow the
torque specification supplied by the
aftermarket manufacturer when using
accessory locking wheel nuts. See
Capacities and Specifications 0396 for
original equipment wheel nut torque
specifications.
Caution
Improperly tightened wheel nuts can lead
to brake pulsation and rotor damage. To
avoid expensive brake repairs, evenly
tighten the wheel nuts in the proper
sequence and to the proper torque
specification. See Capacities and
Specifications 0396 for the wheel nut
torque specification.
Page 398 of 433

Chevrolet Silverado 2500 HD/3500 HD Owner Manual (GMNA-Localizing-U.
S./Canada/Mexico-16908339) - 2024 - CRC - 12/5/22
396 Technical Data
Vehicle Data
Capacities and Specifications
The following approximate capacities are given in metric and English conversions. SeeRecommended Fluids and Lubricants0392.
If the vehicle has a diesel engine, see the Duramax diesel supplement.
Application Capacities
Metric English
Air Conditioning Refrigerant For the air conditioning system refrigerant type and charge
amount, see the refrigerant label under the hood. See your dealer for more information.
Engine Cooling System* 14.6 L15.4 qt
Engine Oil with Filter 7.6 L8.0 qt
Fuel Tank
I2500 Series and 3500 Series Standard Box (Except Double Cab Diesel) 136.3 L
36.0 gal
I2500 Series and 3500 Series Standard Box (Double Cab Diesel) 111.3 L
29.4 gal
I2500 Series and 3500 Series Long Box (Except Regular Cab Diesel) 136.3 L
36.0 gal
I2500 Series and 3500 Series Long Box (Regular Cab Diesel) 106.0 L
28.0 gal