2024 CHEVROLET SILVERADO instrument panel
[x] Cancel search: instrument panelPage 308 of 433

Chevrolet Silverado 2500 HD/3500 HD Owner Manual (GMNA-Localizing-U.
S./Canada/Mexico-16908339) - 2024 - CRC - 12/5/22
306 Vehicle Care
Clear any snow from the hood before
opening.
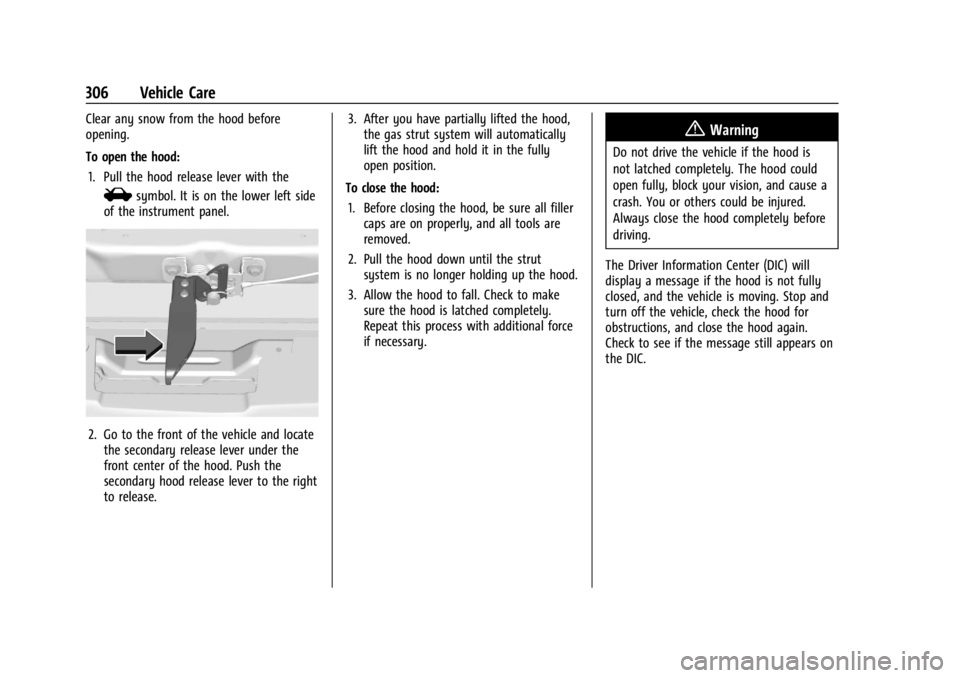
To open the hood:1. Pull the hood release lever with the
isymbol. It is on the lower left side
of the instrument panel.
2. Go to the front of the vehicle and locate the secondary release lever under the
front center of the hood. Push the
secondary hood release lever to the right
to release. 3. After you have partially lifted the hood,
the gas strut system will automatically
lift the hood and hold it in the fully
open position.
To close the hood: 1. Before closing the hood, be sure all filler caps are on properly, and all tools are
removed.
2. Pull the hood down until the strut system is no longer holding up the hood.
3. Allow the hood to fall. Check to make sure the hood is latched completely.
Repeat this process with additional force
if necessary.
{Warning
Do not drive the vehicle if the hood is
not latched completely. The hood could
open fully, block your vision, and cause a
crash. You or others could be injured.
Always close the hood completely before
driving.
The Driver Information Center (DIC) will
display a message if the hood is not fully
closed, and the vehicle is moving. Stop and
turn off the vehicle, check the hood for
obstructions, and close the hood again.
Check to see if the message still appears on
the DIC.
Page 333 of 433

Chevrolet Silverado 2500 HD/3500 HD Owner Manual (GMNA-Localizing-U.
S./Canada/Mexico-16908339) - 2024 - CRC - 12/5/22
Vehicle Care 331
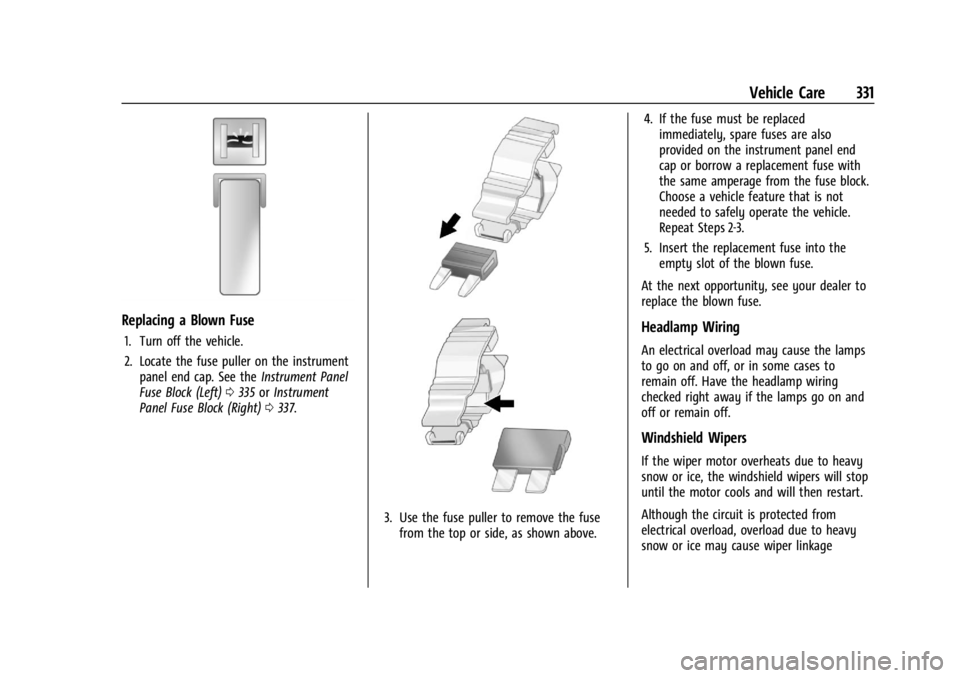
Replacing a Blown Fuse
1. Turn off the vehicle.
2. Locate the fuse puller on the instrumentpanel end cap. See the Instrument Panel
Fuse Block (Left) 0335 orInstrument
Panel Fuse Block (Right) 0337.
3. Use the fuse puller to remove the fuse
from the top or side, as shown above. 4. If the fuse must be replaced
immediately, spare fuses are also
provided on the instrument panel end
cap or borrow a replacement fuse with
the same amperage from the fuse block.
Choose a vehicle feature that is not
needed to safely operate the vehicle.
Repeat Steps 2-3.
5. Insert the replacement fuse into the empty slot of the blown fuse.
At the next opportunity, see your dealer to
replace the blown fuse.
Headlamp Wiring
An electrical overload may cause the lamps
to go on and off, or in some cases to
remain off. Have the headlamp wiring
checked right away if the lamps go on and
off or remain off.
Windshield Wipers
If the wiper motor overheats due to heavy
snow or ice, the windshield wipers will stop
until the motor cools and will then restart.
Although the circuit is protected from
electrical overload, overload due to heavy
snow or ice may cause wiper linkage
Page 334 of 433

Chevrolet Silverado 2500 HD/3500 HD Owner Manual (GMNA-Localizing-U.
S./Canada/Mexico-16908339) - 2024 - CRC - 12/5/22
332 Vehicle Care
damage. Always clear ice and heavy snow
from the windshield before using the
windshield wipers.
If the overload is caused by an electrical
problem and not snow or ice, be sure to get
it fixed.
Fuses and Circuit Breakers
The wiring circuits in the vehicle are
protected from short circuits by a
combination of fuses and circuit breakers.
This greatly reduces the chance of damage
caused by electrical problems.
{Danger
Fuses and circuit breakers are marked
with their ampere rating. Do not exceed
the specified amperage rating when
replacing fuses and circuit breakers. Use
of an oversized fuse or circuit breaker can
result in a vehicle fire. You and others
could be seriously injured or killed.
{Warning
Installation or use of fuses that do not
meet GM’s original fuse specifications is
dangerous. The fuses could fail, and result
in a fire. You or others could be injured
or killed, and the vehicle could be
damaged.
See Accessories and Modifications 0304 and
General Information 0304.
To check or replace a blown fuse, see
Electrical System Overload 0330.
Engine Compartment Fuse Block
If the vehicle has a diesel engine, see the
Duramax diesel supplement.
The engine compartment fuse block is in the
engine compartment on the driver side of
vehicle.
Lift the cover to access the fuse block.
Caution
Spilling liquid on any electrical
component on the vehicle may damage
it. Always keep the covers on any
electrical component.
A fuse puller is available in the left
instrument panel end cap.
The vehicle may not be equipped with all of
the fuses, relays, and features shown.
Page 337 of 433

Chevrolet Silverado 2500 HD/3500 HD Owner Manual (GMNA-Localizing-U.
S./Canada/Mexico-16908339) - 2024 - CRC - 12/5/22
Vehicle Care 335
FusesUsage
78 Engine Control Module
79 Cabin Cool Pump 17W (LD)/Auxiliary
Battery (HD)
80 Powertrain Sensor 1 (DSL)
81 Trailer Stop/Turn Lamp Right
82 Trailer Interface Module 1
83 FTZM 1
84 Trailer Battery 85 –
86 Engine Control Module 87 Injector B Even
88 O2 B Sensor
89 O2 A Sensor
90 Injector A Odd 91 Engine Control Module Throttle Control (HD) Fuses
Usage
92 Cool Fan Clutch (HD DSL)/Aeroshutter
(LD/HD)
Relays Usage
5 Rear Window Defogger
18 DC/AC Inverter
23 Fuel Heater (DSL)
35 Parking Lamp
36 Run/Crank
43 Secondary Axle Motor
59 A/C Clutch
64 Starter Motor (LD)/Cool Fan Clutch (HD DSL)
70 Starter Pinion (LD Gas)/ Starter Motor (HD)
77 PowertrainInstrument Panel Fuse Block (Left)
The left instrument panel fuse block access
door is on the driver side edge of the
instrument panel.
The vehicle may not be equipped with all of
the fuses, relays, and features shown.
Pull off the cover to access the fuse block.
A fuse puller is available on the left
instrument panel end cap.
Page 339 of 433

Chevrolet Silverado 2500 HD/3500 HD Owner Manual (GMNA-Localizing-U.
S./Canada/Mexico-16908339) - 2024 - CRC - 12/5/22
Vehicle Care 337
RelaysUsage
K5 MFEG Minor 2 –
Multifunction End Gate
Minor 2
K6 MFEG Major 2 –
Multifunction End Gate
Major 2
K7 –
K8 –Instrument Panel Fuse Block
(Right)
The right instrument panel fuse block access
door is on the passenger side edge of the
instrument panel.
Pull off the cover to access the front of the
fuse block.
Page 387 of 433

Chevrolet Silverado 2500 HD/3500 HD Owner Manual (GMNA-Localizing-U.
S./Canada/Mexico-16908339) - 2024 - CRC - 12/5/22
Vehicle Care 385
Instrument Panel, Leather, Vinyl, Other
Plastic Surfaces, Low Gloss Paint
Surfaces, and Natural Open Pore Wood
Surfaces
Use a soft bristle brush to remove dust from
knobs and crevices on the instrument
cluster. Use a soft microfiber cloth
dampened with water to remove dust and
loose dirt. For a more thorough cleaning,
use a soft microfiber cloth dampened with a
mild soap and water solution.
Caution
Soaking or saturating leather, especially
perforated leather, as well as other
interior surfaces, may cause permanent
damage. Wipe excess moisture from
these surfaces after cleaning and allow
them to dry naturally. Never use heat,
steam, or spot removers. Do not use
liquids that contain alcohol or solvents on
leather seats. Do not use cleaners that
contain silicone or wax-based products.
Cleaners containing these solvents can
permanently change the appearance and
feel of leather or soft trim, and are not
recommended.Do not use cleaners that increase gloss,
especially on the instrument panel. Reflected
glare can decrease visibility through the
windshield under certain conditions.
Caution
Use of air fresheners may cause
permanent damage to plastics and
painted surfaces. If an air freshener
comes in contact with any plastic or
painted surface in the vehicle, blot
immediately and clean with a soft cloth
dampened with a mild soap solution.
Damage caused by air fresheners would
not be covered by the vehicle warranty.
Care of Seat Belts
Keep belts clean and dry.
{Warning
Do not bleach or dye seat belt webbing.
It may severely weaken the webbing. In
a crash, they might not be able to
provide adequate protection. Clean and
rinse seat belt webbing only with mild
soap and lukewarm water. Allow the
webbing to dry.
Floor Mats
{Warning
If a floor mat, a liner, or a liner insert is
the wrong size or is not properly
installed, it can interfere with the pedals.
Interference with the pedals can cause
unintended acceleration and/or increased
stopping distance, which can cause a
crash and injury. Make sure the floor
mat, liner, or liner insert does not
interfere with the pedals.
Use the following guidelines for proper floor
mat/liner use:
.The original equipment floor mats are
designed for your vehicle. If the floor
mats need to be replaced, it is
recommended that GM-certified floor
mats are purchased. Non-GM floor mats
may not fit properly and may interfere
with the pedals. Always check that the
floor mats do not interfere with the
pedals.
.Do not use a floor mat/liner if the vehicle
is not equipped with a floor mat retainer
on the driver side floor.
Page 397 of 433

Chevrolet Silverado 2500 HD/3500 HD Owner Manual (GMNA-Localizing-U.
S./Canada/Mexico-16908339) - 2024 - CRC - 12/5/22
Technical Data 395
Technical Data
Vehicle Identification
Vehicle Identification Number (VIN) . . . 395
Service Parts Identification . . . . . . . . . . . . 395
Vehicle Data
Capacities and Specifications . . . . . . . . . . 396
Engine Drive Belt Routing . . . . . . . . . . . . . 398
Vehicle Identification
Vehicle Identification
Number (VIN)
This legal identifier is in the front corner of
the instrument panel, on the driver side of
the vehicle. It can be seen through the
windshield from outside. The Vehicle
Identification Number (VIN) also appears on
the Vehicle Certification label and certificates
of title and registration.
Engine Identification
The eighth character in the VIN is the
engine code. This code identifies the
vehicle's engine, specifications, and
replacement parts. See“Engine
Specifications” underCapacities and
Specifications 0396 for the vehicle's
engine code.
Service Parts Identification
There may be a large barcode on the
certification label on the center pillar that
you can scan for the following information:
.Vehicle Identification Number (VIN)
.Model designation
.Paint information
.Production options
If there is not a large barcode on this label,
then you will find this same information on
a label inside of the glove box.
Page 402 of 433

Chevrolet Silverado 2500 HD/3500 HD Owner Manual (GMNA-Localizing-U.
S./Canada/Mexico-16908339) - 2024 - CRC - 12/5/22
400 Customer Information
We encourage you to call the toll-free
number in order to give your inquiry
prompt attention. Have the following
information available to give the Customer
Assistance representative:
.Vehicle Identification Number (VIN). This is
available from the vehicle registration or
title, or the plate at the top left of the
instrument panel and visible through the
windshield.
.Dealership name and location.
.Vehicle delivery date and present mileage.
When contacting Chevrolet, remember that
your concern will likely be resolved at a
dealer's facility. That is why we suggest
following Step One first.
STEP THREE —U.S. Owners : Both General
Motors and your dealer are committed to
making sure you are completely satisfied
with your new vehicle. However, if you
continue to remain unsatisfied after
following the procedure outlined in
Steps One and Two, you can file with the
Better Business Bureau (BBB) AUTO LINE
Program to enforce your rights.
The BBB AUTO LINE Program is an
out-of-court program administered by BBB
National Programs, Inc. to settle automotive disputes regarding vehicle repairs or the
interpretation of the New Vehicle Limited
Warranty. Although you may be required to
resort to this informal dispute resolution
program prior to filing a court action, use of
the program is free of charge and your case
will generally be heard within 40 days.
If you do not agree with the decision given
in your case, you may reject it and proceed
with any other venue for relief available
to you.
You may contact the BBB AUTO LINE
Program using the toll-free telephone
number or write them at the following
address:
BBB AUTO LINE a Division of
BBB National Programs, Inc.
1676 International Drive
Suite 550
McLean, VA 22102
Telephone: 1-800-955-5100
www.bbbautoline.org
This program is available in all 50 states and
the District of Columbia. Eligibility is limited
by vehicle age, mileage, and other factors.
General Motors reserves the right to change
eligibility limitations and/or discontinue its
participation in this program.
STEP THREE
—Canadian Owners : In the
event that you do not feel your concerns
have been addressed after following the
procedure outlined in Steps One and Two,
General Motors of Canada Company wants
you to be aware of its participation in a
no-charge Mediation/Arbitration Program.
General Motors of Canada Company has
committed to binding arbitration of owner
disputes involving factory-related vehicle
service claims. The program provides for the
review of the facts involved by an impartial
third party arbiter, and may include an
informal hearing before the arbiter. The
program is designed so that the entire
dispute settlement process, from the time
you file your complaint to the final decision,
should be completed in about 70 days. We
believe our impartial program offers
advantages over courts in most jurisdictions
because it is informal, quick, and free of
charge.
For further information concerning eligibility
in the Canadian Motor Vehicle Arbitration
Plan (CAMVAP), call toll-free 1-800-207-0685,
or call the General Motors Customer Care
Centre, 1-800-263-3777 (English),
1-800-263-7854 (French), or write to: