2024 CHEVROLET SILVERADO four wheel drive
[x] Cancel search: four wheel drivePage 305 of 433
Chevrolet Silverado 2500 HD/3500 HD Owner Manual (GMNA-Localizing-U.
S./Canada/Mexico-16908339) - 2024 - CRC - 12/5/22
Vehicle Care 303
Vehicle Care
General Information
General Information . . . . . . . . . . . . . . . . . . . 304
California Perchlorate MaterialsRequirements . . . . . . . . . . . . . . . . . . . . . . . 304
Accessories and Modifications . . . . . . . . . 304
Vehicle Checks
Doing Your Own Service Work . . . . . . . . 305
Hood . . . . . . . . . . . . . . . . . . . . . . . . . . . . . . . . . . 305
Engine Compartment Overview . . . . . . . . 307
Engine Oil . . . . . . . . . . . . . . . . . . . . . . . . . . . . . 308
Engine Oil Life System . . . . . . . . . . . . . . . . . 310
Automatic Transmission Fluid . . . . . . . . . . 311
Engine Air Filter Life System . . . . . . . . . . . 311
Engine Air Cleaner/Filter . . . . . . . . . . . . . . . 312
Cooling System . . . . . . . . . . . . . . . . . . . . . . . . 313
Engine Overheating . . . . . . . . . . . . . . . . . . . . 315
Overheated Engine Protection Operating Mode . . . . . . . . . . . . . . . . . . . . . 317
Engine Fan . . . . . . . . . . . . . . . . . . . . . . . . . . . . . 317
Power Steering Fluid . . . . . . . . . . . . . . . . . . . 317
Washer Fluid . . . . . . . . . . . . . . . . . . . . . . . . . . 318
Brakes . . . . . . . . . . . . . . . . . . . . . . . . . . . . . . . . . 319
Brake Pad Life System . . . . . . . . . . . . . . . . . 319
Brake Fluid . . . . . . . . . . . . . . . . . . . . . . . . . . . . 320
Battery - North America . . . . . . . . . . . . . . . 321
Four-Wheel Drive . . . . . . . . . . . . . . . . . . . . . . 323
Front Axle . . . . . . . . . . . . . . . . . . . . . . . . . . . . . 323 Rear Axle . . . . . . . . . . . . . . . . . . . . . . . . . . . . . . 323
Noise Control System . . . . . . . . . . . . . . . . . . 323
Automatic Transmission Shift Lock
Control Function Check . . . . . . . . . . . . . . 324
Park Brake and P (Park) Mechanism
Check . . . . . . . . . . . . . . . . . . . . . . . . . . . . . . . . 325
Wiper Blade Replacement . . . . . . . . . . . . . 325
Glass Replacement . . . . . . . . . . . . . . . . . . . . . 325
Windshield Replacement . . . . . . . . . . . . . . 326
Gas Strut(s) . . . . . . . . . . . . . . . . . . . . . . . . . . . 326
Headlamp Aiming
Front Headlamp Aiming . . . . . . . . . . . . . . . 327
Bulb Replacement
Bulb Replacement . . . . . . . . . . . . . . . . . . . . . 327
Halogen Bulbs . . . . . . . . . . . . . . . . . . . . . . . . . 327
LED Lighting . . . . . . . . . . . . . . . . . . . . . . . . . . . 327
Headlamps, Front Turn Signal, Sidemarker, and Parking Lamps . . . . . . 327
Taillamps, Turn Signal, Stoplamps, and Back-Up Lamps . . . . . . . . . . . . . . . . . . . . . . 328
Center High-Mounted Stoplamp (CHMSL) and Cargo Lamp . . . . . . . . . . . . 329
License Plate Lamp . . . . . . . . . . . . . . . . . . . . 330
Electrical System
Electrical System Overload . . . . . . . . . . . . 330
Fuses and Circuit Breakers . . . . . . . . . . . . . 332
Engine Compartment Fuse Block . . . . . . . 332
Instrument Panel Fuse Block (Left) . . . . . 335 Instrument Panel Fuse Block (Right) . . . 337
Wheels and Tires
Tires . . . . . . . . . . . . . . . . . . . . . . . . . . . . . . . . . . 339
All-Season Tires . . . . . . . . . . . . . . . . . . . . . . . 340
Winter Tires . . . . . . . . . . . . . . . . . . . . . . . . . . . 340
All-Terrain Tires . . . . . . . . . . . . . . . . . . . . . . . . 341
Tire Sidewall Labeling . . . . . . . . . . . . . . . . . . 341
Tire Designations . . . . . . . . . . . . . . . . . . . . . . 342
Tire Terminology and Definitions . . . . . . 342
Tire Pressure . . . . . . . . . . . . . . . . . . . . . . . . . . 344
Tire Pressure Monitor System . . . . . . . . . 345
Tire Pressure Monitor Operation . . . . . . 346
Tire Inspection . . . . . . . . . . . . . . . . . . . . . . . . . 351
Tire Rotation . . . . . . . . . . . . . . . . . . . . . . . . . . . 351
When It Is Time for New Tires . . . . . . . . 353
Buying New Tires . . . . . . . . . . . . . . . . . . . . . 354
Different Size Tires and Wheels . . . . . . . . 355
Uniform Tire Quality Grading . . . . . . . . . 356
Wheel Alignment and Tire Balance . . . . 357
Wheel Replacement . . . . . . . . . . . . . . . . . . . 357
Tire Chains . . . . . . . . . . . . . . . . . . . . . . . . . . . . 358
If a Tire Goes Flat . . . . . . . . . . . . . . . . . . . . . 358
Tire Changing . . . . . . . . . . . . . . . . . . . . . . . . . 360
Full-Size Spare Tire . . . . . . . . . . . . . . . . . . . . 370
Jump Starting
Jump Starting - North America . . . . . . . . 370
Towing the Vehicle
Transporting a Disabled Vehicle . . . . . . . 373
Page 325 of 433
Chevrolet Silverado 2500 HD/3500 HD Owner Manual (GMNA-Localizing-U.
S./Canada/Mexico-16908339) - 2024 - CRC - 12/5/22
Vehicle Care 323
Four-Wheel Drive
Transfer Case
When to Check Lubricant
Refer toMaintenance Schedule 0388 to
determine when to check the lubricant.
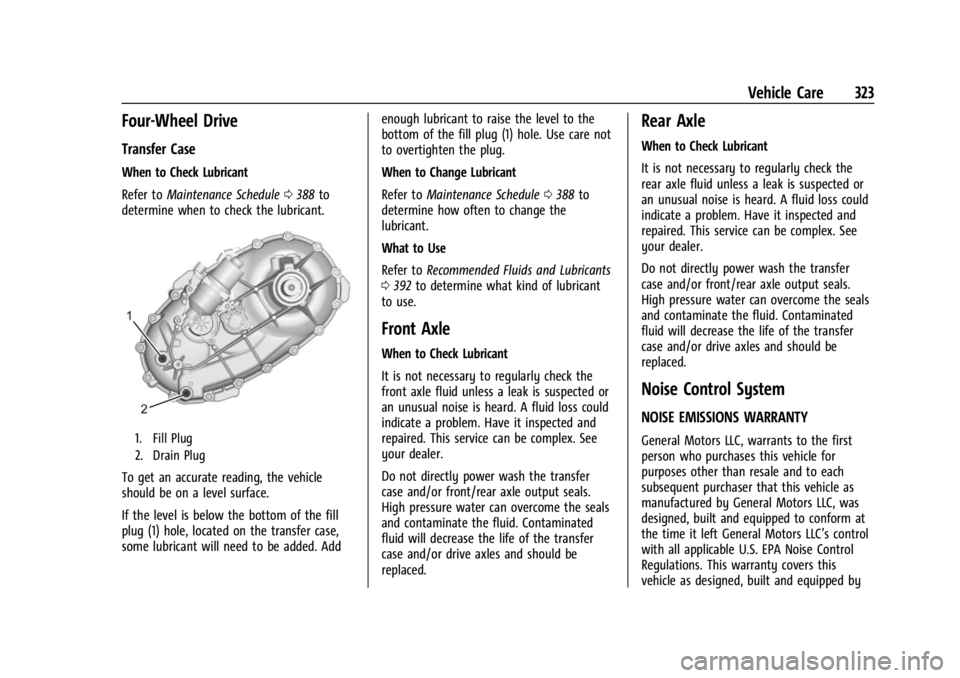
1. Fill Plug
2. Drain Plug
To get an accurate reading, the vehicle
should be on a level surface.
If the level is below the bottom of the fill
plug (1) hole, located on the transfer case,
some lubricant will need to be added. Add enough lubricant to raise the level to the
bottom of the fill plug (1) hole. Use care not
to overtighten the plug.
When to Change Lubricant
Refer to
Maintenance Schedule 0388 to
determine how often to change the
lubricant.
What to Use
Refer to Recommended Fluids and Lubricants
0 392 to determine what kind of lubricant
to use.
Front Axle
When to Check Lubricant
It is not necessary to regularly check the
front axle fluid unless a leak is suspected or
an unusual noise is heard. A fluid loss could
indicate a problem. Have it inspected and
repaired. This service can be complex. See
your dealer.
Do not directly power wash the transfer
case and/or front/rear axle output seals.
High pressure water can overcome the seals
and contaminate the fluid. Contaminated
fluid will decrease the life of the transfer
case and/or drive axles and should be
replaced.
Rear Axle
When to Check Lubricant
It is not necessary to regularly check the
rear axle fluid unless a leak is suspected or
an unusual noise is heard. A fluid loss could
indicate a problem. Have it inspected and
repaired. This service can be complex. See
your dealer.
Do not directly power wash the transfer
case and/or front/rear axle output seals.
High pressure water can overcome the seals
and contaminate the fluid. Contaminated
fluid will decrease the life of the transfer
case and/or drive axles and should be
replaced.
Noise Control System
NOISE EMISSIONS WARRANTY
General Motors LLC, warrants to the first
person who purchases this vehicle for
purposes other than resale and to each
subsequent purchaser that this vehicle as
manufactured by General Motors LLC, was
designed, built and equipped to conform at
the time it left General Motors LLC’s control
with all applicable U.S. EPA Noise Control
Regulations. This warranty covers this
vehicle as designed, built and equipped by
Page 352 of 433

Chevrolet Silverado 2500 HD/3500 HD Owner Manual (GMNA-Localizing-U.
S./Canada/Mexico-16908339) - 2024 - CRC - 12/5/22
350 Vehicle Care
Each TPMS sensor has a unique
identification code. The identification code
needs to be matched to a new tire/wheel
position after rotating the tires or replacing
one or more of the TPMS sensors. When a
tire is installed, the vehicle must be
stationary for about 20 minutes before the
system recalculates. The following relearn
process takes up to 10 minutes, driving at a
minimum speed of 20 km/h (12 mph).
A dash (-) or pressure value will display in
the DIC. SeeDriver Information Center (DIC)
(Base Level) 0126 orDriver Information
Center (DIC) (Uplevel) 0128. A warning
message displays in the DIC if a problem
occurs during the relearn process.
Trailer Tire Pressure Monitoring
Operation
If equipped, the Trailer Tire Pressure
Monitoring System (TTPMS) is designed to
monitor the pressure of the trailer tires and
warn the driver when a low pressure
condition exists. TTPMS sensors for four tires
are provided. The system can accommodate
a trailer with up to six tires if additional
sensors are purchased from the dealer. Also,
the system can be paired with up to five
individual trailers. Prior to use, the vehicle must learn the
sensors by following the learning process.
See
Trailering App 0290.
Contact your trailer service center or tire
service center to have the pressure sensors
installed inside the trailer tires. The
technician should insert the sensor stem
through the hole in the trailer wheel. When
the sensor is correctly positioned, the nut on
the sensor stem should be tightened to
8Y (6 lb ft). When mounting the trailer
tire onto the trailer wheel be careful not to
damage the sensor.
The Trailering App can be used to view the
tire pressures after the recommended trailer
tire pressures have been entered. Refer to the trailer tire placard on the trailer or the
trailer tire sidewall for the recommended
tire pressure.
The system is compatible with trailer tires
that have placard pressure values from
103 - 689 kpa (15 - 100 psi). The hole in the
wheel for the tire stem must be 11.43 mm
(0.453 in) or 15.88 mm (0.625 in) in
diameter. Use of the pressure sensors on a
wheel with a different stem hole size could
result in loss of air from the tire.
If a low trailer tire pressure condition is
detected, the TTPMS displays a warning
message on the DIC. If the warning message
is displayed, stop as soon as possible and
inflate the tires to the recommended
pressure shown on the tire placard on the
trailer.
In addition, the TTPMS monitors the
temperature of the trailer tires. If the
system detects a high temperature on one
or more of the trailer tires, a warning
message will be displayed on the DIC. If this
warning message is displayed, stop as soon
as possible, and inspect the overheated
trailer tire. Common causes for high trailer
tire temperature are underinflation,
overloading, or tire damage.
Page 357 of 433
Chevrolet Silverado 2500 HD/3500 HD Owner Manual (GMNA-Localizing-U.
S./Canada/Mexico-16908339) - 2024 - CRC - 12/5/22
Vehicle Care 355
affected if all the tires are not replaced
at the same time. If proper rotation and
maintenance have been done, all four
tires (six for dual rear wheels) should
wear out at about the same time.
However, if it is necessary to replace
only one axle set of worn tires, place
the new tires on the rear axle (two for
single rear wheels, four for dual rear
wheels). SeeTire Rotation 0351.
{Warning
Tires could explode during improper
service. Attempting to mount or
dismount a tire could cause injury or
death. Only your dealer or authorized
tire service center should mount or
dismount the tires.
{Warning
Mixing tires of different sizes (other
than those originally installed on the
vehicle), brands, tread patterns,
or types may cause loss of vehicle
(Continued)
Warning (Continued)
control, resulting in a crash or other
vehicle damage. Use the correct size,
brand, and type of tire on all wheels.
{Warning
Using bias-ply tires on the vehicle
may cause the wheel rim flanges to
develop cracks after many miles of
driving. A tire and/or wheel could fail
suddenly and cause a crash. Use only
radial-ply tires with the wheels on
the vehicle.
Winter tires with the same speed rating
as the original equipment tires may not
be available for H, V, W, Y and ZR
speed rated tires. Never exceed the
winter tires’ maximum speed capability
when using winter tires with a lower
speed rating.
If the vehicle tires must be replaced
with a tire that does not have a TPC
Spec number, make sure they are the same size, load range, speed rating, and
construction (radial) as the original
tires.
The Tire and Loading Information label
indicates the original equipment tires
on the vehicle. See
Vehicle Load Limits
0 204.
Different Size Tires and Wheels
If wheels or tires are installed that are a
different size than the original equipment
wheels and tires, vehicle performance,
including its braking, ride and handling
characteristics, stability, and resistance to
rollover may be affected. If the vehicle has
electronic systems such as antilock brakes,
rollover airbags, traction control, electronic
stability control, or All-Wheel Drive, the
performance of these systems can also be
affected.
{Warning
If different sized wheels are used, there
may not be an acceptable level of
performance and safety if tires not
recommended for those wheels are
selected. This increases the chance of a
(Continued)
Page 361 of 433
Chevrolet Silverado 2500 HD/3500 HD Owner Manual (GMNA-Localizing-U.
S./Canada/Mexico-16908339) - 2024 - CRC - 12/5/22
Vehicle Care 359
If a front tire fails, the flat tire creates a
drag that pulls the vehicle toward that side.
Take your foot off the accelerator pedal and
grip the steering wheel firmly. Steer to
maintain lane position, and then gently
brake to a stop, well off the road,
if possible.
A rear blowout, particularly on a curve, acts
much like a skid and may require the same
correction as used in a skid. Stop pressing
the accelerator pedal and steer to straighten
the vehicle. It may be very bumpy and
noisy. Gently brake to a stop, well off the
road, if possible.
{Warning
Driving on a flat tire will cause
permanent damage to the tire.
Re-inflating a tire after it has been driven
on while severely underinflated or flat
may cause a blowout and a serious crash.
Never attempt to re-inflate a tire that has
been driven on while severely
underinflated or flat. Have your dealer or
an authorized tire service center repair or
replace the flat tire as soon as possible.
{Warning
Lifting a vehicle and getting under it to
do maintenance or repairs is dangerous
without the appropriate safety equipment
and training. If a jack is provided with
the vehicle, it is designed only for
changing a flat tire. If it is used for
anything else, you or others could be
badly injured or killed if the vehicle slips
off the jack. If a jack is provided with the
vehicle, only use it for changing a
flat tire.
If a tire goes flat, avoid further tire and
wheel damage by driving slowly to a level
place, well off the road, if possible. Turn on
the hazard warning flashers. See Hazard
Warning Flashers 0141.
If your vehicle is loaded at or near
maximum cargo capacity, it may be difficult
to fit the jack under the vehicle due to the
environment (shoulder slope, road debris,
etc.). Removal of some weight may improve
the ability to fit the jack under the vehicle
at the correct jacking location.
{Warning
Changing a tire can be dangerous. The
vehicle can slip off the jack and roll over
or fall causing injury or death. Find a
level place to change the tire. To help
prevent the vehicle from moving:
1. Set the parking brake firmly.
2. Shift the vehicle to P (Park).
3. For vehicles with four-wheel drive with an N (Neutral) transfer case
position, be sure the transfer case is
in a drive gear —not in N (Neutral).
4. Turn off the engine and do not restart while the vehicle is raised.
5. Do not allow passengers to remain in the vehicle.
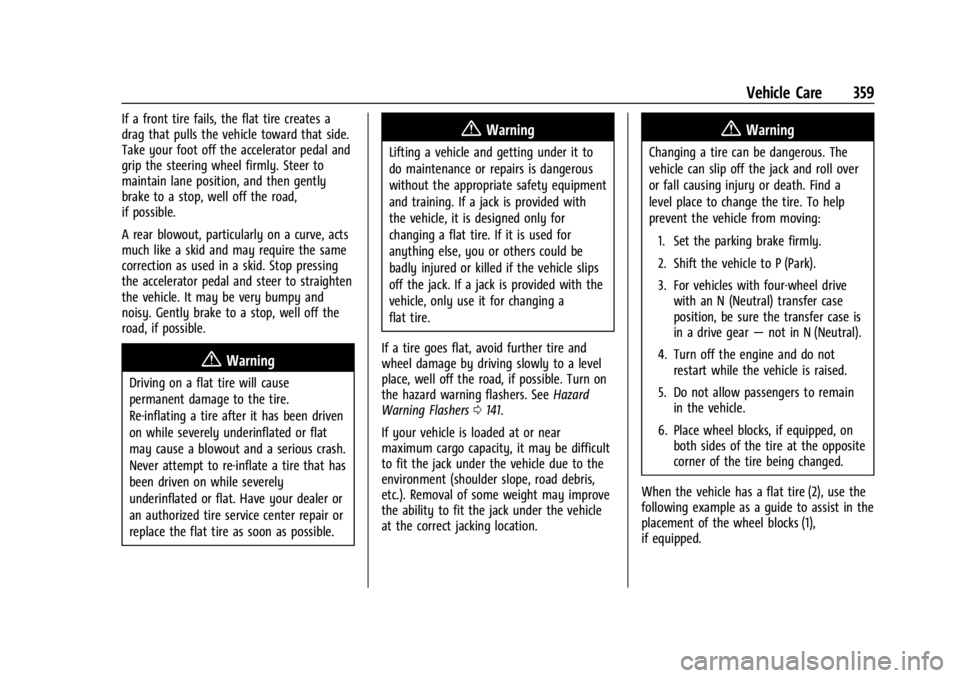
6. Place wheel blocks, if equipped, on both sides of the tire at the opposite
corner of the tire being changed.
When the vehicle has a flat tire (2), use the
following example as a guide to assist in the
placement of the wheel blocks (1),
if equipped.
Page 372 of 433
Chevrolet Silverado 2500 HD/3500 HD Owner Manual (GMNA-Localizing-U.
S./Canada/Mexico-16908339) - 2024 - CRC - 12/5/22
370 Vehicle Care
Correctly Stored
Incorrectly Stored
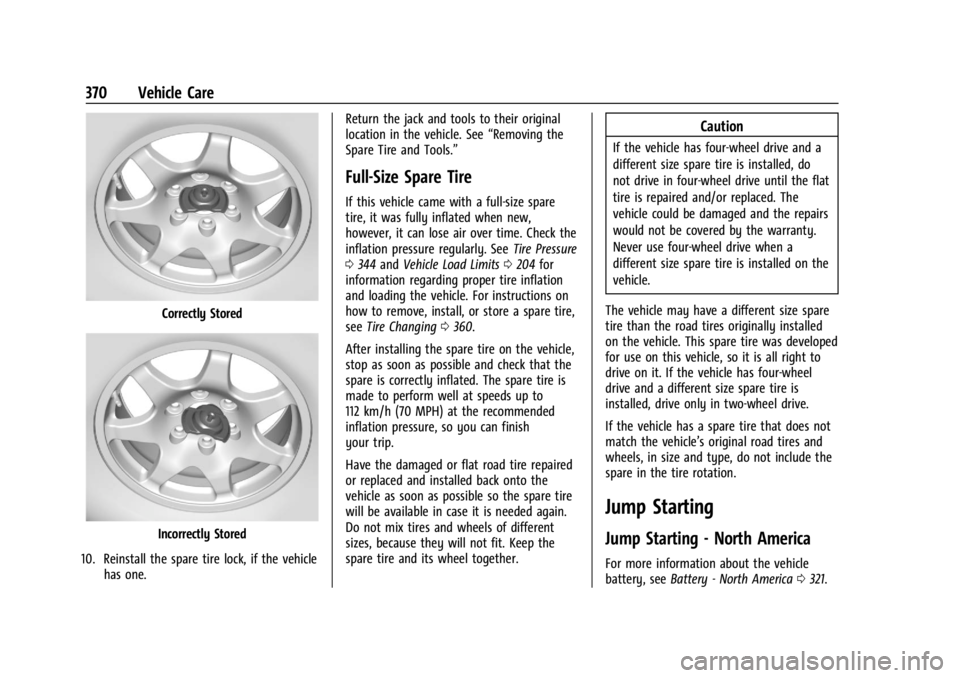
10. Reinstall the spare tire lock, if the vehicle has one. Return the jack and tools to their original
location in the vehicle. See
“Removing the
Spare Tire and Tools.”
Full-Size Spare Tire
If this vehicle came with a full-size spare
tire, it was fully inflated when new,
however, it can lose air over time. Check the
inflation pressure regularly. See Tire Pressure
0 344 and Vehicle Load Limits 0204 for
information regarding proper tire inflation
and loading the vehicle. For instructions on
how to remove, install, or store a spare tire,
see Tire Changing 0360.
After installing the spare tire on the vehicle,
stop as soon as possible and check that the
spare is correctly inflated. The spare tire is
made to perform well at speeds up to
112 km/h (70 MPH) at the recommended
inflation pressure, so you can finish
your trip.
Have the damaged or flat road tire repaired
or replaced and installed back onto the
vehicle as soon as possible so the spare tire
will be available in case it is needed again.
Do not mix tires and wheels of different
sizes, because they will not fit. Keep the
spare tire and its wheel together.
Caution
If the vehicle has four-wheel drive and a
different size spare tire is installed, do
not drive in four-wheel drive until the flat
tire is repaired and/or replaced. The
vehicle could be damaged and the repairs
would not be covered by the warranty.
Never use four-wheel drive when a
different size spare tire is installed on the
vehicle.
The vehicle may have a different size spare
tire than the road tires originally installed
on the vehicle. This spare tire was developed
for use on this vehicle, so it is all right to
drive on it. If the vehicle has four-wheel
drive and a different size spare tire is
installed, drive only in two-wheel drive.
If the vehicle has a spare tire that does not
match the vehicle’s original road tires and
wheels, in size and type, do not include the
spare in the tire rotation.
Jump Starting
Jump Starting - North America
For more information about the vehicle
battery, see Battery - North America 0321.
Page 374 of 433
Chevrolet Silverado 2500 HD/3500 HD Owner Manual (GMNA-Localizing-U.
S./Canada/Mexico-16908339) - 2024 - CRC - 12/5/22
372 Vehicle Care
The discharged battery positive (+) terminal
is under a cover. Open the cover to expose
the terminal.1. Check the other vehicle. It must have a 12-volt battery with a negative ground
system.
Caution
If the other vehicle does not have a
12-volt system with a negative ground,
both vehicles can be damaged. Only use
a vehicle that has a 12-volt system with a
negative ground for jump starting.
2. If you have a vehicle with a diesel engine with two batteries, you should
know before you begin that, especially in
cold weather, you may not be able to
get enough power from a single battery
in another vehicle to start your diesel
engine. If your vehicle has more than
one battery, using the battery that is
closer to the starter will reduce electrical
resistance. This is located on the
passenger side, in the rear of the engine
compartment.
3. Get the vehicles close enough so the jumper cables can reach, but be sure the
vehicles are not touching each other. If they are, it could cause an unwanted
ground connection. You would not be
able to start your vehicle, and the bad
grounding could damage the electrical
systems.
To avoid the possibility of the vehicles
rolling, set the parking brake firmly on
both vehicles involved in the jump start
procedure. Put the automatic
transmission in P (Park) before setting
the parking brake. If you have a
four-wheel-drive vehicle, be sure the
transfer case is in a drive gear, not in
N (Neutral).
Caution
If any accessories are left on or plugged
in during the jump starting procedure,
they could be damaged. The repairs
would not be covered by the vehicle
warranty. Whenever possible, turn off or
unplug all accessories on either vehicle
when jump starting.
4. Turn the ignition off on both vehicles. Unplug unnecessary accessories plugged
into the accessory power outlets. Turn
off the radio and all the lamps that are not needed. This will avoid sparks and
help save both batteries. And it could
save the radio!
5. Open the hood on the other vehicle and locate the positive (+) and negative (−)
terminal locations on that vehicle.
{Warning
An electric fan can start up even when
the engine is not running and can injure
you. Keep hands, clothing, and tools
away from any underhood electric fan.
{Warning
Using a match near a battery can cause
battery gas to explode. People have been
hurt doing this, and some have been
blinded. Use a flashlight if you need
more light.
Battery fluid contains acid that can burn
you. Do not get it on you. If you
accidentally get it in your eyes or on
your skin, flush the place with water and
get medical help immediately.
Page 377 of 433
Chevrolet Silverado 2500 HD/3500 HD Owner Manual (GMNA-Localizing-U.
S./Canada/Mexico-16908339) - 2024 - CRC - 12/5/22
Vehicle Care 375
ground. Dolly towing is towing the vehicle
with two wheels on the ground and two
wheels on a dolly.
Here are some important things to consider
before recreational vehicle towing:
.Before towing the vehicle, become
familiar with the local laws that apply to
recreational vehicle towing. These laws
may vary by region.
.The towing capacity of the towing
vehicle. Read the tow vehicle
manufacturer's recommendations.
.How far the vehicle can be towed. Some
vehicles have restrictions on how far and
how long the vehicle can be towed.
.Whether the vehicle has the proper
towing equipment. See your dealer or
trailering professional for additional
advice and equipment recommendations.
.Whether the vehicle is ready to be towed.
Just as preparing the vehicle for a long
trip, make sure the vehicle is prepared to
be towed.
Follow the tow vehicle manufacturer’s
instructions. See your dealer or trailering
professional for additional advice and
equipment recommendations.
Caution
Use of a shield mounted in front of the
vehicle grille could restrict airflow and
cause damage to the transmission. The
repairs would not be covered by the
vehicle warranty. If using a shield, only
use one that attaches to the towing
vehicle.
Dinghy Towing (Two-Wheel Drive)
Caution
If a two-wheel-drive vehicle is towed with
the rear wheels on the ground, the
transmission could be damaged. The
(Continued)
Caution (Continued)
repairs would not be covered by the
vehicle warranty. Never tow the vehicle
with the rear wheels on the ground.
Two-wheel-drive vehicles should not be
towed with all four wheels on the ground.
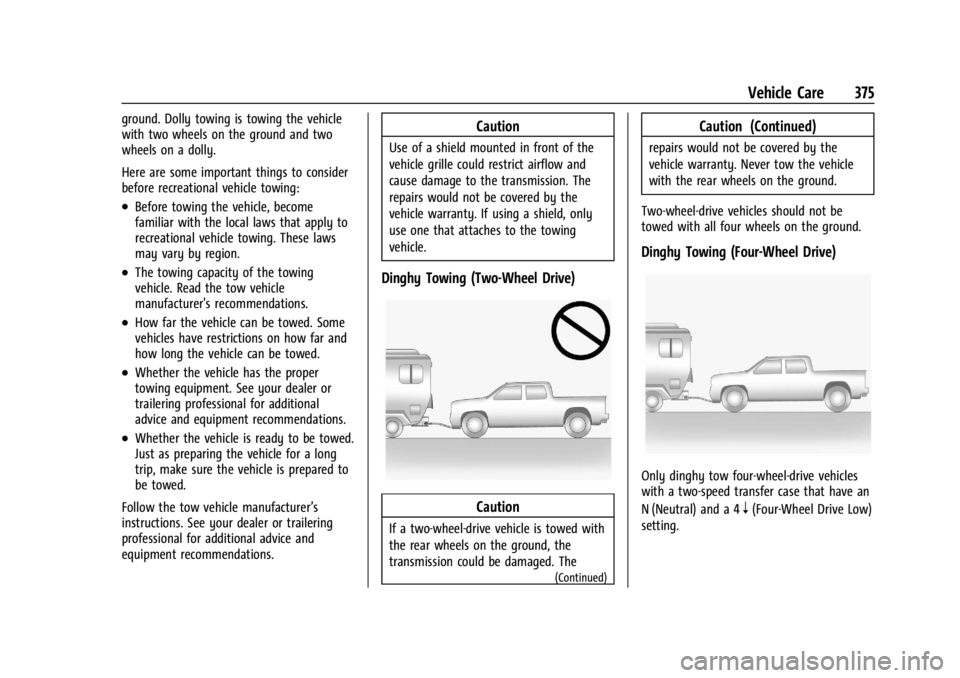
Dinghy Towing (Four-Wheel Drive)
Only dinghy tow four-wheel-drive vehicles
with a two-speed transfer case that have an
N (Neutral) and a 4
n(Four-Wheel Drive Low)
setting.