2024 CHEVROLET SILVERADO height
[x] Cancel search: heightPage 295 of 433

Chevrolet Silverado 2500 HD/3500 HD Owner Manual (GMNA-Localizing-U.
S./Canada/Mexico-16908339) - 2024 - CRC - 12/12/22
Driving and Operating 293
.Trailer Width: 120 cm (47.2 in)–260 cm
(102.3 in). Measure from the left edge of
the trailer to the right edge.
.Trailer Height: 1 cm (0.39 in) –450 cm
(177.1 in). Measure from the ground to
tallest point of the trailer.
.Hitching Point Length: 180 cm (70.8 in) –
970 cm (381.8 in). Measure from the
center of the coupler to the middle of
tires.
.Trailer Tongue Length: 50 cm (19.6 in) –
220 cm (86.6 in). Measure from the center
of the coupler to the trailer front wall if
trailer has a flat front. If it does not have
a flat front, measure from the center of
the coupler to the point where the taper
meets the full width of the trailer.
.Vehicle Hitch Height: 10 cm (3.9 in) –
100 cm (39.3 in). Measure from the
ground to the top of coupler.
.Vehicle Hitch Length: 10 cm (3.9 in) –
100 cm (39.3 in). Measure from the hitch
receiver to the center of ball.
Dimensions for a bed hitch (gooseneck or
fifth wheel) trailer:
.Trailer Length: 300 cm (118.1 in) –2500 cm
(984.2 in). Measure from the front bottom
corner of the trailer to the furthest rear
point of the trailer.
.Trailer Box Width: 3 cm (1 in) –300 cm
(118.1 in). Measure the flat width at the
front bottom corners of the trailer.
.Hitching Point Length: 3 cm (1 in) –
1524 cm (600 in). Measure from the center
of the king pin (for fifth wheel) or coupler
(for gooseneck) to the middle of tires.
.Vehicle Cab to Trailer Length: 3 cm (1 in) –
610 cm (240.2 in). Measure from the back
of the vehicle cab to the front bottom
corner of the trailer.
.Vehicle Cab to Hitch Length: 3 cm (1 in) –
305 cm (120.1 in). Measure from the back
of vehicle cab to the center of the king
pin (for fifth wheel) or coupler (for
gooseneck).
Rear Trailer Guidance Setup
If equipped, a rear trailer camera must be
mounted on the trailer and electrically
connected to the vehicle before rear trailer
guidance feature can be used. See Assistance
Systems for Parking or Backing 0247.
Follow the on-screen instructions to enter
trailer dimensions.
Trailer dimensions must be in range to
enable this feature.
.Trailer Length: 300 cm (118.1 in) –1300 cm
(511.8 in). Measure from center of coupler
to furthest rear point on the trailer.
1. If trailer dimensions are out of range, this feature will be unavailable.
2. Ensure rear trailer camera is connected.
3. Follow the on-screen instructions to drive forward to complete calibration.
Jack-Knife Alert Setup
If equipped, follow the on-screen instructions
to drive forward to complete calibration.
Trailer Length Indicator Setup
If equipped, follow the on-screen instructions
to drive forward to complete calibration.
Trailer Side Blind Zone Alert Setup
If equipped, trailer dimensions must be in
range to enable this feature.
Follow the on-screen instructions to enter
trailer dimensions.
.Trailer Length: 300 cm (118.1 in) –1200 cm
(472.4 in). Measure from center of coupler
to furthest rear point on the trailer.
.Vehicle Hitch Length: 10 cm (3.9 in) –
100 cm (839.3 in). Measure from the hitch
receiver to the center of ball.
Page 307 of 433
Chevrolet Silverado 2500 HD/3500 HD Owner Manual (GMNA-Localizing-U.
S./Canada/Mexico-16908339) - 2024 - CRC - 12/5/22
Vehicle Care 305
Caution (Continued)
overload the vehicle. SeeVehicle Load
Limits 0204 and
Trailer Towing 0274 for those specific
weight ratings.
Damage to suspension components caused
by modifying vehicle height outside of
factory settings will not be covered by the
vehicle warranty.
Damage to vehicle components resulting
from modifications or the installation or use
of non-GM certified parts, including control
module or software modifications, is not
covered under the terms of the vehicle
warranty and may affect remaining
warranty coverage for affected parts.
GM Accessories are designed to complement
and function with other systems on the
vehicle. See your dealer to accessorize the
vehicle using genuine GM Accessories
installed by a dealer technician.
Also, see Adding Equipment to the
Airbag-Equipped Vehicle 069.
Vehicle Checks
Doing Your Own Service Work
{Warning
It can be dangerous to work on your
vehicle if you do not have the proper
knowledge, service manual, tools,
or parts. Always follow owner’s manual
procedures and consult the service
manual for your vehicle before doing any
service work.
If doing some of your own service work, use
the proper service manual. It tells you much
more about how to service the vehicle than
this manual can. To order the proper service
manual, see Publication Ordering
Information 0406.
This vehicle has an airbag system. Before
attempting to do your own service work,
see Servicing the Airbag-Equipped Vehicle
0 69.
If equipped with remote vehicle start, open
the hood before performing any service
work to prevent remote starting the vehicle
accidentally. See Remote Vehicle Start 018. Keep a record with all parts receipts and list
the mileage and the date of any service
work performed. See
Maintenance Records
0 394.
Caution
Even small amounts of contamination can
cause damage to vehicle systems. Do not
allow contaminants to contact the fluids,
reservoir caps, or dipsticks.
Hood
{Warning
Turn the vehicle off before opening the
hood. If the engine is running with the
hood open, you or others could be
injured.
{Warning
Components under the hood can get hot
from running the engine. To help avoid
the risk of burning unprotected skin,
never touch these components until they
have cooled, and always use a glove or
towel to avoid direct skin contact.
Page 321 of 433
Chevrolet Silverado 2500 HD/3500 HD Owner Manual (GMNA-Localizing-U.
S./Canada/Mexico-16908339) - 2024 - CRC - 12/5/22
Vehicle Care 319
Caution (Continued)
.Do not use engine coolant (antifreeze)
in the windshield washer. It can
damage the windshield washer system
and paint.
.Do not mix water with ready-to-use
washer fluid. Water can cause the
solution to freeze and damage the
washer fluid tank and other parts of
the washer system.
.When using concentrated washer fluid,
follow the manufacturer instructions
for adding water.
.Fill the washer fluid tank only
three-quarters full when it is very cold.
This allows for fluid expansion if
freezing occurs, which could damage
the tank if it is completely full.
Brakes
Disc brake linings have built-in wear
indicators that make a high-pitched warning
sound when the brake linings are worn and
new linings are needed. The sound can come
and go or can be heard all the time when
the vehicle is moving, except when applying
the brake pedal firmly.
{Warning
The brake wear warning sound means
that soon the brakes will not work well.
That could lead to a crash. When the
brake wear warning sound is heard, have
the vehicle serviced.
Caution
Continuing to drive with worn-out brake
linings could result in costly brake
repairs.
Some driving conditions or climates can
cause a brake squeal when the brakes are
first applied, clearing up following several
applications. This does not mean something
is wrong with the brakes.
Properly torqued wheel nuts are necessary
to help prevent brake pulsation. When tires
are rotated, inspect brake linings for wear
and evenly tighten wheel nuts in the proper
sequence to torque specifications. See
Capacities and Specifications 0396.
Brake pads should be replaced as complete
axle sets.
Brake Pedal Travel
See your dealer if the brake pedal does not
return to normal height, or if there is a
rapid increase in pedal travel. This could be
a sign that brake service may be required.
Replacing Brake System Parts
Always replace brake system parts with
new, approved replacement parts. If this is
not done, the brakes may not work
properly. The braking performance can
change in many ways if the wrong brake
parts are installed or if parts are improperly
installed.
Brake Pad Life System
When to Change Brake Pads
This vehicle has a system that estimates the
remaining life of the front and rear brake
pads. Brake pad life is displayed in the
Driver Information Center (DIC), along with
a percentage for each axle. The system must
be reset every time the brake pads are
changed.
When the system has determined that the
brake pads need to be replaced, a message
will display, which may include mileage
remaining.
Page 343 of 433
Chevrolet Silverado 2500 HD/3500 HD Owner Manual (GMNA-Localizing-U.
S./Canada/Mexico-16908339) - 2024 - CRC - 12/5/22
Vehicle Care 341
Winter tires with the same speed rating as
the original equipment tires may not be
available for H, V, W, Y, and ZR speed rated
tires. If winter tires with a lower speed
rating are chosen, never exceed the tire's
maximum speed capability.
All-Terrain Tires
This vehicle may have all-terrain or
mud-terrain tires. These tires provide good
performance on most road surfaces, weather
conditions, and for off-road driving. See
Off-Road Driving0197.
The tread pattern on these tires may wear
more unevenly than other tires. Consider
rotating the tires more frequently than at
12 000 km (7,500 mi) intervals if irregular
wear is noted when the tires are inspected.
See Tire Inspection 0351.
Tire Sidewall Labeling
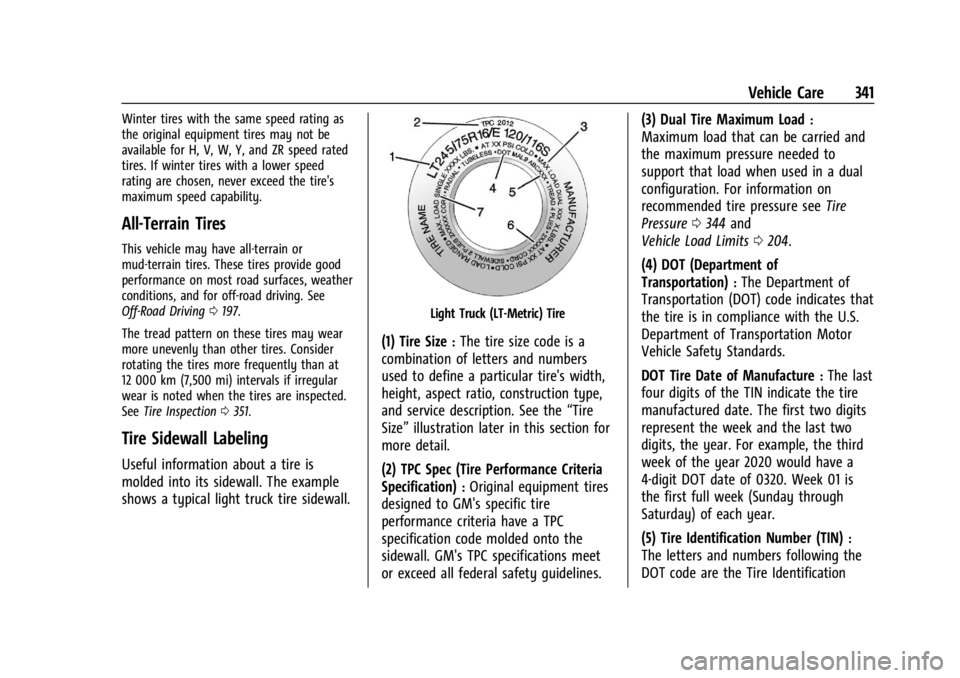
Useful information about a tire is
molded into its sidewall. The example
shows a typical light truck tire sidewall.
Light Truck (LT-Metric) Tire
(1) Tire Size:The tire size code is a
combination of letters and numbers
used to define a particular tire's width,
height, aspect ratio, construction type,
and service description. See the “Tire
Size” illustration later in this section for
more detail.
(2) TPC Spec (Tire Performance Criteria
Specification)
:Original equipment tires
designed to GM's specific tire
performance criteria have a TPC
specification code molded onto the
sidewall. GM's TPC specifications meet
or exceed all federal safety guidelines. (3) Dual Tire Maximum Load
:
Maximum load that can be carried and
the maximum pressure needed to
support that load when used in a dual
configuration. For information on
recommended tire pressure see
Tire
Pressure 0344 and
Vehicle Load Limits 0204.
(4) DOT (Department of
Transportation)
:The Department of
Transportation (DOT) code indicates that
the tire is in compliance with the U.S.
Department of Transportation Motor
Vehicle Safety Standards.
DOT Tire Date of Manufacture
:The last
four digits of the TIN indicate the tire
manufactured date. The first two digits
represent the week and the last two
digits, the year. For example, the third
week of the year 2020 would have a
4-digit DOT date of 0320. Week 01 is
the first full week (Sunday through
Saturday) of each year.
(5) Tire Identification Number (TIN)
:
The letters and numbers following the
DOT code are the Tire Identification
Page 344 of 433
Chevrolet Silverado 2500 HD/3500 HD Owner Manual (GMNA-Localizing-U.
S./Canada/Mexico-16908339) - 2024 - CRC - 12/5/22
342 Vehicle Care
Number (TIN). The TIN shows the
manufacturer and plant code, tire size,
and date the tire was manufactured.
The TIN is molded onto both sides of
the tire, although only one side may
have the date of manufacture.
(6) Tire Ply Material
:The type of cord
and number of plies in the sidewall and
under the tread.
(7) Single Tire Maximum Load
:
Maximum load that can be carried and
the maximum pressure needed to
support that load when used as a
single. For information on
recommended tire pressure see Tire
Pressure 0344 and
Vehicle Load Limits 0204.
Tire Designations
Tire Size
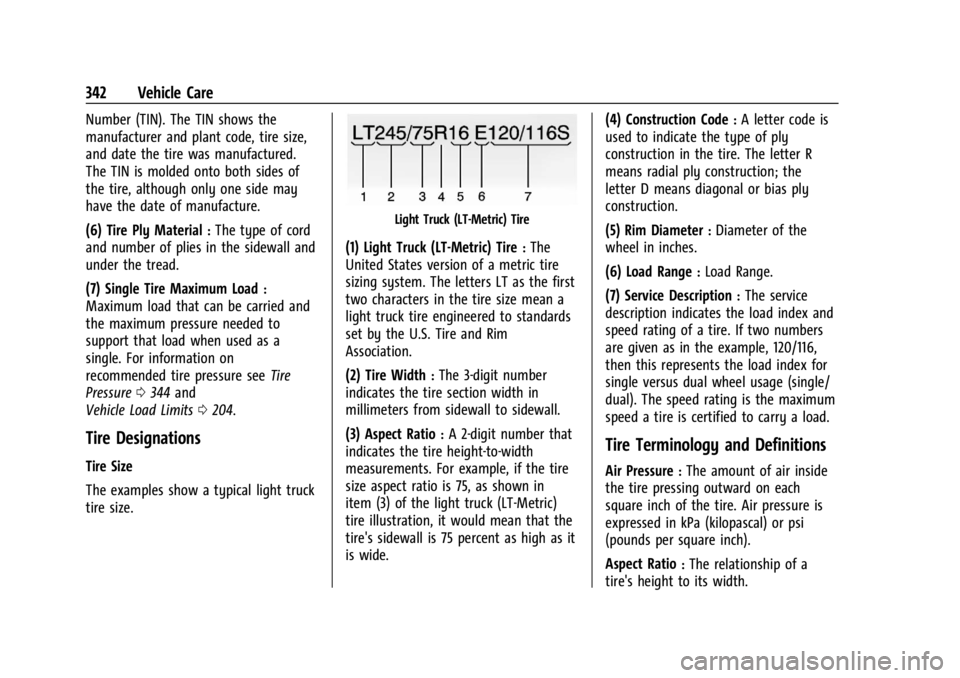
The examples show a typical light truck
tire size.
Light Truck (LT-Metric) Tire
(1) Light Truck (LT-Metric) Tire:The
United States version of a metric tire
sizing system. The letters LT as the first
two characters in the tire size mean a
light truck tire engineered to standards
set by the U.S. Tire and Rim
Association.
(2) Tire Width
:The 3-digit number
indicates the tire section width in
millimeters from sidewall to sidewall.
(3) Aspect Ratio
:A 2-digit number that
indicates the tire height-to-width
measurements. For example, if the tire
size aspect ratio is 75, as shown in
item (3) of the light truck (LT-Metric)
tire illustration, it would mean that the
tire's sidewall is 75 percent as high as it
is wide. (4) Construction Code
:A letter code is
used to indicate the type of ply
construction in the tire. The letter R
means radial ply construction; the
letter D means diagonal or bias ply
construction.
(5) Rim Diameter
:Diameter of the
wheel in inches.
(6) Load Range
:Load Range.
(7) Service Description
:The service
description indicates the load index and
speed rating of a tire. If two numbers
are given as in the example, 120/116,
then this represents the load index for
single versus dual wheel usage (single/
dual). The speed rating is the maximum
speed a tire is certified to carry a load.
Tire Terminology and Definitions
Air Pressure:The amount of air inside
the tire pressing outward on each
square inch of the tire. Air pressure is
expressed in kPa (kilopascal) or psi
(pounds per square inch).
Aspect Ratio
:The relationship of a
tire's height to its width.
Page 360 of 433
Chevrolet Silverado 2500 HD/3500 HD Owner Manual (GMNA-Localizing-U.
S./Canada/Mexico-16908339) - 2024 - CRC - 12/5/22
358 Vehicle Care
Caution
The wrong wheel can also cause
problems with bearing life, brake cooling,
speedometer or odometer calibration,
headlamp aim, bumper height, vehicle
ground clearance, and tire or tire chain
clearance to the body and chassis.
Tire Chains
{Warning
If the vehicle has LT275/65R20, LT265/
60R22, or LT305/70R18E size tires, do not
use tire chains. There is not enough
clearance. Tire chains used on a vehicle
without the proper amount of clearance
can cause damage to the brakes,
suspension, or other vehicle parts. The
area damaged by the tire chains could
cause loss of control and a crash. Use
another type of traction device only if its
manufacturer recommends it for the
vehicle’s tire size combination and road
conditions. Follow that manufacturer’s
instructions. To avoid vehicle damage,
drive slow and readjust or remove the(Continued)
Warning (Continued)
traction device if it is contacting the
vehicle. Do not spin the wheels.
If traction devices are used, install them
on the rear tires.
Caution
Use tire chains only where legal and only
when necessary. Use chains that are the
proper size for the tires. If the vehicle has
LT235/80R17 size tires, install the chains
on the tires of the rear axle only. If the
vehicle has LT245/75R17, LT265/70R17,
or LT275/70R18 size tires, install the
chains on the tires of the front and rear
axle. Tighten them as tightly as possible
with the ends securely fastened. Drive
slowly and follow the chain
manufacturer’s instructions. If the chains
contact the vehicle, stop and retighten
them. If the contact continues, slow
down until it stops. Driving too fast or
spinning the wheels with chains on will
damage the vehicle.
Caution
If the vehicle is equipped with LT235/
80R18 size tires, use tire chains only
where legal and only when necessary.
Use low profile chains that add no more
than 12 mm (0.5 in) thickness to the tire
tread and sidewalls. Use chains that are
the proper size for the tires. Install them
on the tires of the rear axle only. Tighten
them as tightly as possible with the ends
securely fastened. Drive slowly and follow
the chain manufacturer’s instructions.
If the chains contact the vehicle, stop and
retighten them. If the contact continues,
slow down until it stops. Driving too fast
or spinning the wheels with chains on
will damage the vehicle.
If a Tire Goes Flat
It is unusual for a tire to blow out while
driving, especially if the tires are maintained
properly. SeeTires0339. If air goes out of
a tire, it is much more likely to leak out
slowly. But if there ever is a blowout, here
are a few tips about what to expect and
what to do:
Page 367 of 433
Chevrolet Silverado 2500 HD/3500 HD Owner Manual (GMNA-Localizing-U.
S./Canada/Mexico-16908339) - 2024 - CRC - 12/5/22
Vehicle Care 365
If a snow plow has been added to the
front of the vehicle, lower the snow
plow fully before raising the vehicle.
Make sure that the jack head is
positioned so that the rear axle is resting
securely between the grooves that are
on the jack head.
{Warning
Getting under a vehicle when it is lifted
on a jack is dangerous. If the vehicle slips
off the jack, you could be badly injured
or killed. Never get under a vehicle when
it is supported only by a jack.
{Warning
Raising the vehicle with the jack
improperly positioned can damage the
vehicle and even make the vehicle fall. To
help avoid personal injury and vehicle
damage, be sure to fit the jack lift head
into the proper location before raising
the vehicle.
{Warning
The jack has a feature to limit its travel
to prevent overextension. When the
height limit is reached, an increase in
resistance if felt when attempting to
raise the jack farther. Raising the jack
past the height limit can damage the jack
pin and cause the jack to lock into an
overextended position or not lower fully.
Do not attempt to force the jack higher
once the height limit is reached.
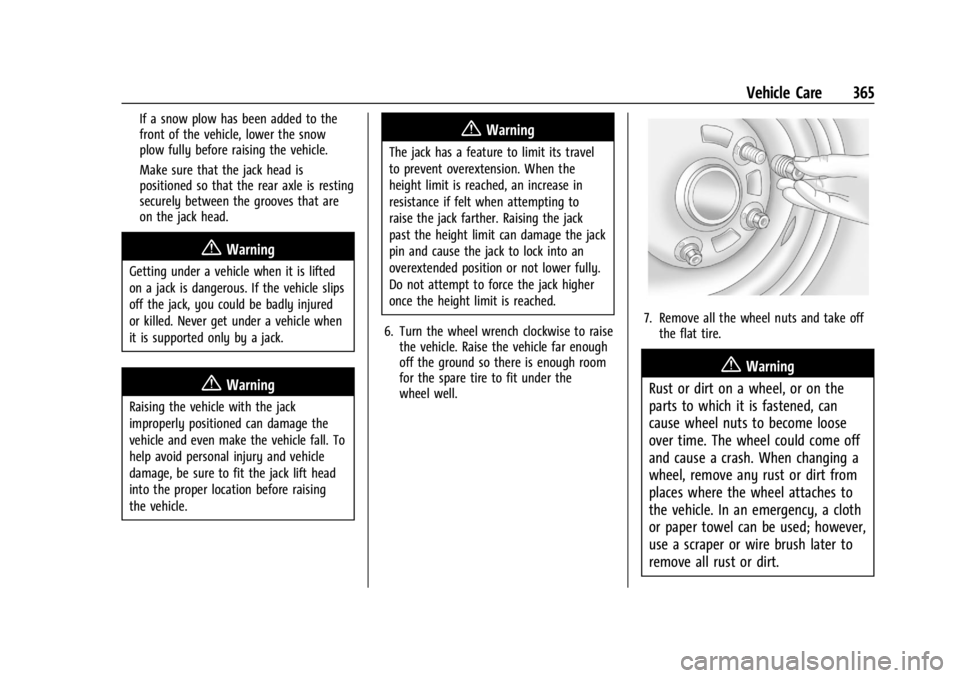
6. Turn the wheel wrench clockwise to raise the vehicle. Raise the vehicle far enough
off the ground so there is enough room
for the spare tire to fit under the
wheel well.
7. Remove all the wheel nuts and take offthe flat tire.
{Warning
Rust or dirt on a wheel, or on the
parts to which it is fastened, can
cause wheel nuts to become loose
over time. The wheel could come off
and cause a crash. When changing a
wheel, remove any rust or dirt from
places where the wheel attaches to
the vehicle. In an emergency, a cloth
or paper towel can be used; however,
use a scraper or wire brush later to
remove all rust or dirt.