Page 330 of 433

Chevrolet Silverado 2500 HD/3500 HD Owner Manual (GMNA-Localizing-U.
S./Canada/Mexico-16908339) - 2024 - CRC - 12/5/22
328 Vehicle Care
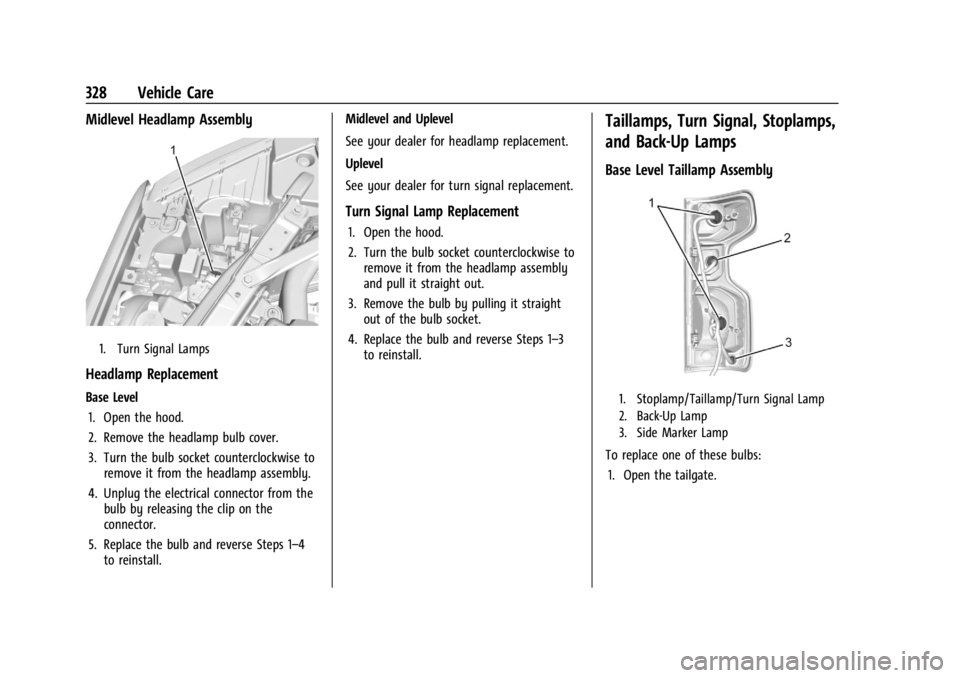
Midlevel Headlamp Assembly
1. Turn Signal Lamps
Headlamp Replacement
Base Level1. Open the hood.
2. Remove the headlamp bulb cover.
3. Turn the bulb socket counterclockwise to remove it from the headlamp assembly.
4. Unplug the electrical connector from the bulb by releasing the clip on the
connector.
5. Replace the bulb and reverse Steps 1–4 to reinstall. Midlevel and Uplevel
See your dealer for headlamp replacement.
Uplevel
See your dealer for turn signal replacement.
Turn Signal Lamp Replacement
1. Open the hood.
2. Turn the bulb socket counterclockwise to
remove it from the headlamp assembly
and pull it straight out.
3. Remove the bulb by pulling it straight out of the bulb socket.
4. Replace the bulb and reverse Steps 1–3 to reinstall.
Taillamps, Turn Signal, Stoplamps,
and Back-Up Lamps
Base Level Taillamp Assembly
1. Stoplamp/Taillamp/Turn Signal Lamp
2. Back-Up Lamp
3. Side Marker Lamp
To replace one of these bulbs:
1. Open the tailgate.
Page 374 of 433

Chevrolet Silverado 2500 HD/3500 HD Owner Manual (GMNA-Localizing-U.
S./Canada/Mexico-16908339) - 2024 - CRC - 12/5/22
372 Vehicle Care
The discharged battery positive (+) terminal
is under a cover. Open the cover to expose
the terminal.1. Check the other vehicle. It must have a 12-volt battery with a negative ground
system.
Caution
If the other vehicle does not have a
12-volt system with a negative ground,
both vehicles can be damaged. Only use
a vehicle that has a 12-volt system with a
negative ground for jump starting.
2. If you have a vehicle with a diesel engine with two batteries, you should
know before you begin that, especially in
cold weather, you may not be able to
get enough power from a single battery
in another vehicle to start your diesel
engine. If your vehicle has more than
one battery, using the battery that is
closer to the starter will reduce electrical
resistance. This is located on the
passenger side, in the rear of the engine
compartment.
3. Get the vehicles close enough so the jumper cables can reach, but be sure the
vehicles are not touching each other. If they are, it could cause an unwanted
ground connection. You would not be
able to start your vehicle, and the bad
grounding could damage the electrical
systems.
To avoid the possibility of the vehicles
rolling, set the parking brake firmly on
both vehicles involved in the jump start
procedure. Put the automatic
transmission in P (Park) before setting
the parking brake. If you have a
four-wheel-drive vehicle, be sure the
transfer case is in a drive gear, not in
N (Neutral).
Caution
If any accessories are left on or plugged
in during the jump starting procedure,
they could be damaged. The repairs
would not be covered by the vehicle
warranty. Whenever possible, turn off or
unplug all accessories on either vehicle
when jump starting.
4. Turn the ignition off on both vehicles. Unplug unnecessary accessories plugged
into the accessory power outlets. Turn
off the radio and all the lamps that are not needed. This will avoid sparks and
help save both batteries. And it could
save the radio!
5. Open the hood on the other vehicle and locate the positive (+) and negative (−)
terminal locations on that vehicle.
{Warning
An electric fan can start up even when
the engine is not running and can injure
you. Keep hands, clothing, and tools
away from any underhood electric fan.
{Warning
Using a match near a battery can cause
battery gas to explode. People have been
hurt doing this, and some have been
blinded. Use a flashlight if you need
more light.
Battery fluid contains acid that can burn
you. Do not get it on you. If you
accidentally get it in your eyes or on
your skin, flush the place with water and
get medical help immediately.
Page 384 of 433

Chevrolet Silverado 2500 HD/3500 HD Owner Manual (GMNA-Localizing-U.
S./Canada/Mexico-16908339) - 2024 - CRC - 12/5/22
382 Vehicle Care
Visually check constant velocity joint boots
and axle seals for leaks.
2500/3500 Series vehicles, at least every
engine oil change lubricate the upper and
lower control arm ball joints.
2500/3500 Series vehicles equipped with
steering linkage, at least every engine oil
change lubricate the tie rod ball joints, idler
arm pivot shaft bearings, idler arm socket,
and pitman arm socket.
Caution
Lubrication of applicable suspension
points should not be done unless the
temperature is−12 °C (10 °F) or higher,
or damage could result.
Body Component Lubrication
Lubricate all key lock cylinders, hood hinges,
liftgate hinges, and the steel fuel door hinge
unless the components are plastic. Applying
silicone grease on weatherstrips with a clean
cloth will make them last longer, seal better,
and not stick or squeak.
Underbody Maintenance
At least twice a year, spring and fall, use
plain water to flush any corrosive materials
from the underbody. Take care to
thoroughly clean any areas where mud and
other debris can collect. If equipped with
power assist steps, extend them and then
use a high pressure wash to clean all joints
and gaps.
Do not directly power wash the transfer
case and/or front/rear axle output seals.
High pressure water can overcome the seals
and contaminate the fluid. Contaminated
fluid will decrease the life of the transfer
case and/or axles and should be replaced.
Sheet Metal Damage
If the vehicle is damaged and requires sheet
metal repair or replacement, make sure the
body repair shop applies anti-corrosion
material to parts repaired or replaced to
restore corrosion protection.
Original manufacturer replacement parts will
provide the corrosion protection while
maintaining the vehicle warranty.
Finish Damage
Quickly repair minor chips and scratches
with touch-up materials available from your
dealer to avoid corrosion. Larger areas of
finish damage can be corrected in your
dealer's body and paint shop.
Chemical Paint Spotting
Airborne pollutants can fall upon and attack
painted vehicle surfaces causing blotchy,
ring-shaped discolorations, and small,
irregular dark spots etched into the paint
surface. Refer to “Finish Care”previously in
this section.
Interior Care
To prevent dirt particle abrasions, regularly
clean the vehicle's interior. Before using
cleaners, read and follow all safety
instructions on the label. While cleaning the
interior, open the doors and windows to get
proper ventilation. Newspapers or dark
garments can transfer color to the vehicle’s
interior.