2024 CHEVROLET SILVERADO key battery
[x] Cancel search: key batteryPage 148 of 433
Chevrolet Silverado 2500 HD/3500 HD Owner Manual (GMNA-Localizing-U.
S./Canada/Mexico-16908339) - 2024 - CRC - 12/5/22
146 Lighting
Rear Reading Lamps
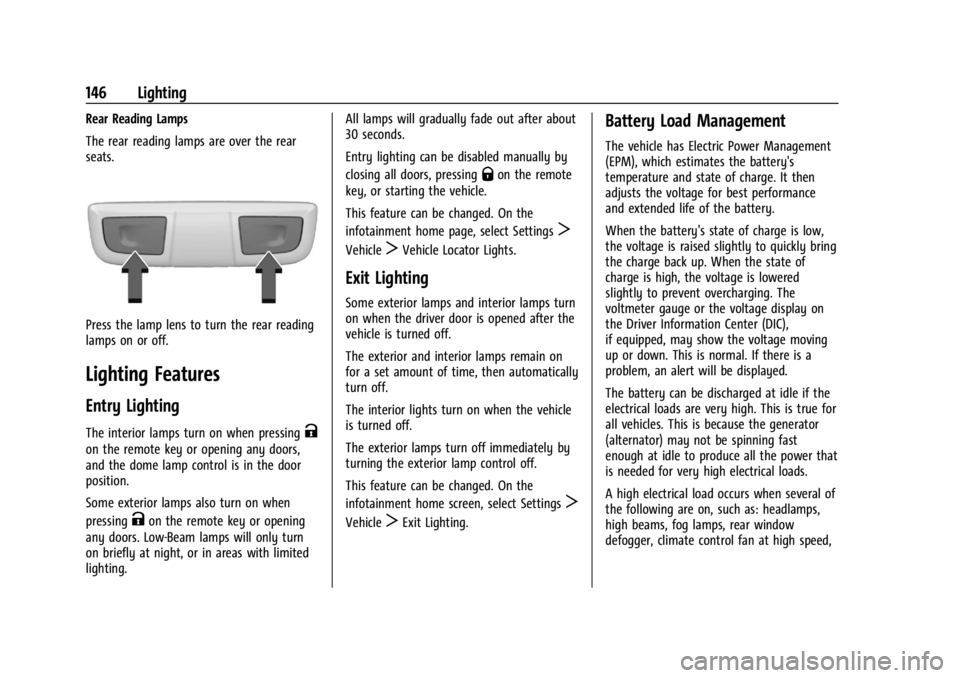
The rear reading lamps are over the rear
seats.
Press the lamp lens to turn the rear reading
lamps on or off.
Lighting Features
Entry Lighting
The interior lamps turn on when pressingK
on the remote key or opening any doors,
and the dome lamp control is in the door
position.
Some exterior lamps also turn on when
pressing
Kon the remote key or opening
any doors. Low-Beam lamps will only turn
on briefly at night, or in areas with limited
lighting. All lamps will gradually fade out after about
30 seconds.
Entry lighting can be disabled manually by
closing all doors, pressing
Qon the remote
key, or starting the vehicle.
This feature can be changed. On the
infotainment home page, select Settings
T
VehicleTVehicle Locator Lights.
Exit Lighting
Some exterior lamps and interior lamps turn
on when the driver door is opened after the
vehicle is turned off.
The exterior and interior lamps remain on
for a set amount of time, then automatically
turn off.
The interior lights turn on when the vehicle
is turned off.
The exterior lamps turn off immediately by
turning the exterior lamp control off.
This feature can be changed. On the
infotainment home screen, select Settings
T
VehicleTExit Lighting.
Battery Load Management
The vehicle has Electric Power Management
(EPM), which estimates the battery's
temperature and state of charge. It then
adjusts the voltage for best performance
and extended life of the battery.
When the battery's state of charge is low,
the voltage is raised slightly to quickly bring
the charge back up. When the state of
charge is high, the voltage is lowered
slightly to prevent overcharging. The
voltmeter gauge or the voltage display on
the Driver Information Center (DIC),
if equipped, may show the voltage moving
up or down. This is normal. If there is a
problem, an alert will be displayed.
The battery can be discharged at idle if the
electrical loads are very high. This is true for
all vehicles. This is because the generator
(alternator) may not be spinning fast
enough at idle to produce all the power that
is needed for very high electrical loads.
A high electrical load occurs when several of
the following are on, such as: headlamps,
high beams, fog lamps, rear window
defogger, climate control fan at high speed,
Page 213 of 433
Chevrolet Silverado 2500 HD/3500 HD Owner Manual (GMNA-Localizing-U.
S./Canada/Mexico-16908339) - 2024 - CRC - 12/12/22
Driving and Operating 211
Caution (Continued)
.Avoid exceeding the following engine
speeds when accelerating or
downshifting to slow or brake the
vehicle:
Gasoline engines: 4000 rpm
Diesel engines: 3000 rpm
.Avoid making hard stops for the first
300 km (200 mi). Hard stops with new
brake linings can result in premature
wear and earlier replacement. Follow
this guideline every time brake linings
are replaced.
.Do not tow a trailer. SeeTrailer
Towing 0274 for the trailer towing
capabilities of the vehicle and more
information.
After the break-in period, the engine
speed and load can be gradually
increased.
On new vehicles, the various mechanical and
electrical systems adjust during the first
6,400 km (4,000 miles) of routine driving to
provide optimal fuel economy and
transmission shift performance. Electrical systems will adapt and calibrate
during the break-in period. A one-time
occurrence of clicks and similar vehicle
noises is normal during this process.
Normal driving charges the vehicle battery
to achieve the best operation of the vehicle.
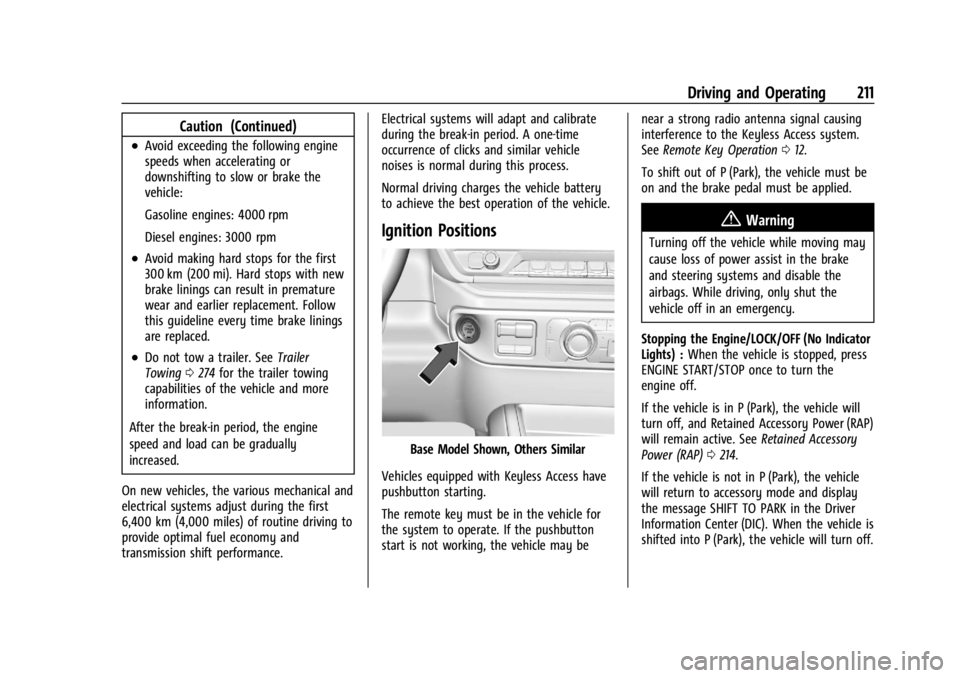
Ignition Positions
Base Model Shown, Others Similar
Vehicles equipped with Keyless Access have
pushbutton starting.
The remote key must be in the vehicle for
the system to operate. If the pushbutton
start is not working, the vehicle may be near a strong radio antenna signal causing
interference to the Keyless Access system.
See
Remote Key Operation 012.
To shift out of P (Park), the vehicle must be
on and the brake pedal must be applied.
{Warning
Turning off the vehicle while moving may
cause loss of power assist in the brake
and steering systems and disable the
airbags. While driving, only shut the
vehicle off in an emergency.
Stopping the Engine/LOCK/OFF (No Indicator
Lights) : When the vehicle is stopped, press
ENGINE START/STOP once to turn the
engine off.
If the vehicle is in P (Park), the vehicle will
turn off, and Retained Accessory Power (RAP)
will remain active. See Retained Accessory
Power (RAP) 0214.
If the vehicle is not in P (Park), the vehicle
will return to accessory mode and display
the message SHIFT TO PARK in the Driver
Information Center (DIC). When the vehicle is
shifted into P (Park), the vehicle will turn off.
Page 215 of 433
Chevrolet Silverado 2500 HD/3500 HD Owner Manual (GMNA-Localizing-U.
S./Canada/Mexico-16908339) - 2024 - CRC - 12/12/22
Driving and Operating 213
Starting the Engine
If the vehicle has a diesel engine, see the
Duramax diesel supplement.
Caution
If you add electrical parts or accessories,
you could change the way the engine
operates. Any resulting damage would
not be covered by the vehicle warranty.
SeeAdd-On Electrical Equipment 0300.
Move the shift lever to P (Park) or
N (Neutral). To restart the engine when the
vehicle is already moving, use
N (Neutral) only.
Caution
Do not try to shift to P (Park) if the
vehicle is moving. If you do, you could
damage the transmission. Shift to P (Park)
only when the vehicle is stopped.
Starting Procedure
1. The remote key must be in the vehicle. Press ENGINE START/STOP with the brake
pedal applied. When the engine begins
cranking, let go of the button. The driver may observe a minor, and
temporary, brake pedal kickback when
starting the vehicle. This is normal.
The idle speed will go down as the
engine gets warm. Do not race the
engine immediately after starting it.
Operate the engine and transmission
gently to allow the oil to warm up and
lubricate all moving parts.
When the low fuel warning light is on
and the FUEL LEVEL LOW message is
displayed in the Driver Information
Center (DIC), press ENGINE START/STOP
to continue engine cranking.
Caution
Cranking the engine for long periods of
time, by returning the ignition to the
START position immediately after
cranking has ended, can overheat and
damage the cranking motor, and drain
the battery. Wait at least 15 seconds
between each try, to let the cranking
motor cool down.
2. If the engine does not start after five to 10 seconds, especially in very cold
weather (below −18 °C or 0 °F), it could
be flooded with too much gasoline. Try pushing the accelerator pedal all the way
to the floor and holding it there while
pressing ENGINE START/STOP for up to a
maximum of 15 seconds. Wait at least
15 seconds between each try, to allow
the cranking motor to cool down. When
the engine starts, let go of the button
and accelerator. If the vehicle starts
briefly but then stops again, do the
same thing. This clears the extra gasoline
from the engine. Do not race the engine
immediately after starting it. Operate
the engine and transmission gently until
the oil warms up and lubricates all
moving parts.Engine Heater
If equipped, the engine heater can provide
easier starting and better fuel economy
during engine warm-up in cold weather
conditions at or below
−18 °C (0 °F). Vehicles
with an engine heater should be plugged in
at least four hours before starting. An
internal thermostat in the plug-end of the
cord may exist, which will prevent engine
heater operation at temperatures above
−18 °C (0 °F).
Page 324 of 433
Chevrolet Silverado 2500 HD/3500 HD Owner Manual (GMNA-Localizing-U.
S./Canada/Mexico-16908339) - 2024 - CRC - 12/5/22
322 Vehicle Care
Extended Storage: Remove the black,
negative (−) cable from the battery or use a
battery trickle charger.
Negative Battery Cable Disconnection
{Warning
Before disconnecting the negative battery
cable, turn off all features, turn the
ignition off, and remove the key,
if equipped, from the vehicle. If this is
not done, you or others could be injured,
and the vehicle could be damaged.
Caution
If the battery is disconnected with the
ignition on or the vehicle in Retained
Accessory Power (RAP), the OnStar
back-up battery will be permanently
discharged and will need to be replaced.
1. Make sure the lamps, features, and accessories are turned off.
2. Turn the vehicle off and remove the key, if equipped.
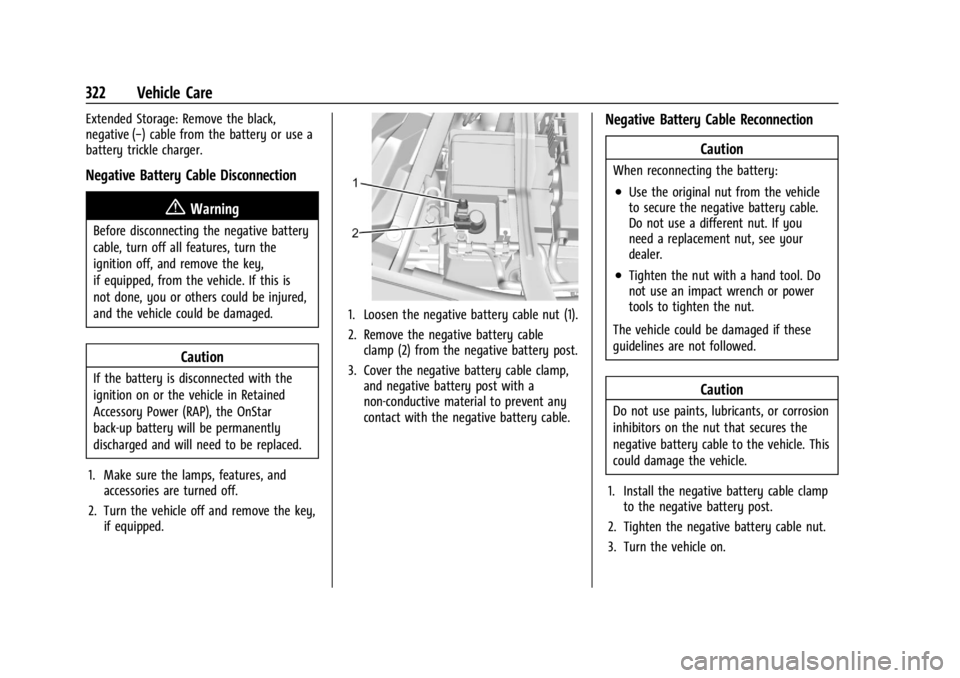
1. Loosen the negative battery cable nut (1).
2. Remove the negative battery cableclamp (2) from the negative battery post.
3. Cover the negative battery cable clamp, and negative battery post with a
non-conductive material to prevent any
contact with the negative battery cable.
Negative Battery Cable Reconnection
Caution
When reconnecting the battery:
.Use the original nut from the vehicle
to secure the negative battery cable.
Do not use a different nut. If you
need a replacement nut, see your
dealer.
.Tighten the nut with a hand tool. Do
not use an impact wrench or power
tools to tighten the nut.
The vehicle could be damaged if these
guidelines are not followed.
Caution
Do not use paints, lubricants, or corrosion
inhibitors on the nut that secures the
negative battery cable to the vehicle. This
could damage the vehicle.
1. Install the negative battery cable clamp to the negative battery post.
2. Tighten the negative battery cable nut.
3. Turn the vehicle on.
Page 378 of 433
Chevrolet Silverado 2500 HD/3500 HD Owner Manual (GMNA-Localizing-U.
S./Canada/Mexico-16908339) - 2024 - CRC - 12/5/22
376 Vehicle Care
{Warning
Shifting a four-wheel-drive vehicle's
transfer case into N (Neutral) can allow
the vehicle to move even if the
transmission is in P (Park). You or others
could be injured. Set the parking brake
and use wheel blocks before shifting the
transfer case to N (Neutral).
To dinghy tow: 1. Position the vehicle being towed behind the tow vehicle, facing forward and on a
level surface.
2. Securely attach the vehicle being towed to the tow vehicle.
3. Apply the parking brake and start the engine.
4. Shift the transfer case to N (Neutral). See “Shifting into N (Neutral)” under
Four-Wheel Drive 0221.
5. With the engine running, release the parking brake and verify that the
transfer case is in N (Neutral) by shifting
the transmission to D (Drive) and then to
R (Reverse). There should be no
movement while shifting the
transmission. 6. Shift the transmission to D (Drive).
7. Turn the vehicle off. Disregard the Shift
to P (Park) DIC message. See Ignition
Positions 0211.
{Warning
To avoid death, serious injury,
or property damage, before dinghy
towing the vehicle, always disconnect and
secure the negative battery cable and
cover the negative battery post and cable
with a non-conductive material. If the
battery is left connected or the battery
cable contacts the post, the Electric
Parking Brake may activate during
towing, which could cause a crash.
8. Disconnect the negative (–) battery cable. See “Negative Battery Cable
Disconnection” inBattery - North
America 0321.
9. Shift the transmission to P (Park).
Caution
If the steering column is locked, vehicle
damage may occur. 10. Move the steering wheel to make sure
the steering column is unlocked.
11. Keep the remote key outside of the vehicle and manually lock the doors.
Access the vehicle by using the key in
the door lock. See Door Locks019.
Disconnecting the Towed Vehicle
Before disconnecting from the tow vehicle: 1. Park on a level surface. Secure the vehicle with wheel blocks.
2. Reconnect the negative (–) battery. See Battery - North America 0321.
3. Turn on the vehicle. With your foot off the brake pedal, press and hold ENGINE
START/STOP for five seconds until the
green light comes on in the button. See
Ignition Positions 0211.
4. Set the parking brake. See Electric
Parking Brake 0228.
5. Disconnect from the tow vehicle.
6. Shift the transmission to N (Neutral).
7. Shift the transfer case to 2
m(Two-Wheel
Drive High). When the shift to 2
m
(Two-Wheel Drive High) is complete, the
light in the instrument cluster will stop
flashing and stay lit. See
Four-Wheel-Drive Light 0120.
Page 413 of 433

Chevrolet Silverado 2500 HD/3500 HD Owner Manual (GMNA-Localizing-U.
S./Canada/Mexico-16908339) - 2024 - CRC - 12/5/22
OnStar 411
Or
.Give OnStar Turn-by-Turn Navigation voice
commands.
.Obtain and customize the Wi-Fi hotspot
name or SSID and password, if equipped.
Press
Qto connect to an Advisor to:
.Verify account information or update
contact information.
.Get driving directions.
.Receive a Diagnostic check of the vehicle's
key operating systems.
.Receive Roadside Assistance.
.Manage Wi-Fi Settings, if equipped.
Press
>to get a priority connection to an
OnStar Advisor available 24/7 to:
.Get help for an emergency.
.Be a Good Samaritan or respond to an
AMBER Alert.
.Get assistance in severe weather or other
crisis situations and find evacuation
routes.
OnStar Services
Emergency
Emergency Services require an active safety
and security plan. With Automatic Crash
Response, built-in sensors can automatically
alert a specially trained OnStar Advisor who
is immediately connected in to the vehicle
to help.
Press
>for a priority connection to an
OnStar Advisor who can contact emergency
service providers, direct them to your exact
location, and relay important information.
With OnStar Crisis Assist, specially trained
Advisors are available 24 hours a day, 7 days
a week, to provide a central point of
contact, assistance, and information during a
crisis.
With Roadside Assistance, Advisors can
locate a nearby service provider to help with
a flat tire, a battery jump, or an empty
gas tank.
Security
If equipped, OnStar provides these services:
.With Stolen Vehicle Assistance, OnStar
Advisors can use GPS to pinpoint the
vehicle and help authorities quickly
recover it.
.With Remote Ignition Block, if equipped,
OnStar can block the vehicle from being
restarted.
.With Stolen Vehicle Slowdown,
if equipped, OnStar can work with law
enforcement to gradually slow the
vehicle down.
Theft Alarm Notification
If equipped, if the doors are locked and the
vehicle alarm sounds, a notification by text,
e-mail, or phone call will be sent. If the
vehicle is stolen, an OnStar Advisor can work
with authorities to recover the vehicle.
Page 428 of 433

Chevrolet Silverado 2500 HD/3500 HD Owner Manual (GMNA-Localizing-U.
S./Canada/Mexico-16908339) - 2024 - CRC - 12/5/22
426 Index
PassengerAirbag Status Indicator . . . . . . . . . . . . . . . . . 116
Compartment Air Filter . . . . . . . . . . . . . . . . 190
Sensing System . . . . . . . . . . . . . . . . . . . . . . . . . 65
Pedestrian Ahead Indicator . . . . . . . . . . . . . . . 121
Perchlorate Materials Requirements, California . . . . . . . . . . . . . . . . . . . . . . . . . . . . . . 304
Phone Apple CarPlay andAndroid Auto . . . . . . . . . . . . . . . . . . . . 172, 174
Bluetooth . . . . . . . . . . . . . . . . . . . . . . . . . 165, 169
Pickup Conversion to Chassis Cab . . . . . . . . 302
Port USB . . . . . . . . . . . . . . . . . . . . . . . . . . . . . . . . . . . . 158
Positioning Vehicle . . . . . . . . . . . . . . . . . . . . . . . . . . . . . . . . 162
Power Assist Steps . . . . . . . . . . . . . . . . . . . . . . . . . . . . . 28
Door Locks . . . . . . . . . . . . . . . . . . . . . . . . . . . . . . 20
Mirrors . . . . . . . . . . . . . . . . . . . . . . . . . . . . . . . . . 32
Outlets . . . . . . . . . . . . . . . . . . . . . . . . . . . . . . . . 102
Protection, Battery . . . . . . . . . . . . . . . . . . . . . 147
Retained Accessory (RAP) . . . . . . . . . . . . . . 214
Seat Adjustment . . . . . . . . . . . . . . . . . . . . . . . . 46
Steering Fluid . . . . . . . . . . . . . . . . . . . . . . . . . . . 317
Windows . . . . . . . . . . . . . . . . . . . . . . . . . . . . . . . 39
Pregnancy, Using Seat Belts . . . . . . . . . . . . . . 59 Privacy
Vehicle Data Recording . . . . . . . . . . . . . . . . 408
Problems with Route Guidance . . . . . . . . . . 163
Program Courtesy Transportation . . . . . . . . . . . . . . . 404
Prohibited Fuels . . . . . . . . . . . . . . . . . . . . . . . . . 266
Proposition 65 Warning California . . . . . . . . . . . . . . . . . . . . . . . . . . . . . . . . . 1
Proposition 65 Warning, California . . . . . . . 370
Publication Ordering Information . . . . . . . . 406
R
Radiator . . . . . . . . . . . . . . . . . . . . . . . . . . . . . . . . . . 313
Radio AM-FM Radio . . . . . . . . . . . . . . . . . . . . . . 154, 156
Frequency Statement . . . . . . . . . . . . . . . . . . 407
Reception . . . . . . . . . . . . . . . . . . . . . . . . . . . . . . . 157
Satellite . . . . . . . . . . . . . . . . . . . . . . . . . . . . . . . . . 157
Reading Lamps . . . . . . . . . . . . . . . . . . . . . . . . . . .145
Rear Axle . . . . . . . . . . . . . . . . . . . . . . . . . . . . . . . . . . . 323
Camera Mirror . . . . . . . . . . . . . . . . . . . . . . . . . . 35
Heated Seats . . . . . . . . . . . . . . . . . . . . . . . . . . . 52
Locking Axle . . . . . . . . . . . . . . . . . . . . . . . . . . . 233
Seats . . . . . . . . . . . . . . . . . . . . . . . . . . . . . . . . . . . . 51
Storage . . . . . . . . . . . . . . . . . . . . . . . . . . . . . . . . . 95
Windows . . . . . . . . . . . . . . . . . . . . . . . . . . . . . . . 41 Rearview Mirror
Truck Bed Camera . . . . . . . . . . . . . . . . . . . . . . 38
Rearview Mirrors . . . . . . . . . . . . . . . . . . . . . . . . . .35 Automatic Dimming . . . . . . . . . . . . . . . . . . . . 35
Reclining Seatbacks . . . . . . . . . . . . . . . . . . . . . . . 46
Recognition Voice . . . . . . . . . . . . . . . . . . . . . . . . . . . . . . . . . . 163
Recommended Fuel . . . . . . . . . . . . . . . . . . . . . . . . . . . . . . . . . . . . 266
Recommended Fluids and Lubricants . . . . . 392
Records Maintenance . . . . . . . . . . . . . . . . . . . . . . . . . . . 394
Recreational Vehicle Towing . . . . . . . . . . . . . 374
Reimbursement Program, GM Mobility . . . . . . . . . . . . . . . . . . . . . . . . . . . . . . . 402
Remote
Key . . . . . . . . . . . . . . . . . . . . . . . . . . . . . . . . . . . . . . 12
Key Operation . . . . . . . . . . . . . . . . . . . . . . . . . . . 12
Vehicle Start . . . . . . . . . . . . . . . . . . . . . . . . . . . . 18
Replacement Glass . . . . . . . . . . . . . . . . . . . . . . . . . . . . . . . . . . 325
Replacement Parts Airbags . . . . . . . . . . . . . . . . . . . . . . . . . . . . . . . . . 70
Maintenance . . . . . . . . . . . . . . . . . . . . . . . . . . . 393
Replacing
Airbag System . . . . . . . . . . . . . . . . . . . . . . . . . . 70
LATCH System Parts After a Crash . . . . . . 87