2024 CHEVROLET CORVETTE brake light
[x] Cancel search: brake lightPage 4 of 362
Chevrolet Corvette Owner Manual (GMNA-Localizing-U.S./Canada/Mexico-
17272984) - 2024 - CRC - 2/20/23
Introduction 3
A circle with a slash through it is a safety
symbol which means“Do not,” “Do not do
this,” or“Do not let this happen.”
Symbols
The vehicle has components and labels that
use symbols instead of text. Symbols are
shown along with the text describing the
operation or information relating to a
specific component, control, message, gauge,
or indicator.
M:Shown when the owner’s manual has
additional instructions or information.
*: Shown when the service manual has
additional instructions or information.
0: Shown when there is more information
on another page — “see page.”
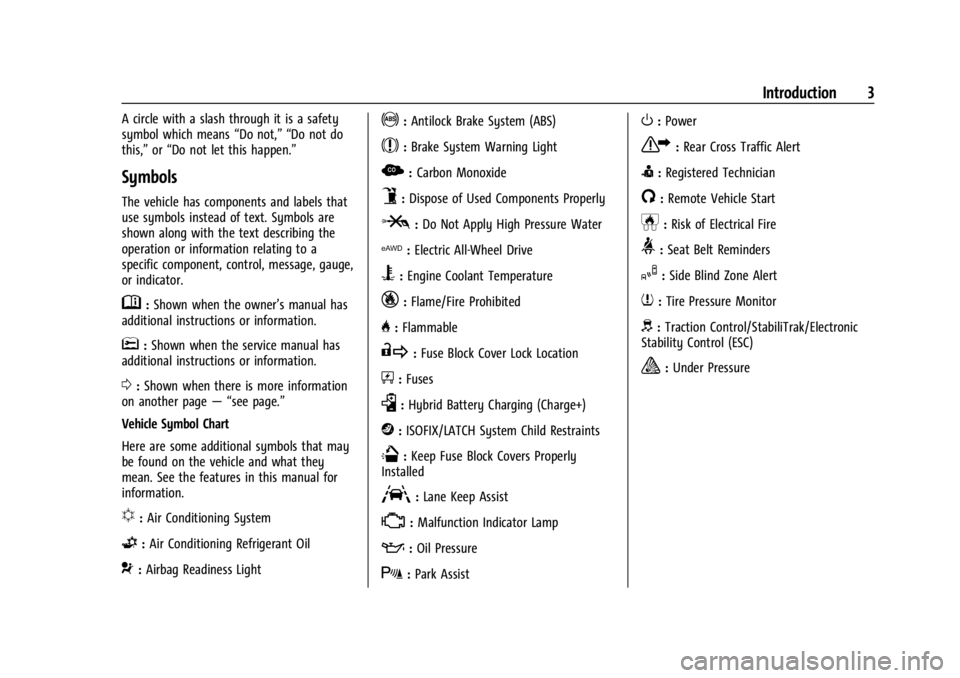
Vehicle Symbol Chart
Here are some additional symbols that may
be found on the vehicle and what they
mean. See the features in this manual for
information.
u: Air Conditioning System
G:Air Conditioning Refrigerant Oil
9:Airbag Readiness Light
!:Antilock Brake System (ABS)
$:Brake System Warning Light
z: Carbon Monoxide
9:Dispose of Used Components Properly
P:Do Not Apply High Pressure Water
l: Electric All-Wheel Drive
B:Engine Coolant Temperature
_:Flame/Fire Prohibited
H: Flammable
R:Fuse Block Cover Lock Location
+:Fuses
k:Hybrid Battery Charging (Charge+)
j:ISOFIX/LATCH System Child Restraints
Q:Keep Fuse Block Covers Properly
Installed
A: Lane Keep Assist
*: Malfunction Indicator Lamp
::Oil Pressure
X:Park Assist
O:Power
7:Rear Cross Traffic Alert
I:Registered Technician
/:Remote Vehicle Start
h:Risk of Electrical Fire
>:Seat Belt Reminders
I:Side Blind Zone Alert
7:Tire Pressure Monitor
d:Traction Control/StabiliTrak/Electronic
Stability Control (ESC)
a: Under Pressure
Page 6 of 362

Chevrolet Corvette Owner Manual (GMNA-Localizing-U.S./Canada/Mexico-
17272984) - 2024 - CRC - 2/20/23
Introduction 5
1.Air Vents 0153.
2. Turn Signal Lever. See Turn and
Lane-Change Signals 0112.
Exterior Lamp Controls 0109.
3. Manual Shift Paddles. See Manual Mode
0 187.
4. Instrument Cluster 081.
5. Windshield Wiper/Washer 075.
6. Volume Control Knob and Infotainment Home Button. See Overview0117.
7. Infotainment Display. See Using the
System 0120.
8. Alarm System Indicator Light. See Vehicle
Alarm System 022.
Light Sensor. See Automatic Headlamp
System 0111.
9. Dual Automatic Climate Control System
0150.
Driver and Passenger Heated and
Ventilated Seat Controls (If Equipped).
See Heated and Ventilated Front Seats
0 44. 10.
Traction Control/Electronic Stability
Control 0194.
Curb View Camera (If Equipped). See
Assistance Systems for Parking or Backing
0 215.
Front Lift System Control (If Equipped).
See Front Lift System 0205.
11. Driver Mode Control 0196.
12. Shift Switches. See Dual Clutch
Transmission 0184.
13. Hybrid Battery Charging (Charge+). See Driver Mode Control 0196.
Auto Stop Disable Switch. See Stop/Start
System 0180.
14. Keyless Ignition. See Ignition Positions
0 178.
15. Driver Information Center (DIC) Controls. SeeDriver Information Center (DIC) 099.
16. Heated Steering Wheel 075 (If
Equipped).
17. Bluetooth Controls. See Steering Wheel
Controls 0119.
Voice Recognition Controls. See Steering
Wheel Controls 0119. 18. Volume Control Buttons. See
Steering
Wheel Controls 0119.
19. Horn 075.
20. Favorites Select Buttons. Steering Wheel
Controls 0119.
21. Z-Mode Control. See Driver Mode Control
0 196.
Forward Collision Alert (FCA) System
0 218.
22. Cruise Control 0212.
23. Electric Parking Brake 0192.
24. Data Link Connector (DLC) (Out of View). SeeMalfunction Indicator Lamp (Check
Engine Light) 090.
25. Instrument Panel Illumination Control
0113.
26. Head-Up Display Controls (If Equipped). SeeHead-Up Display (HUD) 0102.
Page 9 of 362

Chevrolet Corvette Owner Manual (GMNA-Localizing-U.S./Canada/Mexico-
17272984) - 2024 - CRC - 2/20/23
8 Keys, Doors, and Windows
H:Press to lock both doors and the fuel
door. The turn signal indicators may flash
and/or the horn may sound on the second
press to indicate locking. To view available
settings from the infotainment screen, touch
Settings > Vehicle > Remote Lock, Unlock,
Start.
Pressing
Hmay also arm the
theft-deterrent system. See Vehicle Alarm
System 022.
If equipped with remote folding mirrors,
double pressing and holding
Hfor
one second may fold the mirrors. See
Folding Mirrors 025.
I:Press to unlock the driver door and the
fuel door. Press again within five seconds to
unlock both doors. When remotely unlocking
the vehicle at night, the headlamps and
taillamps may come on for about
30 seconds to light your approach to the
vehicle depending on the settings. To view
available settings from the infotainment
screen, touch Settings > Vehicle > Remote
Lock, Unlock, Start. The turn signal indicators
may flash to indicate unlocking.
Pressing
Iwill disarm the theft-deterrent
system. See Vehicle Alarm System 022.
If equipped with remote window operation,
double press
Iand hold for three seconds
to remotely open the windows, if enabled.
To view available settings from the
infotainment screen, touch Settings >
Vehicle > Remote Lock, Unlock, Start.
If equipped with remote folding mirrors,
double pressing and holding
Ifor
one second may unfold the mirrors. See
Folding Mirrors 025.
S:Press twice to start the engine from
outside the vehicle using the remote key.
See Remote Vehicle Start 012. The vehicle
can not be driven during a remote start. To drive the vehicle, press the brake pedal, then
press ENGINE START/STOP, with the remote
key in the vehicle.
7:
Press and release to initiate vehicle
locator. The exterior lamps flash and the
horn chirps three times. Press
7and hold
for approximately three seconds to sound
the panic alarm. The horn sounds and the
turn signal lamps flash for 30 seconds,
or until
7is pressed again or the vehicle is
started.
D: Press twice to release the hatch/
trunk. The vehicle must be in P (Park).
E: Press twice and continue holding
following the second press until the hood
releases. The vehicle must be in P (Park).
M: If equipped, press and releaseI,
then immediately press and hold
M
continuously to open the convertible top all
the way. Release the button to stop
movement. This button will only open the
convertible top.
If equipped, press and release
Hthen
immediately press and hold
Mto open
the engine compartment.
Page 18 of 362
Chevrolet Corvette Owner Manual (GMNA-Localizing-U.S./Canada/Mexico-
17272984) - 2024 - CRC - 2/20/23
Keys, Doors, and Windows 17
number of remote keys inside has not
reduced, the driver door will unlock and the
horn will chirp three times.
Lockout Protection can be manually
overridden with the driver door open by
pressing and holding
Qon the power door
lock switch.
Doors
Hood
Hood Release
{Warning
Do not drive the vehicle if the hood is
not latched completely. The hood could
open fully, block your vision, and cause a
crash. You or others could be injured.
Always close the hood completely before
driving. When the hood is not closed, the
vehicle will not exceed 42 km/h
(26 mph). Close the hood to drive faster
than 42 km/h (26 mph).
{Warning
When closing the hood, keep hands out
of the opening between the body and
the trunk. The vehicle features a self
closing power latch. You or others could
be injured.
The hood compartment can be accessed in
several ways.
Ensure the hood is clear of any objects
before opening.
This vehicle prevents from shifting out of
P (Park) when the hood is not closed. Close
the hood to shift out of P (Park). Confirm
the hood is closed by checking that the
hood is flush with the surrounding
components.
If the hood is closed but the ajar message is
still present, then the transmission lockout
can be overridden by holding the brake for
20 seconds and then shifting into D (Drive).
In this case, the vehicle will not exceed
42 km/h (26 mph). See your dealer for
service. Driver Door Hood Latch Release Button
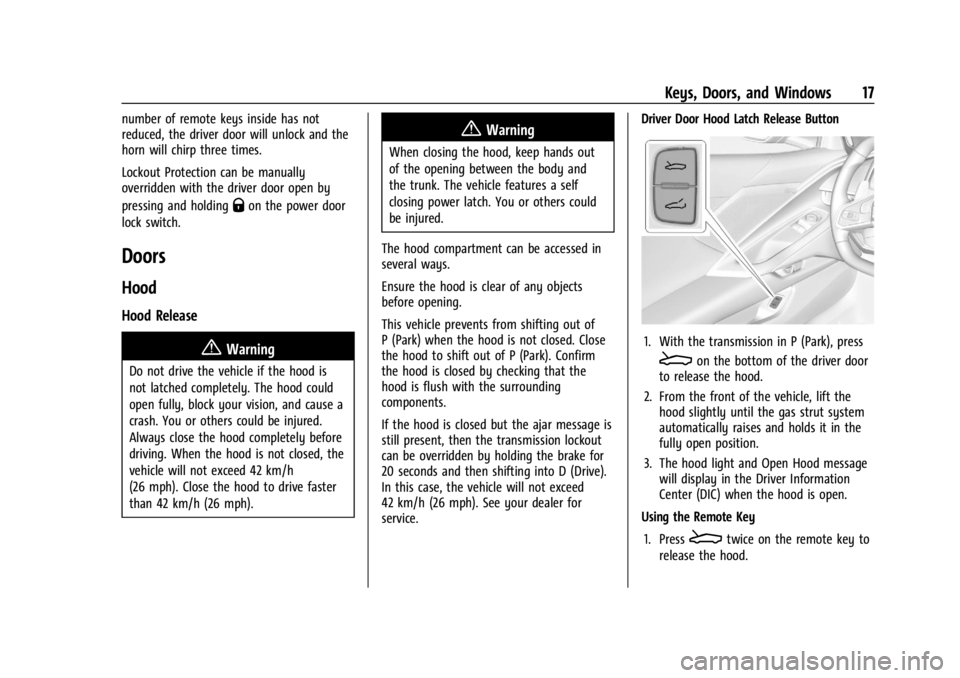
1. With the transmission in P (Park), press
Eon the bottom of the driver door
to release the hood.
2. From the front of the vehicle, lift the hood slightly until the gas strut system
automatically raises and holds it in the
fully open position.
3. The hood light and Open Hood message will display in the Driver Information
Center (DIC) when the hood is open.
Using the Remote Key
1. Press
Etwice on the remote key to
release the hood.
Page 20 of 362
Chevrolet Corvette Owner Manual (GMNA-Localizing-U.S./Canada/Mexico-
17272984) - 2024 - CRC - 2/20/23
Keys, Doors, and Windows 19
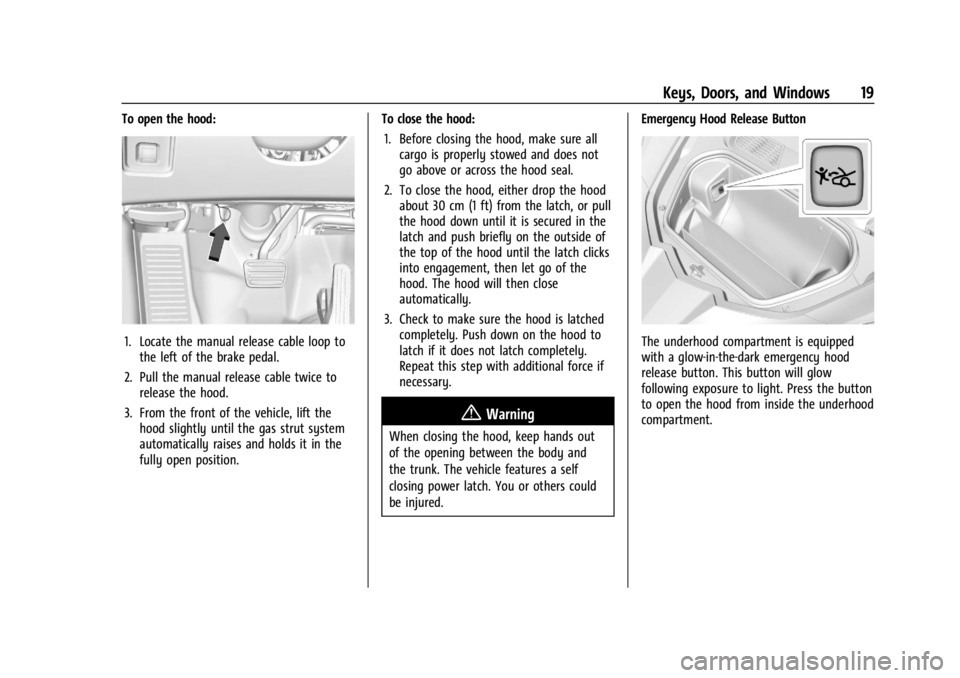
To open the hood:
1. Locate the manual release cable loop tothe left of the brake pedal.
2. Pull the manual release cable twice to release the hood.
3. From the front of the vehicle, lift the hood slightly until the gas strut system
automatically raises and holds it in the
fully open position. To close the hood:
1. Before closing the hood, make sure all cargo is properly stowed and does not
go above or across the hood seal.
2. To close the hood, either drop the hood about 30 cm (1 ft) from the latch, or pull
the hood down until it is secured in the
latch and push briefly on the outside of
the top of the hood until the latch clicks
into engagement, then let go of the
hood. The hood will then close
automatically.
3. Check to make sure the hood is latched completely. Push down on the hood to
latch if it does not latch completely.
Repeat this step with additional force if
necessary.
{Warning
When closing the hood, keep hands out
of the opening between the body and
the trunk. The vehicle features a self
closing power latch. You or others could
be injured. Emergency Hood Release Button
The underhood compartment is equipped
with a glow-in-the-dark emergency hood
release button. This button will glow
following exposure to light. Press the button
to open the hood from inside the underhood
compartment.
Page 47 of 362
Chevrolet Corvette Owner Manual (GMNA-Localizing-U.S./Canada/Mexico-
17272984) - 2024 - CRC - 2/20/23
46 Seats and Restraints
Questions and Answers About Seat Belts
Q: Will I be trapped in the vehicle after acrash if I am wearing a seat belt?
A: You could be— whether you are
wearing a seat belt or not. Your chance
of being conscious during and after a
crash, so you canunbuckle and get out,
is much greater if you are belted.
Q: If my vehicle has airbags, why should I have to wear seat belts?
A: Airbags are supplemental systems only.
They work withseat belts —not instead
of them. Whether or not an airbag is
provided, all occupants still have to
buckle up to get the most protection.
Also, in nearly all states and in all
Canadian provinces, the law requires
wearing seat belts.
Buckle To Drive
If equipped, this feature delays the vehicle
from shifting out of P (Park) when the driver
seat belt is not buckled. The Buckle to Drive
feature must be turned ON in the
infotainment system to work. To turn the
Buckle to Drive feature on or off, select
Settings > Vehicle > Buckle to Drive. See
Teen Driver 0144, if equipped. If the vehicle is on and the brake pedal is
pressed with the vehicle in P (Park) but the
driver seat belt is not buckled, a message
displays in the Driver Information
Center (DIC) and the vehicle will be delayed
from shifting out of P (Park). Buckle the
driver seat belt to clear the message and
shift out of P (Park). Shifting from P (Park)
will be delayed once for each time the
vehicle is started.
For some fleet vehicles, the feature is
always ON and cannot be turned OFF in the
infotainment system. The vehicle will be
delayed from shifting from P (Park) each
time the driver attempts to do so while the
driver seat belt is not buckled. Turning the
vehicle off then on will not change this
condition.
On some models, Buckle to Drive may also
delay shifting out of P (Park) if a front
passenger seat belt is unbuckled. A message
displays in the DIC. Buckle the front
passenger seat belt to shift out of P (Park).
This feature may delay the vehicle from
shifting out of P (Park) if an object, such as
a briefcase, handbag, grocery bag, laptop,
or other electronic device, is on the front
passenger seat. If this happens, remove the
object from the seat or buckle the seat belt
to shift out of P (Park).
If the driver, or on some vehicles, the
present front passenger remains unbuckled,
the DIC message will turn off after several
seconds and the vehicle can be shifted out
of P (Park). See
“Seat Belts”and“Child
Restraints” in the Index for information
about the importance of proper
restraint use.
If the driver seat belt or the front passenger
seat belt is unbuckled when driving, the seat
belt reminder chime and light(s) will come
on. See Seat Belt Reminders 088. This
feature may not function properly if the
airbag readiness light is on. See Airbag
Readiness Light 088.
How to Wear Seat Belts Properly
Follow these rules for everyone's protection.
There are additional things to know about
seat belts and children, including smaller
children and infants. If a child will be riding
in the vehicle, see Older Children062 or
Infants and Young Children 063. Review
and follow the rules for children in addition
to the following rules.
Page 75 of 362

Chevrolet Corvette Owner Manual (GMNA-Localizing-U.S./Canada/Mexico-
17272984) - 2024 - CRC - 2/20/23
74 Instruments and Controls
Instruments and Controls
Controls
Steering Wheel Adjustment . . . . . . . . . . . . . 75
Heated Steering Wheel . . . . . . . . . . . . . . . . . 75
Horn . . . . . . . . . . . . . . . . . . . . . . . . . . . . . . . . . . . . 75
Windshield Wiper/Washer . . . . . . . . . . . . . . 75
Compass . . . . . . . . . . . . . . . . . . . . . . . . . . . . . . . 76
Clock . . . . . . . . . . . . . . . . . . . . . . . . . . . . . . . . . . . 76
Power Outlets . . . . . . . . . . . . . . . . . . . . . . . . . . 77
Wireless Charging . . . . . . . . . . . . . . . . . . . . . . 78
Warning Lights, Gauges, and Indicators
Warning Lights, Gauges, andIndicators . . . . . . . . . . . . . . . . . . . . . . . . . . . . 80
Instrument Cluster . . . . . . . . . . . . . . . . . . . . . . 81
Speedometer . . . . . . . . . . . . . . . . . . . . . . . . . . . 85
Odometer . . . . . . . . . . . . . . . . . . . . . . . . . . . . . . 85
Trip Odometer . . . . . . . . . . . . . . . . . . . . . . . . . . 85
Tachometer . . . . . . . . . . . . . . . . . . . . . . . . . . . . 85
Battery Gauge (High Voltage) . . . . . . . . . . 86
Stealth Drive Mode Capability Gauge . . . . . . . . . . . . . . . . . . . . . . . . . . . . . . . . 86
Fuel Gauge . . . . . . . . . . . . . . . . . . . . . . . . . . . . . 86
Hybrid Battery Charging Light (Charge+) . . . . . . . . . . . . . . . . . . . . . . . . . . . . . 87
Power Indicator Gauge . . . . . . . . . . . . . . . . . 87
Engine Coolant Temperature Gauge . . . . 87
Transmission Temperature Gauge . . . . . . 88
Seat Belt Reminders . . . . . . . . . . . . . . . . . . . . 88 Airbag Readiness Light . . . . . . . . . . . . . . . . . 88
Passenger Airbag Status Indicator . . . . . . 89
Charging System Light (12-Volt
Battery) . . . . . . . . . . . . . . . . . . . . . . . . . . . . . . 90
Malfunction Indicator Lamp (Check
Engine Light) . . . . . . . . . . . . . . . . . . . . . . . . . 90
Front Lift System Light . . . . . . . . . . . . . . . . . 91
Brake System Warning Light . . . . . . . . . . . 92
Electric Parking Brake Light . . . . . . . . . . . . . 92
Service Electric Parking Brake Light . . . . . 92
Antilock Brake System (ABS) Warning Light . . . . . . . . . . . . . . . . . . . . . . . . . . . . . . . . . . 93
Performance Transmission Active . . . . . . . 93
All-Wheel-Drive Light . . . . . . . . . . . . . . . . . . . 93
Lane Keep Assist (LKA) Light . . . . . . . . . . . 94
Automatic Emergency Braking (AEB) Disabled Light . . . . . . . . . . . . . . . . . . . . . . . . 94
Vehicle Ahead Indicator . . . . . . . . . . . . . . . . 94
Pedestrian Ahead Indicator . . . . . . . . . . . . . 94
Traction Off Light . . . . . . . . . . . . . . . . . . . . . . 95
Traction Control System (TCS)/Electronic Stability Control Light . . . . . . . . . . . . . . . . 95
Electronic Stability Control (ESC) Off Light . . . . . . . . . . . . . . . . . . . . . . . . . . . . . . . . . . 95
Engine Coolant Temperature Warning Light . . . . . . . . . . . . . . . . . . . . . . . . . . . . . . . . . 96
Driver Mode Control Light . . . . . . . . . . . . . . 96
Tire Pressure Light . . . . . . . . . . . . . . . . . . . . . . 97
Engine Oil Pressure Light . . . . . . . . . . . . . . . 97
Low Fuel Warning Light . . . . . . . . . . . . . . . . 97 Auto Stop Indicator . . . . . . . . . . . . . . . . . . . . 98
Traffic Sign Indicator . . . . . . . . . . . . . . . . . . . 98
Security Light . . . . . . . . . . . . . . . . . . . . . . . . . . 98
High-Beam On Light . . . . . . . . . . . . . . . . . . . . 98
Lamps On Reminder . . . . . . . . . . . . . . . . . . . . 99
Cruise Control Light . . . . . . . . . . . . . . . . . . . . 99
Door Ajar Light . . . . . . . . . . . . . . . . . . . . . . . . . 99
Information Displays
Driver Information Center (DIC) . . . . . . . . 99
Head-Up Display (HUD) . . . . . . . . . . . . . . . . 102
Vehicle Messages
Vehicle Messages . . . . . . . . . . . . . . . . . . . . . . 105
Engine Power Messages . . . . . . . . . . . . . . . 106
Vehicle Speed Messages . . . . . . . . . . . . . . . 106
Universal Remote System
Universal Remote System . . . . . . . . . . . . . 106
Universal Remote System
Programming . . . . . . . . . . . . . . . . . . . . . . . . 106
Universal Remote System Operation . . . . . . . . . . . . . . . . . . . . . . . . . . . 108
Page 84 of 362
Chevrolet Corvette Owner Manual (GMNA-Localizing-U.S./Canada/Mexico-
17272984) - 2024 - CRC - 2/20/23
Instruments and Controls 83
Brake Temperature :Shows overall
temperature as either Normal, Warm, Hot,
or Overheated. Normal is typical for normal
driving while Warm is typical for spirited
driving. Unknown may be displayed if tire
temperature information is unavailable.
Lifetime Fuel Economy : Shows the
instantaneous fuel economy over the
lifetime of the vehicle.
Follow Distance : Shows the current follow
time to the vehicle ahead is displayed as a
time value.
Hybrid Battery Temperature : If equipped,
displays the temperature of the high voltage
battery which assists performance of the
vehicle in either degrees Celsius (°C) or
degrees Fahrenheit (°F).
Electric Power : If equipped, shows the
power coming from the high voltage
battery. When the power indicator is green,
battery power is being charged. When the
indicator is amber, the vehicle is using
power to assist.
Hybrid Battery : If equipped, displays the
high voltage battery charge status of the
vehicle. Hybrid Battery states:
.Red
–No eAWD
.Yellow –Electric assist limited
.White –Normal state of charge range
.Blue –Maximum state of charge range
Audio
Use the thumbwheel to scroll through audio
presets.
Options
Use the thumbwheel to scroll through items
in the Options menu.
Display Options
Press the thumbwheel to enter the Display
menu. There are seven instrument cluster
display configurations to choose from. Sport,
Tour, Track, Weather, My Mode, Z-Mode,
and Night. The style of the cluster will
change depending on the theme selected.
Default is linked to Driver mode. Other
display themes can be set.
If in Z-Mode or My Mode then those
displays plus HUD (if equipped) can be set. Night Mode is enabled when the Instrument
Panel Illumination Control is set to the
minimum level. See
Instrument Panel
Illumination Control 0113.
Shuttle Mode and Stealth Mode are enabled
when either are selected in the Driver Mode
Control before the vehicle is turned on. See
Driver Mode Control 0196.
.Sport/Z-Mode: Displays Coolant
Temperature, Fuel Gauge, Compass, Drive
Mode Indicator, Odometer, Speed,
Tachometer, Electronic Transmission
Range, Current Gear, Active Fuel
Management (AFM), Peak Performance,
Performance Shift Lights, Speed Limit, Info
Area, and Interaction Area.
.Tour/Weather/My Mode: Displays Coolant
Temperature, Fuel Gauge, Compass, Drive
Mode Indicator, Odometer, Speed,
Tachometer, Electronic Transmission
Range, Current Gear, Active Fuel
Management (AFM), Peak Performance,
Speed Limit, Info Area, and
Interaction Area.
.Track: Displays Coolant Temperature, Fuel
Gauge, Performance Traction
Management, Drive Mode Indicator,