2024 CHEVROLET CORVETTE tow
[x] Cancel search: towPage 231 of 362
Chevrolet Corvette Owner Manual (GMNA-Localizing-U.S./Canada/Mexico-
17272984) - 2024 - CRC - 2/20/23
230 Driving and Operating
Trailer Towing
General Towing Information
{Warning
Never tow a trailer with your vehicle.
It was not designed or intended to tow a
trailer.
Conversions and Add-Ons
Add-On Electrical Equipment
{Warning
The Data Link Connector (DLC) is used for
vehicle service and Emission Inspection/
Maintenance testing. SeeMalfunction
Indicator Lamp (Check Engine Light) 090.
A device connected to the DLC —such as
an aftermarket fleet or driver-behavior
tracking device —may interfere with
vehicle systems. This could affect vehicle
operation and cause a crash. Such devices
may also access information stored in the
vehicle’s systems.
Caution
Some electrical equipment can damage
the vehicle or cause components to not
work and would not be covered by the
vehicle warranty. Always check with your
dealer before adding electrical equipment.
Add-on equipment can drain the vehicle's
12-volt battery, even if the vehicle is not
operating.
The vehicle has an airbag system. Before
attempting to add anything electrical to the
vehicle, see Servicing the Airbag-Equipped
Vehicle 060 and
Adding Equipment to the Airbag-Equipped
Vehicle 061.
Page 232 of 362
Chevrolet Corvette Owner Manual (GMNA-Localizing-U.S./Canada/Mexico-
17272984) - 2024 - CRC - 2/20/23
Vehicle Care 231
Vehicle Care
General Information
General Information . . . . . . . . . . . . . . . . . . . 232
California Perchlorate MaterialsRequirements . . . . . . . . . . . . . . . . . . . . . . . . 232
Accessories and Modifications . . . . . . . . . 232
Lifting the Vehicle . . . . . . . . . . . . . . . . . . . . . 232
Vehicle Storage . . . . . . . . . . . . . . . . . . . . . . . . 234
Vehicle Checks
Doing Your Own Service Work . . . . . . . . 234
Underhood Compartment Overview . . . 235
Engine Compartment Overview . . . . . . . . 238
Engine Oil (5.5L LT6 Engine) . . . . . . . . . . . 246
Engine Oil (6.2L LT2 Engine) . . . . . . . . . . . 249
Engine Oil Life System . . . . . . . . . . . . . . . . . 252
Dual Clutch Transmission Fluid . . . . . . . . 253
Dual Clutch Transmission Fluid Life System . . . . . . . . . . . . . . . . . . . . . . . . . . . . . . 253
Engine Air Filter Life System . . . . . . . . . . 254
Engine Air Cleaner/Filter . . . . . . . . . . . . . . . 255
Cooling System (Engine) . . . . . . . . . . . . . . . 257
Cooling System (Electrified Propulsion) . . . . . . . . . . . . . . . . . . . . . . . . . . 260
Engine Overheating . . . . . . . . . . . . . . . . . . . . 261
Washer Fluid . . . . . . . . . . . . . . . . . . . . . . . . . . 262
Brakes . . . . . . . . . . . . . . . . . . . . . . . . . . . . . . . . . 262
Brake Pad Life System (If Equipped) . . . 264
Brake Fluid . . . . . . . . . . . . . . . . . . . . . . . . . . . . 265 Battery - North America . . . . . . . . . . . . . . . 266
Park Brake and P (Park) Mechanism
Check . . . . . . . . . . . . . . . . . . . . . . . . . . . . . . . 269
Wiper Blade Replacement . . . . . . . . . . . . . 270
Windshield Replacement . . . . . . . . . . . . . . 270
Gas Strut(s) . . . . . . . . . . . . . . . . . . . . . . . . . . . 270
Headlamp Aiming
Front Headlamp Aiming . . . . . . . . . . . . . . . . 271
Bulb Replacement
LED Lighting . . . . . . . . . . . . . . . . . . . . . . . . . . . 271
Electrical System
Electrical System Overload . . . . . . . . . . . . . 272
Fuses and Circuit Breakers . . . . . . . . . . . . . 273
Instrument Panel Fuse Block . . . . . . . . . . . 273
Rear Compartment Fuse Block . . . . . . . . . 276
Wheels and Tires
Tires . . . . . . . . . . . . . . . . . . . . . . . . . . . . . . . . . . . 279
All-Season Tires . . . . . . . . . . . . . . . . . . . . . . . 280
Winter Tires . . . . . . . . . . . . . . . . . . . . . . . . . . . 280
Run-Flat Tires . . . . . . . . . . . . . . . . . . . . . . . . . 280
Low-Profile Tires . . . . . . . . . . . . . . . . . . . . . . . 281
Competition Oriented Tires . . . . . . . . . . . . 281
Summer Tires . . . . . . . . . . . . . . . . . . . . . . . . . 282
Tire Sidewall Labeling . . . . . . . . . . . . . . . . . 282
Tire Designations . . . . . . . . . . . . . . . . . . . . . . 283
Tire Terminology and Definitions . . . . . . 284
Tire Pressure . . . . . . . . . . . . . . . . . . . . . . . . . . 286 Tire Pressure for High-Speed
Operation . . . . . . . . . . . . . . . . . . . . . . . . . . . . 287
Tire Pressure Monitor System . . . . . . . . . 288
Tire Pressure Monitor Operation . . . . . . 289
Tire Inspection . . . . . . . . . . . . . . . . . . . . . . . . . 291
Tire Rotation . . . . . . . . . . . . . . . . . . . . . . . . . . 292
When It Is Time for New Tires . . . . . . . . 293
Buying New Tires . . . . . . . . . . . . . . . . . . . . . 294
Different Size Tires and Wheels . . . . . . . 295
Uniform Tire Quality Grading . . . . . . . . . 295
Wheel Alignment and Tire Balance . . . . 296
Wheel Replacement . . . . . . . . . . . . . . . . . . . 297
Tire Chains . . . . . . . . . . . . . . . . . . . . . . . . . . . . 298
If a Tire Goes Flat . . . . . . . . . . . . . . . . . . . . . 298
Jump Starting
Jump Starting - North America . . . . . . . . 299
Towing the Vehicle
Transporting a Disabled Vehicle . . . . . . . 303
Recreational Vehicle Towing . . . . . . . . . . 306
Appearance Care
Exterior Care . . . . . . . . . . . . . . . . . . . . . . . . . . 306
Interior Care . . . . . . . . . . . . . . . . . . . . . . . . . . . 311
Floor Mats . . . . . . . . . . . . . . . . . . . . . . . . . . . . . 314
Page 247 of 362
Chevrolet Corvette Owner Manual (GMNA-Localizing-U.S./Canada/Mexico-
17272984) - 2024 - CRC - 2/20/23
246 Vehicle Care
Engine Oil (5.5L LT6 Engine)
To ensure proper engine performance and
long life, pay careful attention to engine oil.
Follow these important steps:
.Use engine oil approved to the proper
specification and of the proper viscosity
grade. See“Selecting the Right Engine
Oil” later in this section.
.Check the engine oil level regularly and
maintain the proper oil level. See
“Checking Engine Oil” and“When to Add
Engine Oil” later in this section.
.Change the engine oil at the appropriate
time. SeeEngine Oil Life System 0252.
.Always dispose of engine oil properly. See
“What to Do with Used Oil” in this
section.
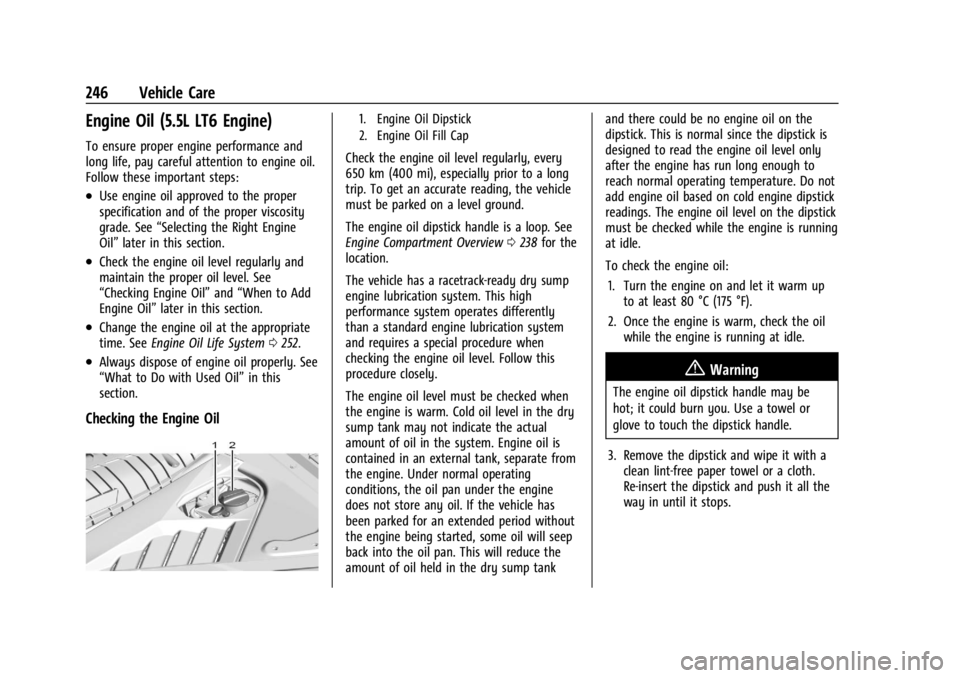
Checking the Engine Oil
1. Engine Oil Dipstick
2. Engine Oil Fill Cap
Check the engine oil level regularly, every
650 km (400 mi), especially prior to a long
trip. To get an accurate reading, the vehicle
must be parked on a level ground.
The engine oil dipstick handle is a loop. See
Engine Compartment Overview 0238 for the
location.
The vehicle has a racetrack-ready dry sump
engine lubrication system. This high
performance system operates differently
than a standard engine lubrication system
and requires a special procedure when
checking the engine oil level. Follow this
procedure closely.
The engine oil level must be checked when
the engine is warm. Cold oil level in the dry
sump tank may not indicate the actual
amount of oil in the system. Engine oil is
contained in an external tank, separate from
the engine. Under normal operating
conditions, the oil pan under the engine
does not store any oil. If the vehicle has
been parked for an extended period without
the engine being started, some oil will seep
back into the oil pan. This will reduce the
amount of oil held in the dry sump tank and there could be no engine oil on the
dipstick. This is normal since the dipstick is
designed to read the engine oil level only
after the engine has run long enough to
reach normal operating temperature. Do not
add engine oil based on cold engine dipstick
readings. The engine oil level on the dipstick
must be checked while the engine is running
at idle.
To check the engine oil:
1. Turn the engine on and let it warm up to at least 80 °C (175 °F).
2. Once the engine is warm, check the oil while the engine is running at idle.
{Warning
The engine oil dipstick handle may be
hot; it could burn you. Use a towel or
glove to touch the dipstick handle.
3. Remove the dipstick and wipe it with a clean lint-free paper towel or a cloth.
Re-insert the dipstick and push it all the
way in until it stops.
Page 251 of 362
Chevrolet Corvette Owner Manual (GMNA-Localizing-U.S./Canada/Mexico-
17272984) - 2024 - CRC - 2/20/23
250 Vehicle Care
and there could be no engine oil on the
dipstick. This is normal since the dipstick is
designed to read the engine oil level only
after the engine has run long enough to
reach normal operating temperature. Do not
add engine oil based on cold engine dipstick
readings. The engine oil level on the dipstick
must be checked while the engine is running
at idle.
To check the engine oil:1. Turn the engine on and let it warm up to at least 80 °C (175 °F).
2. Once the engine is warm, check the oil while the engine is running at idle.
{Warning
The engine oil dipstick handle may be
hot; it could burn you. Use a towel or
glove to touch the dipstick handle.
3. Remove the dipstick and wipe it with a clean lint-free paper towel or a cloth.
Re-insert the dipstick and push it all the
way in until it stops.
4. Remove the dipstick again and read the level on the cross-hatched area. Re-insert
the dipstick and push it all the way in
until it stops. 5. Turn the engine off.
When to Add Engine Oil
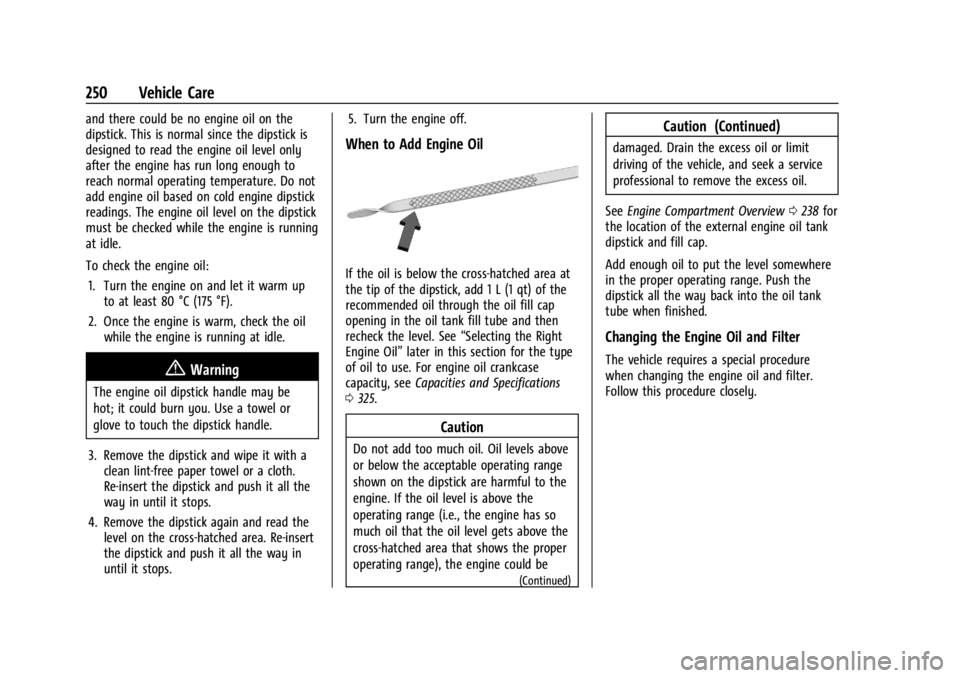
If the oil is below the cross-hatched area at
the tip of the dipstick, add 1 L (1 qt) of the
recommended oil through the oil fill cap
opening in the oil tank fill tube and then
recheck the level. See
“Selecting the Right
Engine Oil” later in this section for the type
of oil to use. For engine oil crankcase
capacity, see Capacities and Specifications
0 325.
Caution
Do not add too much oil. Oil levels above
or below the acceptable operating range
shown on the dipstick are harmful to the
engine. If the oil level is above the
operating range (i.e., the engine has so
much oil that the oil level gets above the
cross-hatched area that shows the proper
operating range), the engine could be
(Continued)
Caution (Continued)
damaged. Drain the excess oil or limit
driving of the vehicle, and seek a service
professional to remove the excess oil.
See Engine Compartment Overview 0238 for
the location of the external engine oil tank
dipstick and fill cap.
Add enough oil to put the level somewhere
in the proper operating range. Push the
dipstick all the way back into the oil tank
tube when finished.
Changing the Engine Oil and Filter
The vehicle requires a special procedure
when changing the engine oil and filter.
Follow this procedure closely.
Page 271 of 362

Chevrolet Corvette Owner Manual (GMNA-Localizing-U.S./Canada/Mexico-
17272984) - 2024 - CRC - 2/20/23
270 Vehicle Care
Wiper Blade Replacement
Windshield wiper blades should be inspected
for wear and cracking.
Replacement blades come in different types
and are removed in different ways. For
proper type and length, seeMaintenance
Replacement Parts 0321.
To replace the windshield wiper blade: 1. Pull the windshield wiper assembly away from the windshield.
2. Lift up on the latch in the middle of thewiper blade where the wiper arm
attaches. 3. With the latch open, pull the wiper blade
down toward the windshield far enough
to release it from the J-hooked end of
the wiper arm.
4. Remove the wiper blade.
Allowing the wiper blade arm to touch
the windshield when no wiper blade is
installed could damage the windshield.
Any damage that occurs would not be
covered by the vehicle warranty. Do not
allow the wiper blade arm to touch the
windshield.
5. Reverse Steps 1–3 for wiper blade replacement.
Windshield Replacement
HUD System
The windshield is part of the HUD system.
If the windshield needs to be replaced, be
sure to get one that is designed for HUD or
the HUD image may look out of focus.
Driver Assistance Systems
If the windshield needs to be replaced and
the vehicle is equipped with a front camera
sensor for the Driver Assistance Systems,
a GM replacement windshield is
recommended. The replacement windshield must be installed according to GM
specifications for proper alignment. If it is
not, these systems may not work properly,
they may display messages, or they may
not work at all. See your dealer for proper
windshield replacement.
Acoustic Windshield
The vehicle is equipped with an acoustic
windshield. If the windshield needs to be
replaced be sure to get an acoustic
windshield so you will continue to have the
benefits an acoustic windshield can provide.
Gas Strut(s)
Your vehicle may be equipped with gas
strut(s) to provide assistance in lifting and
holding open the hood/trunk/liftgate system
in full open position.
{Warning
If the gas struts that hold open the hood,
trunk, and/or liftgate fail, you or others
could be seriously injured. Take the
vehicle to your dealer for service
immediately. Visually inspect the gas
struts for signs of wear, cracks, or other
damage periodically. Check to make sure
(Continued)
Page 293 of 362
Chevrolet Corvette Owner Manual (GMNA-Localizing-U.S./Canada/Mexico-
17272984) - 2024 - CRC - 2/20/23
292 Vehicle Care
Replace the tire if:
.The indicators at three or more
places around the tire can be seen.
.There is cord or fabric showing
through the tire's rubber.
.The tread or sidewall is cracked, cut,
or snagged deep enough to show
cord or fabric.
.The tire has a bump, bulge, or split.
.The tire has a puncture, cut, or other
damage that cannot be repaired well
because of the size or location of the
damage.
Tire Rotation
Tires should be rotated according to the
interval listed in the maintenance
schedule. SeeMaintenance Schedule
0 316.
Tires are rotated to achieve uniform
wear for all tires. The first rotation is
the most important.
Anytime unusual wear is noticed, rotate
the tires as soon as possible, check for
proper tire inflation pressure, and check for damaged tires or wheels. If the
unusual wear continues after the
rotation, check the wheel alignment.
See
When It Is Time for New Tires
0 293 and
Wheel Replacement 0297.
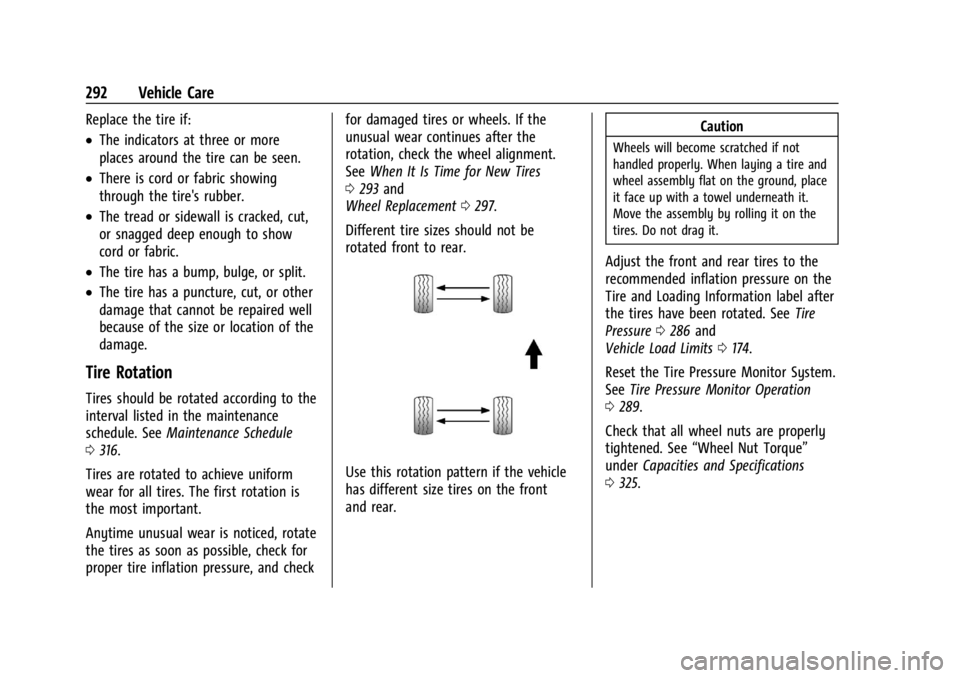
Different tire sizes should not be
rotated front to rear.
Use this rotation pattern if the vehicle
has different size tires on the front
and rear. Caution
Wheels will become scratched if not
handled properly. When laying a tire and
wheel assembly flat on the ground, place
it face up with a towel underneath it.
Move the assembly by rolling it on the
tires. Do not drag it.
Adjust the front and rear tires to the
recommended inflation pressure on the
Tire and Loading Information label after
the tires have been rotated. See
Tire
Pressure 0286 and
Vehicle Load Limits 0174.
Reset the Tire Pressure Monitor System.
See Tire Pressure Monitor Operation
0 289.
Check that all wheel nuts are properly
tightened. See “Wheel Nut Torque”
under Capacities and Specifications
0 325.
Page 294 of 362

Chevrolet Corvette Owner Manual (GMNA-Localizing-U.S./Canada/Mexico-
17272984) - 2024 - CRC - 2/20/23
Vehicle Care 293
{Warning
Rust or dirt on a wheel, or on the
parts to which it is fastened, can
cause wheel nuts to become loose
over time. The wheel could come off
and cause a crash. When changing a
wheel, remove any rust or dirt from
places where the wheel attaches to
the vehicle. In an emergency, a cloth
or paper towel can be used; however,
use a scraper or wire brush later to
remove all rust or dirt.
Lightly coat the inner diameter of the
wheel hub opening with wheel bearing
grease after a wheel change or tire
rotation to prevent corrosion or rust
buildup.
{Warning
Do not apply grease to the wheel
mounting surface, wheel conical
seats, or the wheel nuts or bolts.
Grease applied to these areas could
cause a wheel to become loose or
come off, resulting in a crash.
When It Is Time for New Tires
Factors, such as maintenance, temperatures,
driving speeds, vehicle loading, and road
conditions affect the wear rate of the tires.
Treadwear indicators are one way to tell
when it is time for new tires. Treadwear
indicators appear when the tires have only
1.6 mm (1/16 in) or less of tread remaining.
See Tire Inspection 0291 and
Tire Rotation 0292.
The rubber in tires ages over time. This also
applies to the spare tire, if the vehicle has
one, even if it is never used. Multiple factors
including temperatures, loading conditions,
and inflation pressure maintenance affect
how fast aging takes place. GM recommends that tires, including the spare if equipped,
be replaced after six years, regardless of
tread wear. To identify the age of a tire, use
the tire manufacture date, which is the last
four digits of the DOT Tire Identification
Number (TIN) molded into one side of the
tire sidewall. The last four digits of the TIN
indicate the tire manufactured date. The
first two digits represent the week and the
last two digits, the year. For example, the
third week of the year 2020 would have a
4-digit DOT date of 0320. Week 01 is the
first full week (Sunday through Saturday) of
each year.
Vehicle Storage
Tires age when stored normally mounted on
a parked vehicle. Park a vehicle that will be
stored for at least a month in a cool, dry,
clean area away from direct sunlight to slow
aging. This area should be free of grease,
gasoline, or other substances that can
deteriorate rubber.
Parking for an extended period can cause
flat spots on the tires that may result in
vibrations while driving. When storing a
vehicle for at least a month, remove the
tires or raise the vehicle to reduce the
weight from the tires.
Page 299 of 362
Chevrolet Corvette Owner Manual (GMNA-Localizing-U.S./Canada/Mexico-
17272984) - 2024 - CRC - 2/20/23
298 Vehicle Care
Caution
The wrong wheel can also cause
problems with bearing life, brake cooling,
speedometer or odometer calibration,
headlamp aim, bumper height, vehicle
ground clearance, and tire or tire chain
clearance to the body and chassis.
Tire Chains
{Warning
Do not use tire chains. There is not
enough clearance. Tire chains used on a
vehicle without the proper amount of
clearance can cause damage to the
brakes, suspension, or other vehicle parts.
The area damaged by the tire chains
could cause loss of control and a crash.
Use another type of traction device only
if its manufacturer recommends it for the
vehicle's tire size combination and road
conditions. Follow that manufacturer's
instructions. To avoid vehicle damage,
drive slowly and readjust or remove the
traction device if it contacts the vehicle.(Continued)
Warning (Continued)
Do not spin the wheels. If traction
devices are used, install them on the tires
of the drive axle only.
If a Tire Goes Flat
It is unusual for a tire to blow out while
driving, especially if the tires are maintained
properly. SeeTires0279. If air goes out of
a tire, it is much more likely to leak out
slowly. But if there ever is a blowout, here
are a few tips about what to expect and
what to do:
If a front tire fails, the flat tire creates a
drag that pulls the vehicle toward that side.
Take your foot off the accelerator pedal and
grip the steering wheel firmly. Steer to
maintain lane position, and then gently
brake to a stop, well off the road,
if possible.
A rear blowout, particularly on a curve, acts
much like a skid and may require the same
correction as used in a skid. Stop pressing
the accelerator pedal and steer to straighten
the vehicle. It may be very bumpy and
noisy. Gently brake to a stop, well off the
road, if possible. The vehicle has no spare tire, no tire
changing equipment, and no place to store
a tire.
If the vehicle has run-flat tires, there is no
need to stop on the side of the road to
change a flat tire. See
Run-Flat Tires0280.{Warning
Driving on a flat tire will cause
permanent damage to the tire.
Re-inflating a tire after it has been driven
on while severely underinflated or flat
may cause a blowout and a serious crash.
Never attempt to re-inflate a tire that has
been driven on while severely
underinflated or flat. Have your dealer or
an authorized tire service center repair or
replace the flat tire as soon as possible.
{Warning
Special tools and procedures are required
to service a run-flat tire. If these special
tools and procedures are not used, injury
or vehicle damage may occur. Always be
sure the proper tools and procedures, as
described in the service manual, are used.