Page 235 of 362

Chevrolet Corvette Owner Manual (GMNA-Localizing-U.S./Canada/Mexico-
17272984) - 2024 - CRC - 2/20/23
234 Vehicle Care
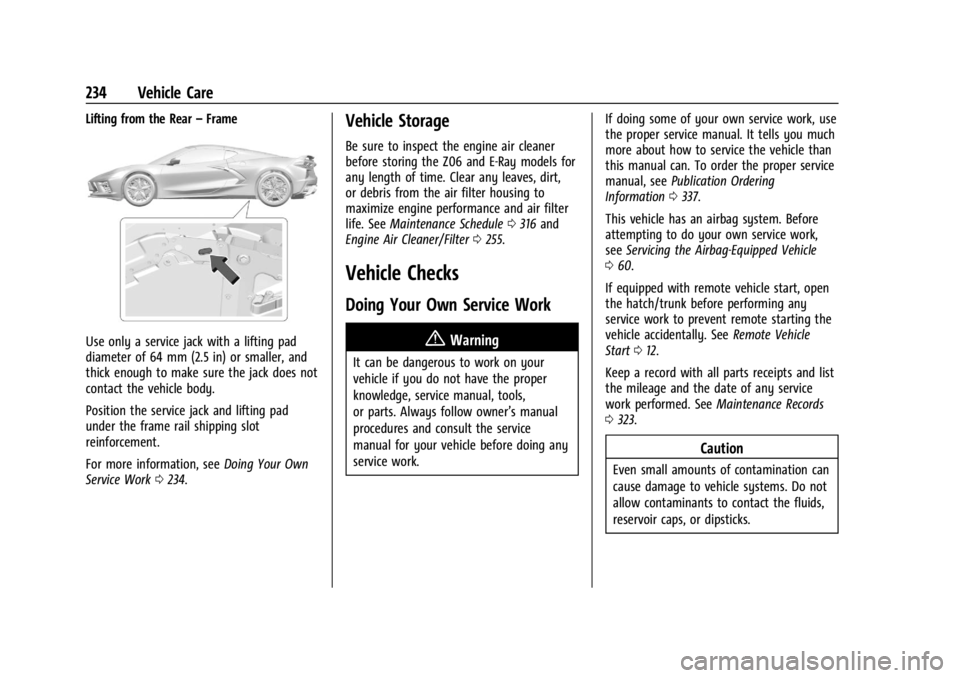
Lifting from the Rear–Frame
Use only a service jack with a lifting pad
diameter of 64 mm (2.5 in) or smaller, and
thick enough to make sure the jack does not
contact the vehicle body.
Position the service jack and lifting pad
under the frame rail shipping slot
reinforcement.
For more information, see Doing Your Own
Service Work 0234.
Vehicle Storage
Be sure to inspect the engine air cleaner
before storing the Z06 and E-Ray models for
any length of time. Clear any leaves, dirt,
or debris from the air filter housing to
maximize engine performance and air filter
life. See Maintenance Schedule 0316 and
Engine Air Cleaner/Filter 0255.
Vehicle Checks
Doing Your Own Service Work
{Warning
It can be dangerous to work on your
vehicle if you do not have the proper
knowledge, service manual, tools,
or parts. Always follow owner’s manual
procedures and consult the service
manual for your vehicle before doing any
service work. If doing some of your own service work, use
the proper service manual. It tells you much
more about how to service the vehicle than
this manual can. To order the proper service
manual, see
Publication Ordering
Information 0337.
This vehicle has an airbag system. Before
attempting to do your own service work,
see Servicing the Airbag-Equipped Vehicle
0 60.
If equipped with remote vehicle start, open
the hatch/trunk before performing any
service work to prevent remote starting the
vehicle accidentally. See Remote Vehicle
Start 012.
Keep a record with all parts receipts and list
the mileage and the date of any service
work performed. See Maintenance Records
0 323.
Caution
Even small amounts of contamination can
cause damage to vehicle systems. Do not
allow contaminants to contact the fluids,
reservoir caps, or dipsticks.
Page 239 of 362
Chevrolet Corvette Owner Manual (GMNA-Localizing-U.S./Canada/Mexico-
17272984) - 2024 - CRC - 2/20/23
238 Vehicle Care
Engine Compartment Overview
On coupe models, open the rear hatch/trunk to access the engine compartment. SeeHatch (Trunk)020.
On convertible models, open the rear tonneau cover to access the engine compartment. The rear hatch/trunk and the convertible top must be
closed and the vehicle must be in P (Park). See Convertible Top034.
Engine Cover (Convertible Only)
Page 260 of 362

Chevrolet Corvette Owner Manual (GMNA-Localizing-U.S./Canada/Mexico-
17272984) - 2024 - CRC - 2/20/23
Vehicle Care 259
How to Add Coolant to the Coolant
Surge Tank
{Warning
Spilling coolant on hot engine parts can
burn you. Coolant contains ethylene
glycol and it will burn if the engine parts
are hot enough.
{Warning
Steam and scalding liquids from a hot
cooling system are under pressure.
Turning the pressure cap, even a little,
can cause them to come out at high
speed and you could be burned. Never
turn the cap when the cooling system,
including the pressure cap, is hot. Wait
for the cooling system and pressure cap
to cool.
If coolant is needed, be sure the cooling
system is cool, then add the proper
DEX-COOL coolant mixture directly to the
surge tank. 1. Open the Hatch/Trunk. See
Hatch (Trunk)
0 20.
2. When the cooling system, including the
coolant surge tank pressure cap and
engine, is no longer hot, remove the
pressure cap.
Turn the pressure cap slowly
counterclockwise about one-quarter turn
and then stop.
If a hiss is heard, wait for that to stop.
A hiss means there is still some
pressure left.
3. Keep turning the pressure cap slowly, and remove it.
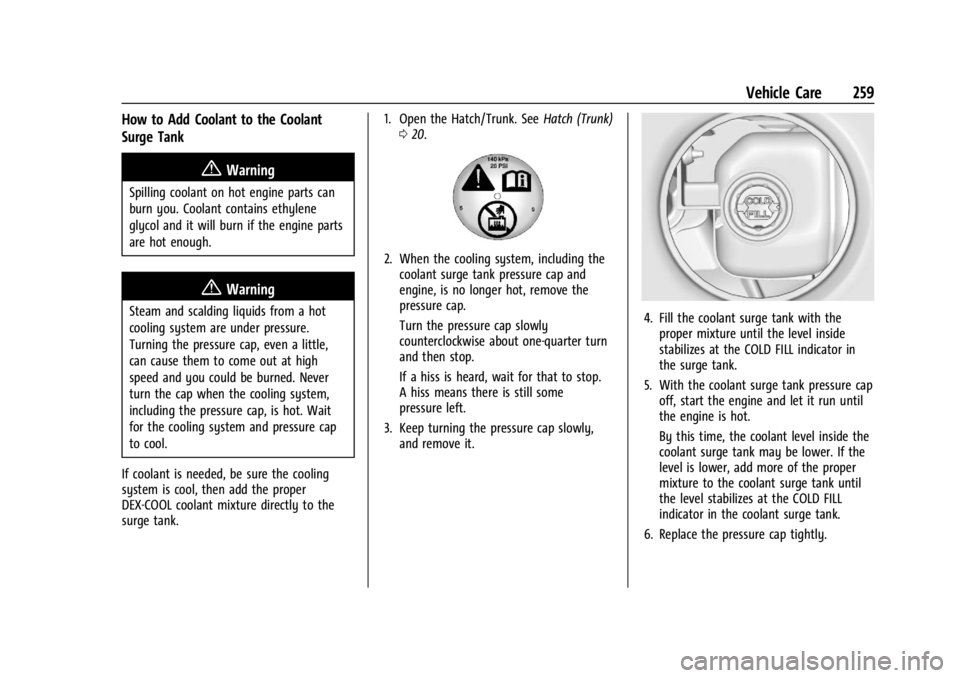
4. Fill the coolant surge tank with theproper mixture until the level inside
stabilizes at the COLD FILL indicator in
the surge tank.
5. With the coolant surge tank pressure cap off, start the engine and let it run until
the engine is hot.
By this time, the coolant level inside the
coolant surge tank may be lower. If the
level is lower, add more of the proper
mixture to the coolant surge tank until
the level stabilizes at the COLD FILL
indicator in the coolant surge tank.
6. Replace the pressure cap tightly.
Page 271 of 362

Chevrolet Corvette Owner Manual (GMNA-Localizing-U.S./Canada/Mexico-
17272984) - 2024 - CRC - 2/20/23
270 Vehicle Care
Wiper Blade Replacement
Windshield wiper blades should be inspected
for wear and cracking.
Replacement blades come in different types
and are removed in different ways. For
proper type and length, seeMaintenance
Replacement Parts 0321.
To replace the windshield wiper blade: 1. Pull the windshield wiper assembly away from the windshield.
2. Lift up on the latch in the middle of thewiper blade where the wiper arm
attaches. 3. With the latch open, pull the wiper blade
down toward the windshield far enough
to release it from the J-hooked end of
the wiper arm.
4. Remove the wiper blade.
Allowing the wiper blade arm to touch
the windshield when no wiper blade is
installed could damage the windshield.
Any damage that occurs would not be
covered by the vehicle warranty. Do not
allow the wiper blade arm to touch the
windshield.
5. Reverse Steps 1–3 for wiper blade replacement.
Windshield Replacement
HUD System
The windshield is part of the HUD system.
If the windshield needs to be replaced, be
sure to get one that is designed for HUD or
the HUD image may look out of focus.
Driver Assistance Systems
If the windshield needs to be replaced and
the vehicle is equipped with a front camera
sensor for the Driver Assistance Systems,
a GM replacement windshield is
recommended. The replacement windshield must be installed according to GM
specifications for proper alignment. If it is
not, these systems may not work properly,
they may display messages, or they may
not work at all. See your dealer for proper
windshield replacement.
Acoustic Windshield
The vehicle is equipped with an acoustic
windshield. If the windshield needs to be
replaced be sure to get an acoustic
windshield so you will continue to have the
benefits an acoustic windshield can provide.
Gas Strut(s)
Your vehicle may be equipped with gas
strut(s) to provide assistance in lifting and
holding open the hood/trunk/liftgate system
in full open position.
{Warning
If the gas struts that hold open the hood,
trunk, and/or liftgate fail, you or others
could be seriously injured. Take the
vehicle to your dealer for service
immediately. Visually inspect the gas
struts for signs of wear, cracks, or other
damage periodically. Check to make sure
(Continued)
Page 272 of 362
Chevrolet Corvette Owner Manual (GMNA-Localizing-U.S./Canada/Mexico-
17272984) - 2024 - CRC - 2/20/23
Vehicle Care 271
Warning (Continued)
the hood/trunk/liftgate is held open with
enough force. If struts are failing to hold
the hood/trunk/liftgate, do not operate.
Have the vehicle serviced.
Caution
Do not apply tape or hang any objects
from gas struts. Also do not push down
or pull on gas struts. This may cause
damage to the vehicle.
See Maintenance Schedule 0316.
Hood
Trunk
Liftgate
Headlamp Aiming
Front Headlamp Aiming
Headlamp aim has been preset and should
need no further adjustment.
If the vehicle is damaged in a crash, the
headlamp aim may be affected.
If adjustment to the headlamps is necessary,
see your dealer.
Bulb Replacement
LED Lighting
This vehicle has all LED lamps. For
replacement of any LED lighting assembly,
contact your dealer.
Page 275 of 362
Chevrolet Corvette Owner Manual (GMNA-Localizing-U.S./Canada/Mexico-
17272984) - 2024 - CRC - 2/20/23
274 Vehicle Care
The vehicle may not be equipped with all of
the fuses and relays shown.Fuses Usage
F1 –
F2 Front Wiper
F3 Cooling Fan 1
F4 – Fuses Usage
F5 Cooling Fan 2
F6 Front Blower F7 Automatic Level Control
F8 Shifter Interface Board Module Fuses
Usage
F9 Display IP Cluster/HVAC/ Center Stack Module
F10 Traction Power Inverter Module Battery 1
F11 USB
F12 Traction Power Inverter Module Battery 2
F13 Transmission Oil Pump Motor
F14 Glove Box F15 –
F16 –
Electrical Park Brake/
Automatic Occupant
Sensing (E-Ray)
F17 Remote Function Actuator
F18 Front Trunk Release
F19 Intelligent Battery Sensor
F20 Exterior Lighting Module 1
Page 277 of 362
Chevrolet Corvette Owner Manual (GMNA-Localizing-U.S./Canada/Mexico-
17272984) - 2024 - CRC - 2/20/23
276 Vehicle Care
RelaysUsage
K1 –
K2 Glove Box Relay
K3 Horn Relay
K4 Front Wash Relay K5 Retained Accessory Power/Accessory Relay
K6 Front Trunk Release Relay 1
K7 –
K8 –
K9 Front Trunk Release Relay 2
K10 Wiper RelayRear Compartment Fuse Block
The rear compartment fuse block is in the
rear of the vehicle in between the seats.
To Access: 1. Open top cover.
2. Remove the top cover by pushing inward on the latch.
3. Pull the cover upward.
To Install: 1. Insert the tabs on the back of the cover into the slots in the rear compartment.
2. Align the clip with the slots in the instrument panel.
3. Press the cover into place.
See your dealer if additional assistance is
needed.