2024 CHEVROLET CORVETTE brake
[x] Cancel search: brakePage 32 of 362
Chevrolet Corvette Owner Manual (GMNA-Localizing-U.S./Canada/Mexico-
17272984) - 2024 - CRC - 2/20/23
Keys, Doors, and Windows 31
Sun Visors
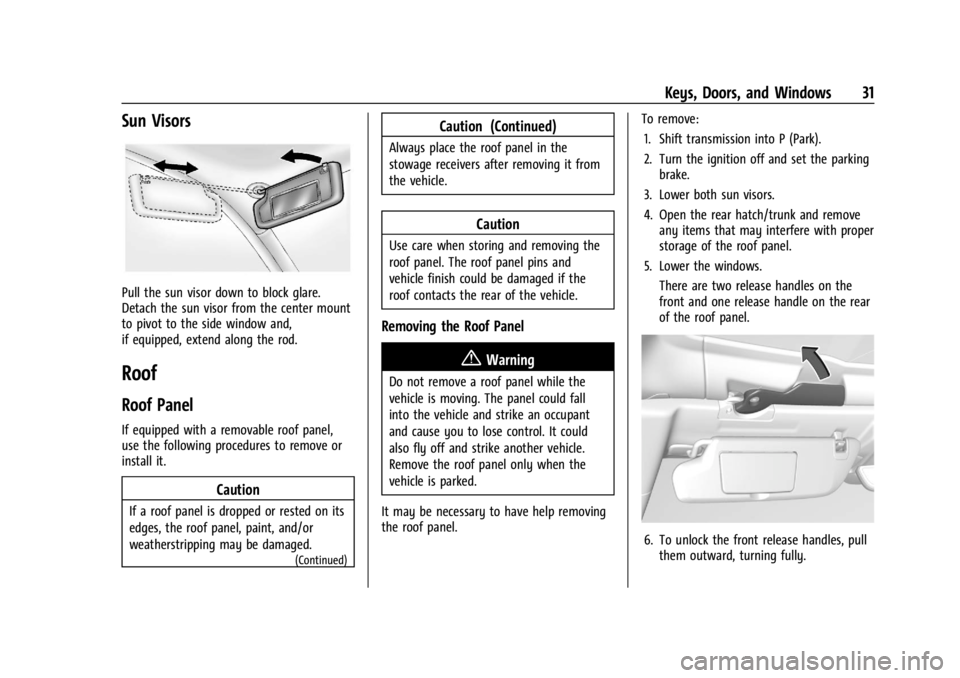
Pull the sun visor down to block glare.
Detach the sun visor from the center mount
to pivot to the side window and,
if equipped, extend along the rod.
Roof
Roof Panel
If equipped with a removable roof panel,
use the following procedures to remove or
install it.
Caution
If a roof panel is dropped or rested on its
edges, the roof panel, paint, and/or
weatherstripping may be damaged.
(Continued)
Caution (Continued)
Always place the roof panel in the
stowage receivers after removing it from
the vehicle.
Caution
Use care when storing and removing the
roof panel. The roof panel pins and
vehicle finish could be damaged if the
roof contacts the rear of the vehicle.
Removing the Roof Panel
{Warning
Do not remove a roof panel while the
vehicle is moving. The panel could fall
into the vehicle and strike an occupant
and cause you to lose control. It could
also fly off and strike another vehicle.
Remove the roof panel only when the
vehicle is parked.
It may be necessary to have help removing
the roof panel. To remove:
1. Shift transmission into P (Park).
2. Turn the ignition off and set the parking brake.
3. Lower both sun visors.
4. Open the rear hatch/trunk and remove any items that may interfere with proper
storage of the roof panel.
5. Lower the windows. There are two release handles on the
front and one release handle on the rear
of the roof panel.
6. To unlock the front release handles, pullthem outward, turning fully.
Page 34 of 362
Chevrolet Corvette Owner Manual (GMNA-Localizing-U.S./Canada/Mexico-
17272984) - 2024 - CRC - 2/20/23
Keys, Doors, and Windows 33
{Warning
Do not push from the sides of the roof
panel when seating the panel into the
upper receivers for storage. Pushing from
the sides may result in injury from
pinched fingers. Only push along the top
edge of the roof panel.
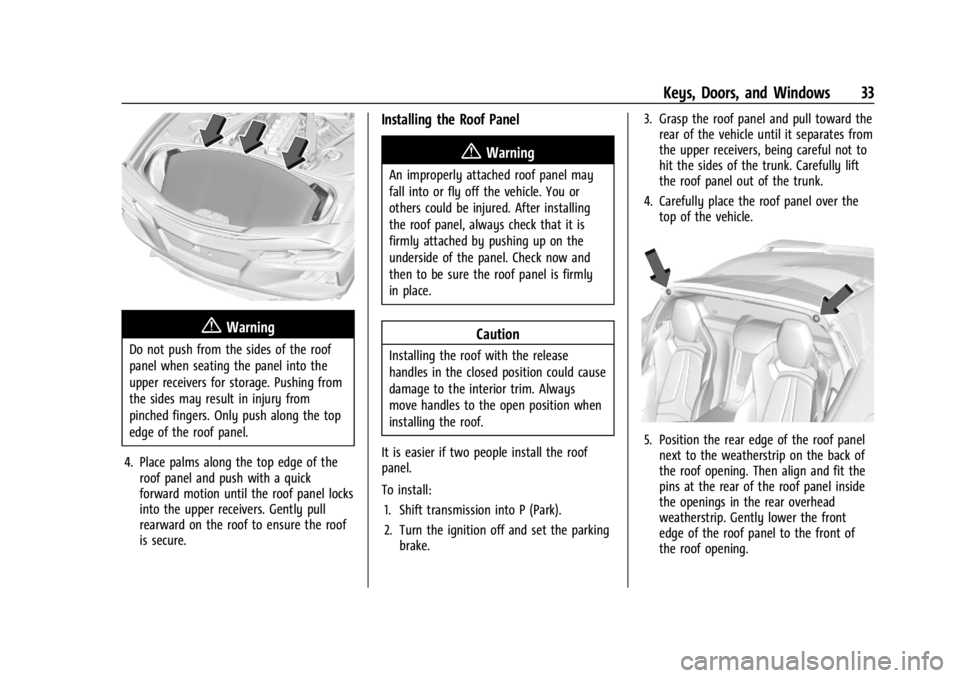
4. Place palms along the top edge of the roof panel and push with a quick
forward motion until the roof panel locks
into the upper receivers. Gently pull
rearward on the roof to ensure the roof
is secure.
Installing the Roof Panel
{Warning
An improperly attached roof panel may
fall into or fly off the vehicle. You or
others could be injured. After installing
the roof panel, always check that it is
firmly attached by pushing up on the
underside of the panel. Check now and
then to be sure the roof panel is firmly
in place.
Caution
Installing the roof with the release
handles in the closed position could cause
damage to the interior trim. Always
move handles to the open position when
installing the roof.
It is easier if two people install the roof
panel.
To install: 1. Shift transmission into P (Park).
2. Turn the ignition off and set the parking brake. 3. Grasp the roof panel and pull toward the
rear of the vehicle until it separates from
the upper receivers, being careful not to
hit the sides of the trunk. Carefully lift
the roof panel out of the trunk.
4. Carefully place the roof panel over the top of the vehicle.
5. Position the rear edge of the roof panelnext to the weatherstrip on the back of
the roof opening. Then align and fit the
pins at the rear of the roof panel inside
the openings in the rear overhead
weatherstrip. Gently lower the front
edge of the roof panel to the front of
the roof opening.
Page 47 of 362
Chevrolet Corvette Owner Manual (GMNA-Localizing-U.S./Canada/Mexico-
17272984) - 2024 - CRC - 2/20/23
46 Seats and Restraints
Questions and Answers About Seat Belts
Q: Will I be trapped in the vehicle after acrash if I am wearing a seat belt?
A: You could be— whether you are
wearing a seat belt or not. Your chance
of being conscious during and after a
crash, so you canunbuckle and get out,
is much greater if you are belted.
Q: If my vehicle has airbags, why should I have to wear seat belts?
A: Airbags are supplemental systems only.
They work withseat belts —not instead
of them. Whether or not an airbag is
provided, all occupants still have to
buckle up to get the most protection.
Also, in nearly all states and in all
Canadian provinces, the law requires
wearing seat belts.
Buckle To Drive
If equipped, this feature delays the vehicle
from shifting out of P (Park) when the driver
seat belt is not buckled. The Buckle to Drive
feature must be turned ON in the
infotainment system to work. To turn the
Buckle to Drive feature on or off, select
Settings > Vehicle > Buckle to Drive. See
Teen Driver 0144, if equipped. If the vehicle is on and the brake pedal is
pressed with the vehicle in P (Park) but the
driver seat belt is not buckled, a message
displays in the Driver Information
Center (DIC) and the vehicle will be delayed
from shifting out of P (Park). Buckle the
driver seat belt to clear the message and
shift out of P (Park). Shifting from P (Park)
will be delayed once for each time the
vehicle is started.
For some fleet vehicles, the feature is
always ON and cannot be turned OFF in the
infotainment system. The vehicle will be
delayed from shifting from P (Park) each
time the driver attempts to do so while the
driver seat belt is not buckled. Turning the
vehicle off then on will not change this
condition.
On some models, Buckle to Drive may also
delay shifting out of P (Park) if a front
passenger seat belt is unbuckled. A message
displays in the DIC. Buckle the front
passenger seat belt to shift out of P (Park).
This feature may delay the vehicle from
shifting out of P (Park) if an object, such as
a briefcase, handbag, grocery bag, laptop,
or other electronic device, is on the front
passenger seat. If this happens, remove the
object from the seat or buckle the seat belt
to shift out of P (Park).
If the driver, or on some vehicles, the
present front passenger remains unbuckled,
the DIC message will turn off after several
seconds and the vehicle can be shifted out
of P (Park). See
“Seat Belts”and“Child
Restraints” in the Index for information
about the importance of proper
restraint use.
If the driver seat belt or the front passenger
seat belt is unbuckled when driving, the seat
belt reminder chime and light(s) will come
on. See Seat Belt Reminders 088. This
feature may not function properly if the
airbag readiness light is on. See Airbag
Readiness Light 088.
How to Wear Seat Belts Properly
Follow these rules for everyone's protection.
There are additional things to know about
seat belts and children, including smaller
children and infants. If a child will be riding
in the vehicle, see Older Children062 or
Infants and Young Children 063. Review
and follow the rules for children in addition
to the following rules.
Page 75 of 362

Chevrolet Corvette Owner Manual (GMNA-Localizing-U.S./Canada/Mexico-
17272984) - 2024 - CRC - 2/20/23
74 Instruments and Controls
Instruments and Controls
Controls
Steering Wheel Adjustment . . . . . . . . . . . . . 75
Heated Steering Wheel . . . . . . . . . . . . . . . . . 75
Horn . . . . . . . . . . . . . . . . . . . . . . . . . . . . . . . . . . . . 75
Windshield Wiper/Washer . . . . . . . . . . . . . . 75
Compass . . . . . . . . . . . . . . . . . . . . . . . . . . . . . . . 76
Clock . . . . . . . . . . . . . . . . . . . . . . . . . . . . . . . . . . . 76
Power Outlets . . . . . . . . . . . . . . . . . . . . . . . . . . 77
Wireless Charging . . . . . . . . . . . . . . . . . . . . . . 78
Warning Lights, Gauges, and Indicators
Warning Lights, Gauges, andIndicators . . . . . . . . . . . . . . . . . . . . . . . . . . . . 80
Instrument Cluster . . . . . . . . . . . . . . . . . . . . . . 81
Speedometer . . . . . . . . . . . . . . . . . . . . . . . . . . . 85
Odometer . . . . . . . . . . . . . . . . . . . . . . . . . . . . . . 85
Trip Odometer . . . . . . . . . . . . . . . . . . . . . . . . . . 85
Tachometer . . . . . . . . . . . . . . . . . . . . . . . . . . . . 85
Battery Gauge (High Voltage) . . . . . . . . . . 86
Stealth Drive Mode Capability Gauge . . . . . . . . . . . . . . . . . . . . . . . . . . . . . . . . 86
Fuel Gauge . . . . . . . . . . . . . . . . . . . . . . . . . . . . . 86
Hybrid Battery Charging Light (Charge+) . . . . . . . . . . . . . . . . . . . . . . . . . . . . . 87
Power Indicator Gauge . . . . . . . . . . . . . . . . . 87
Engine Coolant Temperature Gauge . . . . 87
Transmission Temperature Gauge . . . . . . 88
Seat Belt Reminders . . . . . . . . . . . . . . . . . . . . 88 Airbag Readiness Light . . . . . . . . . . . . . . . . . 88
Passenger Airbag Status Indicator . . . . . . 89
Charging System Light (12-Volt
Battery) . . . . . . . . . . . . . . . . . . . . . . . . . . . . . . 90
Malfunction Indicator Lamp (Check
Engine Light) . . . . . . . . . . . . . . . . . . . . . . . . . 90
Front Lift System Light . . . . . . . . . . . . . . . . . 91
Brake System Warning Light . . . . . . . . . . . 92
Electric Parking Brake Light . . . . . . . . . . . . . 92
Service Electric Parking Brake Light . . . . . 92
Antilock Brake System (ABS) Warning Light . . . . . . . . . . . . . . . . . . . . . . . . . . . . . . . . . . 93
Performance Transmission Active . . . . . . . 93
All-Wheel-Drive Light . . . . . . . . . . . . . . . . . . . 93
Lane Keep Assist (LKA) Light . . . . . . . . . . . 94
Automatic Emergency Braking (AEB) Disabled Light . . . . . . . . . . . . . . . . . . . . . . . . 94
Vehicle Ahead Indicator . . . . . . . . . . . . . . . . 94
Pedestrian Ahead Indicator . . . . . . . . . . . . . 94
Traction Off Light . . . . . . . . . . . . . . . . . . . . . . 95
Traction Control System (TCS)/Electronic Stability Control Light . . . . . . . . . . . . . . . . 95
Electronic Stability Control (ESC) Off Light . . . . . . . . . . . . . . . . . . . . . . . . . . . . . . . . . . 95
Engine Coolant Temperature Warning Light . . . . . . . . . . . . . . . . . . . . . . . . . . . . . . . . . 96
Driver Mode Control Light . . . . . . . . . . . . . . 96
Tire Pressure Light . . . . . . . . . . . . . . . . . . . . . . 97
Engine Oil Pressure Light . . . . . . . . . . . . . . . 97
Low Fuel Warning Light . . . . . . . . . . . . . . . . 97 Auto Stop Indicator . . . . . . . . . . . . . . . . . . . . 98
Traffic Sign Indicator . . . . . . . . . . . . . . . . . . . 98
Security Light . . . . . . . . . . . . . . . . . . . . . . . . . . 98
High-Beam On Light . . . . . . . . . . . . . . . . . . . . 98
Lamps On Reminder . . . . . . . . . . . . . . . . . . . . 99
Cruise Control Light . . . . . . . . . . . . . . . . . . . . 99
Door Ajar Light . . . . . . . . . . . . . . . . . . . . . . . . . 99
Information Displays
Driver Information Center (DIC) . . . . . . . . 99
Head-Up Display (HUD) . . . . . . . . . . . . . . . . 102
Vehicle Messages
Vehicle Messages . . . . . . . . . . . . . . . . . . . . . . 105
Engine Power Messages . . . . . . . . . . . . . . . 106
Vehicle Speed Messages . . . . . . . . . . . . . . . 106
Universal Remote System
Universal Remote System . . . . . . . . . . . . . 106
Universal Remote System
Programming . . . . . . . . . . . . . . . . . . . . . . . . 106
Universal Remote System Operation . . . . . . . . . . . . . . . . . . . . . . . . . . . 108
Page 84 of 362
Chevrolet Corvette Owner Manual (GMNA-Localizing-U.S./Canada/Mexico-
17272984) - 2024 - CRC - 2/20/23
Instruments and Controls 83
Brake Temperature :Shows overall
temperature as either Normal, Warm, Hot,
or Overheated. Normal is typical for normal
driving while Warm is typical for spirited
driving. Unknown may be displayed if tire
temperature information is unavailable.
Lifetime Fuel Economy : Shows the
instantaneous fuel economy over the
lifetime of the vehicle.
Follow Distance : Shows the current follow
time to the vehicle ahead is displayed as a
time value.
Hybrid Battery Temperature : If equipped,
displays the temperature of the high voltage
battery which assists performance of the
vehicle in either degrees Celsius (°C) or
degrees Fahrenheit (°F).
Electric Power : If equipped, shows the
power coming from the high voltage
battery. When the power indicator is green,
battery power is being charged. When the
indicator is amber, the vehicle is using
power to assist.
Hybrid Battery : If equipped, displays the
high voltage battery charge status of the
vehicle. Hybrid Battery states:
.Red
–No eAWD
.Yellow –Electric assist limited
.White –Normal state of charge range
.Blue –Maximum state of charge range
Audio
Use the thumbwheel to scroll through audio
presets.
Options
Use the thumbwheel to scroll through items
in the Options menu.
Display Options
Press the thumbwheel to enter the Display
menu. There are seven instrument cluster
display configurations to choose from. Sport,
Tour, Track, Weather, My Mode, Z-Mode,
and Night. The style of the cluster will
change depending on the theme selected.
Default is linked to Driver mode. Other
display themes can be set.
If in Z-Mode or My Mode then those
displays plus HUD (if equipped) can be set. Night Mode is enabled when the Instrument
Panel Illumination Control is set to the
minimum level. See
Instrument Panel
Illumination Control 0113.
Shuttle Mode and Stealth Mode are enabled
when either are selected in the Driver Mode
Control before the vehicle is turned on. See
Driver Mode Control 0196.
.Sport/Z-Mode: Displays Coolant
Temperature, Fuel Gauge, Compass, Drive
Mode Indicator, Odometer, Speed,
Tachometer, Electronic Transmission
Range, Current Gear, Active Fuel
Management (AFM), Peak Performance,
Performance Shift Lights, Speed Limit, Info
Area, and Interaction Area.
.Tour/Weather/My Mode: Displays Coolant
Temperature, Fuel Gauge, Compass, Drive
Mode Indicator, Odometer, Speed,
Tachometer, Electronic Transmission
Range, Current Gear, Active Fuel
Management (AFM), Peak Performance,
Speed Limit, Info Area, and
Interaction Area.
.Track: Displays Coolant Temperature, Fuel
Gauge, Performance Traction
Management, Drive Mode Indicator,
Page 93 of 362
Chevrolet Corvette Owner Manual (GMNA-Localizing-U.S./Canada/Mexico-
17272984) - 2024 - CRC - 2/20/23
92 Instruments and Controls
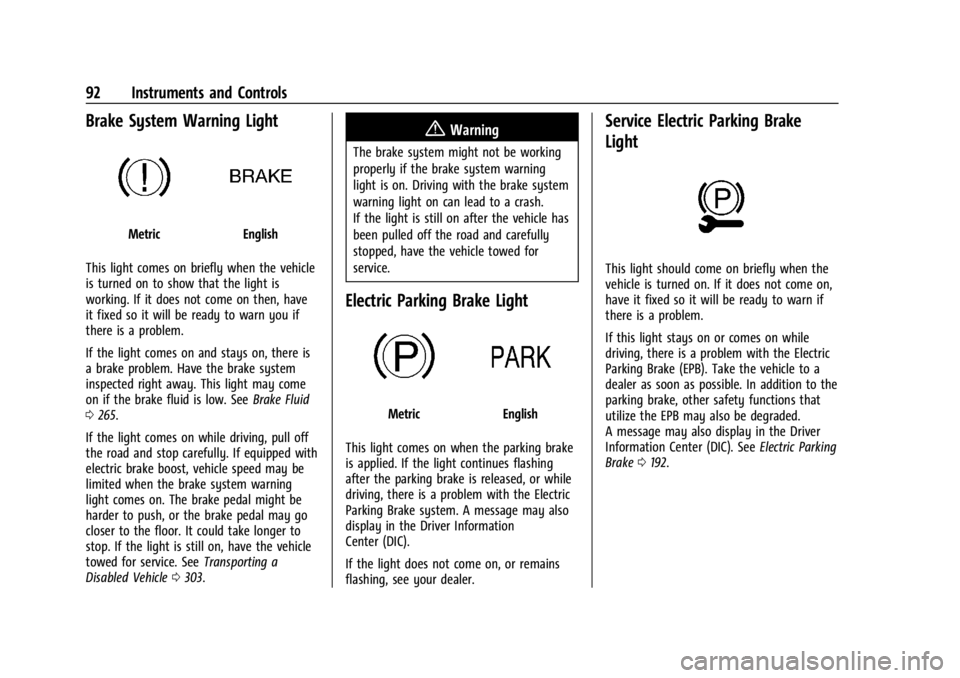
Brake System Warning Light
MetricEnglish
This light comes on briefly when the vehicle
is turned on to show that the light is
working. If it does not come on then, have
it fixed so it will be ready to warn you if
there is a problem.
If the light comes on and stays on, there is
a brake problem. Have the brake system
inspected right away. This light may come
on if the brake fluid is low. See Brake Fluid
0 265.
If the light comes on while driving, pull off
the road and stop carefully. If equipped with
electric brake boost, vehicle speed may be
limited when the brake system warning
light comes on. The brake pedal might be
harder to push, or the brake pedal may go
closer to the floor. It could take longer to
stop. If the light is still on, have the vehicle
towed for service. See Transporting a
Disabled Vehicle 0303.
{Warning
The brake system might not be working
properly if the brake system warning
light is on. Driving with the brake system
warning light on can lead to a crash.
If the light is still on after the vehicle has
been pulled off the road and carefully
stopped, have the vehicle towed for
service.
Electric Parking Brake Light
MetricEnglish
This light comes on when the parking brake
is applied. If the light continues flashing
after the parking brake is released, or while
driving, there is a problem with the Electric
Parking Brake system. A message may also
display in the Driver Information
Center (DIC).
If the light does not come on, or remains
flashing, see your dealer.
Service Electric Parking Brake
Light
This light should come on briefly when the
vehicle is turned on. If it does not come on,
have it fixed so it will be ready to warn if
there is a problem.
If this light stays on or comes on while
driving, there is a problem with the Electric
Parking Brake (EPB). Take the vehicle to a
dealer as soon as possible. In addition to the
parking brake, other safety functions that
utilize the EPB may also be degraded.
A message may also display in the Driver
Information Center (DIC). See Electric Parking
Brake 0192.
Page 94 of 362
Chevrolet Corvette Owner Manual (GMNA-Localizing-U.S./Canada/Mexico-
17272984) - 2024 - CRC - 2/20/23
Instruments and Controls 93
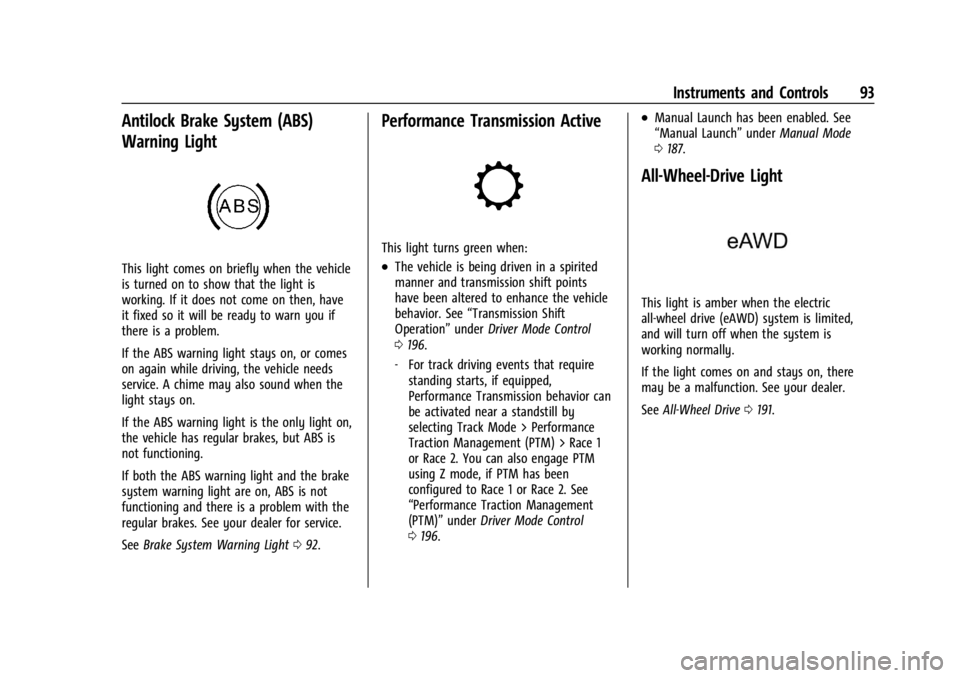
Antilock Brake System (ABS)
Warning Light
This light comes on briefly when the vehicle
is turned on to show that the light is
working. If it does not come on then, have
it fixed so it will be ready to warn you if
there is a problem.
If the ABS warning light stays on, or comes
on again while driving, the vehicle needs
service. A chime may also sound when the
light stays on.
If the ABS warning light is the only light on,
the vehicle has regular brakes, but ABS is
not functioning.
If both the ABS warning light and the brake
system warning light are on, ABS is not
functioning and there is a problem with the
regular brakes. See your dealer for service.
SeeBrake System Warning Light 092.
Performance Transmission Active
This light turns green when:
.The vehicle is being driven in a spirited
manner and transmission shift points
have been altered to enhance the vehicle
behavior. See “Transmission Shift
Operation” underDriver Mode Control
0 196.
‐ For track driving events that require
standing starts, if equipped,
Performance Transmission behavior can
be activated near a standstill by
selecting Track Mode > Performance
Traction Management (PTM) > Race 1
or Race 2. You can also engage PTM
using Z mode, if PTM has been
configured to Race 1 or Race 2. See
“Performance Traction Management
(PTM)” underDriver Mode Control
0 196.
.Manual Launch has been enabled. See
“Manual Launch” underManual Mode
0 187.
All-Wheel-Drive Light
This light is amber when the electric
all-wheel drive (eAWD) system is limited,
and will turn off when the system is
working normally.
If the light comes on and stays on, there
may be a malfunction. See your dealer.
See All-Wheel Drive 0191.
Page 106 of 362
Chevrolet Corvette Owner Manual (GMNA-Localizing-U.S./Canada/Mexico-
17272984) - 2024 - CRC - 2/20/23
Instruments and Controls 105
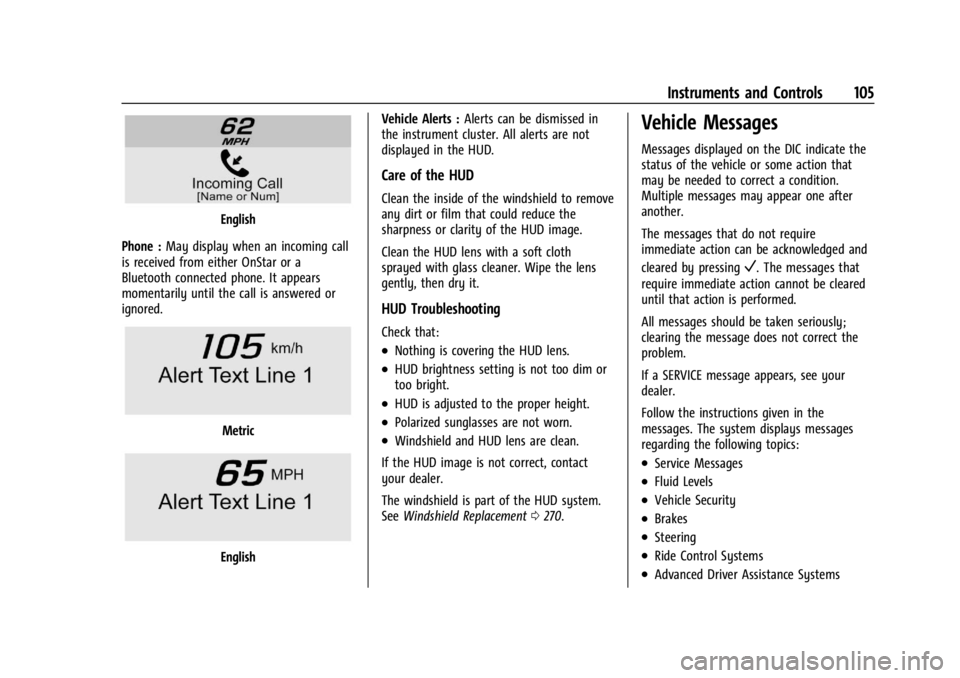
English
Phone : May display when an incoming call
is received from either OnStar or a
Bluetooth connected phone. It appears
momentarily until the call is answered or
ignored.
Metric
English Vehicle Alerts :
Alerts can be dismissed in
the instrument cluster. All alerts are not
displayed in the HUD.
Care of the HUD
Clean the inside of the windshield to remove
any dirt or film that could reduce the
sharpness or clarity of the HUD image.
Clean the HUD lens with a soft cloth
sprayed with glass cleaner. Wipe the lens
gently, then dry it.
HUD Troubleshooting
Check that:
.Nothing is covering the HUD lens.
.HUD brightness setting is not too dim or
too bright.
.HUD is adjusted to the proper height.
.Polarized sunglasses are not worn.
.Windshield and HUD lens are clean.
If the HUD image is not correct, contact
your dealer.
The windshield is part of the HUD system.
See Windshield Replacement 0270.
Vehicle Messages
Messages displayed on the DIC indicate the
status of the vehicle or some action that
may be needed to correct a condition.
Multiple messages may appear one after
another.
The messages that do not require
immediate action can be acknowledged and
cleared by pressing
V. The messages that
require immediate action cannot be cleared
until that action is performed.
All messages should be taken seriously;
clearing the message does not correct the
problem.
If a SERVICE message appears, see your
dealer.
Follow the instructions given in the
messages. The system displays messages
regarding the following topics:
.Service Messages
.Fluid Levels
.Vehicle Security
.Brakes
.Steering
.Ride Control Systems
.Advanced Driver Assistance Systems