2023 TOYOTA YARIS CROSS rear view mirror
[x] Cancel search: rear view mirrorPage 95 of 698

93
2
Owners Manual_Europe_M52N75_en
2-1. Instrument cluster
Vehicle status information and indicators
*1: This light illuminates on the multi-
information display (with 7-inch dis-
play only).
*2: These lights come on when the
power switch is turned to ON to indi-
cate that a system check is being
performed. They will turn off after the
hybrid system is started, or after a
few seconds. There may be a mal-
function in a system if the lights do
not come on, or turn off. Have the
vehicle inspected by any authorized
Toyota retailer or Toyota authorized
repairer, or any reliable repairer.
*3: This light comes on when the system
is turned off.
*4: This light illuminates on the multi-
information display.
*5: Depending on the operating condi-
tion, the color and illuminating/flash-
ing state of the light change.
*6: This light illuminates on the outside
rear view mirrors.
Cruise control “SET” indica-
tor*4 (if equipped) ( P.252)
*5
LTA indicator*4 (if equipped)
( P.232, 248)
BSM outside rear view mirror
indicators*2, 6 (if equipped)
( P.271, 285)
BSM OFF indicator*1, 3 (if
equipped) ( P.271)
Toyota parking assist-sensor
OFF indicator*1, 2, 3 (if
equipped) ( P.276)
RCTA OFF indicator*1, 2, 3 (if
equipped) ( P.286)
PKSB OFF indicator*1, 2, 3 (if
equipped) ( P.292)
Speed limiter indicator (if
equipped) ( P.264)
(Flashes)
Slip indicator*2 (P.329)
VSC OFF indicator*2, 3
( P.330)
Smart entry & start system
indicator*4 ( P.191)
“READY” indicator*1
( P.191)
EV drive mode indicator*1
( P.195)
Parking brake indicator
( P.200)
Brake hold standby indica-
tor*1, 2 ( P.203)
Brake hold operated indica-
tor*2 ( P.203)
EV indicator*1 ( P. 7 6 )
Low outside temperature
indicator*4, 7 ( P.95, 100)
Security indicator (P. 8 4 ,
86)
“PASSENGER AIR
BAG” indicator*2, 8
( P.47)
Eco drive mode indicator*4
( P.322)
Power mode indicator*4
( P.322)
Trail Mode indicator*4 (if
equipped) ( P.323)
Snow Mode indicator*4 (if
equipped) ( P.325)
(Illumi- nates or Flashes)
Downhill assist control sys-
tem indicator*1, 2 (if
equipped) ( P.325)
Page 131 of 698

3
129
Owners Manual_Europe_M52N75_en
3
Before driving
Before driving
3-1. Key information
Keys.................................. 130
3-2. Opening, closing and locking
the doors
Side doors ........................ 135
Back door ......................... 139
Smart entry & start system 152
3-3. Adjusting the seats
Front seats........................ 157
Rear seats ........................ 158
Head restraints ................. 160
3-4. Adjusting the steering wheel
and mirrors
Steering wheel .................. 164
Inside rear view mirror ...... 165
Outside rear view mirrors . 166
3-5. Opening and closing the win-
dows
Power windows................. 169
Page 167 of 698

165
3
Owners Manual_Europe_M52N75_en
3-4. Adjusting the steering wheel and mirrors
Before driving
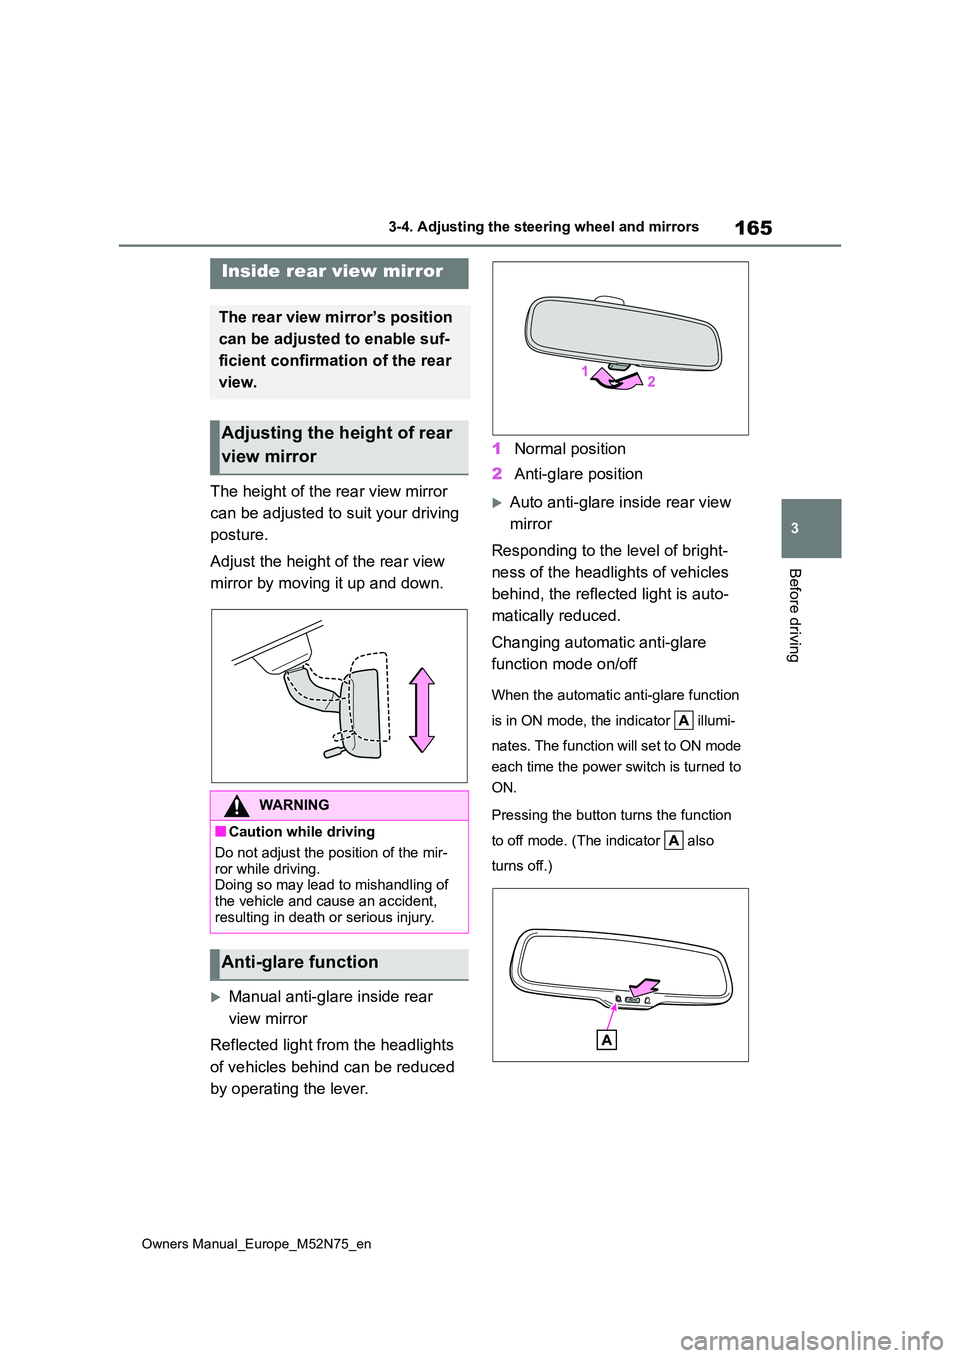
The height of the rear view mirror
can be adjusted to suit your driving
posture.
Adjust the height of the rear view
mirror by moving it up and down.
Manual anti-glare inside rear
view mirror
Reflected light from the headlights
of vehicles behind can be reduced
by operating the lever.
1 Normal position
2 Anti-glare position
Auto anti-glare inside rear view
mirror
Responding to the level of bright-
ness of the headlights of vehicles
behind, the reflected light is auto-
matically reduced.
Changing automatic anti-glare
function mode on/off
When the automatic anti-glare function
is in ON mode, the indicator illumi-
nates. The function will set to ON mode
each time the power switch is turned to
ON.
Pressing the button turns the function
to off mode. (The indicator also
turns off.)
Inside rear view mirror
The rear view mirror’s position
can be adjusted to enable suf-
ficient confirmation of the rear
view.
Adjusting the height of rear
view mirror
WARNING
■Caution while driving
Do not adjust the position of the mir-
ror while driving. Doing so may lead to mishandling of the vehicle and cause an accident,
resulting in death or serious injury.
Anti-glare function
Page 168 of 698

166
Owners Manual_Europe_M52N75_en
3-4. Adjusting the steering wheel and mirrors
■To prevent sensor error (vehicles with an auto anti-glare inside rear
view mirror)
To ensure that the sensors operate properly, do not touch or cover them.
1 To select a mirror to adjust, turn
the switch.
Left
Right
Outside rear view mir-
rors
The rear view mirror’s position
can be adjusted to enable suf-
ficient confirmation of the rear
view.
WARNING
■Important points while driving
Observe the following precautions while driving.
Failure to do so may result in loss of control of the vehicle and cause an accident, resulting in death or serious
injury.
●Do not adjust the mirrors while driv-
ing.
●Do not drive with the mirrors folded.
●Both the driver and passenger side mirrors must be extended and prop-
erly adjusted before driving.
Adjustment procedure
Page 169 of 698

167
3
Owners Manual_Europe_M52N75_en
3-4. Adjusting the steering wheel and mirrors
Before driving
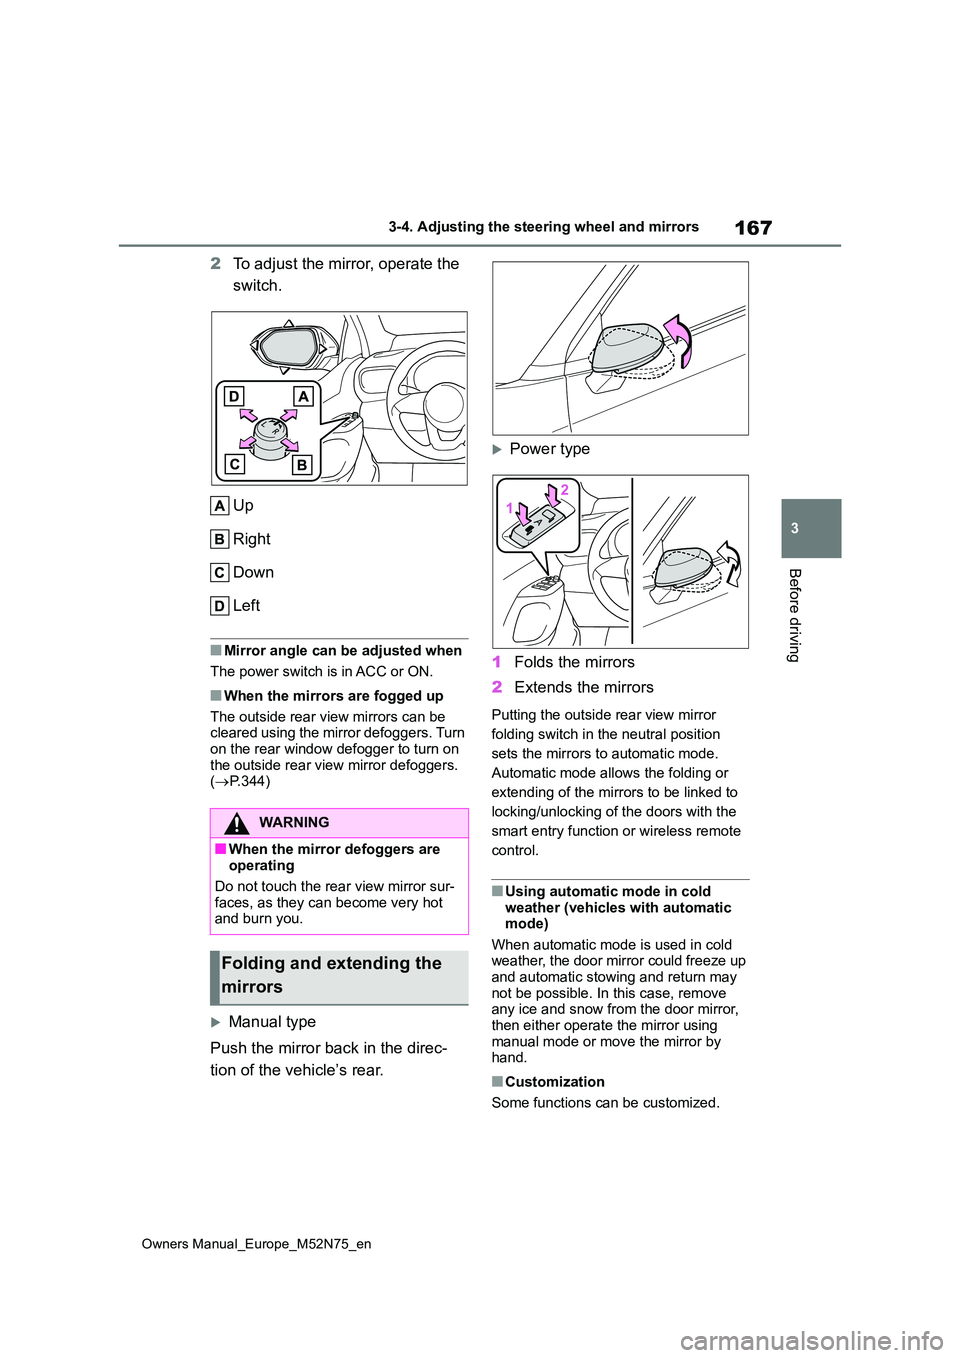
2To adjust the mirror, operate the
switch.
Up
Right
Down
Left
■Mirror angle can be adjusted when
The power switch is in ACC or ON.
■When the mirrors are fogged up
The outside rear view mirrors can be cleared using the mirror defoggers. Turn
on the rear window defogger to turn on the outside rear view mirror defoggers. ( P.344)
Manual type
Push the mirror back in the direc-
tion of the vehicle’s rear.
Power type
1 Folds the mirrors
2 Extends the mirrors
Putting the outside rear view mirror
folding switch in the neutral position
sets the mirrors to automatic mode.
Automatic mode allows the folding or
extending of the mirrors to be linked to
locking/unlocking of the doors with the
smart entry function or wireless remote
control.
■Using automatic mode in cold weather (vehicles with automatic mode)
When automatic mode is used in cold weather, the door mirror could freeze up and automatic stowing and return may
not be possible. In this case, remove any ice and snow from the door mirror, then either operate the mirror using
manual mode or move the mirror by hand.
■Customization
Some functions can be customized.
WARNING
■When the mirror defoggers are operating
Do not touch the rear view mirror sur-
faces, as they can become very hot and burn you.
Folding and extending the
mirrors
Page 187 of 698

185
4
Owners Manual_Europe_M52N75_en
4-1. Before driving
Driving3855 mm (33.7 in.)
4 768 mm (30.2 in.)
5 335 mm (13.2 in.)
6 30 mm (1.2 in.)
7 396 mm (15.6 in.)
■Tire information
●Increase the tire inflation pressure to
20.0 kPa (0.2 kgf/cm2 or bar, 3 psi) greater than the recommended value when towing. ( P.490)
●Increase the air pressure of the trailer tires in accordance with the total
trailer weight and according to the val- ues recommended by the manufac-turer of your trailer.
■Trailer lights
Please consult any authorized Toyota retailer or Toyota authorized repairer, or any reliable repairer when installing
trailer lights, as incorrect installation may cause damage to the vehicle’s lights. Please take care to comply with
your state’s laws when installing trailer lights.
■When towing a trailer
Disable the following systems, as the systems may not operate properly.
●LTA (Lane Tracing Assist) ( P. 2 4 2 )
●Dynamic radar cruise control with full-
speed range ( P.252)
●PKSB (Parking Support Brake)
( P.291)
●BSM (Blind Spot Monitor) (P.270)
●Toyota parking assist-sensor ( P.275)
●RCTA (Rear Cross Traffic Alert) func- tion ( P.285)
■Break-in schedule
Toyota recommends that vehicles fitted with new power train components should not be used for towing trailers for
the first 800 km (500 miles).
■Safety checks before towing
●Check that the maximum load limit for
the towing hitch/bracket hitch ball is not exceeded. Bear in mind that the coupling weight of the trailer will add
to the load exerted on the vehicle. Also make sure that you will not be towing a load that exceeds the maxi-
mum permissible axle capacity.
●Ensure that the trailer load is secure.
●Supplementary outside rear view mir- rors should be added to the vehicle if
the traffic behind cannot be clearly seen with standard mirrors. Adjust the extending arms of these mirrors on
both sides of the vehicle so that they always provide maximum visibility of the road behind.
■Maintenance
●Maintenance must be performed more frequently when using the vehicle for
towing due to the greater weight bur- den placed on the vehicle compared to normal driving.
●Retighten all bolts securing the hitch-ing ball and bracket after towing for
approximately 1000 km (600 miles).
Page 230 of 698

228
Owners Manual_Europe_M52N75_en
4-5. Using the driving support systems
WARNING
●Do not attach objects, such as stickers, transparent stickers, etc.,
to the outer side of the windshield in front of the front camera (shaded area in the illustration).
From the top of the windshield to
approximately 1 cm (0.4 in.) below
the bottom of the front camera
Approximately 20 cm (7.9 in.)
(Approximately 10 cm [4.0 in.] to
the right and left from the center of
the front camera)
●If the part of the windshield in front
of the front camera is fogged up or covered with condensation or ice, use the windshield defogger to
remove the fog, condensation or ice. ( P.344)
●If water droplets cannot be properly removed from the area of the wind-shield in front of the front camera by
the windshield wipers, replace the wiper insert or wiper blade.
●Do not attach window tint to the windshield.
●Replace the windshield if it is dam-aged or cracked.After replacing the windshield, the
front camera must be recalibrated. Contact any authorized Toyota retailer or Toyota authorized
repairer, or any reliable repairer for details.
●Do not allow liquids to contact the front camera.
●Do not allow bright lights to shine into the front camera.
●Do not dirty or damage the front camera.When cleaning the inside of the
windshield, do not allow glass cleaner to contact the lens of the front camera. Also, do not touch the
lens. If the lens is dirty or damaged, con-tact any authorized Toyota retailer
or Toyota authorized repairer, or any reliable repairer.
●Do not subject the front camera to a strong impact.
●Do not change the installation posi-tion or direction of the front camera or remove it.
●Do not disassemble the front cam-era.
●Do not modify any components of the vehicle around the front camera
(inside rear view mirror, etc.) or ceil- ing.
●Do not attach any accessories to the hood, front grille or front bumper that may obstruct the front camera.
Contact any authorized Toyota retailer or Toyota authorized repairer, or any reliable repairer for
details.
●If a surfboard or other long object is
to be mounted on the roof, make sure that it will not obstruct the front camera.
●Do not modify the headlights or other lights.
Page 272 of 698

270
Owners Manual_Europe_M52N75_en
4-5. Using the driving support systems
●S t ic ke r s a r e a t t ac he d t o t h e r e ar o f t he
preceding vehicle.
●A sign resembling a system compati-
ble sign is recognized.
●Side road speed signs may be
detected and displayed (if positioned in sight of the front camera) while the vehicle is traveling on the main road.
●Roundabout exit road speed signs may be detected and displayed (if
positioned in sight of the front camera) while traveling on a roundabout.
●The front of the vehicle is raised or lowered due to the carried load.
●The surrounding brightness is not suf-ficient or changes suddenly.
●When a sign intended for trucks, etc., is recognized.
●The vehicle is driven in a country with a different direction of traffic.
●The 7-inch/8-inch display navigation system map data is outdated.
●The 7-inch/8-inch display navigation system is not operating.
●The speed information displayed on the meter and on the 7-inch/8-inch display navigation system may be dif-
ferent due to the 7-inch/8-inch display navigation system using map data.
■Speed limit sign display
If the power switch was last turned off
while a speed limit sign was displayed on the multi-information display, the same sign displays again when the
power switch is turned to ON.
■If “RSA Malfunction Visit Your Dealer” is shown
The system may be malfunctioning.
Have the vehicle inspected by any authorized Toyota retailer or Toyota authorized repairer, or any reliable
repairer.
■Customization
Some functions can be customized. (Customizable features: P.494)
*: If equipped
BSM (Blind Spot Moni-
tor)*
The Blind Spot Monitor is a
system that uses rear side
radar sensors installed on the
inner side of the rear bumper
on the left and right side to
assist the driver in confirming
safety when changing lanes.
WARNING
■Cautions regarding the use of
the system
The driver is solely responsible for safe driving. Always drive safely, tak-
ing care to observe your surround- ings.
The Blind Spot Monitor is a supple-
mentary function which alerts the driver that a vehicle is in a blind spot of the outside rear view mirrors or is
approaching rapidly from behind into a blind spot. Do not overly rely on the
Blind Spot Monitor. As the function cannot judge if it is safe to change lanes, over reliance could lead to an
accident resulting in death or serious injury.
As the system may not function cor-
rectly under certain conditions, the driver’s own visual confirmation of safety is necessary.