2023 TOYOTA YARIS CROSS ESP
[x] Cancel search: ESPPage 99 of 698

97
2
Owners Manual_Europe_M52N75_en
2-1. Instrument cluster
Vehicle status information and indicators
• When the outside temperature has
changed suddenly (at the entrance/exit of a garage, tunnel, etc.)
●When “--” is displayed, the system may be malfunctioning. Take your vehicle to any authorized Toyota
retailer or Toyota authorized repairer, or any reliable repairer.
■Fuel gauge and driving range dis-play
The fuel gauge and driving range dis- play are linked. If the fuel gauge and driving range display do not update after
refueling a small amount, they can be updated by performing the following pro-cedure:
1 Stop the vehicle on a level surface.
Wait until the fuel in the fuel tank stabi- lizes.
2 Press the display change button to change the odometer and trip meter
display to the odometer.
3 Turn the power switch off.
4 While pressing and holding the dis- play change button, turn the power switch to ON.
5 Continue holding the display change
button for approximately 5 seconds.
Release the button when the odometer begins blinking.
Updating will be complete when the odometer blinks for approximately 5 seconds and then returns to the normal
display.
■Liquid crystal display
P. 1 0 6
■Customization
The gauges and meters can be custom-
ized in of the multi-information dis-
play. ( P.494)
■Changing the display
Press the display change button
until the desired item is displayed.
WARNING
■The information display at low temperatures
Allow the interior of the vehicle to warm up before using the liquid crys-tal information display. At extremely
low temperatures, the information dis- play monitor may respond slowly, and display changes may be delayed.
For example, there is a lag between the driver’s shifting and the new gear
number appearing on the display. This lag could cause the driver to downshift again, causing rapid and
excessive engine braking and possi- bly an accident resulting in death or injury.
NOTICE
■To prevent damage to the engine and its components
The engine may be overheating if the engine coolant temperature gauge is in the red zone (H). In this case,
immediately stop the vehicle in a safe place, and check the engine after it
has cooled completely. ( P.477)
Odometer and trip meter
display
Page 105 of 698

103
2
Owners Manual_Europe_M52N75_en
2-1. Instrument cluster
Vehicle status information and indicators
Shows that an Eco-friendly driving range
is being exceeded (during full power
driving, etc.)
*: When used in this manual, regenera-
tion refers to the conversion of energy
created by the movement of the vehi-
cle into electrical energy.
In the following situation, the Hybrid
System Indicator does not operate.
●“READY” indicator is not illuminated.
●The shift position is in a range other than D or B.
■Outside temperature display
●In the following situations, the correct outside temperature may not be dis-
played, or the display may take longer than normal to change:• When stopped, or driving at low
speeds (less than 25 km/h [16 mph]) • When the outside temperature has changed suddenly (at the
entrance/exit of a garage, tunnel, etc.)
●When “--” is displayed, the system
may be malfunctioning. Take your vehicle to any authorized Toyota retailer or Toyota authorized repairer,
or any reliable repairer.
■Fuel gauge and driving range dis- play
The fuel gauge and driving range dis-
play are linked. If the fuel gauge and driving range display do not update after refueling a small amount, they can be
updated by performing the following pro- cedure:
1 Stop the vehicle on a level surface.
Wait until the fuel in the fuel tank stabi-
lizes.
2 Press the display change button to change the odometer and trip meter display to the odometer.
3 Turn the power switch off.
4 While pressing and holding the dis-
play change button, turn the power switch to ON.
5 Continue holding the display change
button for approximately 5 seconds.
Release the button when the odometer begins blinking.
Updating will be complete when the odometer blinks for approximately 5 seconds and then returns to the normal
display.
■Liquid crystal display
P. 1 1 3
■Customization
The gauges and meters can be custom-
ized in of the multi-information dis-
play. ( P.494)
WARNING
■The information display at low temperatures
Allow the interior of the vehicle to warm up before using the liquid crys-tal information display. At extremely
low temperatures, the information dis- play monitor may respond slowly, and display changes may be delayed.
For example, there is a lag between the driver’s shifting and the new gear
number appearing on the display. This lag could cause the driver to downshift again, causing rapid and
excessive engine braking and possi- bly an accident resulting in death or injury.
NOTICE
■To prevent damage to the engine
and its components
The engine may be overheating if the engine coolant temperature gauge is
in the red zone (H). In this case, immediately stop the vehicle in a safe place, and check the engine after it
has cooled completely. ( P.477)
Page 121 of 698

119
2
Owners Manual_Europe_M52N75_en
2-1. Instrument cluster
Vehicle status information and indicators
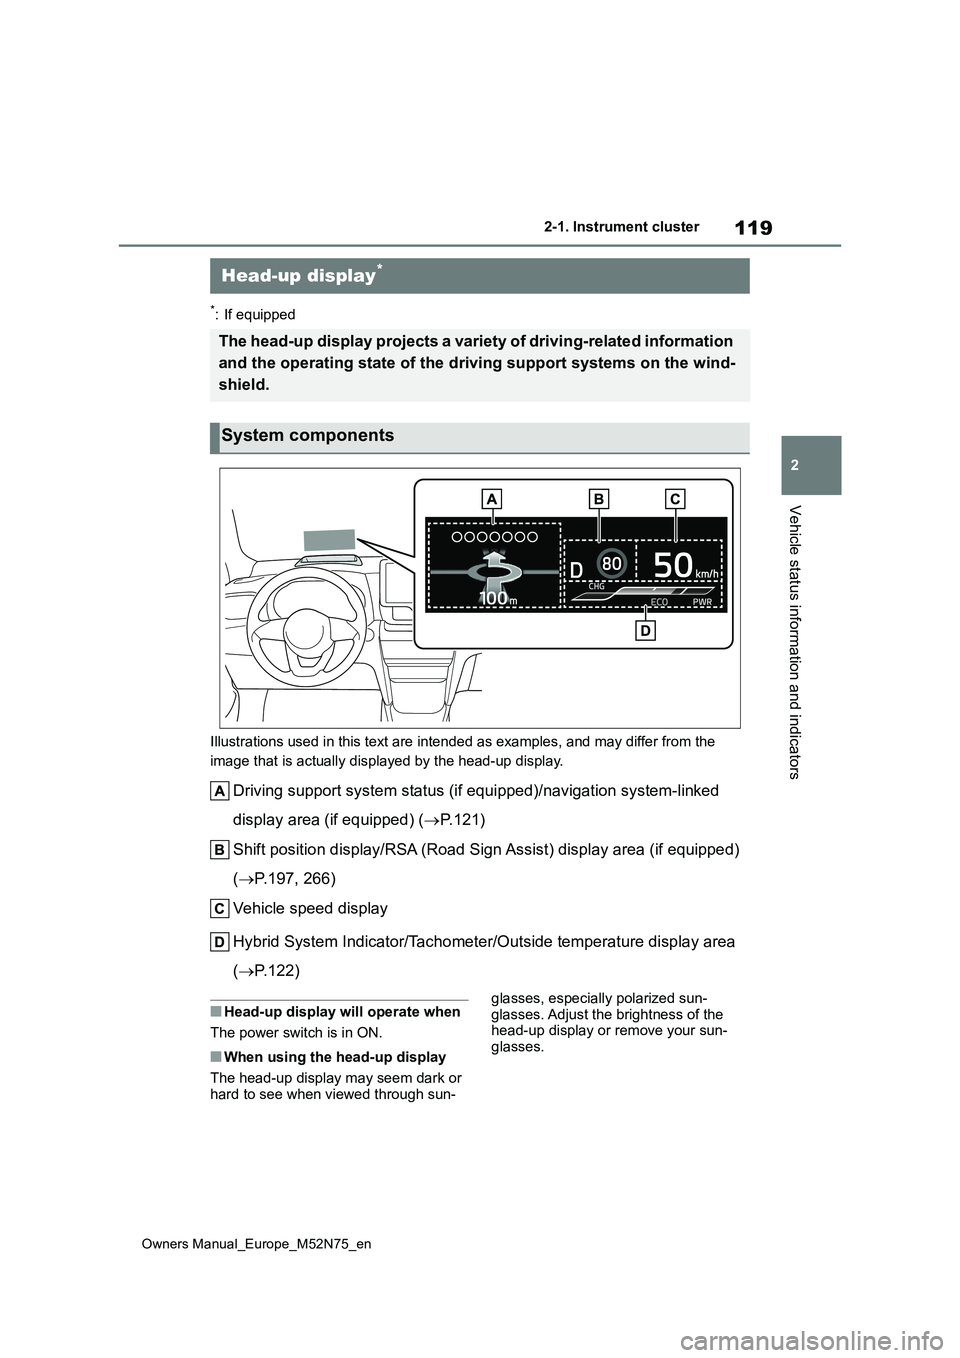
*: If equipped
Illustrations used in this text are intended as examples, and m ay differ from the
image that is actually displayed by the head-up display.
Driving support system status (if equipped)/navigation system-l inked
display area (if equipped) ( P. 1 2 1 )
Shift position display/RSA (Road Sign Assist) display area (if equipped)
( P.197, 266)
Vehicle speed display
Hybrid System Indicator/Tachometer/Outside temperature display area
( P.122)
■Head-up display will operate when
The power switch is in ON.
■When using the head-up display
The head-up display may seem dark or hard to see when viewed through sun-
glasses, especially polarized sun-
glasses. Adjust the brightness of the head-up display or remove your sun-glasses.
Head-up display*
The head-up display projects a variety of driving-related infor mation
and the operating state of the d riving support systems on the wind-
shield.
System components
Page 139 of 698

137
3
Owners Manual_Europe_M52N75_en
3-2. Opening, closing and locking the doors
Before driving
■Door lock buzzer (vehicles with a
smart entry & start system)
If an attempt to lock the doors using the entry function or wireless remote control
is made when a door is not fully closed, a buzzer will sound continuously for 5 seconds. Fully close the door to stop the
buzzer, and lock the doors again.
■Alarm (if equipped)
Locking the doors will set the alarm sys- tem. ( P.86)
■Conditions affecting the operation
of the smart entry & start system or wireless remote control
Vehicles without a smart entry & start
system
P. 1 3 3
Vehicles with a smart entry & start system
P. 1 5 4
■If the smart entry & start system or
the wireless remote control does not operate properly
Vehicles without a smart entry & start
system
Replace the key battery with a new one
if it is depleted. ( P.409)
Vehicles with a smart entry & start system
Use the mechanical key to lock and
unlock the doors. ( P.470)
Replace the key battery with a new one
if it is depleted. ( P.409)
■If the 12-volt battery is discharged
(vehicles with a smart entry & start system)
The doors cannot be locked and
unlocked using the entry function or wireless remote control. Lock or unlock the doors using the mechanical key.
( P.470)
■Rear seat reminder function
●In order to remind you not to forget
luggage, etc., in the rear seat, when the power switch is turned to OFF
after any of the following conditions
are met, a buzzer will sound and a message will be displayed on the multi-information display for approxi-
mately 6 seconds. • The hybrid system is started within 10 minutes after opening and closing a
rear door. • A rear door has been opened and closed after the hybrid system was
started.
However, if a rear door is opened and
then closed within approximately 2 sec-
onds, the rear seat reminder function
may not operate.
●The rear seat reminder function deter-
mines that luggage, etc., has been placed in a rear seat based on open-ing and closing of a rear door. There-
fore, depending on the situation, the rear seat reminder function may not operate and you may still forget lug-
gage, etc., in the rear seat, or it may operate unnecessarily.
●The rear seat reminder function can be enabled/disabled. ( P.494)
■Customization
Some functions can be customized.
( P.494)
WARNING
■To prevent an accident
Observe the following precautions
while driving the vehicle. Failure to do so may result in a door opening and an occupant being
thrown out of the vehicle, resulting in death or serious injury.
●Ensure that all doors are properly closed and locked.
●Do not pull the inside door handle while driving.Be especially careful of the front
doors, as the doors may be opened even if the inside lock buttons are in the locked position.
Page 162 of 698

160
Owners Manual_Europe_M52N75_en
3-3. Adjusting the seats
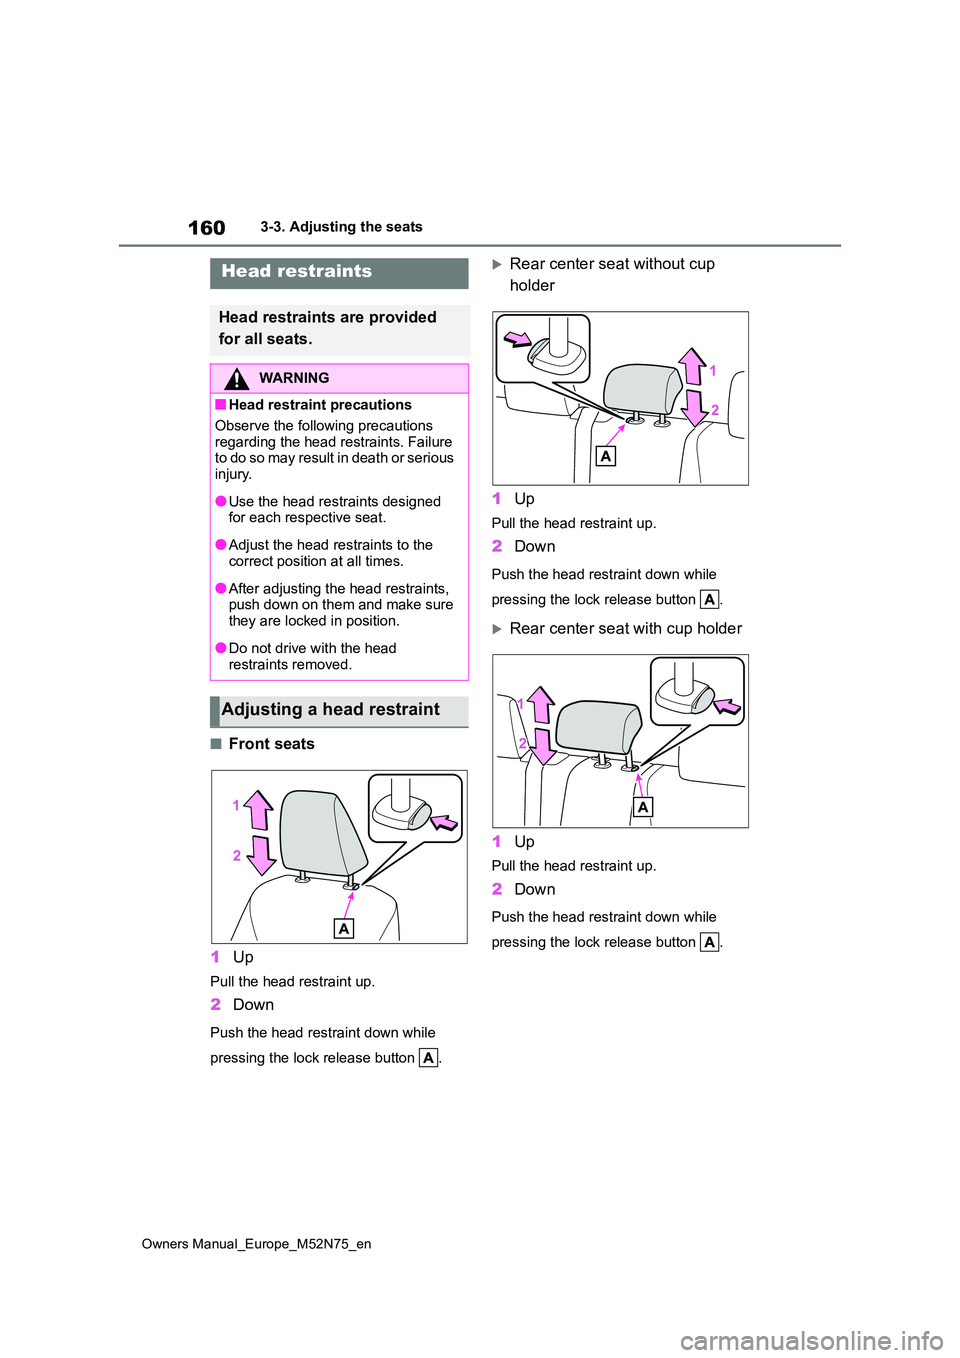
■Front seats
1 Up
Pull the head restraint up.
2Down
Push the head restraint down while
pressing the lock release button .
Rear center seat without cup
holder
1 Up
Pull the head restraint up.
2Down
Push the head restraint down while
pressing the lock release button .
Rear center seat with cup holder
1 Up
Pull the head restraint up.
2Down
Push the head restraint down while
pressing the lock release button .
Head restraints
Head restraints are provided
for all seats.
WARNING
■Head restraint precautions
Observe the following precautions
regarding the head restraints. Failure t o d o so ma y r e su lt i n d ea t h o r s e ri o us injury.
●Use the head restraints designed for each respective seat.
●Adjust the head restraints to the correct position at all times.
●After adjusting the head restraints, push down on them and make sure
they are locked in position.
●Do not drive with the head
restraints removed.
Adjusting a head restraint
Page 167 of 698

165
3
Owners Manual_Europe_M52N75_en
3-4. Adjusting the steering wheel and mirrors
Before driving
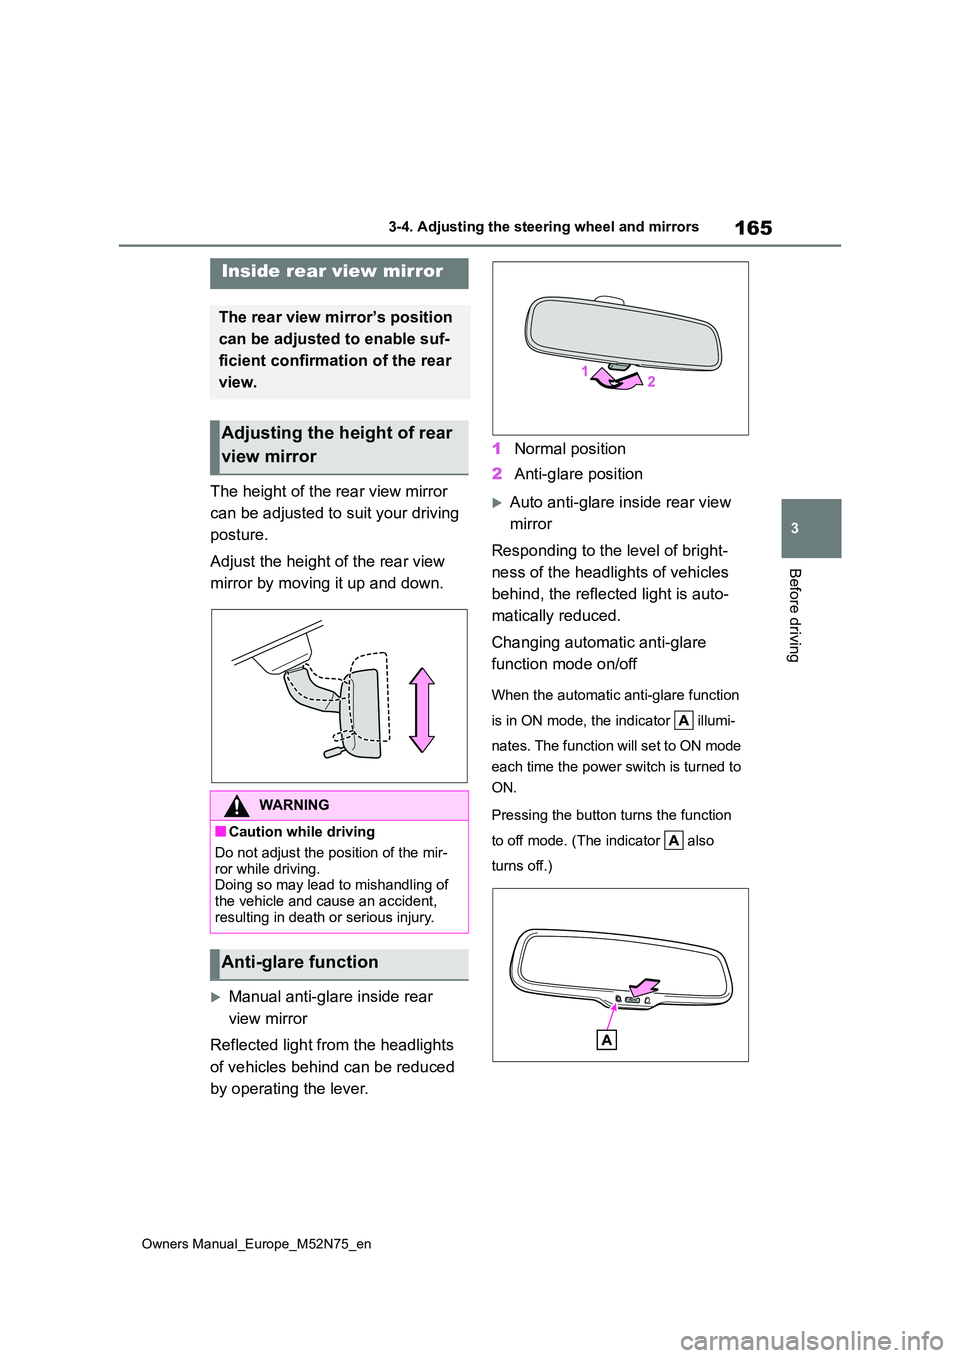
The height of the rear view mirror
can be adjusted to suit your driving
posture.
Adjust the height of the rear view
mirror by moving it up and down.
Manual anti-glare inside rear
view mirror
Reflected light from the headlights
of vehicles behind can be reduced
by operating the lever.
1 Normal position
2 Anti-glare position
Auto anti-glare inside rear view
mirror
Responding to the level of bright-
ness of the headlights of vehicles
behind, the reflected light is auto-
matically reduced.
Changing automatic anti-glare
function mode on/off
When the automatic anti-glare function
is in ON mode, the indicator illumi-
nates. The function will set to ON mode
each time the power switch is turned to
ON.
Pressing the button turns the function
to off mode. (The indicator also
turns off.)
Inside rear view mirror
The rear view mirror’s position
can be adjusted to enable suf-
ficient confirmation of the rear
view.
Adjusting the height of rear
view mirror
WARNING
■Caution while driving
Do not adjust the position of the mir-
ror while driving. Doing so may lead to mishandling of the vehicle and cause an accident,
resulting in death or serious injury.
Anti-glare function
Page 172 of 698

170
Owners Manual_Europe_M52N75_en
3-5. Opening and closing the windows
direction, and hold it there for
approximately 4 seconds or more.
6 Pull and hold the power window switch in the one-touch closing direction again. After the side win-
dow is completely closed, continue holding the switch for a further 1 sec-ond or more.
If you release the switch while the win- dow is moving, start again from the beginning.
If the window reverses and cannot be fully closed or opened, have the vehicle inspected by any authorized Toyota
retailer or Toyota authorized repairer, or any reliable repairer.
■Door lock linked window operation
●The power windows can be opened
and closed using the key (vehicles without a smart entry & start system)
or mechanical key (vehicles with a
sm ar t e n tr y & st a r t sy st em ) .* ( P.136, 470)
●The power windows can be opened
and closed using the wireless remote
control.* ( P.135)*: These settings must be customized at
any authorized Toyota retailer or
Toyota authorized repairer, or any reli-
able repairer.
■Customization
Some functions can be customized.
( P.494)
WARNING
Observe the following precautions. Failure to do so may result in death or
serious injury.
■Closing the windows
●The driver is responsible for all the power window operations, including
the operation for the passengers. In order to prevent accidental opera-tion, especially by a child, do not let
a child operate the power windows. It is possible for children and other passengers to have body parts
caught in the power window. Also, when riding with a child, it is recom-mended to use the window lock
switch. ( P.171)
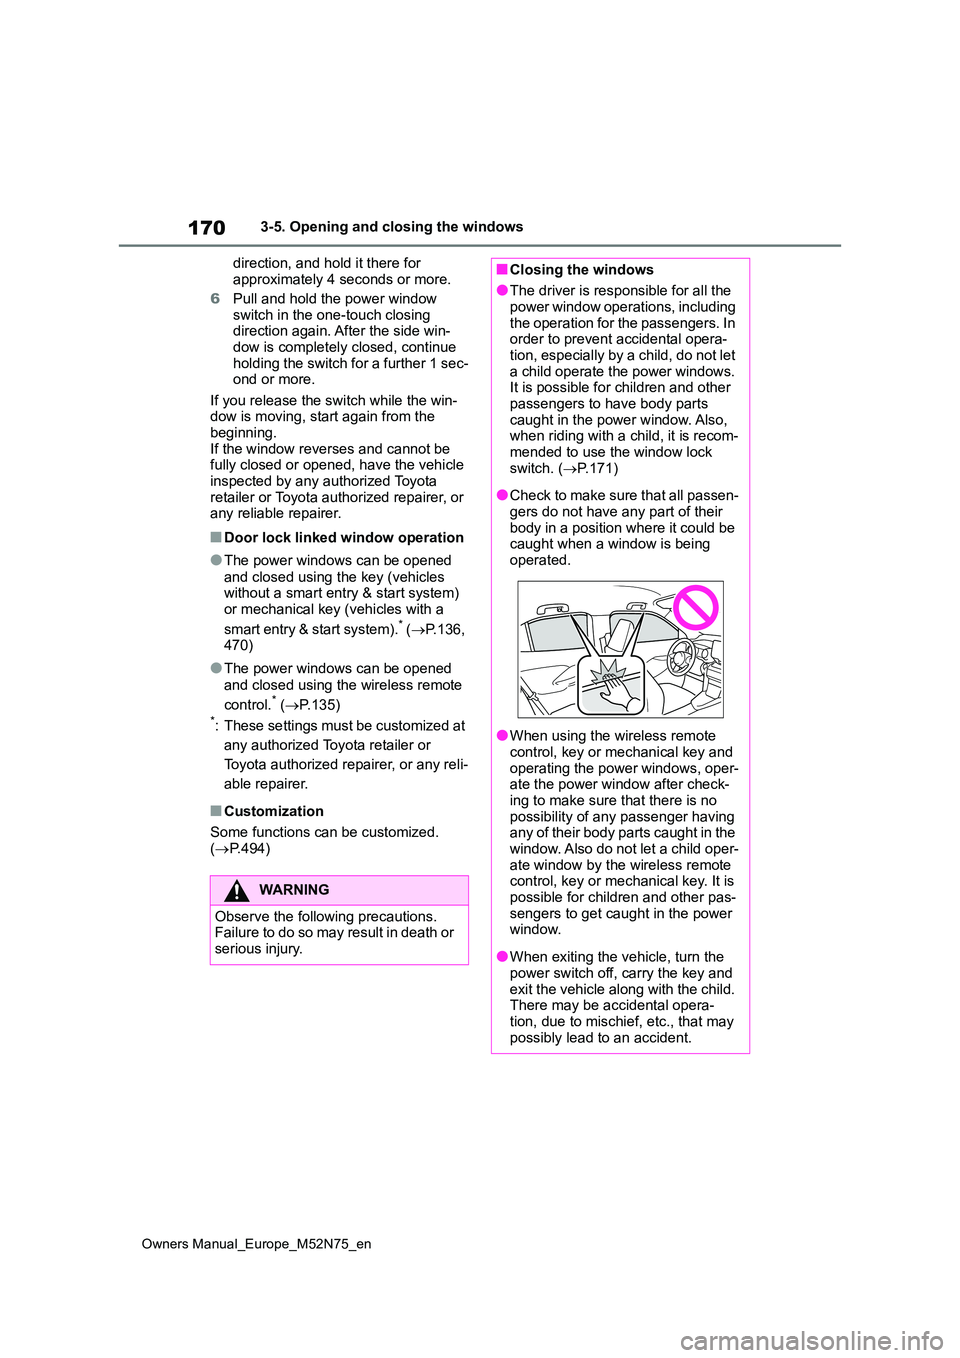
●Check to make sure that all passen-
gers do not have any part of their body in a position where it could be caught when a window is being
operated.
●When using the wireless remote
control, key or mechanical key and operating the power windows, oper-ate the power window after check-
ing to make sure that there is no possibility of any passenger having any of their body parts caught in the
window. Also do not let a child oper- ate window by the wireless remote control, key or mechanical key. It is
possible for children and other pas- sengers to get caught in the power window.
●When exiting the vehicle, turn the power switch off, carry the key and
exit the vehicle along with the child. There may be accidental opera-tion, due to mischief, etc., that may
possibly lead to an accident.
Page 178 of 698

176
Owners Manual_Europe_M52N75_en
4-1. Before driving
●Drive carefully when it starts to rain,
because the road surface will be especially slippery.
●Refrain from high speeds when driv-ing on an expressway in the rain, because there may be a layer of water
between the tires and the road sur- face, preventing the steering and brakes from operating properly.
■Restraining the hybrid system out-
put (Brake Override System)
●When the accelerator and brake ped-
als are depressed at the same time, the hybrid system output may be restrained.
●A warning message is displayed on the multi-information display while the
system is operating.
■ECO Accelerator Guidance ( P.108, 114)
Eco-friendly driving may be achieved
mo r e ea si l y b y s ta y in g w it h in t he zo n e o f Eco acceleration. Also, by staying within the zone of Eco acceleration, it will be
easier to obtain a good Eco score.
●When starting off:
Gradually depress the accelerator pedal
to stay within the zone of Eco accelera-
tion and accelerate to the desired
speed. By refraining from excessive
acceleration, a good eco start score will
be obtained.
●When driving:
After accelerating to the desired speed,
release the accelerator pedal and drive
at a stable speed while staying within
the zone of Eco acceleration. By staying
within the zone of Eco acceleration, a
good eco cruise score will be obtained.
●When stopping:
By starting to release the accelerator
pedal early before decelerating, a good
eco stop score will be obtained.
■Breaking in your new Toyota
To extend the life of the vehicle, observ- ing the following precautions is recom-mended:
●For the first 300 km (186 miles):
Avoid sudden stops.
●For the first 800 km (500 miles):
Do not tow a trailer.
●For the first 1000 km (621 miles):
• Do not drive at extremely high speeds.• Avoid sudden acceleration.
• Do not drive at a constant speed for extended periods.
■Operating your vehicle in a foreign country
Comply with the relevant vehicle regis- tration laws and confirm the availability of the correct fuel. ( P.486)
WARNING
Observe the following precautions. Failure to do so may result in death or serious injury.
■When starting the vehicle
Always keep your foot on the brake
pedal while stopped with the “READY” indicator is illuminated. This prevents the vehicle from creeping.
■When driving the vehicle
●Do not drive if you are unfamiliar
with the location of the brake and accelerator pedals to avoid depressing the wrong pedal.
• Accidentally depressing the accel- erator pedal instead of the brake
pedal will result in sudden accelera- tion that may lead to an accident.
• When backing up, you may twist your body around, leading to a diffi-culty in operating the pedals. Make
sure to operate the pedals properly.