2023 TOYOTA VENZA HYBRID power steering
[x] Cancel search: power steeringPage 163 of 560
1633-3. Adjusting the seats
3
Before driving
The power switch has been
turned to OFF.
The driver’s seat belt has
been unfastened.
When any of the following has
been performed, the driver’s
seat and steering wheel auto-
matically return to their original
positions.
The power switch has been
turned to ACC or ON.
The driver’s seat belt has
been fastened.
■Operation of the power easy
access system
When exiting the vehicle, the power
easy access system may not oper-
ate if the seat is already close to the
rearmost position, etc.
■Customization
The seat movement amount set-
tings of the powe r easy access sys-
tem can be customized.
(Customizable features: P.508)
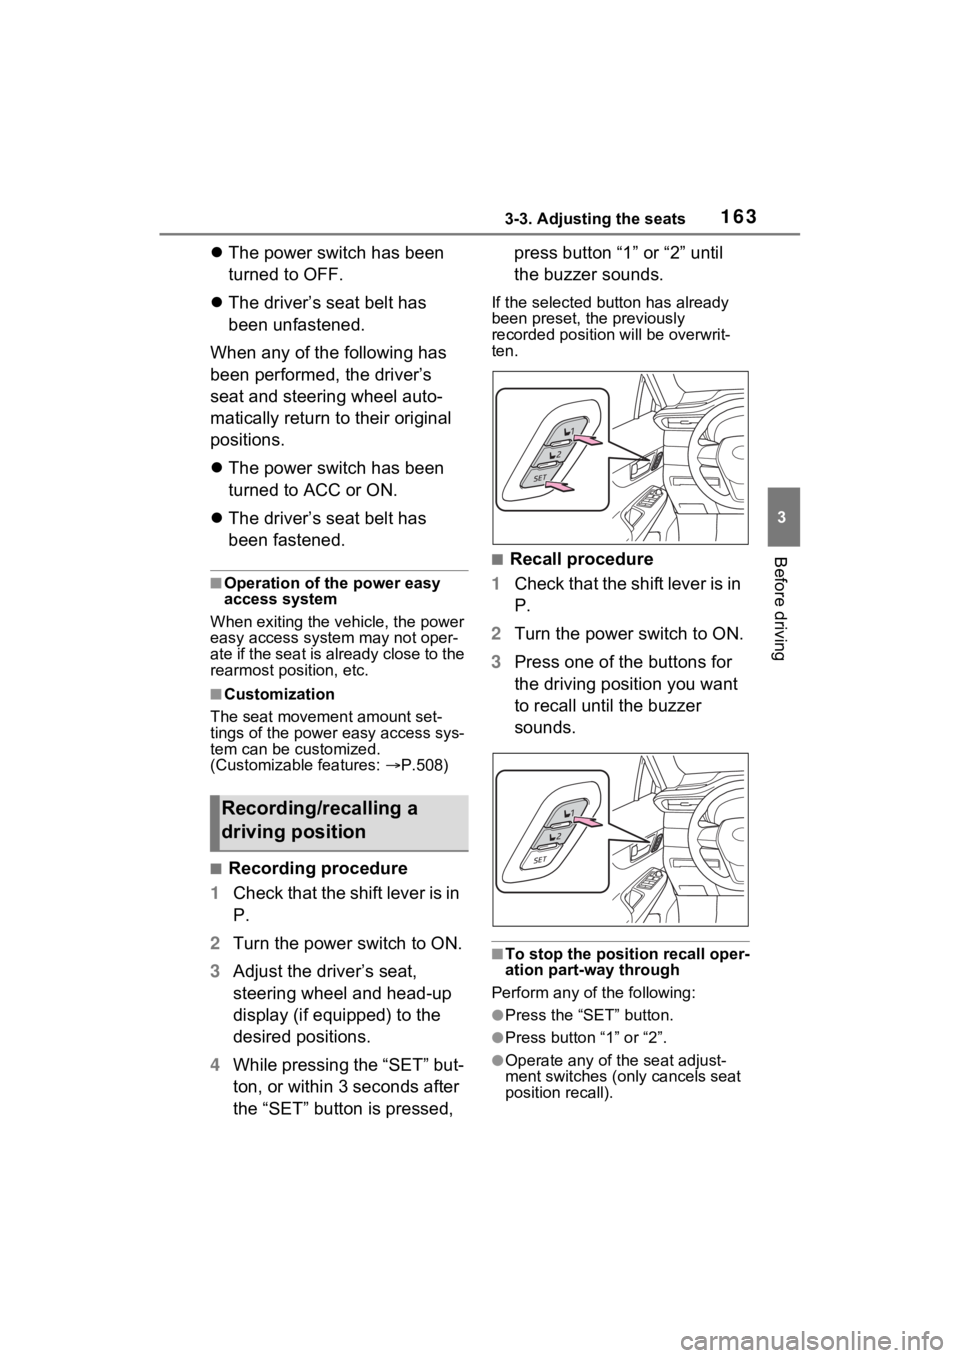
■Recording procedure
1 Check that the shift lever is in
P.
2 Turn the power switch to ON.
3 Adjust the driver’s seat,
steering wheel and head-up
display (if equipped) to the
desired positions.
4 While pressing the “SET” but-
ton, or within 3 seconds after
the “SET” button is pressed, press button “1” or “2” until
the buzzer sounds.
If the selected button has already
been preset, the previously
recorded positio
n will be overwrit-
ten.
■Recall procedure
1 Check that the shift lever is in
P.
2 Turn the power switch to ON.
3 Press one of the buttons for
the driving position you want
to recall until the buzzer
sounds.
■To stop the position recall oper-
ation part-way through
Perform any of the following:
●Press the “SET” button.
●Press button “1” or “2”.
●Operate any of t he seat adjust-
ment switches (only cancels seat
position recall).
Recording/recalling a
driving position
Page 164 of 560
1643-3. Adjusting the seats
●Operate the tilt and telescopic
steering control switch (only can-
cels steering wheel position
recall).
■Using the Intelligent Assistant
(if equipped)
The following operations can be
performed using the Intelligent
Assistant:
●Recording a dr iving position
●Recalling a driving position (it can
be performed only when the shift
lever is in P)
For details regardi ng the Intelligent
Assistant, refer to the “MULTIME-
DIA OWNER’S MANUAL”.
■Seat positions that can be
memorized ( P.159)
The positions adjusted by the fol-
lowing procedure can be recorded:
●Seat position adjustment
●Seatback angle adjustment
●Seat cushion (front) angle adjust-
ment
●Vertical height adjustment
■Operating the driving position
memory after turning the power
switch to OFF
Recorded seat positions can be
activated up to 1 80 seconds after
the driver’s door is opened and
another 60 seconds after it is closed
again.
■In order to correctly use the
driving position memory func-
tion
If a seat position is already in the
furthest possible position and the
seat is operated in the same direc-
tion, the recorded position may be
slightly different w hen it is recalled.
■When recalling the driving posi-
tion
Take care when recalling the driving
position so that the head restraint
does not touch the ceiling.
■When the recorded seat posi-
tion cannot be recalled
The seat position may not be
recalled in some situations when the
seat position is recorded in a certain
range. For details, contact your
Toyota dealer.
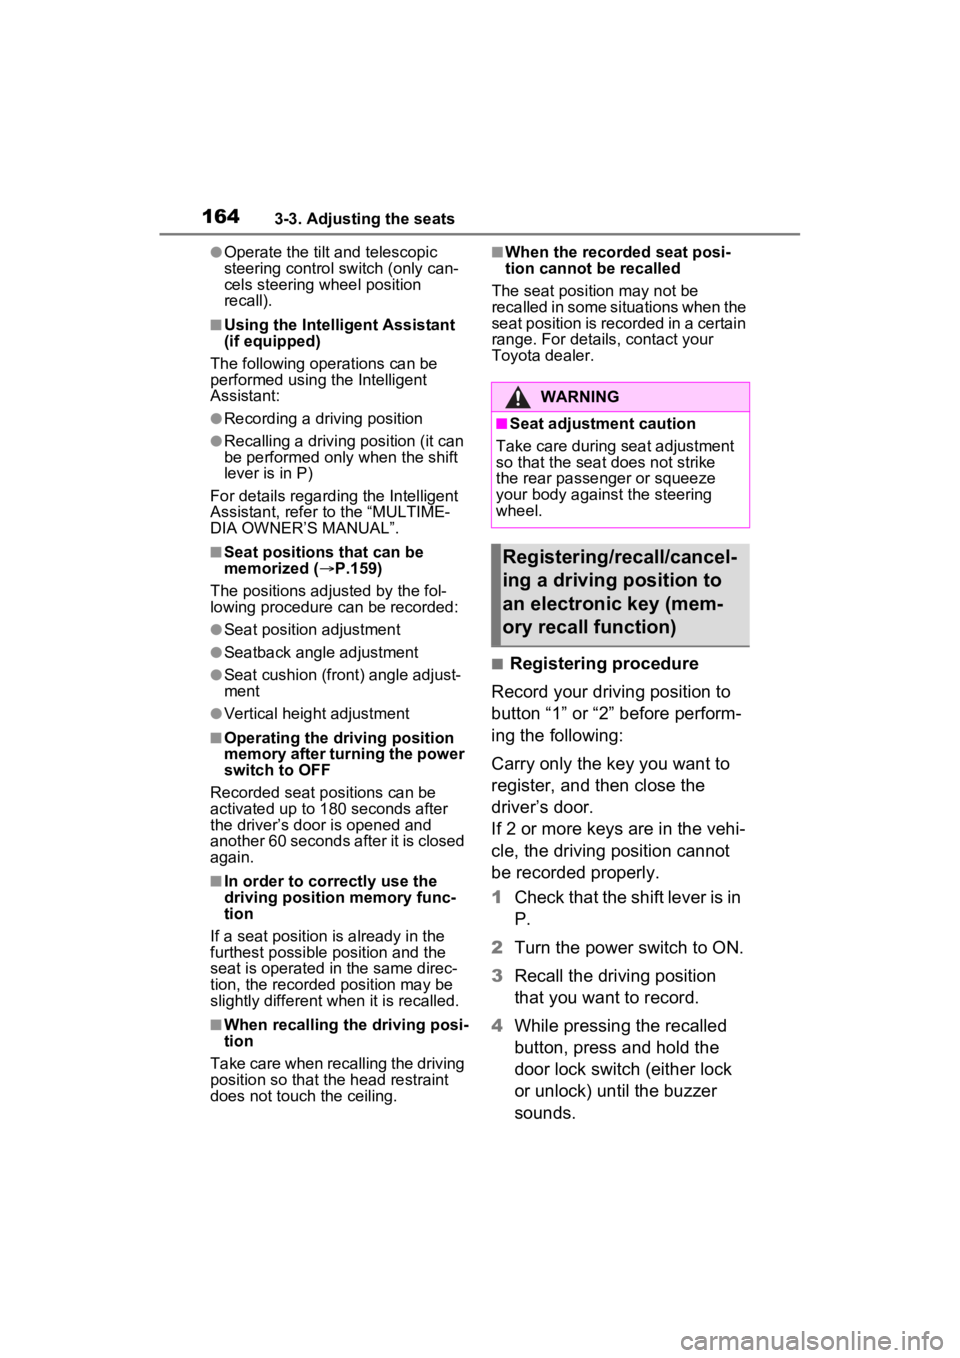
■Registering procedure
Record your driving position to
button “1” or “2” before perform-
ing the following:
Carry only the key you want to
register, and then close the
driver’s door.
If 2 or more keys are in the vehi-
cle, the driving position cannot
be recorded properly.
1 Check that the shift lever is in
P.
2 Turn the power switch to ON.
3 Recall the driving position
that you want to record.
4 While pressing the recalled
button, press and hold the
door lock switch (either lock
or unlock) until the buzzer
sounds.
WARNING
■Seat adjustment caution
Take care during seat adjustment
so that the seat does not strike
the rear passenger or squeeze
your body against the steering
wheel.
Registering/recall/cancel-
ing a driving position to
an electronic key (mem-
ory recall function)
Page 165 of 560
1653-3. Adjusting the seats
3
Before driving
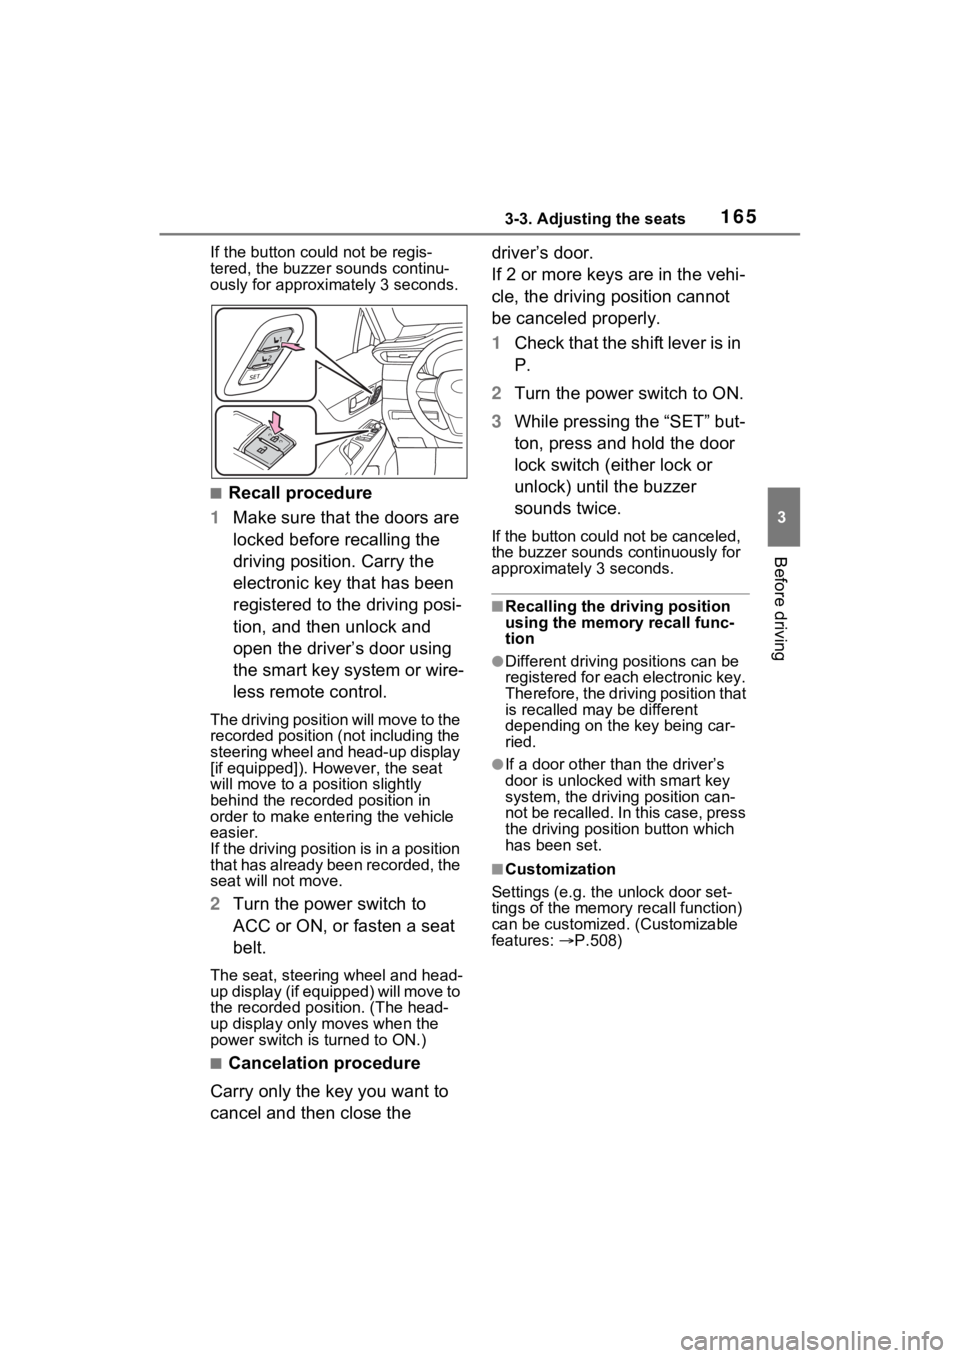
If the button could not be regis-
tered, the buzzer sounds continu-
ously for approximately 3 seconds.
■Recall procedure
1 Make sure that the doors are
locked before recalling the
driving position. Carry the
electronic key that has been
registered to the driving posi-
tion, and then unlock and
open the driver’s door using
the smart key system or wire-
less remote control.
The driving positi on will move to the
recorded position (not including the
steering wheel and head-up display
[if equipped]). However, the seat
will move to a position slightly
behind the recorded position in
order to make entering the vehicle
easier.
If the driving position is in a position
that has already been recorded, the
seat will not move.
2 Turn the power switch to
ACC or ON, or fasten a seat
belt.
The seat, steering wheel and head-
up display (if equipped) will move to
the recorded position. (The head-
up display only moves when the
power switch is turned to ON.)
■Cancelation procedure
Carry only the key you want to
cancel and then close the driver’s door.
If 2 or more keys are in the vehi-
cle, the driving position cannot
be canceled properly.
1
Check that the shift lever is in
P.
2 Turn the power switch to ON.
3 While pressing the “SET” but-
ton, press and hold the door
lock switch (either lock or
unlock) until the buzzer
sounds twice.
If the button could not be canceled,
the buzzer sounds c ontinuously for
approximately 3 seconds.
■Recalling the driving position
using the memory recall func-
tion
●Different driving p ositions can be
registered for each electronic key.
Therefore, the driving position that
is recalled may be different
depending on the key being car-
ried.
●If a door other than the driver’s
door is unlocked with smart key
system, the driving position can-
not be recalled. In this case, press
the driving position button which
has been set.
■Customization
Settings (e.g. the unlock door set-
tings of the memory recall function)
can be customized. (Customizable
features: P.508)
Page 168 of 560
1683-4. Adjusting the steering wheel and mirrors
3-4.Adjusting the steering wheel and mirrors
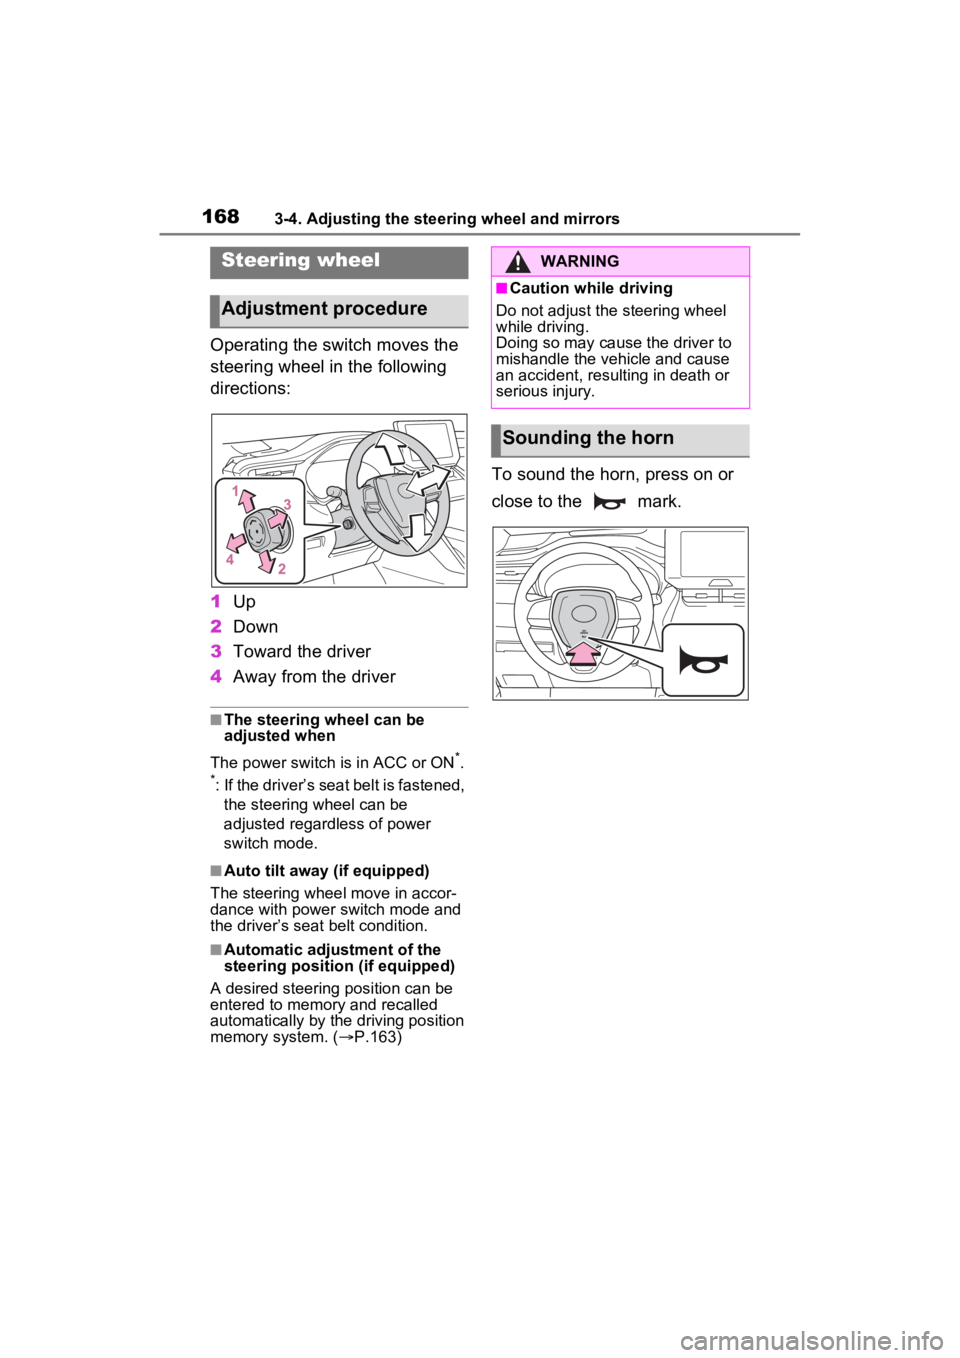
Operating the switch moves the
steering wheel in the following
directions:
1Up
2 Down
3 Toward the driver
4 Away from the driver
■The steering wheel can be
adjusted when
The power switch is in ACC or ON
*.
*: If the driver’s seat belt is fastened,
the steering wheel can be
adjusted regardless of power
switch mode.
■Auto tilt away (if equipped)
The steering wheel move in accor-
dance with power switch mode and
the driver’s seat belt condition.
■Automatic adjustment of the
steering position (if equipped)
A desired steering position can be
entered to memory and recalled
automatically by the driving position
memory system. ( P.163)
To sound the horn, press on or
close to the mark.
Steering wheel
Adjustment procedure
WARNING
■Caution while driving
Do not adjust the steering wheel
while driving.
Doing so may cause the driver to
mishandle the vehicle and cause
an accident, resulting in death or
serious injury.
Sounding the horn
Page 169 of 560
1693-4. Adjusting the steering wheel and mirrors
3
Before driving
*: If equipped
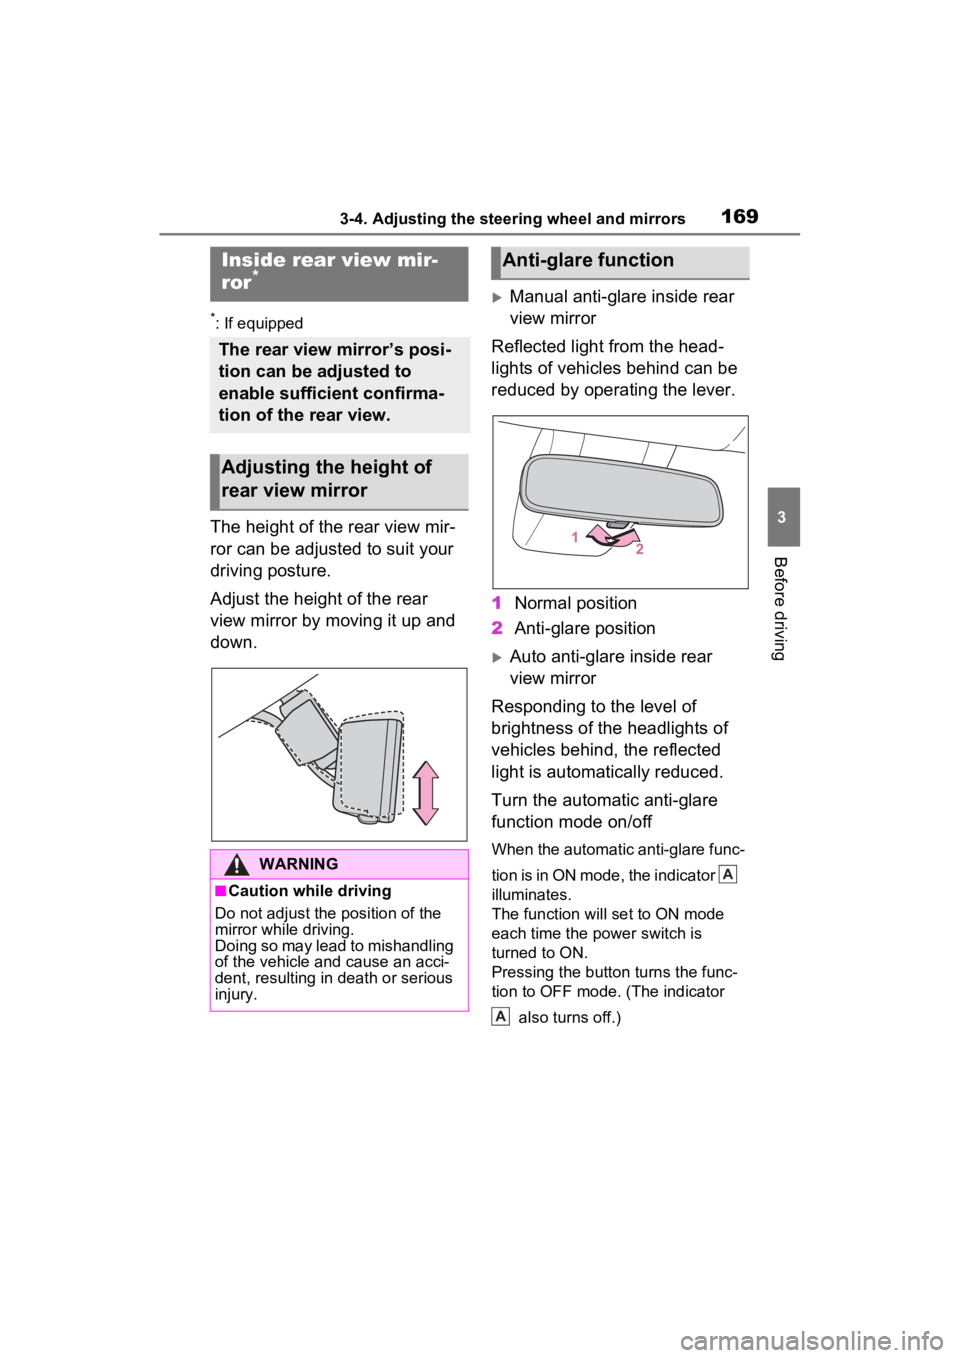
The height of the rear view mir-
ror can be adjusted to suit your
driving posture.
Adjust the height of the rear
view mirror by moving it up and
down.
Manual anti-glare inside rear
view mirror
Reflected light from the head-
lights of vehicles behind can be
reduced by operating the lever.
1 Normal position
2 Anti-glare position
Auto anti-glare inside rear
view mirror
Responding to the level of
brightness of the headlights of
vehicles behind, the reflected
light is automatically reduced.
Turn the automatic anti-glare
function mode on/off
When the automatic anti-glare func-
tion is in ON mode, the indicator
illuminates.
The function will set to ON mode
each time the power switch is
turned to ON.
Pressing the button turns the func-
tion to OFF mode. (The indicator
also turns off.)
Inside rear view mir-
ror*
The rear view mirror’s posi-
tion can be adjusted to
enable sufficient confirma-
tion of the rear view.
Adjusting the height of
rear view mirror
WARNING
■Caution while driving
Do not adjust the position of the
mirror while driving.
Doing so may lead to mishandling
of the vehicle and cause an acci-
dent, resulting in death or serious
injury.
Anti-glare function
A
A
Page 171 of 560
1713-4. Adjusting the steering wheel and mirrors
3
Before driving
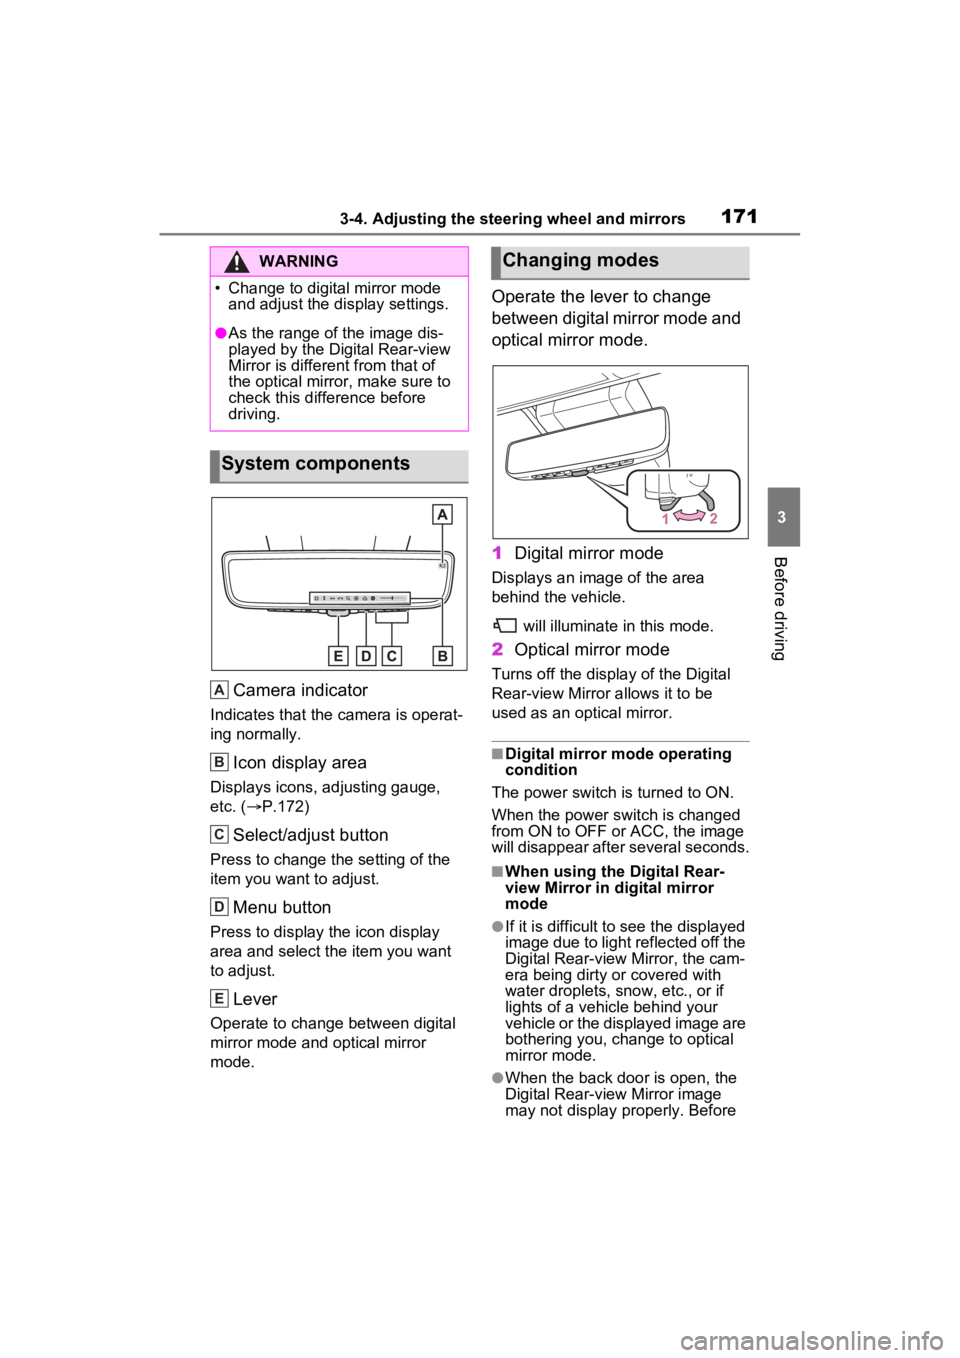
Camera indicator
Indicates that the camera is operat-
ing normally.
Icon display area
Displays icons, adjusting gauge,
etc. ( P.172)
Select/adjust button
Press to change the setting of the
item you want to adjust.
Menu button
Press to display the icon display
area and select the item you want
to adjust.
Lever
Operate to change between digital
mirror mode and optical mirror
mode.
Operate the lever to change
between digital mirror mode and
optical mirror mode.
1 Digital mirror mode
Displays an ima ge of the area
behind the vehicle.
will illuminate in this mode.
2Optical mirror mode
Turns off the display of the Digital
Rear-view Mirror allows it to be
used as an optical mirror.
■Digital mirror mode operating
condition
The power switch is turned to ON.
When the power switch is changed
from ON to OFF or ACC, the image
will disappear after several seconds.
■When using the Digital Rear-
view Mirror in d igital mirror
mode
●If it is difficult to see the displayed
image due to light reflected off the
Digital Rear-view Mirror, the cam-
era being dirty or covered with
water droplets, snow, etc., or if
lights of a vehicle behind your
vehicle or the displayed image are
bothering you, change to optical
mirror mode.
●When the back door is open, the
Digital Rear-view Mirror image
may not display properly. Before
WARNING
�
Page 173 of 560
1733-4. Adjusting the steering wheel and mirrors
3
Before driving
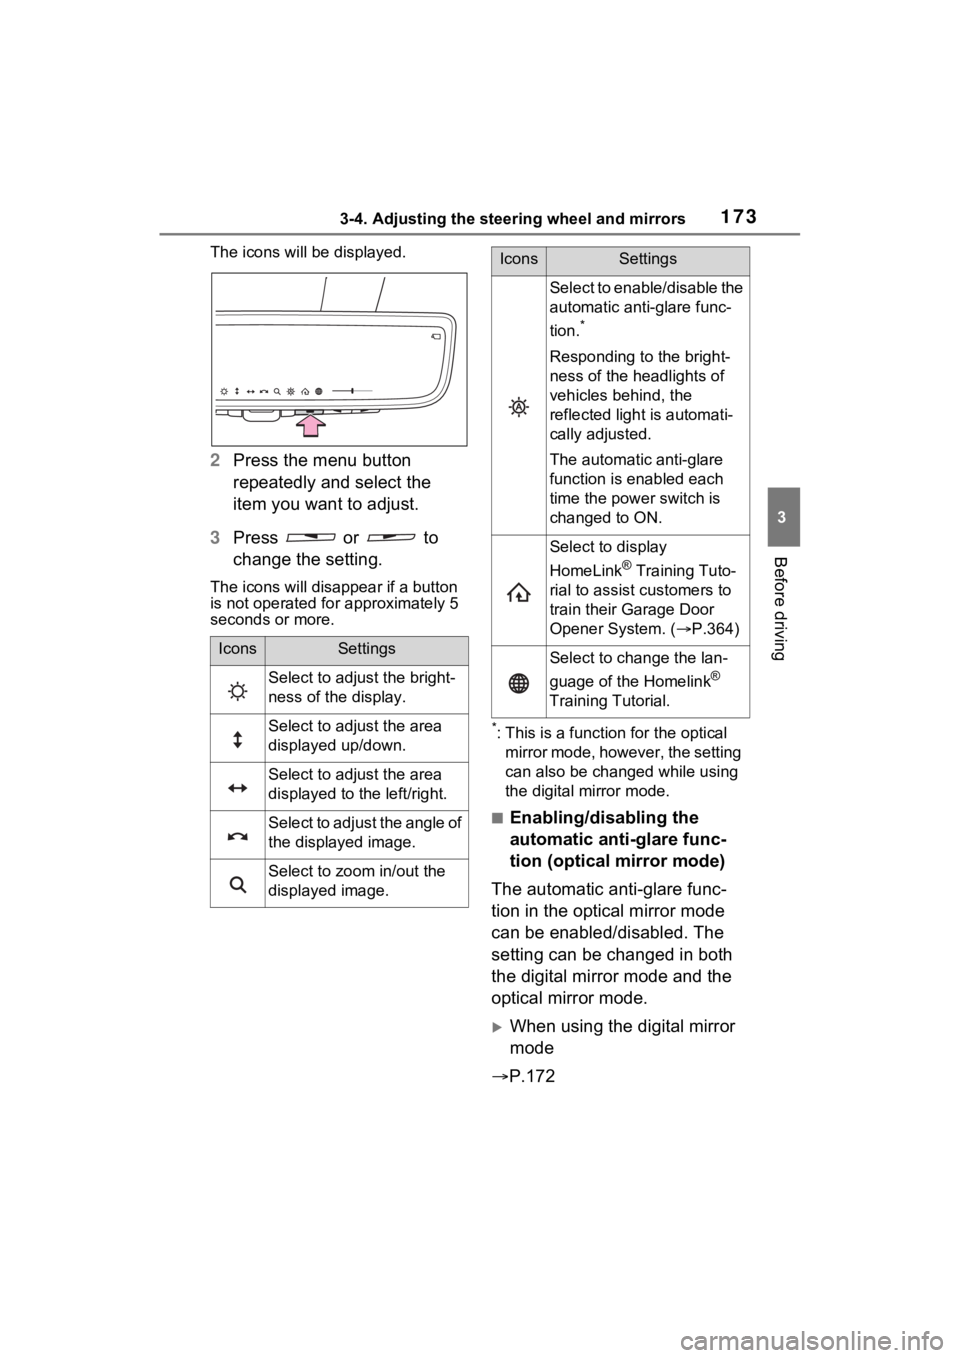
The icons will be displayed.
2Press the menu button
repeatedly and select the
item you want to adjust.
3 Press or to
change the setting.
The icons will disapp ear if a button
is not operated fo r approximately 5
seconds or more.
*: This is a functi on for the optical
mirror mode, however, the setting
can also be changed while using
the digital mirror mode.
■Enabling/disabling the
automatic anti-glare func-
tion (optical mirror mode)
The automatic anti-glare func-
tion in the optical mirror mode
can be enabled/disabled. The
setting can be changed in both
the digital mirror mode and the
optical mirror mode.
When using the digital mirror
mode
P.172
IconsSettings
Select to adjust the bright-
ness of the display.
Select to adjust the area
displayed up/down.
Select to adjust the area
displayed to the left/right.
Select to adjust the angle of
the displayed image.
Select to zoom in/out the
displayed image.
Select to enable/disable the
automatic anti-glare func-
tion.
*
Responding to the bright-
ness of the headlights of
vehicles behind, the
reflected light is automati-
cally adjusted.
The automatic anti-glare
function is enabled each
time the power switch is
changed to ON.
Select to display
HomeLink
® Training Tuto-
rial to assist customers to
train their Garage Door
Opener System. ( P.364)
Select to change the lan-
guage of the Homelink
®
Training Tutorial.
IconsSettings
Page 178 of 560
1783-4. Adjusting the steering wheel and mirrors
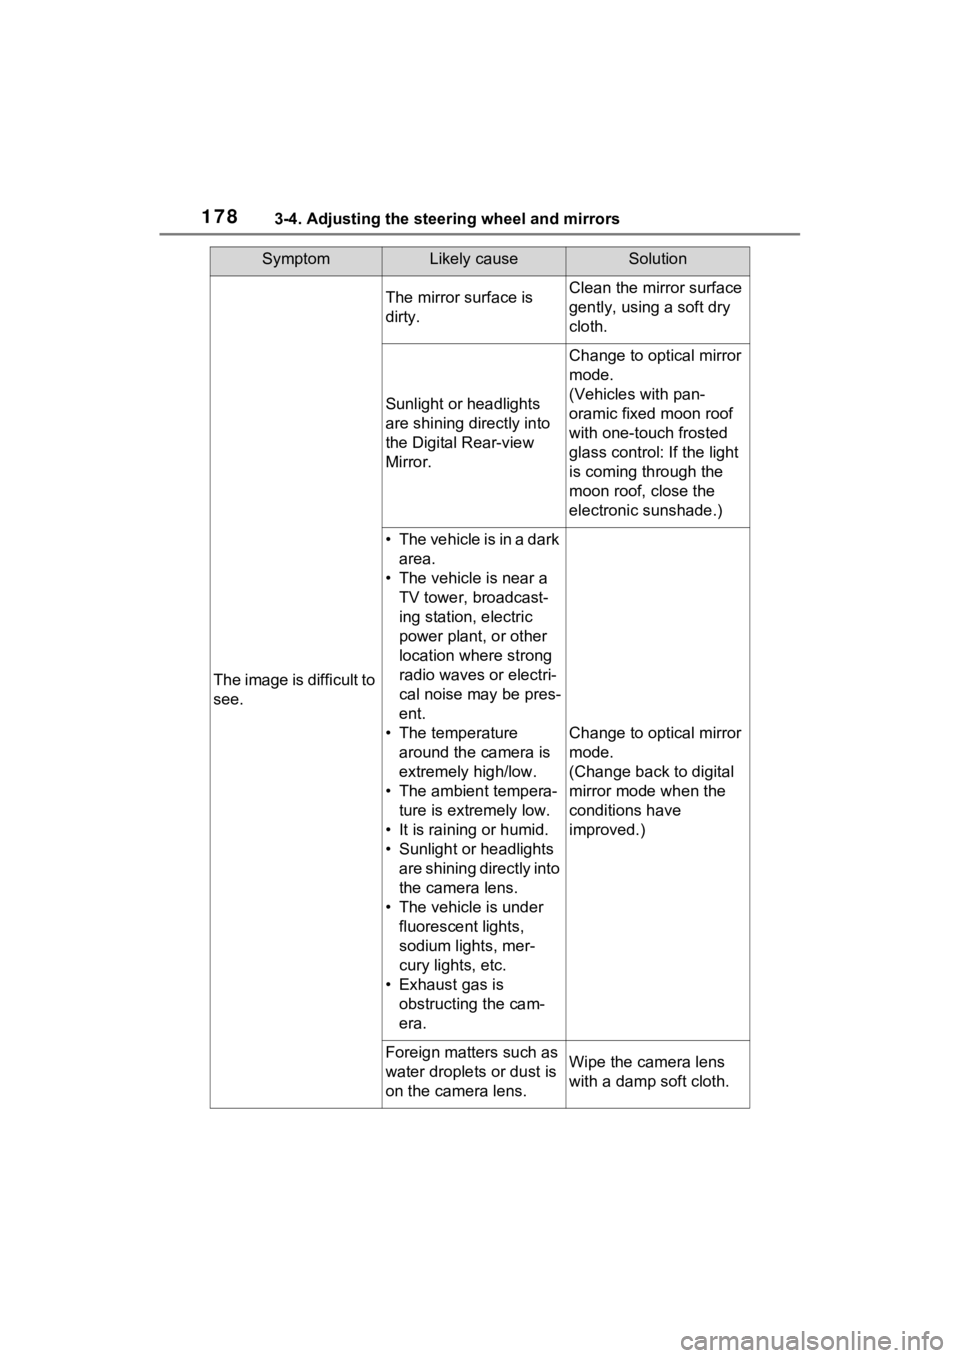
SymptomLikely causeSolution
The image is difficult to
see.
The mirror surface is
dirty.Clean the mirror surface
gently, using a soft dry
cloth.
Sunlight or headlights
are shining directly into
the Digital Rear-view
Mirror.
Change to optical mirror
mode.
(Vehicles with pan-
oramic fixed moon roof
with one-touch frosted
glass control: If the light
is coming through the
moon roof, close the
electronic sunshade.)
• T h e v e h i c l e i s i n a d a r k area.
• The vehicle is near a TV tower, broadcast-
ing station, electric
power plant, or other
location where strong
radio waves or electri-
cal noise may be pres-
ent.
• The temperature around the camera is
extremely high/low.
• The ambient tempera- ture is extremely low.
• It is raining or humid.
• Sunlight or headlights are shining directly into
the camera lens.
• The vehicle is under fluorescent lights,
sodium lights, mer-
cury lights, etc.
• Exhaust gas is obstructing the cam-
era.
Change to optical mirror
mode.
(Change back to digital
mirror mode when the
conditions have
improved.)
Foreign matters such as
water droplets or dust is
on the camera lens.Wipe the camera lens
with a damp soft cloth.