2023 TOYOTA TUNDRA HYBRID trailer
[x] Cancel search: trailerPage 383 of 618
3834-5. Using the driving support systems
Owners Manual_USA_M0C052_en
4
Driving
“Trailer Direction”
When using Straight Path Assist,
the driver can override the system
using the steering wheel to adjust
the trailer direction. Upon release of
the steering wheel, Straight Path
Assist re-activates with a revised
straight back target direction.
■When adding the trailer
Use the meter control switches to
select the trailer type. ( P. 9 6 )
1 Press or to select .
2 Press or to select “Trailer
Settings” and then press and
hold .
3 According to the display, select
the desired setting and then
press . ( P.100)
Trailer Settings are not available
while Trailer Backup Guide system
is active.
The system is designed to support
trailers with single or multi-axles
using a ball hitch. The system does
not support fifth wheel or gooseneck
trailers.
Bring the vehicle and trailer to a
large open space like an empty
parking lot. Activate Trailer
Backup Guide system and fol-
low the instructions displayed on
the multi-information dis-
play/multimedia.
For best calibration results, do
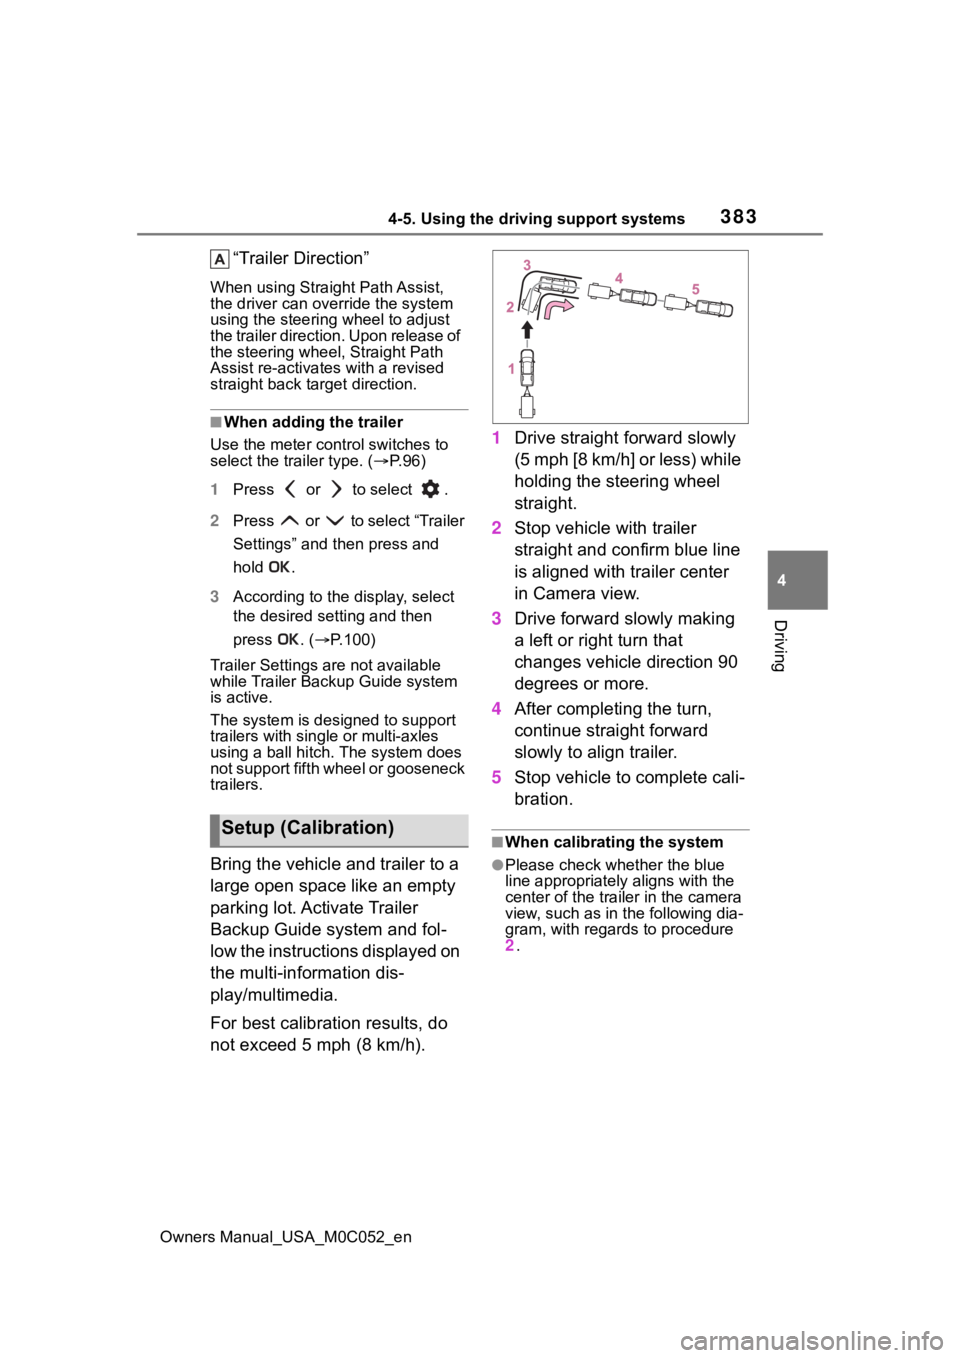
not exceed 5 mph (8 km/h). 1
Drive straight forward slowly
(5 mph [8 km/h] or less) while
holding the steering wheel
straight.
2 Stop vehicle with trailer
straight and confirm blue line
is aligned with trailer center
in Camera view.
3 Drive forward slowly making
a left or right turn that
changes vehicle direction 90
degrees or more.
4 After completing the turn,
continue straight forward
slowly to align trailer.
5 Stop vehicle to complete cali-
bration.
■When calibrating the system
●Please check whether the blue
line appropriately aligns with the
center of the trailer in the camera
view, such as in the following dia-
gram, with regards to procedure
2 .
Setup (Calibration)
Page 384 of 618
3844-5. Using the driving support systems
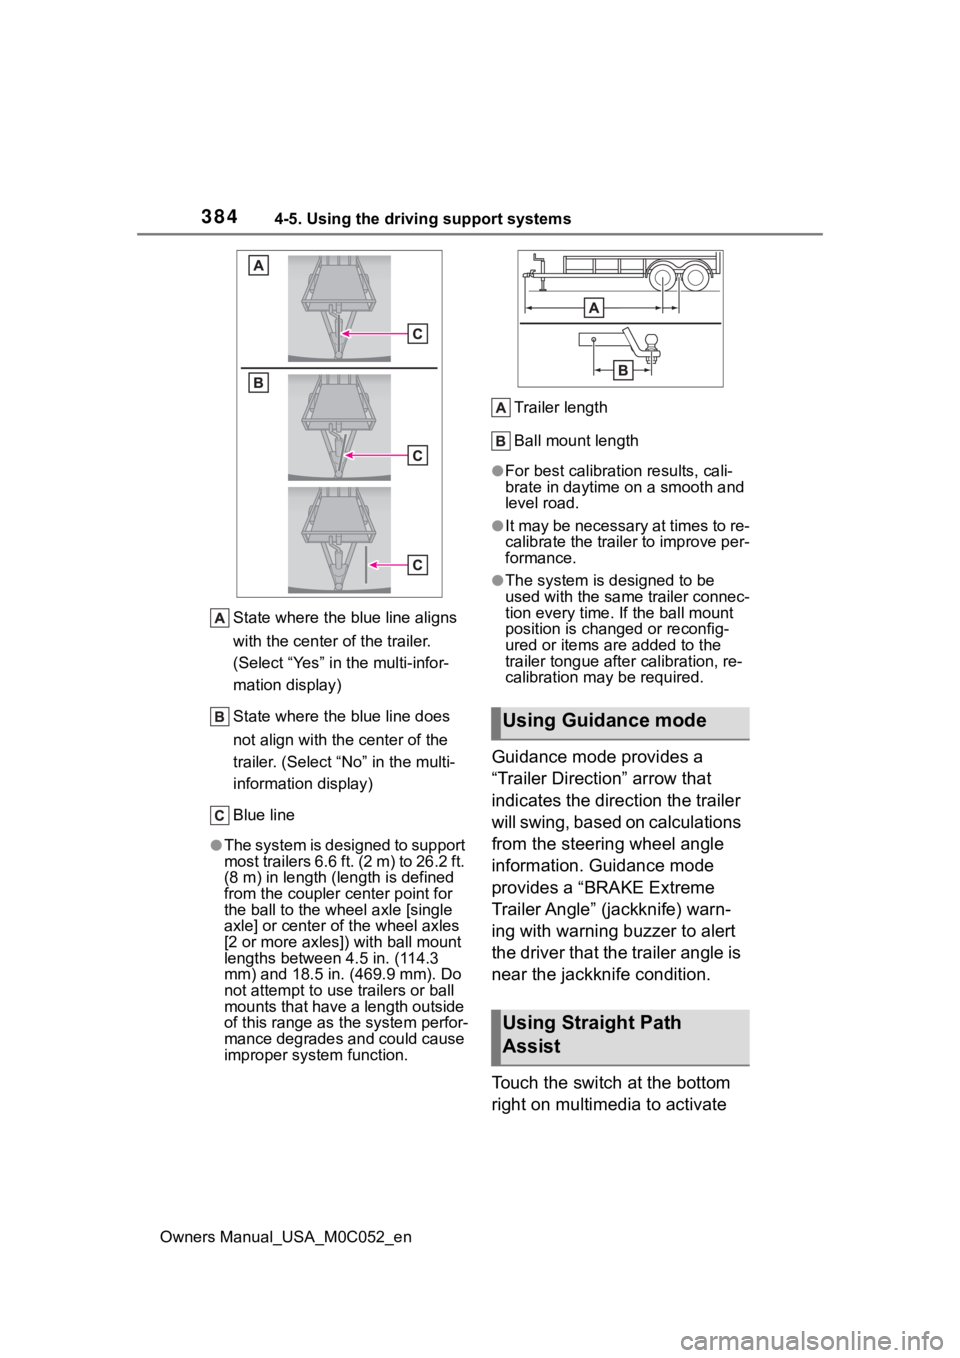
Owners Manual_USA_M0C052_enState where the blue line aligns
with the center of the trailer.
(Select “Yes” in the multi-infor-
mation display)
State where the blue line does
not align with the center of the
trailer. (Select “
No” in the multi-
information display)
Blue line
●The system is designed to support
most trailers 6.6 ft. (2 m) to 26.2 ft.
(8 m) in length (length is defined
from the coupler c enter point for
the ball to the wheel axle [single
axle] or center o f the wheel axles
[2 or more axles]) with ball mount
lengths between 4.5 in. (114.3
mm) and 18.5 in. ( 469.9 mm). Do
not attempt to use trailers or ball
mounts that have a length outside
of this range as t he system perfor-
mance degrades and could cause
improper system function. Trailer length
Ball mount length
●For best calibration results, cali-
brate in daytime on a smooth and
level road.
●It may be necessary at times to re-
calibrate the trailer to improve per-
formance.
●The system is designed to be
used with the same trailer connec-
tion every time. If the ball mount
position is changed or reconfig-
ured or items are added to the
trailer tongue
after calibration, re-
calibration may be required.
Guidance mode provides a
“Trailer Direction” arrow that
indicates the direction the trailer
will swing, based on calculations
from the steering wheel angle
information. Guidance mode
provides a “BRAKE Extreme
Trailer Angle” (jackknife) warn-
ing with warning buzzer to alert
the driver that the trailer angle is
near the jackknife condition.
Touch the switch at the bottom
right on multimedia to activate
Using Guidance mode
Using Straight Path
Assist
Page 385 of 618
3854-5. Using the driving support systems
Owners Manual_USA_M0C052_en
4
Driving
Straight Path Assist. Straight
Pass Assist controls steering to
back up the trailer in a straight-
line. The system can be overrid-
den by using steering wheel to
adjust trailer direction.
The driver is always responsible
for paying attention to the vehi-
cle’s surroundings and driving
safely. This system does not
control braking. Driver needs to
control vehicle speed, control
braking, and stop the vehicle to
avoid any collision.
For best results, reverse slowly
when using Straight Path Assist.
Trailer Backup Guide system
is canceled when the trailer
cannot be detected (e.g. dirty
camera lens, insufficient light-
ing condition, obstruction of
the trailer in the rear camera
view, incorrectly selected
trailer, etc.)
Guidance mode is canceled
when any of the following
occurs:
• Press the Trailer Backup Guide
switch
*
• Press the Camera switch*
• Vehicle speed is greater than approximately 4.7 mph (7.6 km/h)
• VSC or ABS is operated
*
• Tailgate is opened*
• Trailer tracking is lost • Shift the shift lever out of R
• There is a system malfunction
*
*
: Includes Trailer Backup Guide system cancel
Straight Path Assist is can-
celed when any of the follow-
ing occurs:
• Any of the events, above, that
cancel Guidance mode occur
• Press the Straight Path Assist switch on the multimedia screen
• The system temperature preser- vation function operates (to pre-
vent power steering equipment
from overheating)
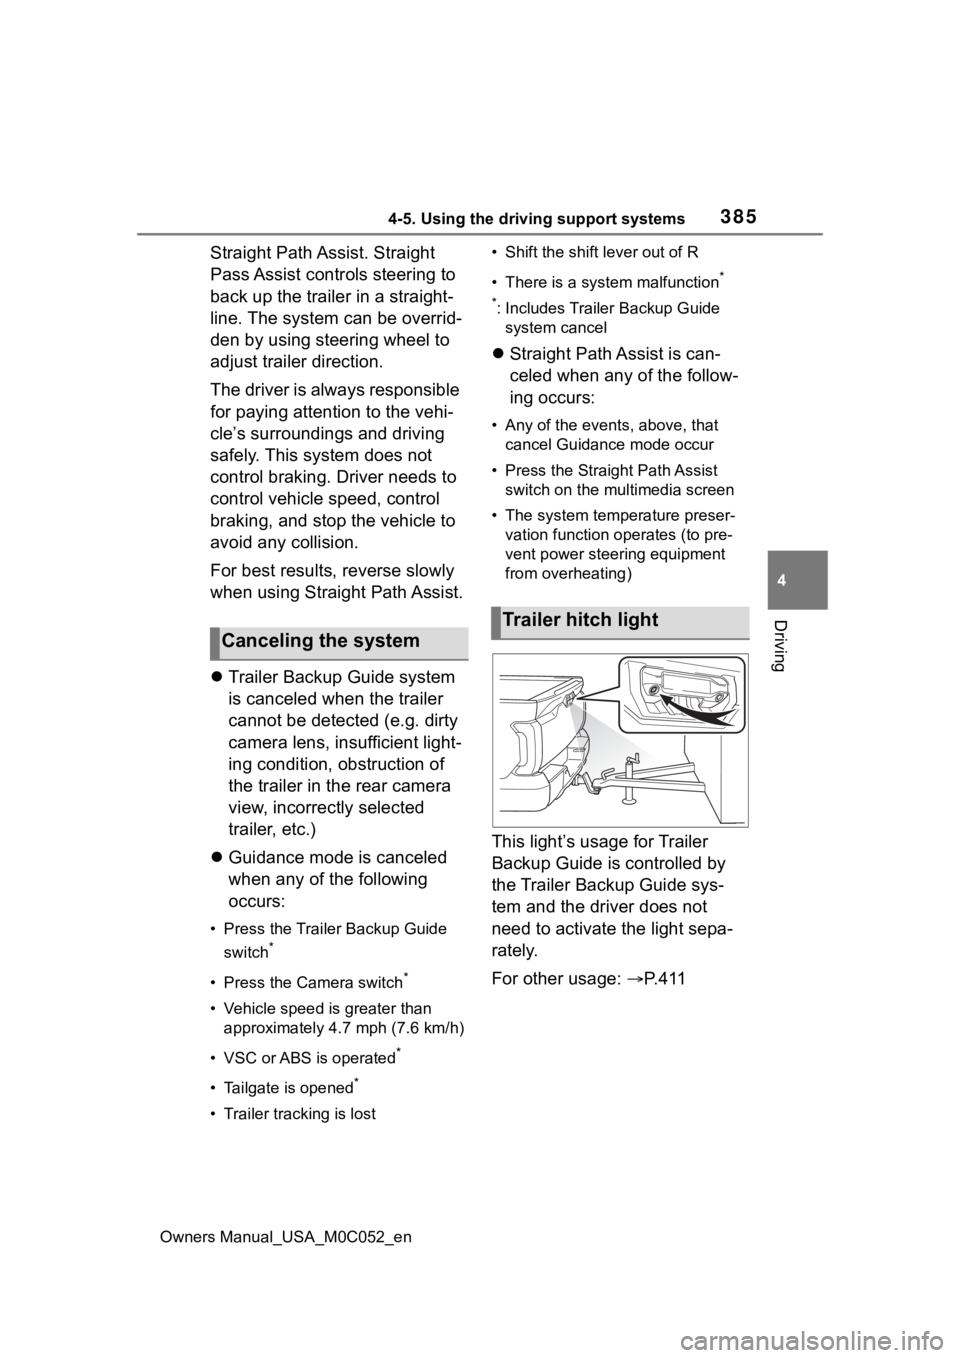
This light’s usage for Trailer
Backup Guide is controlled by
the Trailer Backup Guide sys-
tem and the driver does not
need to activate the light sepa-
rately.
For other usage: P. 4 1 1
Canceling the system
Trailer hitch light
Page 386 of 618
3864-5. Using the driving support systems
Owners Manual_USA_M0C052_en
WARNING
■Cautions regarding the use of
the system
In order for this system to perform
as designed, the vehicle must be
driven safely and the driver must
control the speed to keep it within
operating parameters and to
avoid a collision.
As there is a limit to the degree of
control performance that this sys-
tem can provide, do not overly
rely on this system. The driver is
always responsible for paying
attention to the vehicle’s sur-
roundings and driving safely. This
system does not control braking
(or steering when in Guidance
mode). Driver needs to control
vehicle speed, control braking,
(and steering when in Guidance
mode,) and stop the vehicle to
avoid any collision. Failure to fol-
low this warning could result in
property damage, serious injury
or death.
■When using the Trailer
Backup Guide
For proper system performance,
observe the following precautions.
Failure to do so may lead to an
accident resulting in property
damage, serious injury, or death.
●Keep the tailgat e fully latched.
●Keep the rear camera clean at
all times.
●Do not change the installation
position or direction of the rear
camera or remove it.
●Do not modify the trailer hitch
light. (→P.386)
●Make sure nothing can obstruct
the rear camera view of the
trailer.
The system is designed to oper-
ate in various weather and lighting
conditions and on different ground
surfaces (asphalt , grass, gravel,
etc.), however performance can
still be affected by various envi-
ronmental factors (e.g. shadow
passing over the tr ailer or dimin-
ished contrast between trailer and
the ground leading to trailer
detection being lost, etc.) so
always drive carefully, remain
alert and aware of your surround-
ings, and do not overly rely on the
system.
Page 408 of 618
4105-2. Using the interior lights
Owners Manual_USA_M0C052_en
5-2.Using the interior lights
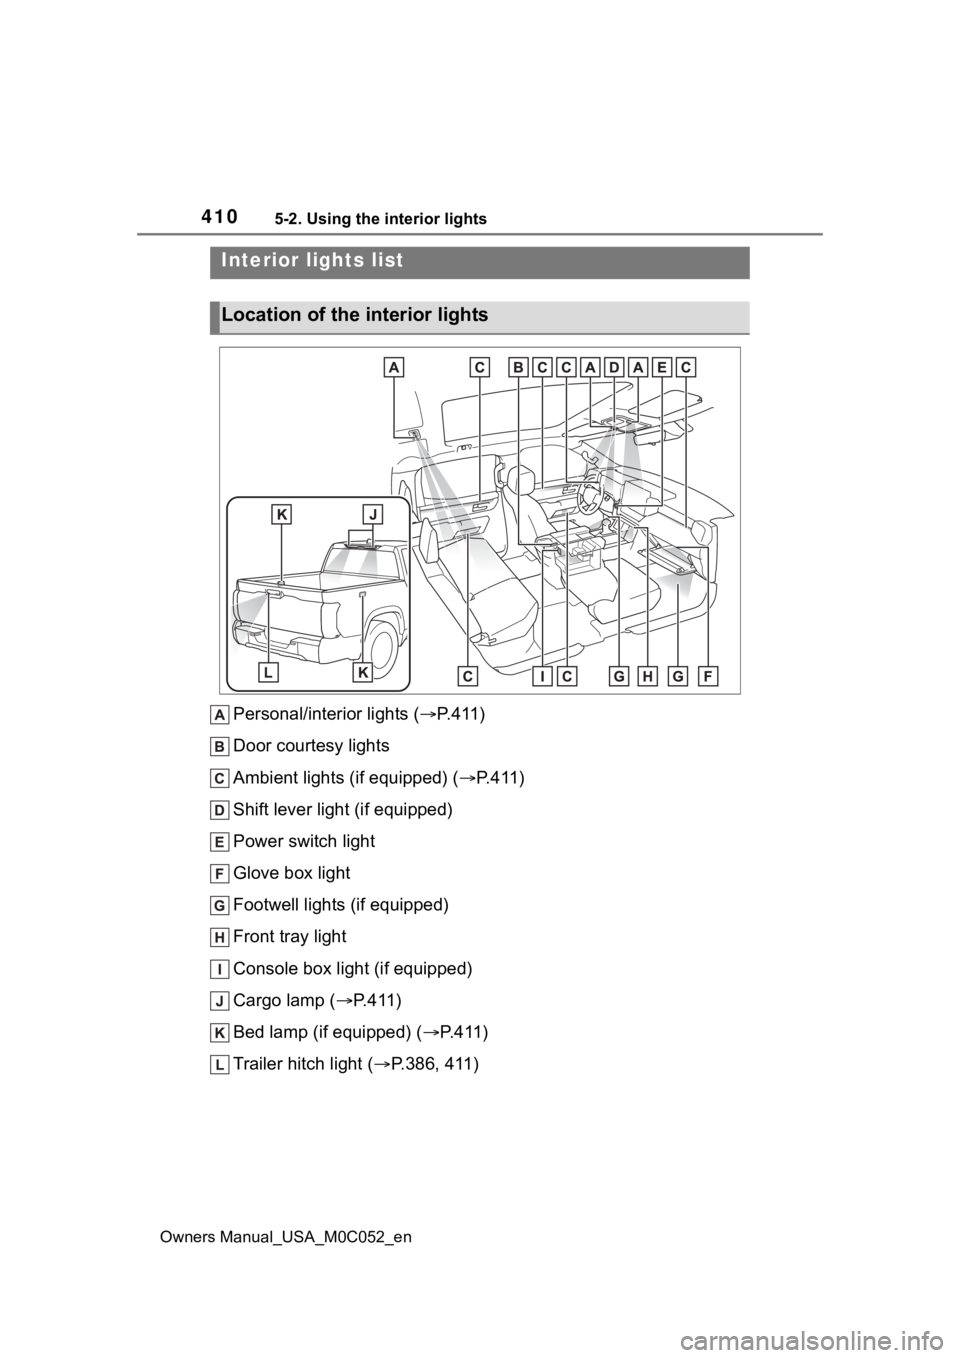
Personal/interior lights (P.411)
Door courtesy lights
Ambient lights (if equipped) ( P.411)
Shift lever light (if equipped)
Power switch light
Glove box light
Footwell lights (if equipped)
Front tray light
Console box light (if equipped)
Cargo lamp ( P.411)
Bed lamp (if equipped) ( P.411)
Trailer hitch light ( P.386, 411)
Interior lights list
Location of the i nterior lights
Page 410 of 618
4125-2. Using the interior lights
Owners Manual_USA_M0C052_enopened or closed while the shift
lever is in P, D or R.
The trailer hitch light turns on when
the door or tailgate is opened or
closed while the shift lever is in P or
R. trailer hitch light will turn off
when shift lever in D.
“ON”
The cargo lamp, bed lamp, trailer
hitch light turns o
n while the shift
lever is in P or R. Only cargo lamp
and bed lamp turns on while shift
lever is in D.
■Illuminated entry system
The lights automatically turn on/off
according to the power switch
mode, the presence of the elec-
tronic key, whether the doors are
locked/unlocked, and whether the
doors are open/closed.
■To prevent the 12-volt battery
from being discharged
If the follo wing lights remain on
when the door is not fully closed and
the main switch i s in the “DOOR”
position, the lights will go off auto-
matically after 20 minutes:
●Personal/interior lights
●Cargo lamp
●Bed lamp
●Trailer hitch light
■The personal/interior lights may
turn on automatically when
If any of the SRS airbags deploy
(inflate) or in the event of a strong
rear impact, the personal/interior
lights will turn on automatically.
The personal/interior lights will turn
off automatically after approximately
20minutes.
The personal/interior lights can be
turned off manually. However, in
order to help prev ent further colli-
sions, it is recommended that they be left on until safety can be
ensured.
(The personal/interior lights may not
turn on automatically depending on
the force of the impact and condi-
tions of the collision.)
■Customization
Some functions can be customized.
( P.561)
NOTICE
■To prevent 12-volt battery dis-
charge
Do not leave the lights on longer
than necessary when the hybrid
system is off.
■Removing light lenses
Never remove the lens for the
personal/interior lights. Otherwise,
the lights will be damaged. If a
lens needs to be removed, con-
tact your Toyota dealer.
Page 488 of 618

4906-3. Do-it-yourself maintenance
Owners Manual_USA_M0C052_en
■Lights that need to be
replaced by your Toyota
dealer
Headlights
Daytime running lights
Front turn signal/parking lights
(LED type)
Front fog lights
Side marker lights
Side turn signal lights
Trailering light (if equipped)
Tail lights
Stop lights
Back-up light
Rear turn signal lights
High mounted stoplight/cargo
lamp
Trailer hitch light (if equipped)
Bed lamp (if equipped)
Auxiliary lights (if equipped)
Light bar (if equipped)
Arch molding marker lights (if
equipped)
■When replacing the light bulbs
Confirm that they are properly
engaged with the bulb base and that
there is no light leakage.
■LED Lights
The lights other th an front turn sig-
nal/parking lights (bulb type) consist
of a number of LEDs. If any of the
LEDs burn out, take your vehicle to
your Toyota dealer to have the light
replaced.
■Condensation build-up on the
inside of the lens
Temporary condensation build-up
on the inside of t he headlight lens
does not indicate a malfunction.
Contact your Toyota dealer for more
information in t he following situa-
tions:
●Large drops of water have built up
on the inside of the lens.
●Water has built up inside the
headlight.
■When replacing light bulbs
P.489
■Front turn signal/parking
lights (bulb type)
1 To allow enough working
space, turn the steering
wheel to the opposite side of
the bulb to be replaced.
Remove the screws, and
remove the fender liner.
Turn the steering wheel to the left
when replacing the right side light
bulb, and turn the steering wheel to
the right when replacing the left
side light bulb.
Replacing light bulb
Page 503 of 618
5057-2. Steps to take in an emergency
Owners Manual_USA_M0C052_en
7
When trouble arises
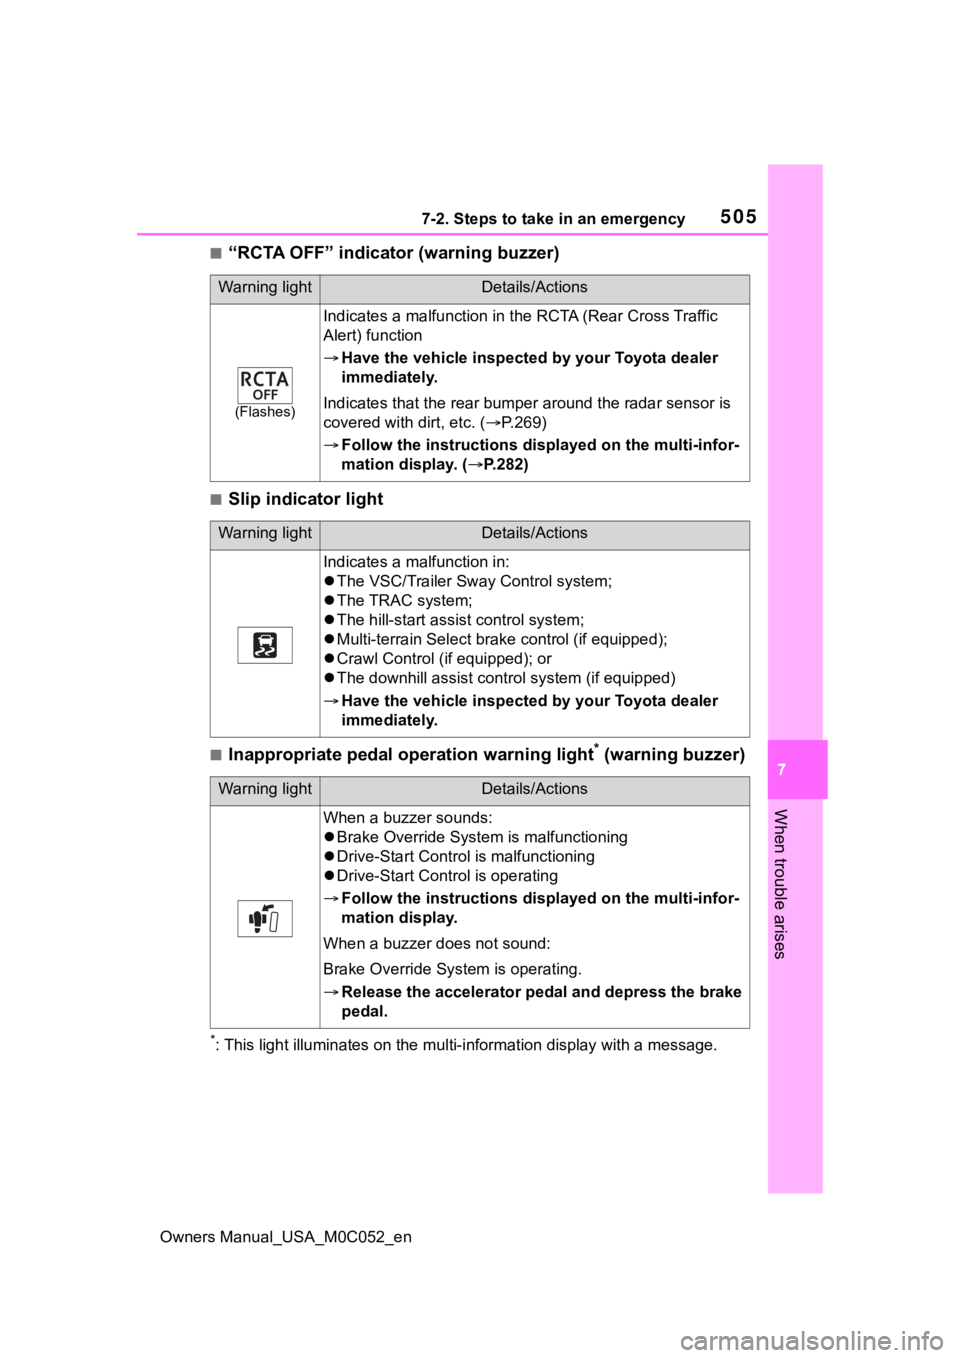
■“RCTA OFF” indicator (warning buzzer)
■Slip indicator light
■Inappropriate pedal operation warning light* (warning buzzer)
*: This light illuminates on the mu lti-information display with a message.
Warning lightDetails/Actions
(Flashes)
Indicates a malfunction in t he RCTA (Rear Cross Traffic
Alert) function
Have the vehicle inspecte d by your Toyota dealer
immediately.
Indicates that the rear bumper around the radar sensor is
covered with dirt, etc. ( P.269)
Follow the instructions dis played on the multi-infor-
mation display. ( P.282)
Warning lightDetails/Actions
Indicates a malfunction in:
The VSC/Trailer Sway Control system;
The TRAC system;
The hill-start assi st control system;
Multi-terrain Select brake control (if equipped);
Crawl Control (if equipped); or
The downhill assist control system (if equipped)
Have the vehicle inspecte d by your Toyota dealer
immediately.
Warning lightDetails/Actions
When a buzzer sounds:
Brake Override System is malfunctioning
Drive-Start Control is malfunctioning
Drive-Start Control is operating
Follow the instructions dis played on the multi-infor-
mation display.
When a buzzer does not sound:
Brake Override Syst em is operating.
Release the accelerator pedal and depress the brake
pedal.