2023 TOYOTA TUNDRA HYBRID warning light
[x] Cancel search: warning lightPage 510 of 618

5127-2. Steps to take in an emergency
Owners Manual_USA_M0C052_entems such as PCS (Pre-Collision
system) or the dynamic radar cruise
control with full-speed range is oper-
ating. If a warning message is
shown, be sure to decelerate the
vehicle or follow an instruction
shown on the multi
-information dis-
play.
A warning message is shown when
Brake Override System operates.
( P.172)
A warning message is shown when
Drive-Start Control ( P.177) or
Parking Support Brake ( P.287)
operates. Follow the instructions on
the multi-information display.
●If a message about an operation
of the power switch is displayed
An instruction for operation of the
power switch is shown when the
incorrect procedure for starting the
hybrid system is performed or the
power switch is operated incorrectly.
Follow the instructions shown on the
multi-information display to operate
the power switch again.
●If a message abou t a shift lever
operation is displayed
To prevent the shift lever from being
operated incorrectly or the vehicle
from moving unexpectedly, a mes-
sage that requires shifting the shift
lever may be sho wn on the multi-
information display . In that case, fol-
low the instruction of the message
and shift the shift lever.
●If a message or image about an
open/close state of a part or
replenishment of a consumable is
displayed
Confirm the part indicated by the
multi-information display or a warn-
ing light, and then perform the cop-
ing method such as closing the open door or replenishing a con-
sumable.
■If a message that indicates the
need for visiting your Toyota
dealer is displayed
The system or part shown on the
multi-information di splay is malfunc-
tioning. Have the vehicle inspected
by your Toyota dealer immediately.
■If a message that indicates the
need for referring to Owner’s
Manual is displayed
●If “Engine Coolant Temp High
Stop in a Safe Place See Owner’s
Manual” is shown, follow the
instructions ( P.535).
●If the following messages are
shown, there may be a malfunc-
tion.
Immediately stop the vehicle in a
safe place and contact your Toy-
ota dealer. Continuing to drive the
vehicle may be dangerous.
• “Hybrid System Malfunction”
• “Check Engine”
• “Traction battery system malfunc- tion”
• “Accelerator System Malfunction”
• “Hybrid System Stopped”
• “Smart Key System Malfunction See Owner’s Manual”
●If the following messages are
shown, there may be a malfunc-
tion.
Immediately have the vehicle
inspected by your Toyota dealer.
• “Oil Pressure Low Stop in a Safe Place See Owner’s Manual”
• “Braking Power Low Stop in a
Safe Place See Owner’s Manual”
●If “Maintenance Required for Trac-
tion Battery Cooling Parts See
Owner’s Manual” is shown, the fil-
ter may be clogged, the air intake
vents may be blo cked, or there
may be a gap in the duct. There-
fore, perform the following correc-
tion procedure.
Cleaning the hybrid battery (traction
battery) air intake vents ( P.481)
Page 511 of 618

5137-2. Steps to take in an emergency
Owners Manual_USA_M0C052_en
7
When trouble arises
If the warning message is shown
even if the vents are cleaned, have
the vehicle inspected by your Toyota
dealer.
■If “Shift to P Before Exiting
Vehicle” or “Shift to P when
Parked” is displayed
Message is displayed when the
driver’s door is opened without turn-
ing the power switch to OFF with the
shift lever in any position other than
P.
Shift the shift lever to P.
■If “Shift is in N Release Acceler-
ator Before Shif ting” is shown
Message is displayed when the
accelerator pedal has been
depressed and the shift lever is in N.
Release the accelerator pedal and
shift the shift lever to D, S or R.
■If “Auto Power OFF to Conserve
Battery” is displayed
Power was turned off due to the
automatic power off function.
Next time when starting the hybrid
system, increase the hybrid system
speed slightly and maintain that
level for approximately 5 minutes to
recharge the 12-volt battery.
■If “Headlight System Malfunc-
tion Visit Your Dealer” is dis-
played
The following systems may be mal-
functioning. Have the vehicle
inspected by your Toyota dealer
immediately.
●The LED headlight system
●The automatic headlight leveling
system (if equipped)
●Automatic High Beam
■If “Engine Oil Level Low Add or
Replace” is displayed
The engine oil le vel may be low.
Check the level of the engine oil,
and add engine oil if necessary. This
message may be di splayed if the
vehicle is stopped on a slope. Move the vehicle to a l
evel surface and
check if the message disappears.
■If “Hybrid System Stopped
Steering Power Low” is dis-
played
This message is displayed if the
hybrid system is stopped while driv-
ing.
When steering wheel operations are
heavier than usual, grip the steering
wheel firmly and operate it using
more force than usual.
■If “Maintenance Required
Soon” is displayed
Indicates that all maintenance
according to the driven distance on
the maintenance schedule
* should
be performed soon.
Comes on approximately 4500
miles (7200 km) after the message
has been reset.
If necessary, perform maintenance.
Please reset the m essage after the
maintenance is performed.
( P.449)
*: Refer to the separate “Scheduled
Maintenance Guide” or “Owner’s
Manual Supplement” for the main-
tenance interval applicable to your
vehicle.
■If “Maintenance Required Visit
Your Dealer” is displayed
Indicates that all maintenance is
required to correspond to the driven
distance on the maintenance sched-
ule
*.
Comes on approximately 5000
miles (8000 km) after the message
has been reset. (The indicator will
not work properly unless the mes-
sage has been reset.)
Perform the necessary mainte-
nance. Please reset the message
after the maintenance is performed.
( P.449)
*: Refer to the separate “Scheduled
Maintenance Guide” or “Owner’s
Page 517 of 618
5197-2. Steps to take in an emergency
Owners Manual_USA_M0C052_en
7
When trouble arises
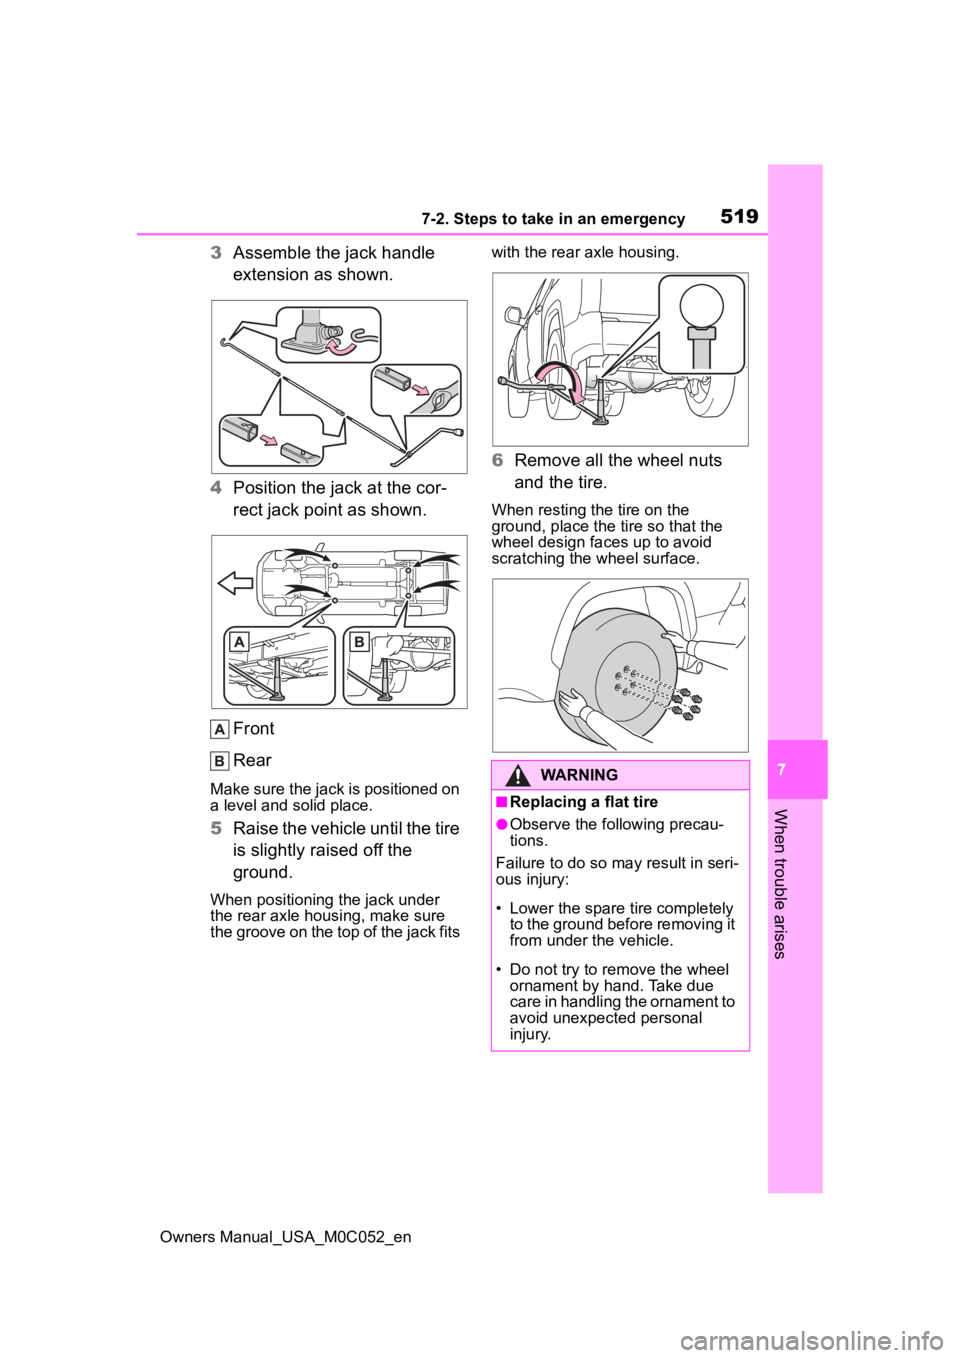
3 Assemble the jack handle
extension as shown.
4 Position the jack at the cor-
rect jack point as shown.
Front
Rear
Make sure the jack is positioned on
a level and solid place.
5Raise the vehicle until the tire
is slightly raised off the
ground.
When positioning the jack under
the rear axle housing, make sure
the groove on the top of the jack fits with the rear axle housing.
6
Remove all the wheel nuts
and the tire.
When resting the tire on the
ground, place the tire so that the
wheel design faces up to avoid
scratching the wheel surface.
WARNING
■Replacing a flat tire
●Observe the fo llowing precau-
tions.
Failure to do so may result in seri-
ous injury:
• Lower the spare tire completely to the ground before removing it
from under the vehicle.
• Do not try to remove the wheel ornament by hand. Take due
care in handling the ornament to
avoid unexpected personal
injury.
Page 520 of 618
5227-2. Steps to take in an emergency
Owners Manual_USA_M0C052_en
4While raising, secure the tire,
taking care that the tire goes
straight up without catching
on any surrounding part, to
prevent it from flying forward
during a collision or sudden
braking.
Tightening torque:
34.7 ft•lbf (46.6 N•m, 4.8 kgf•m)
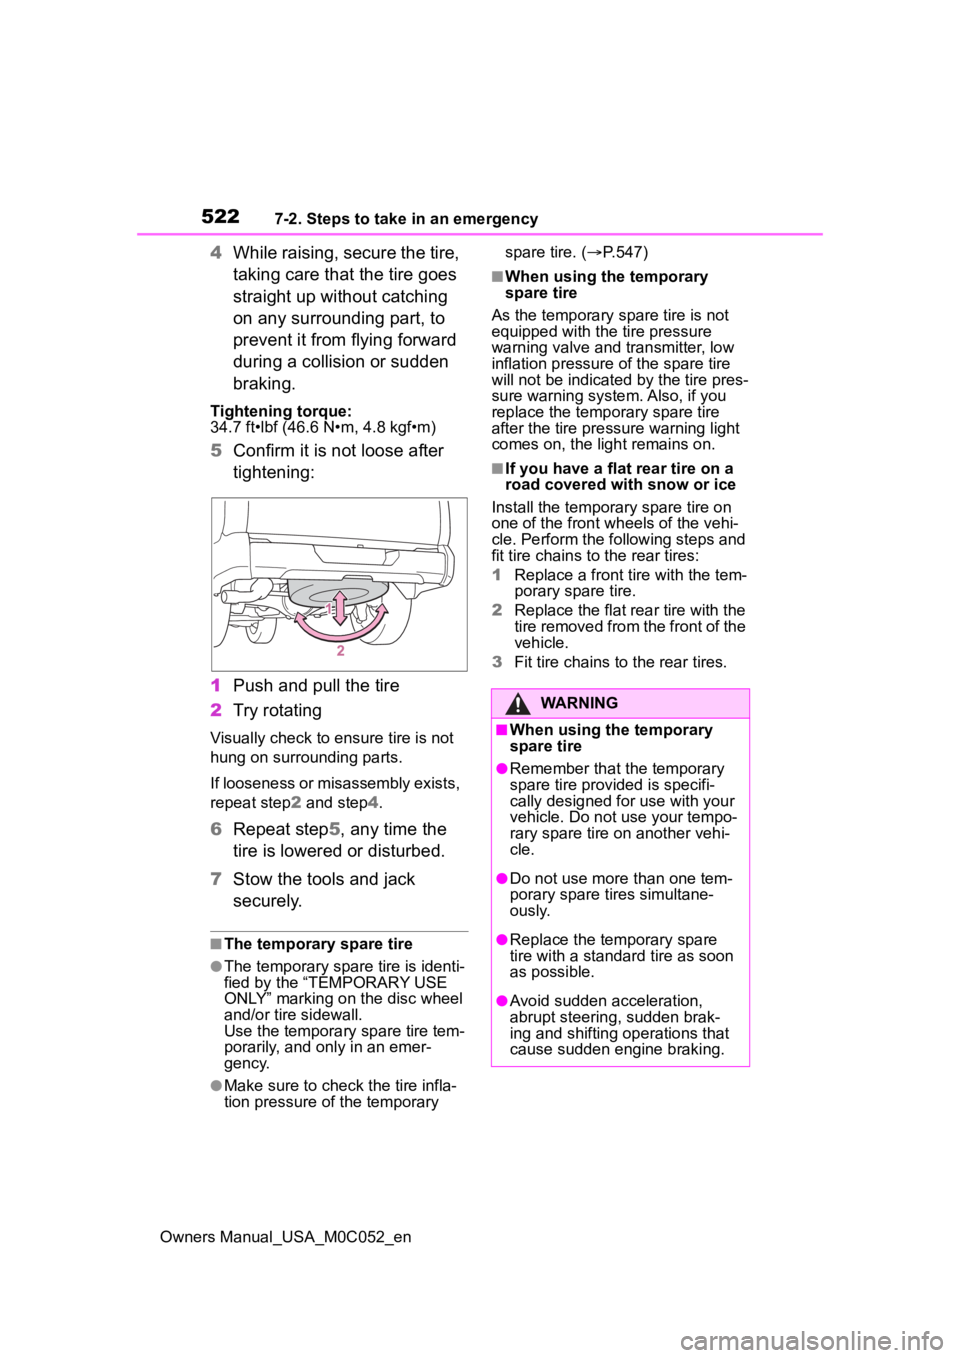
5Confirm it is not loose after
tightening:
1 Push and pull the tire
2 Try rotating
Visually check to ensure tire is not
hung on surrounding parts.
If looseness or misassembly exists,
repeat step 2 and step 4.
6 Repeat step5, any time the
tire is lowered or disturbed.
7 Stow the tools and jack
securely.
■The temporary spare tire
●The temporary spare tire is identi-
fied by the “TEMPORARY USE
ONLY” marking on the disc wheel
and/or tire sidewall.
Use the temporary spare tire tem-
porarily, and only in an emer-
gency.
●Make sure to check the tire infla-
tion pressure of the temporary spare tire. (
P.547)
■When using the temporary
spare tire
As the temporary spare tire is not
equipped with the tire pressure
warning valve and transmitter, low
inflation pressure of the spare tire
will not be indicated by the tire pres-
sure warning system. Also, if you
replace the temporary spare tire
after the tire pressure warning light
comes on, the light remains on.
■If you have a flat rear tire on a
road covered with snow or ice
Install the temporary spare tire on
one of the front w heels of the vehi-
cle. Perform the following steps and
fit tire chains to the rear tires:
1 Replace a front tire with the tem-
porary spare tire.
2 Replace the flat rear tire with the
tire removed from the front of the
vehicle.
3 Fit tire chains to the rear tires.
WARNING
■When using the temporary
spare tire
●Remember that t he temporary
spare tire provided is specifi-
cally designed for use with your
vehicle. Do not use your tempo-
rary spare tire on another vehi-
cle.
●Do not use more than one tem-
porary spare tires simultane-
ously.
●Replace the temporary spare
tire with a standa rd tire as soon
as possible.
●Avoid sudden acceleration,
abrupt steering, sudden brak-
ing and shifting operations that
cause sudden engine braking.
Page 531 of 618
5337-2. Steps to take in an emergency
Owners Manual_USA_M0C052_en
7
When trouble arises
WARNING
■When removing the 12-volt
battery terminals
Always remove the negative (-)
terminal first. If the positive (+) ter-
minal contacts any metal in the
surrounding area when the posi-
tive (+) terminal is removed, a
spark may occur, l eading to a fire
in addition to electrical shocks
and death or serious injury.
■Avoiding 12-volt battery fires
or explosions
Observe the following precautions
to prevent accidentally igniting the
flammable gas that may be emit-
ted from the 12-volt battery:
●Make sure each jumper cable is
connected to the correct termi-
nal and that it is not unintention-
ally in contact with any other
than the intended terminal.
●Do not allow the other end of
the jumper cable connected to
the “+” terminal to come into
contact with any other parts or
metal surfaces in the area, such
as brackets or unpainted metal.
●Do not allow the + and - clamps
of the jumper cables to come
into contact with each other.
●Do not smoke, use matches,
cigarette lighters or allow open
flame near the 12-volt battery.
■12-volt battery precautions
The 12-volt battery contains poi-
sonous and corrosi ve acidic elec-
trolyte, while related parts contain
lead and lead compounds.
Observe the following precautions
when handling the 12-volt battery:
●When working with the 12-volt
battery, always wear safety
glasses and take care not to
allow any 12-volt battery fluids
(acid) to come into contact with
skin, clothing or the vehicle
body.
●Do not lean over the 12-volt bat-
tery.
●In the event that 1 2-volt battery
fluid comes into contact with the
skin or eyes, immediately wash
the affected area with water and
seek medical attention. Place a
wet sponge or cloth over the
affected area until medical
attention can be received.
●Always wash your hands after
handling the 12-volt battery sup-
port, terminals, and other bat-
tery-related parts.
●Do not allow children near the
12-volt battery.
■After recharging the 12-volt
battery
Have the 12-volt battery
inspected at your Toyota dealer
as soon as possible. If the 12-volt
battery is deteriorating, continued
use may cause the 12-volt battery
to emit a malodorous gas, which
may be detrimenta l to the health
of passengers.
■When replacing the 12-volt
battery
●For information regarding 12-
volt battery rep lacement, con-
tact your Toyota dealer.
Page 544 of 618
5468-1. Specifications
Owners Manual_USA_M0C052_en
Your Toyota vehicle is filled with “Toyota Genuine Differential Gear
Oil” at the factory.
Use Toyota approved “Toyota Genuine Differential Gear Oil” or an
equivalent oil of matching quality to satisfy the above specifi cation.
Please contact your Toyota dealer for further details.
*1: Minimum pedal clearance when depressed with a force of 110 lbf (490 N,
50 kgf) while the hybrid system is running.
*2: Make sure to confirm that the brake warning light (yellow) doe s not illumi-
nate. (If the brake warning light illuminates, refer to P.501.)
Differential
Oil capacity
Front (4WD
models)1.4 qt. (1.29 L, 1.1 Imp.qt.)
Rear
Without rear differential lock system
6.0 qt. (5.73 L , 5.0 Imp.qt.)
With rear differential lock system
5.8 qt. (5.51 L, 4.8 Imp.qt.)
Oil type and viscosityToyota Genuine Differential Ge ar Oil LT
75W-85 GL-5 or equivalent
Brakes
Pedal clearance*13.6 in. (90.8 mm) Min.
Pedal free play0.04 0.24 in. (1 6 mm)
Brake pad wear limit0.04 in. (1 mm)
Parking brake indicator*2
When pulling the parking brake switch for
1 to 2 seconds: comes on
When pushing the parking brake switch for
1 to 2 seconds: turns off
Fluid typeFMVSS No.116 DOT 3 or SAE J1703
FMVSS No.116 DOT 4 or SAE J1704
Steering
Free playLess than 1.2 in. (30 mm)
Page 564 of 618

5668-2. Customization
Owners Manual_USA_M0C052_en
■Outside rear view mirrors (P.155)
■Power windows and panoramic moon roof*(P.160, 164)
*: If equipped
■Turn signal lever ( P.204)
■Automatic light control system ( P. 2 1 1 )
FunctionDefault settingCustomized
setting
Automatic mirror folding and
extending operation
Linked to the locking/
unlocking of the doorsOff
——OLinked to oper- ation of the
power switch
FunctionDefault settingCustomized setting
Mechanical key linked opera-
tionOffOn——O
Wireless remote control
linked operationOffOn (open only)——O
Wireless remote control
linked operation signal
(buzzer)
OnOff——O
Side windows open warning
functionOnOff——O
Sliding roof open warning
functionOnOff——O
FunctionDefault settingCustomized setting
Times of flashing of the lane
change signal flashers3Off——O4 to 7
FunctionDefault settingCustomized setting
Light sensor sensitivityStandard-2 to 2O—O
Page 565 of 618
5678-2. Customization
Owners Manual_USA_M0C052_en
8
Vehicle specifications
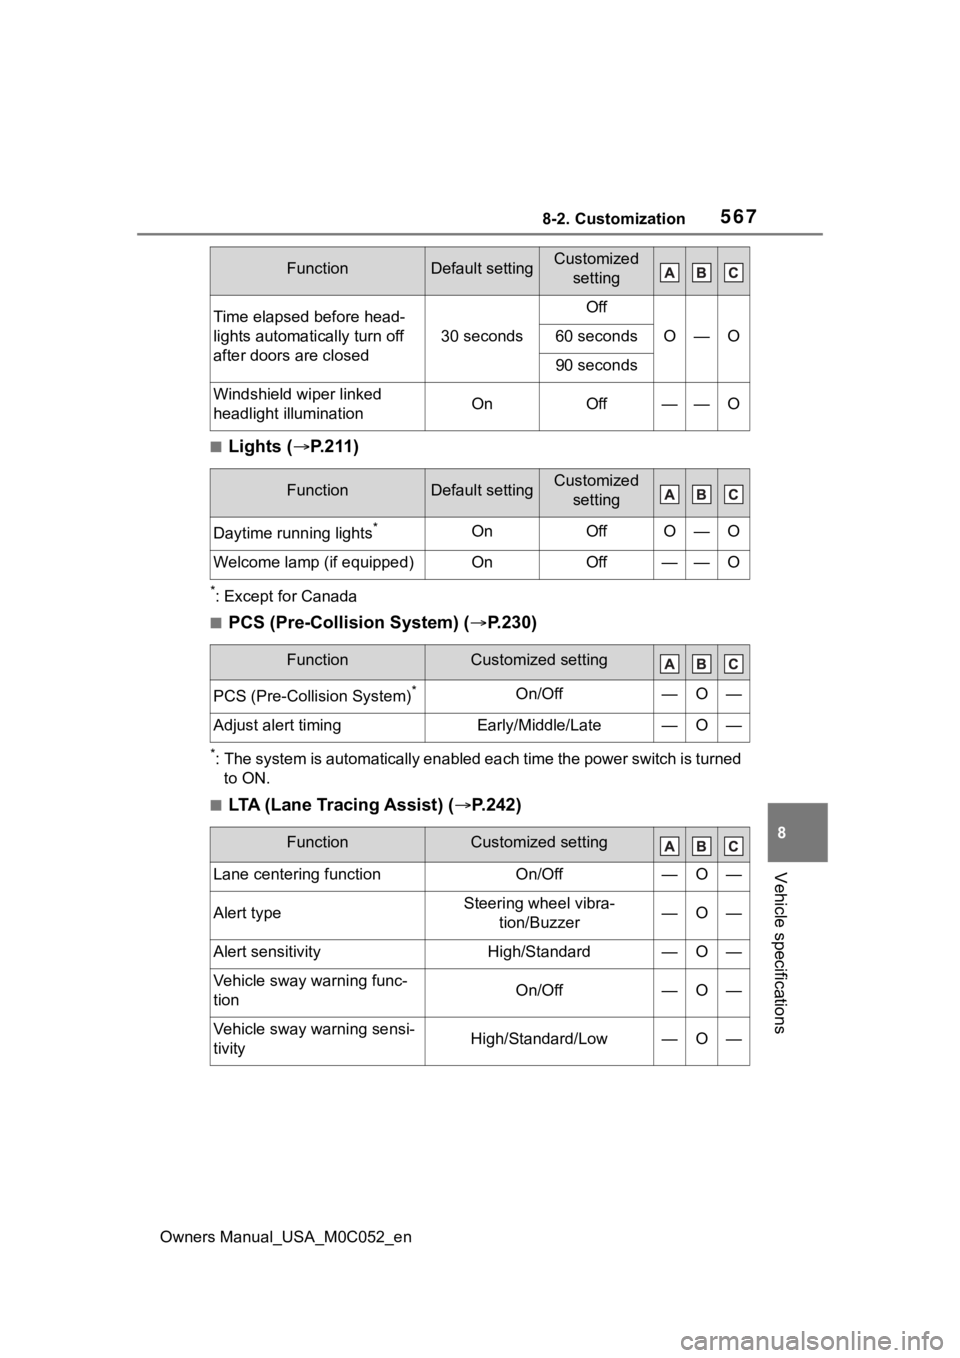
■Lights ( P.211)
*: Except for Canada
■PCS (Pre-Collision System) ( P.230)
*: The system is automatically enabled each time the power switch is turned
to ON.
■LTA (Lane Tracing Assist) ( P.242)
Time elapsed before head-
lights automatically turn off
after doors are closed
30 seconds
Off
O—O60 seconds
90 seconds
Windshield wiper linked
headlight illuminationOnOff——O
FunctionDefault settingCustomized
setting
Daytime running lights*OnOffO—O
Welcome lamp (if equipped)OnOff——O
FunctionCustomized setting
PCS (Pre-Collision System)*On/Off—O—
Adjust alert timingEarly/Middle/Late—O—
FunctionCustomized setting
Lane centering functionOn/Off—O—
Alert typeSteering wheel vibra- tion/Buzzer—O—
Alert sensitivityHigh/Standard—O—
Vehicle sway warning func-
tionOn/Off—O—
Vehicle sway warning sensi-
tivityHigh/Standard/Low—O—
FunctionDefault settingCustomized setting