2023 TOYOTA TUNDRA HYBRID brake
[x] Cancel search: brakePage 295 of 618
2954-5. Using the driving support systems
Owners Manual_USA_M0C052_en
4
Driving
■The Parking Support Brake
function (static objects) will
stop operating when
The function will st op operating if
any of the following conditions are
met:
●Hybrid system output restriction
control
• The Parking Support Brake is dis- abled.
• The system determines that the collision has beco me avoidable
with normal brake operation.
• The static object is no longer approximately 6 to 13 ft. (2 to 4 m)
away from the vehicle or in the
traveling directi on of the vehicle.
●Brake control
• The Parking Support Brake is dis- abled.
• Approximately 2 seconds have
elapsed since the vehicle was
stopped by brake control.
• The brake pedal is depressed
after the vehicle is stopped by
brake control.
• The static object is no longer
approximately 6 to 13 ft. (2 to 4 m)
away from the vehicle or in the
traveling directi on of the vehicle.
■Detection range of the Parking
Support Brake function (static
objects)
The detection range of the Parking
Support Brake function (static
objects) differs from the detection
range of the intuitive parking assist.
( P.279) Therefore, even if the intu-
itive parking assist detects an object
and provides a warning, the Parking
Support Brake function (static
objects) may not start operating.
■Situations in which the system
may not operate properly
P. 2 7 7
■Situations in which the system
may operate even if there is no
possibility of a collision
P. 2 7 8
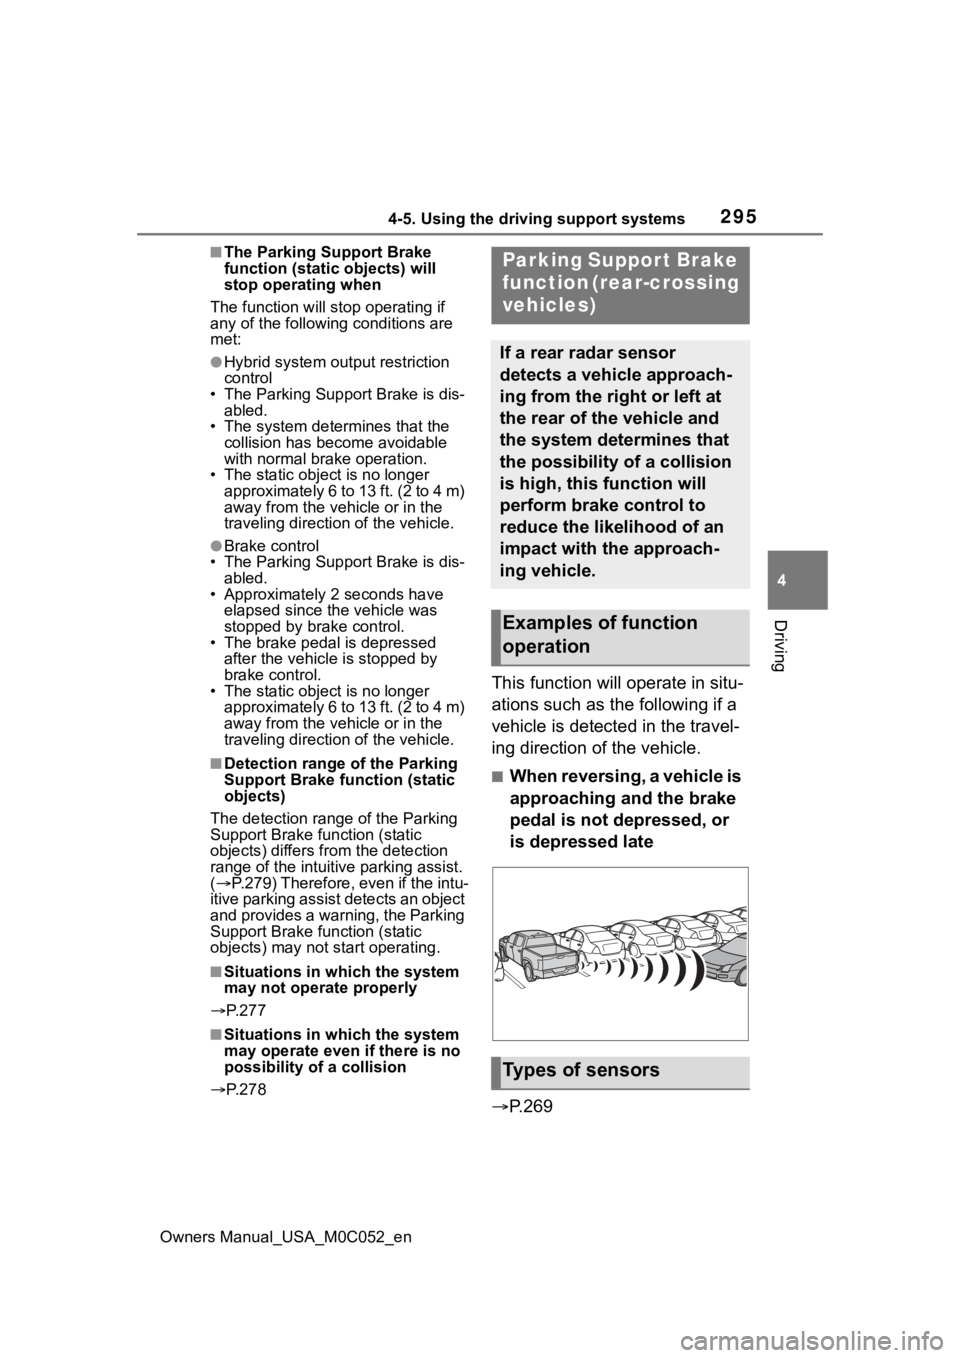
This function will operate in situ-
ations such as the following if a
vehicle is detected in the travel-
ing direction of the vehicle.
■When reversing, a vehicle is
approaching and the brake
pedal is not depressed, or
is depressed late
P.269
Parking Support Brake
function (rear-crossing
vehicles)
If a rear radar sensor
detects a vehicle approach-
ing from the right or left at
the rear of the vehicle and
the system determines that
the possibility of a collision
is high, this function will
perform brake control to
reduce the likelihood of an
impact with the approach-
ing vehicle.
Examples of function
operation
Types of sensors
Page 296 of 618
2964-5. Using the driving support systems
Owners Manual_USA_M0C052_en
■The Parking Support Brake
function (rear-crossing vehi-
cles) will operate when
The function will operate when the
PKSB OFF indicator is not illumi-
nated or flashing ( P.89, 504) and
all of the followin g conditions are
met:
●Hybrid system output restriction
control
• The Parking Support Brake is enabled.
• The vehicle speed is approxi- mately 9 mph (15 km/h) or less.
• Vehicles are approaching from the
right or left at th e rear of the vehi-
cle at a traveling speed of approx- imately 5 mph (8 km/h) or more.
• The shift position is in R.
• The Parking Support Brake deter- mines that a stronger than normal
brake operation is necessary to
avoid a collision with an approach-
ing vehicle.
●Brake control
• Hybrid system output restriction control is operating.
• The Parking Support Brake deter-
mines that an emergency brake
operation is necessary to avoid a
collision with an approaching vehi-
cle.
■The Parking Support Brake
function (rear-crossing vehi-
cles) will stop operating when
The function will stop operating if
any of the following conditions are
met:
●Hybrid system output restriction
control
• The Parking Support Brake is dis- abled.
• The collision becomes avoidable with normal brake operation.
• A vehicle is no longer approaching
from the right or left at the rear of
the vehicle.
●Brake control
• The Parking Support Brake is dis- abled.
• Approximately 2 seconds have elapsed since the vehicle was
stopped by brake control.
• The brake pedal is depressed after the vehicle is stopped by
brake control.
• A vehicle is no longer approaching from the right or left at the rear of
the vehicle.
■Detection area of the Parking
Support Brake function (rear-
crossing vehicles)
The detection area of the Parking
Support Brake function (rear-cross-
ing vehicles) differs from the detec-
tion area of the RCTA function
( P.283). Therefor e, even if the
RCTA function detects a vehicle and
WARNING
■To ensure the system can
operate properly
Observe the following precautions
regarding the rear radar sensors
( P.268). Failure to do so may
cause a sensor to not operate
properly, and may cause an acci-
dent.
●Do not modify, disassemble or
paint the sensors.
●Do not replace a rear radar sen-
sor with a part o ther than a gen-
uine part.
●Do not damage the rear radar
sensors, and always keep the
radar sensors and their sur-
rounding area on the bumper
clean.
●If the area around a rear radar
sensor is subjected to an
impact, the system may not
operate properly due to a sen-
sor malfunction. Have the vehi-
cle inspected by your Toyota
dealer.
●Observe the rear radar sensor
handling precautions. ( P.268)
Page 297 of 618
2974-5. Using the driving support systems
Owners Manual_USA_M0C052_en
4
Driving
provides an alert, the Parking Sup-
port Brake function (rear-crossing
vehicles) may not start operating.
■Situations in which the system
may not operate properly
P. 2 8 5
■Situations in which the system
may operate even if there is no
possibility of a collision
P. 2 8 6
*: If equipped
●The screen illust rations used in
this text are intended as exam-
ples, and may di ffer from the
image that is actually displayed on
the screen.
The parking assist monitor is a
supplemental device intended to
assist the driver when backing
up. When backing up, be sure to
visually check all around the
vehicle both directly and using
the mirrors before proceeding. If
you do not, you may hit another
vehicle, and could possibly
cause an accident.
Pay attention to the following
precautions when using the
parking assist monitor.
Toyota parking assist
monitor*
The parking assist monitor
assists the driver by dis-
playing an image of the
view behind the vehicle
while backing up, for exam-
ple while parking.
When the display is
changed to the wide rear
view mode, a wider lateral
view behind the vehicle will
be displayed.
Driving precautions
Page 298 of 618
2984-5. Using the driving support systems
Owners Manual_USA_M0C052_en
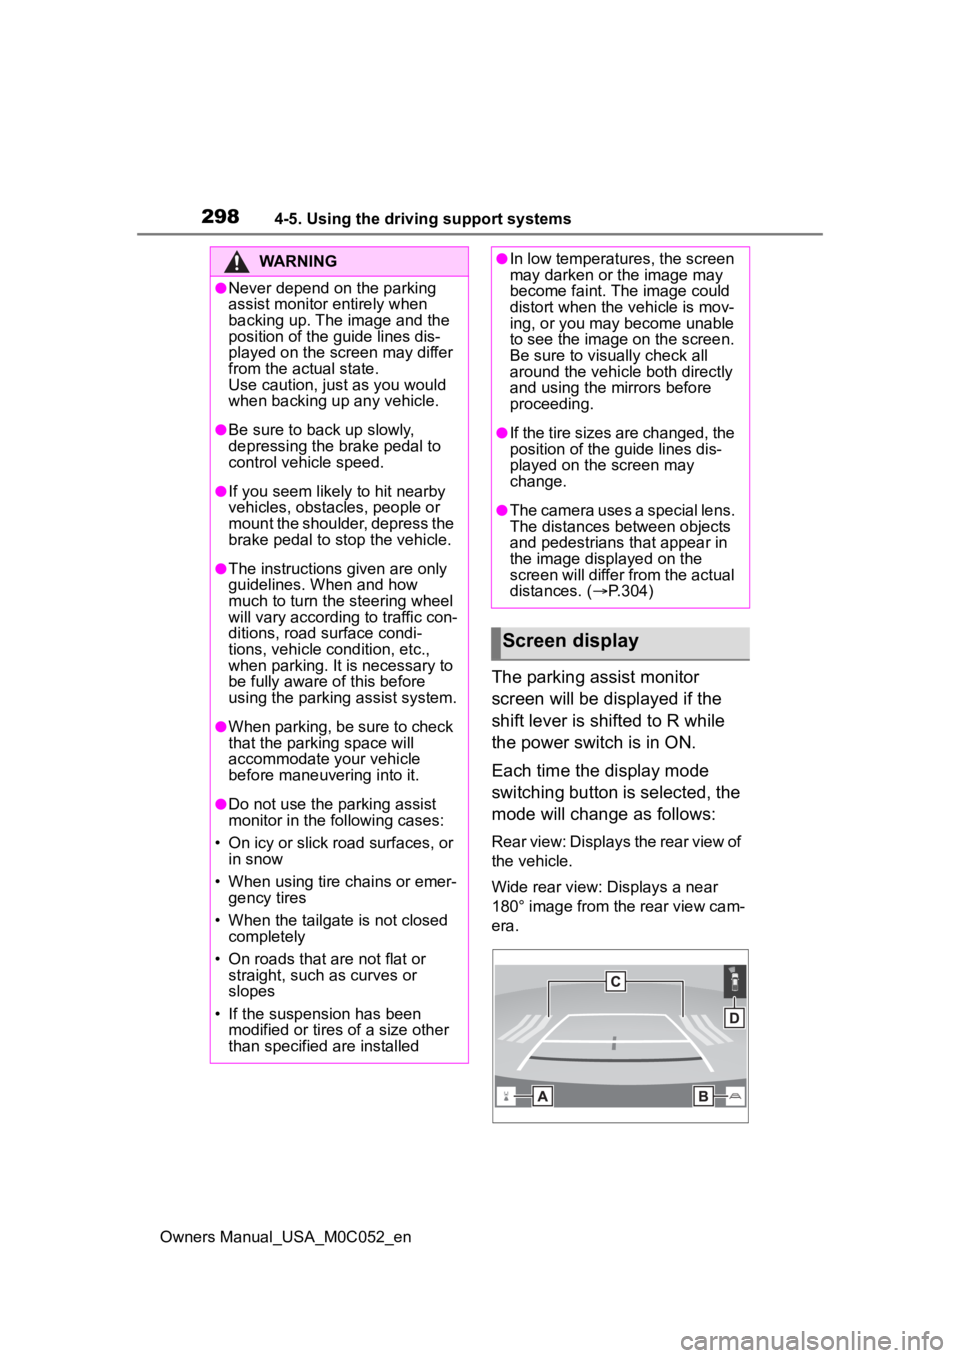
The parking assist monitor
screen will be displayed if the
shift lever is shifted to R while
the power switch is in ON.
Each time the display mode
switching button is selected, the
mode will change as follows:
Rear view: Displays the rear view of
the vehicle.
Wide rear view: Displays a near
180° image from the rear view cam-
era.
WARNING
●Never depend on the parking
assist monitor entirely when
backing up. The image and the
position of the guide lines dis-
played on the screen may differ
from the actual state.
Use caution, just as you would
when backing up any vehicle.
●Be sure to back up slowly,
depressing the brake pedal to
control vehicle speed.
●If you seem likely to hit nearby
vehicles, obstacles, people or
mount the shoulder, depress the
brake pedal to stop the vehicle.
●The instructions given are only
guidelines. When and how
much to turn the steering wheel
will vary according to traffic con-
ditions, road surface condi-
tions, vehicle condition, etc.,
when parking. It is necessary to
be fully aware of this before
using the parking assist system.
●When parking, be sure to check
that the par king space will
accommodate your vehicle
before maneuveri ng into it.
●Do not use the parking assist
monitor in the following cases:
• On icy or slick road surfaces, or in snow
• When using tire chains or emer- gency tires
• When the tailgate is not closed completely
• On roads that are not flat or straight, such as curves or
slopes
• If the suspension has been modified or tires of a size other
than specified are installed
●In low temperatures, the screen
may darken or the image may
become faint. The image could
distort when the vehicle is mov-
ing, or you may become unable
to see the image on the screen.
Be sure to visually check all
around the vehicle both directly
and using the mirrors before
proceeding.
●If the tire sizes are changed, the
position of the guide lines dis-
played on the screen may
change.
●The camera uses a special lens.
The distances between objects
and pedestrians that appear in
the image displayed on the
screen will differ from the actual
distances. ( P.304)
Screen display
Page 360 of 618
3604-5. Using the driving support systems
Owners Manual_USA_M0C052_en
*: If equipped
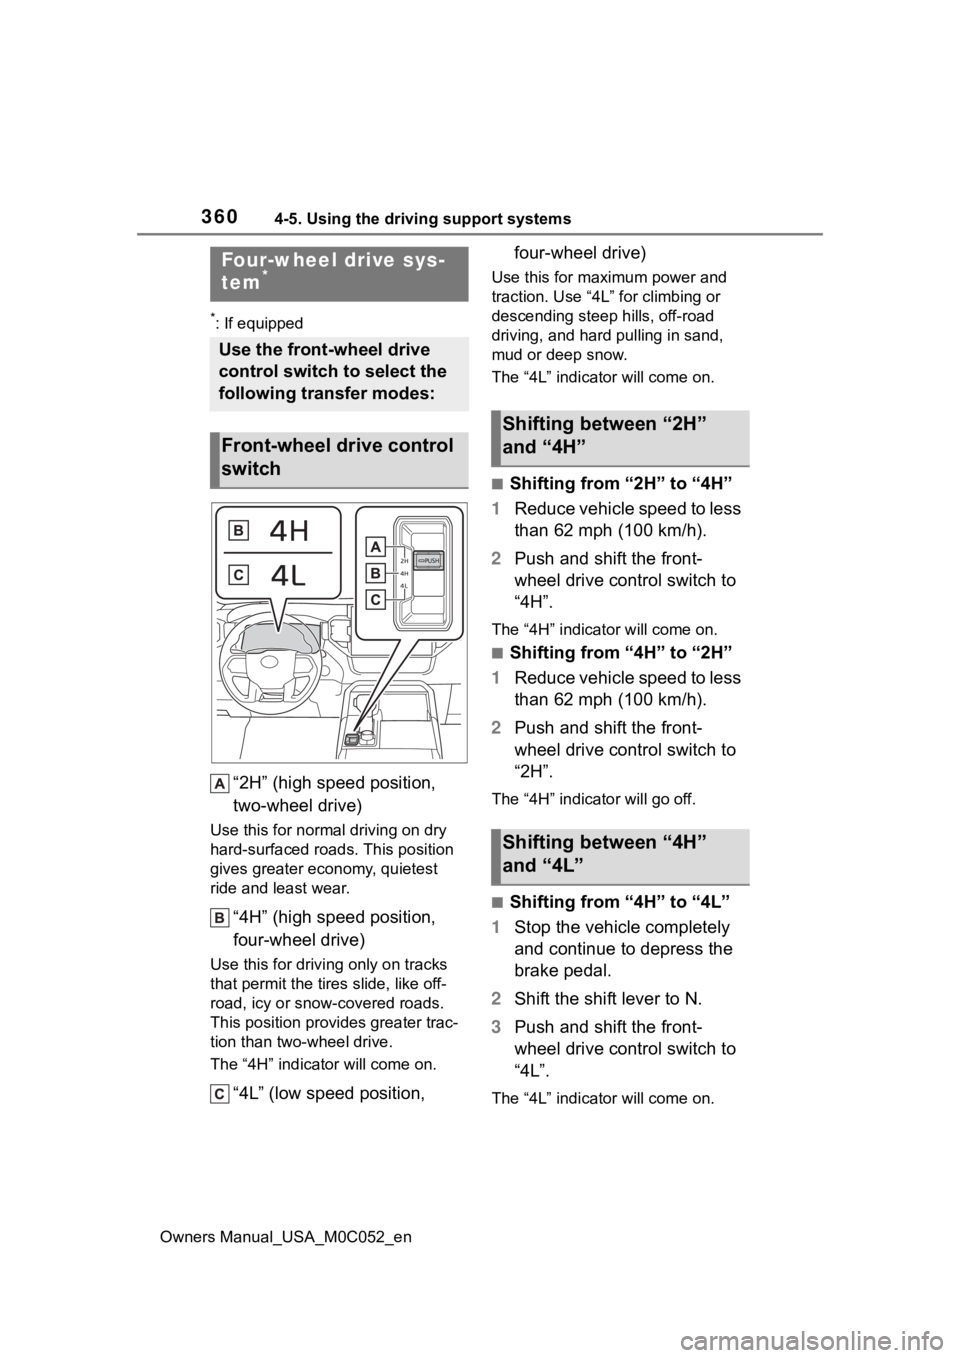
“2H” (high speed position,
two-wheel drive)
Use this for normal driving on dry
hard-surfaced roads. This position
gives greater economy, quietest
ride and least wear.
“4H” (high speed position,
four-wheel drive)
Use this for drivi ng only on tracks
that permit the tires slide, like off-
road, icy or snow-covered roads.
This position prov ides greater trac-
tion than two-wheel drive.
The “4H” indicat or will come on.
“4L” (low speed position, four-wheel drive)
Use this for maximum power and
traction. Use “4L” for climbing or
descending steep hills, off-road
driving, and hard
pulling in sand,
mud or deep snow.
The “4L” indicat or will come on.
■Shifting from “2H” to “4H”
1 Reduce vehicle speed to less
than 62 mph (100 km/h).
2 Push and shift the front-
wheel drive control switch to
“4H”.
The “4H” indicat or will come on.
■Shifting from “4H” to “2H”
1 Reduce vehicle speed to less
than 62 mph (100 km/h).
2 Push and shift the front-
wheel drive control switch to
“2H”.
The “4H” indicator will go off.
■Shifting from “4H” to “4L”
1 Stop the vehicle completely
and continue to depress the
brake pedal.
2 Shift the shift lever to N.
3 Push and shift the front-
wheel drive control switch to
“4L”.
The “4L” indicat or will come on.
Four-wheel drive sys-
tem*
Use the front-wheel drive
control switch to select the
following transfer modes:
Front-wheel drive control
switch
Shifting between “2H”
and “4H”
Shifting between “4H”
and “4L”
Page 361 of 618
3614-5. Using the driving support systems
Owners Manual_USA_M0C052_en
4
Driving
■Shifting from “4L” to “4H”
1 Stop the vehicle completely
and continue to depress the
brake pedal.
2 Shift the shift lever to N.
3 Push and shift the front-
wheel drive control switch to
“4H”.
The “4L” indicator will go off.
■When the front-wheel drive con-
trol switch is shifted to “4L”
VSC is automatically turned off.
■If the “4H” indicator flashes
The transfer mode may not suc-
cessfully change. Drive straight
ahead while accelerating or deceler-
ating, or drive in reverse.
■If the “4H” indicator is ON and
the “4L” indicator continues to
flash
A message will be displayed in the
multi-information display. Follow a
message, shift the shift lever to D or
R and drive the vehicle slowly, then
stop.
■If the “4H” indicator continues
to flash and the “4L” indicator
is ON
A message will be displayed in the
multi-information display. Follow a
message, shift the shift lever to D or
R and drive the vehicle slowly, then
stop.
■If the “4H” indicator is ON and
the “4L” indicator continues to
flash and a buzzer sounds
The shift lever is not in N and/or the
vehicle is moving . Stop the vehicle
completely, shift th e shift lever to N
and make sure that the indicator
stops flashing.
■If the “4H” indicator continues
to flash and the “4L” indicator
is ON and a buzzer sounds
The shift lever is not in N and/or the
vehicle is moving. Stop the vehicle
completely, shift the shift lever to N
and make sure that the indicator
stops flashing
■If the “4H” and “4L” indicator
flashes rapidly
There may be a malfunction in the
four-wheel drive system. Have the
vehicle inspected by your Toyota
dealer immediately.
■Four-wheel drive usage fre-
quency
You should drive in four-wheel drive
for at least 10 miles (16 km) each
month. This will assure that the front
drive components are lubricated.
WARNING
■Shifting the front-wheel drive
control switch from “2H” to
“4H” while driving
Never operate the front-wheel
drive control switch if the wheels
are slipping. Stop the slipping or
spinning before shifting.
■When the vehicle is parked
If the shift lever is moved before
the “4L” indicator turns on/off, the
transfer mode may not be shifted
completely. The transfer mode
disengages both the front and
rear driveshafts from the power-
train and allows the vehicle to
move regardless of the shift posi-
tion. (At this time, the indicator
blinks and the buzzer sounds.)
Therefore, the vehicle is free to
roll even if the automatic trans-
mission is in P. You or someone
else could be seriously injured.
You must complete the shifting of
the transfer mode before placing
transmission in P.
Page 362 of 618
3624-5. Using the driving support systems
Owners Manual_USA_M0C052_en
*: If equipped
The system can be used only on
2WD models. The system is
activated when driving at a
speed under 62 mph (100
km/h). The AUTO LSD system
will be activated with the follow-
ing two procedures.
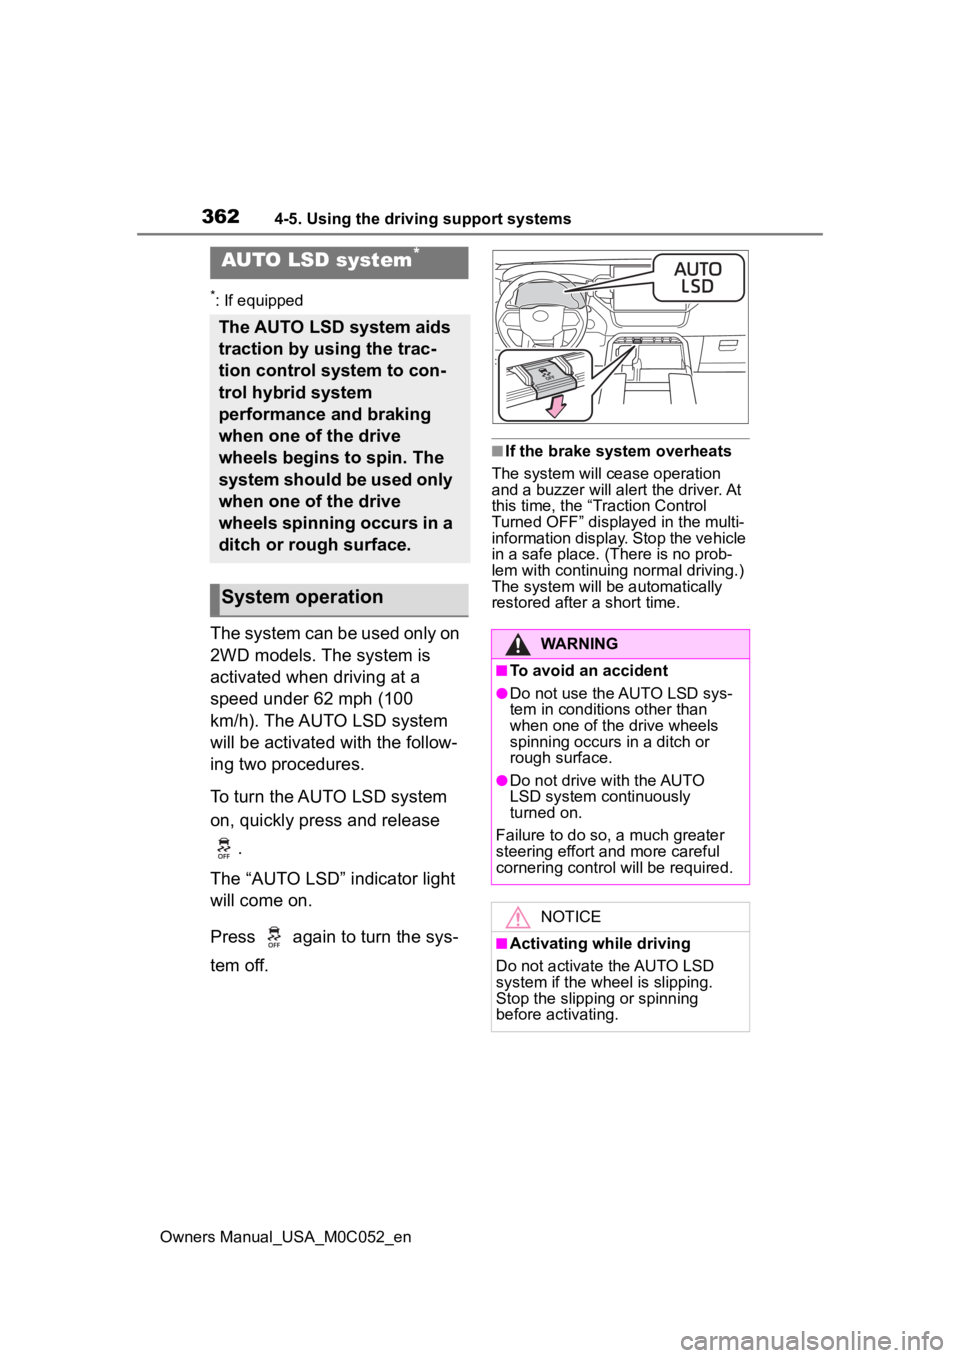
To turn the AUTO LSD system
on, quickly press and release .
The “AUTO LSD” indicator light
will come on.
Press again to turn the sys-
tem off.
■If the brake system overheats
The system will cease operation
and a buzzer will alert the driver. At
this time, the “T raction Control
Turned OFF” displayed in the multi-
information display. Stop the vehicle
in a safe place. (There is no prob-
lem with continuing normal driving.)
The system will be automatically
restored after a short time.
AUTO LSD system*
The AUTO LSD system aids
traction by using the trac-
tion control system to con-
trol hybrid system
performance and braking
when one of the drive
wheels begins to spin. The
system should be used only
when one of the drive
wheels spinning occurs in a
ditch or rough surface.
System operation
WARNING
■To avoid an accident
●Do not use the AUTO LSD sys-
tem in conditions other than
when one of the drive wheels
spinning occurs in a ditch or
rough surface.
●Do not drive with the AUTO
LSD system continuously
turned on.
Failure to do so, a much greater
steering effort an d more careful
cornering control will be required.
NOTICE
■Activating while driving
Do not activate the AUTO LSD
system if the wh eel is slipping.
Stop the slipping or spinning
before activating.
Page 363 of 618
3634-5. Using the driving support systems
Owners Manual_USA_M0C052_en
4
Driving
*: If equipped
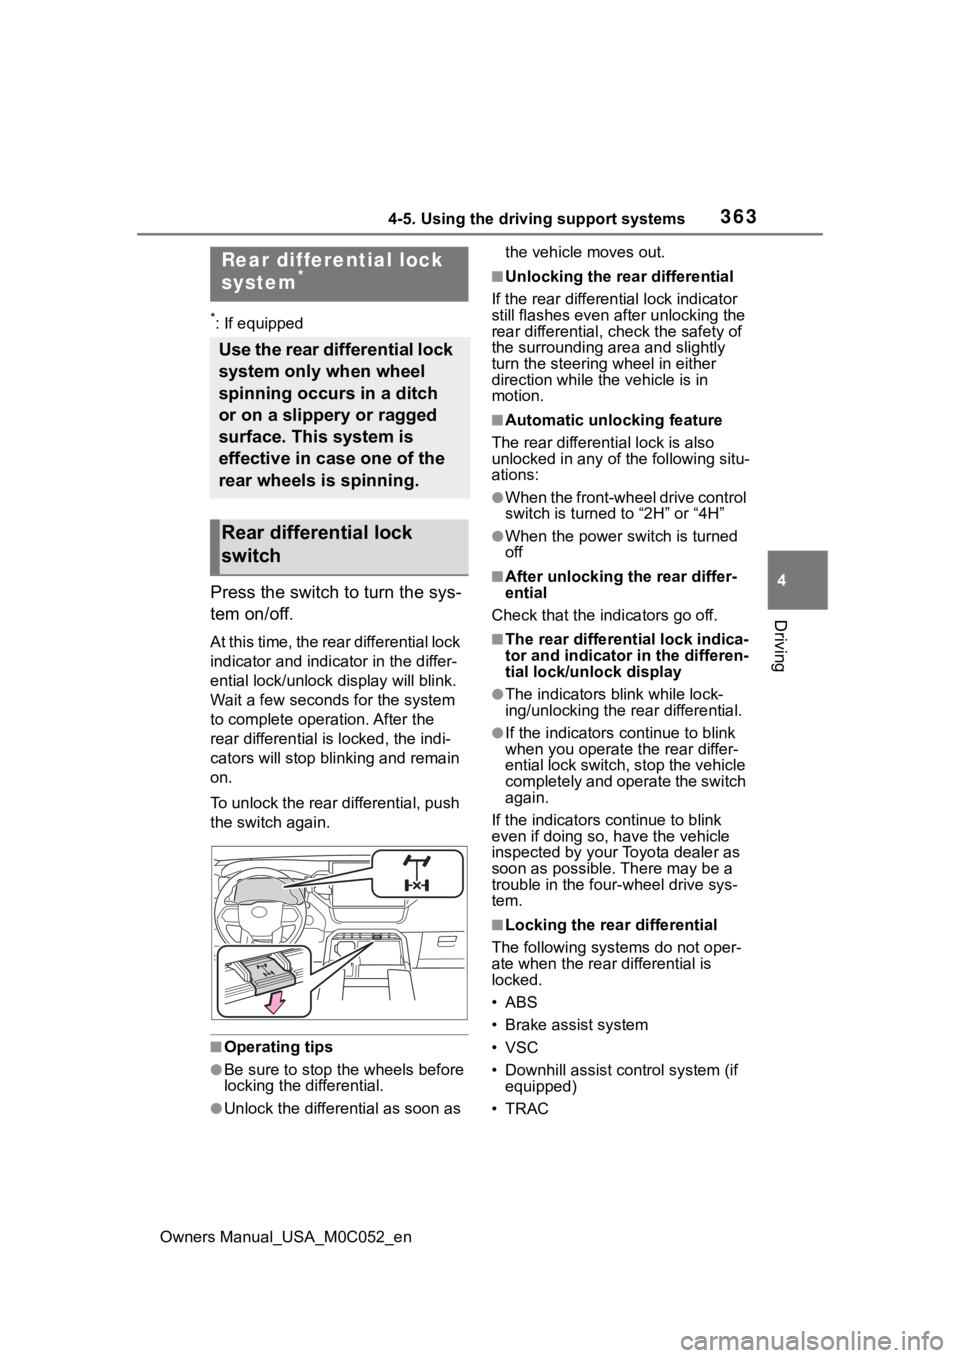
Press the switch to turn the sys-
tem on/off.
At this time, the rear differential lock
indicator and indicator in the differ-
ential lock/unlock display will blink.
Wait a few seconds for the system
to complete operation. After the
rear different ial is locked, the indi-
cators will stop blinking and remain
on.
To unlock the rear differential, push
the switch again.
■Operating tips
●Be sure to stop the wheels before
locking the differential.
●Unlock the differential as soon as the vehicle moves out.
■Unlocking the rear differential
If the rear different ial lock indicator
still flashes even a fter unlocking the
rear differential, check the safety of
the surrounding area and slightly
turn the steering wheel in either
direction while the vehicle is in
motion.
■Automatic unlocking feature
The rear different ial lock is also
unlocked in any of the following situ-
ations:
●When the front-wheel drive control
switch is turned to “2H” or “4H”
●When the power switch is turned
off
■After unlocking the rear differ-
ential
Check that the indicators go off.
■The rear different ial lock indica-
tor and indicator in the differen-
tial lock/unlock display
●The indicators blink while lock-
ing/unlocking the rear differential.
●If the indicators c ontinue to blink
when you operate the rear differ-
ential lock switch, stop the vehicle
completely and operate the switch
again.
If the indicators continue to blink
even if doing so, have the vehicle
inspected by your Toyota dealer as
soon as possible. There may be a
trouble in the four-wheel drive sys-
tem.
■Locking the rear differential
The following systems do not oper-
ate when the rear differential is
locked.
• ABS
• Brake assist system
• VSC
• Downhill assist control system (if equipped)
•TRAC
Rear differential lock
system*
Use the rear differential lock
system only when wheel
spinning occurs in a ditch
or on a slippery or ragged
surface. This system is
effective in case one of the
rear wheels is spinning.
Rear differential lock
switch