2023 TOYOTA TUNDRA HYBRID glove box
[x] Cancel search: glove boxPage 123 of 618
1233-2. Opening, closing and locking the doors and tailgate
Owners Manual_USA_M0C052_en
3
Before driving
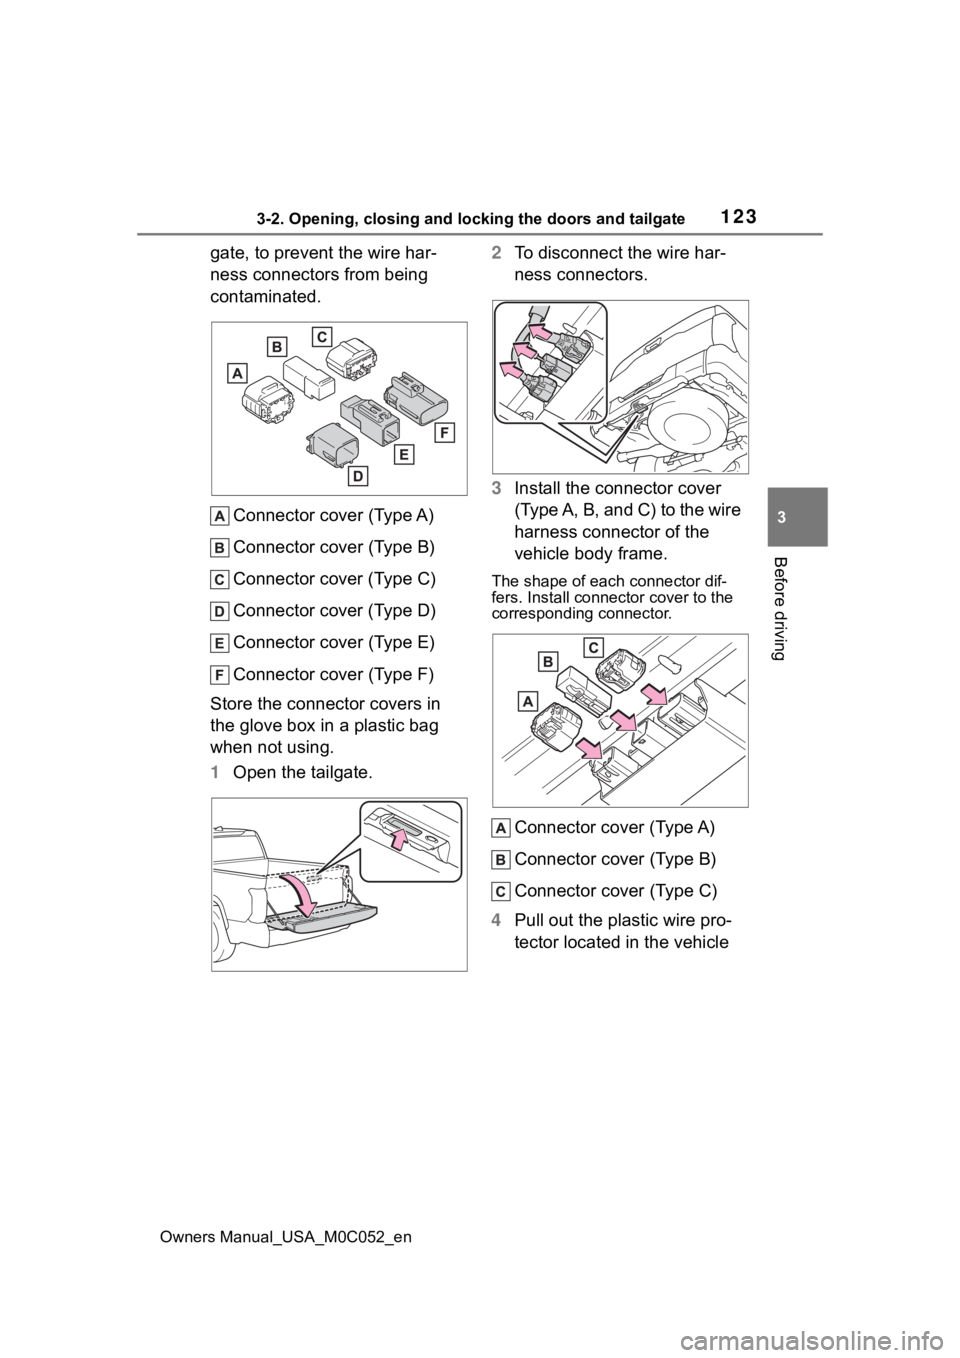
gate, to prevent the wire har-
ness connectors from being
contaminated. Connector cover (Type A)
Connector cover (Type B)
Connector cover (Type C)
Connector cover (Type D)
Connector cover (Type E)
Connector cover (Type F)
Store the connector covers in
the glove box in a plastic bag
when not using.
1 Open the tailgate. 2
To disconnect the wire har-
ness connectors.
3 Install the connector cover
(Type A, B, and C) to the wire
harness connector of the
vehicle body frame.
The shape of each connector dif-
fers. Install connec tor cover to the
corresponding connector.
Connector cover (Type A)
Connector cover (Type B)
Connector cover (Type C)
4 Pull out the plastic wire pro-
tector located in the vehicle
Page 130 of 618

1303-2. Opening, closing and locking the doors and tailgate
Owners Manual_USA_M0C052_en
■Conditions affecting operation
The smart key system uses weak
radio waves. In the following situa-
tions, the communication between
the electronic key and the vehicle
may be affected, preventing the
smart key system, wireless remote
control and immobilizer system from
operating properly. (Ways of coping:
P.527)
●When the electronic key battery is
depleted
●Near a TV tower, electric power
plant, gas station , radio station,
large display, airpo rt or other facil-
ity that generates strong radio
waves or electrical noise
●When carrying a portable radio,
cellular phone, cordless phone or
other wireless communication
device
●When the electronic key is in con-
tact with, or is covered by the fol-
lowing metallic objects
• Cards to which al uminum foil is
attached
• Cigarette boxes that have alumi- num foil inside
• Metallic wallets or bags
• Coins
• Hand warmers made of metal
• Media such as CDs and DVDs
●When other wireless keys (that
emit radio waves) are being used
nearby
●When carrying the electronic key
together with the following devices
that emit radio waves
• Another electronic key or a wire- less key that emits radio waves
• Personal computers or personal
digital assistants (PDAs)
• Digital audio players
• Portable game systems
●If window tint with a metallic con-
tent or metallic objects are
attached to the rear window
●When the electronic key is placed
near a battery charger or elec-
tronic devices
●When the vehicle is parked in a
pay parking spot where radio
waves are emitted.
■Note for the entry function
●Even when the electronic key is
within the effective range (detec-
tion areas), the system may not
operate properly in the following
cases:
• The electronic key is too close to the window or outside door han-
dle, near the ground, or in a high
place when the doors are locked
or unlocked.
• The electronic key is near the
ground or in a high place, or too
close to the center of the rear
bumper.
• The electronic key is on the instru- ment panel, or floor, or in the door
pockets or glove box when the
hybrid system is started or power
switch modes are changed.
●Do not leave the electronic key on
top of the instrument panel or near
the door pockets when exiting the
vehicle. Depending on the radio
wave reception conditions, it may
be detected by the antenna out-
side the cabin and the doors will
become lockable from the outside,
possibly trapping the electronic
key inside the vehicle.
●As long as the electronic key is
within the effective range, the
doors may be locked or unlocked
by anyone. However, only the
doors detecting the electronic key
can be used to unlock the vehicle.
●Even if the electro nic key is not
inside the vehicle, it may be possi-
ble to start the hybrid system if the
electronic key is near the window.
●The doors may unlock or lock if a
large amount of water splashes on
the door handle, such as in the
rain or in a car wash, when the
electronic key is within the effec-
tive range. (The doors will auto-
matically be locked after
approximately 60 seconds if the
Page 175 of 618
1754-1. Before driving
Owners Manual_USA_M0C052_en
4
Driving
WARNING
●If the vehicle is stopped on an
incline, in order to prevent acci-
dents caused by the vehicle roll-
ing forward or backward, always
depress the brake pedal and
securely apply the parking
brake as needed.
●Avoid revving or racing the
engine.
Running the engine at high
speed while the vehicle is
stopped may cause the exhaust
system to overheat, which could
result in a fire if combustible
material is nearby.
■When the vehicle is parked
●Do not leave glasses, cigarette
lighters, spray cans, or soft
drink cans in the vehicle when it
is in the sun.
Doing so may result in the fol-
lowing:
• Gas may leak from a cigarette lighter or spray can, and may
lead to a fire.
• The temperature inside the vehicle may cause the plastic
lenses and plastic material of
glasses to deform or crack.
• Soft drink cans may fracture, causing the contents to spray
over the interior of the vehicle,
and may also caus e a short cir-
cuit in the vehicle’s electrical
components.
●Do not leave cigarette lighters in
the vehicle. If a cigarette lighter
is in a place such as the glove
box or on the floor, it may be lit
accidentally when luggage is
loaded or the seat is adjusted,
causing a fire.
●Do not attach adhesive discs to
the windshield or windows. Do
not place containers such as air
fresheners on the instrument
panel or dashboard. Adhesive
discs or containers may act as
lenses, causing a fire in the
vehicle.
●Do not leave a door or window
open if the curved glass is
coated with a metallized film
such as a silver-colored one.
Reflected sunlight may cause
the glass to act a s a lens, caus-
ing a fire.
●Always apply the parking brake,
shift the shift lever to P, stop the
hybrid system and lock the vehi-
cle. Do not leave the vehicle
unattended while the hybrid
system is operating.
If the vehicle is parked with the
shift lever in P but the parking
brake is not set, the vehicle may
start to move, possibly leading
to an accident.
●Do not touch the exhaust pipes
while the “READY” indicator is
illuminated or immediately after
turning the hybrid system off.
Doing so may cause burns.
●4WD models: If the shift lever is
moved before the “4L” indicator
turns on/off, the transfer mode
may not be shifted completely.
The transfer mode disengages
both the front and rear drivesh-
afts from the p owertrain and
allows the vehicle to move
regardless of the shift position.
(At this time, the indicator blinks
and the buzzer sounds.)
Therefore, the vehicle is free to
roll even if the automatic trans-
mission is in P. You or someone
else could be seriously injured.
You must complete the shifting
of the transfer mode. ( P.361)
Page 408 of 618
4105-2. Using the interior lights
Owners Manual_USA_M0C052_en
5-2.Using the interior lights
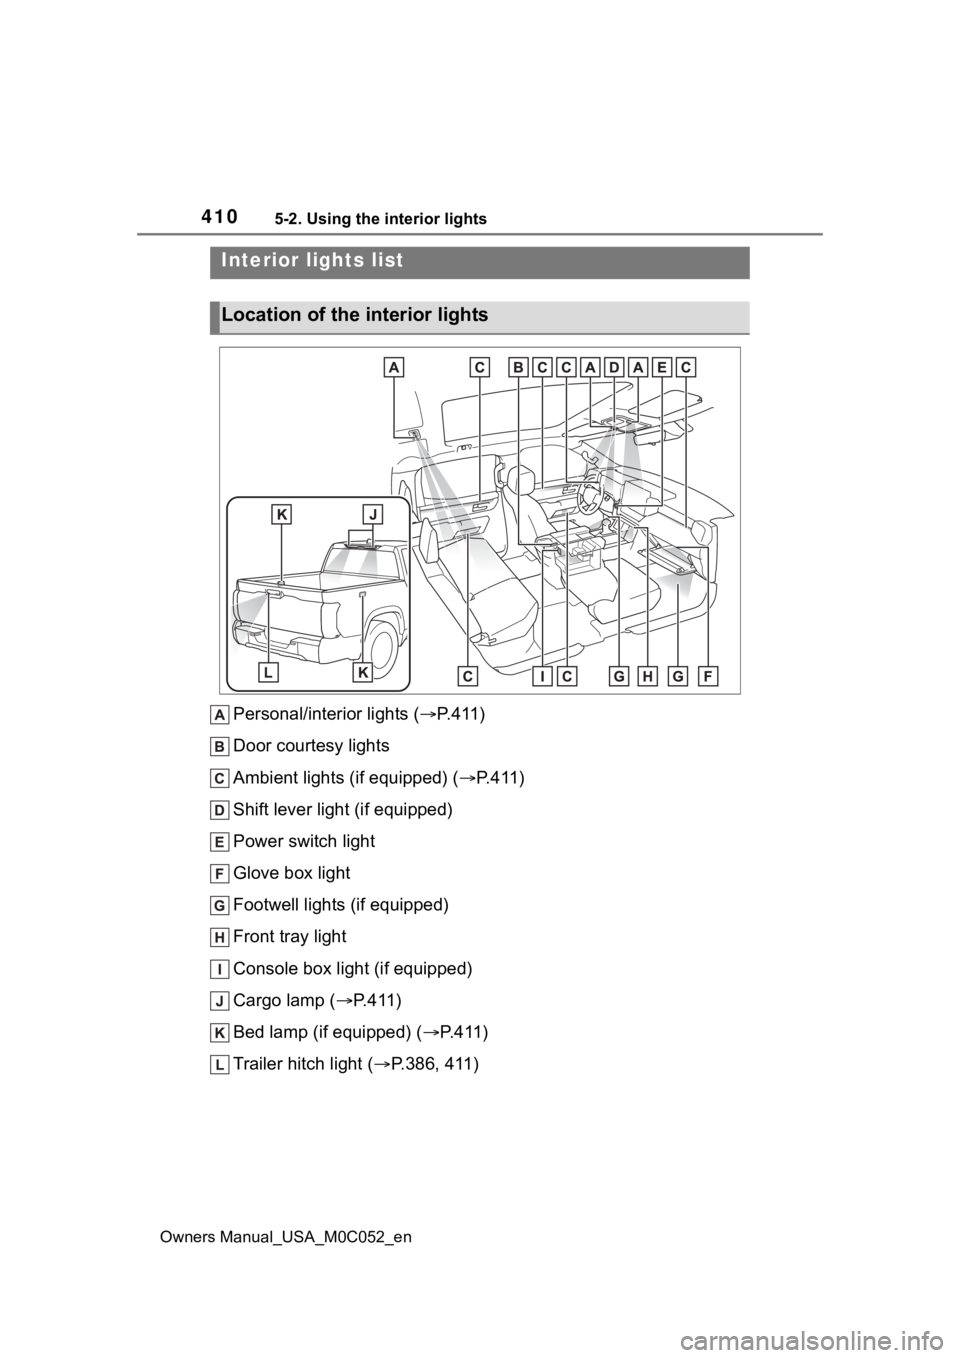
Personal/interior lights (P.411)
Door courtesy lights
Ambient lights (if equipped) ( P.411)
Shift lever light (if equipped)
Power switch light
Glove box light
Footwell lights (if equipped)
Front tray light
Console box light (if equipped)
Cargo lamp ( P.411)
Bed lamp (if equipped) ( P.411)
Trailer hitch light ( P.386, 411)
Interior lights list
Location of the i nterior lights
Page 411 of 618
4135-3. Using the storage features
Owners Manual_USA_M0C052_en
5
Interior features
5-3.Using the storage features
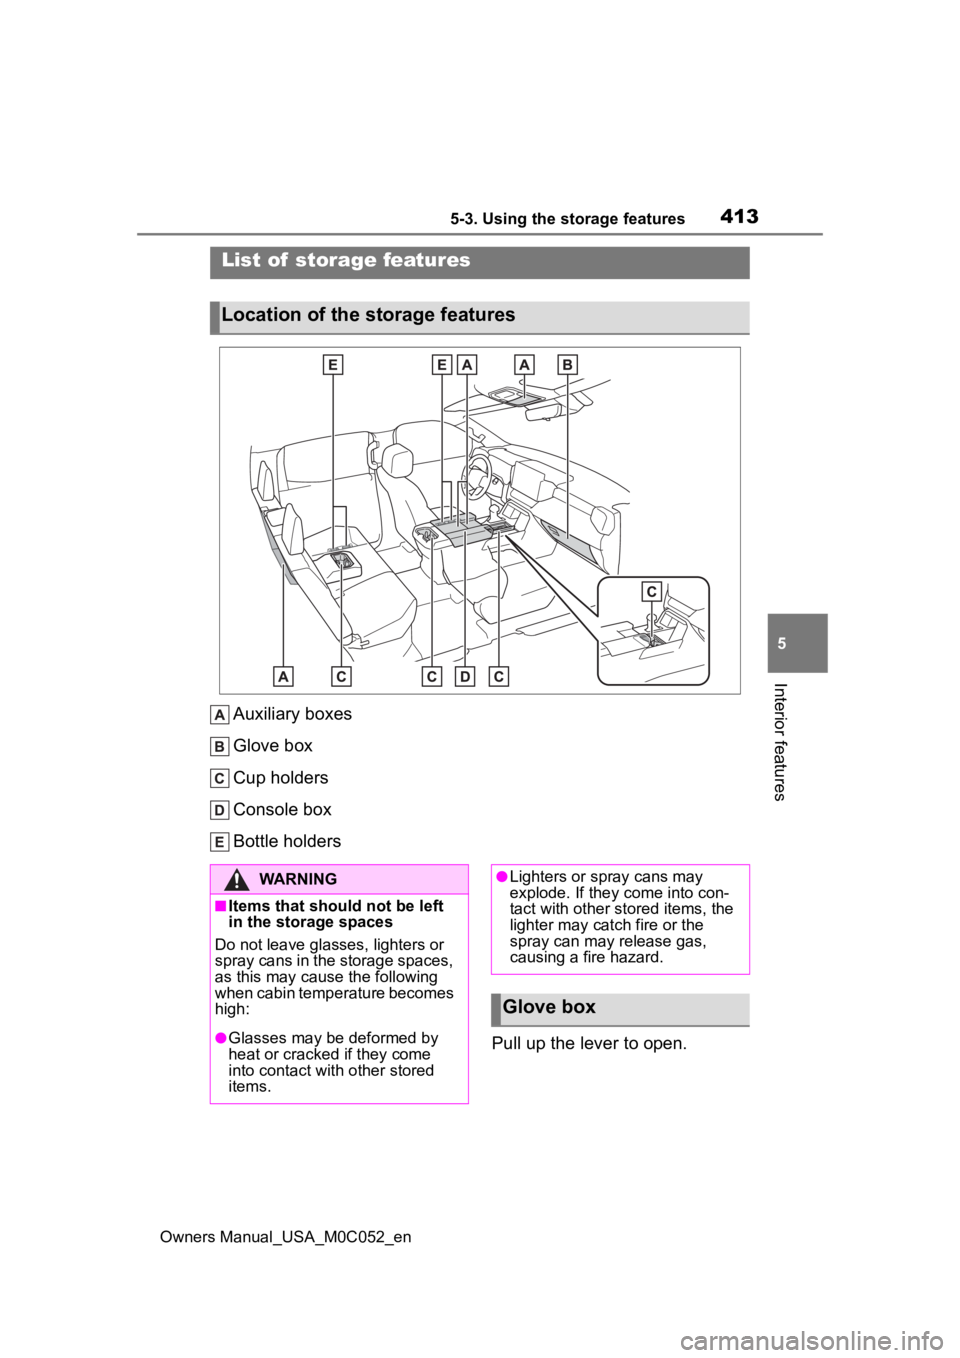
Auxiliary boxes
Glove box
Cup holders
Console box
Bottle holders Pull up the lever to open.
List of storage features
Location of the storage features
WARNING
■Items that should not be left
in the storage spaces
Do not leave glasses, lighters or
spray cans in the storage spaces,
as this may cau se the following
when cabin temperature becomes
high:
●Glasses may be deformed by
heat or cracked if they come
into contact with other stored
items.
●Lighters or spray cans may
explode. If they come into con-
tact with other stored items, the
lighter may catch fire or the
spray can may release gas,
causing a fire hazard.
Glove box
Page 412 of 618
4145-3. Using the storage features
Owners Manual_USA_M0C052_en
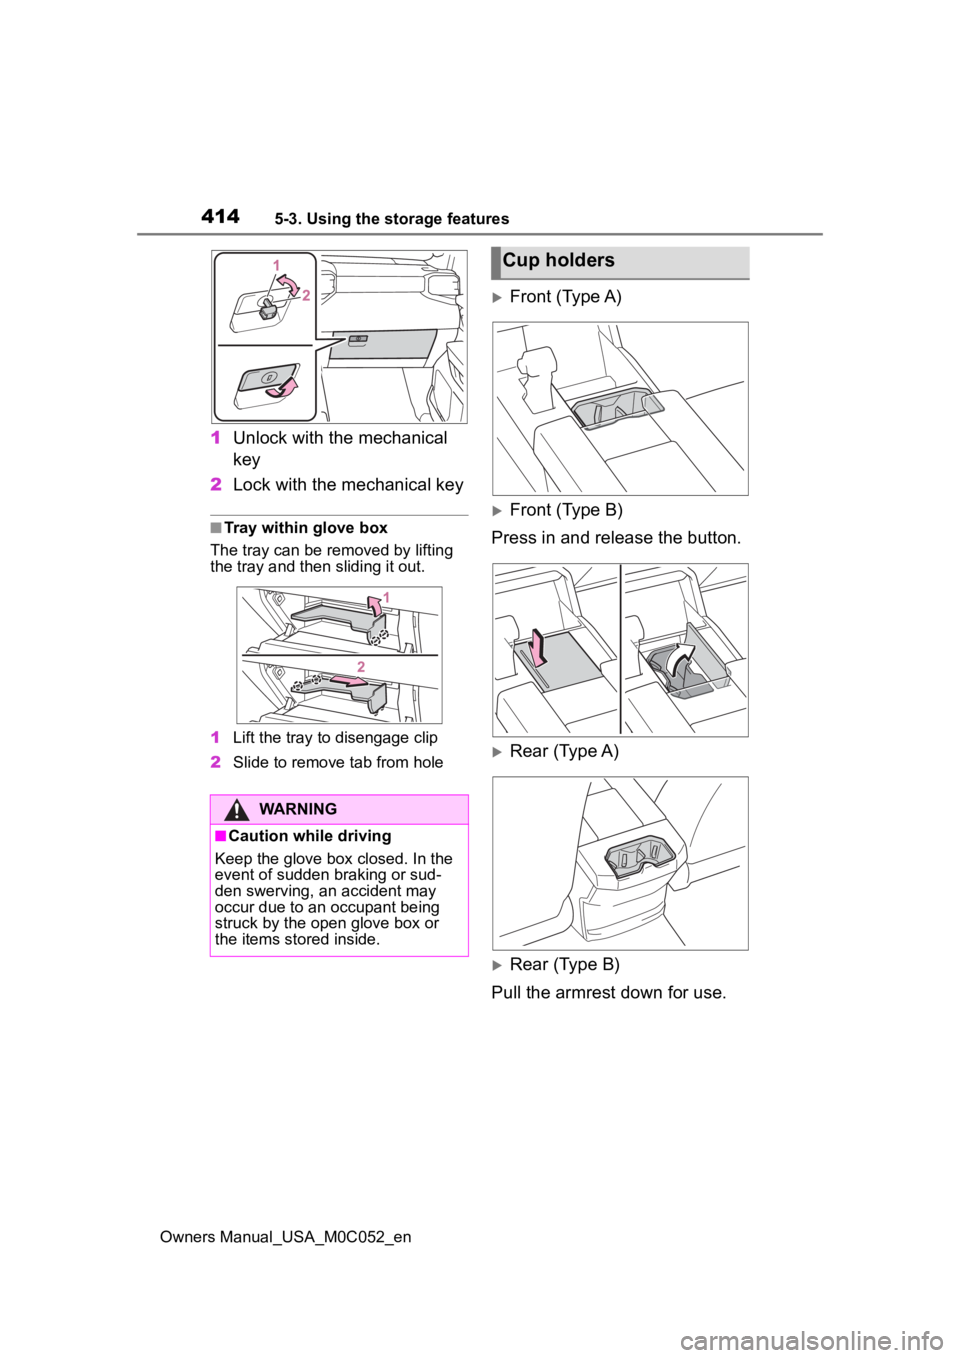
1Unlock with the mechanical
key
2 Lock with the mechanical key
■Tray within glove box
The tray can be removed by lifting
the tray and then sliding it out.
1 Lift the tray to disengage clip
2 Slide to remove tab from hole
Front (Type A)
Front (Type B)
Press in and release the button.
Rear (Type A)
Rear (Type B)
Pull the armrest down for use.
WARNING
■Caution while driving
Keep the glove box closed. In the
event of sudden braking or sud-
den swerving, an accident may
occur due to an occupant being
struck by the open glove box or
the items stored inside.
Cup holders
Page 477 of 618
4796-3. Do-it-yourself maintenance
Owners Manual_USA_M0C052_en
6
Maintenance and care
Use only Toyota wheel nuts
and wheel nut wrenches
designed for use with your
aluminum wheels.
When rotating, repairing or
changing your tires, check
that the wheel nuts are still
tight after driving 1000 miles
(1600 km).
Be careful not to damage the
aluminum wheels when using
tire chains.
Use only Toyota genuine bal-
ance weights or equivalent
and a plastic or rubber ham-
mer when balancing your
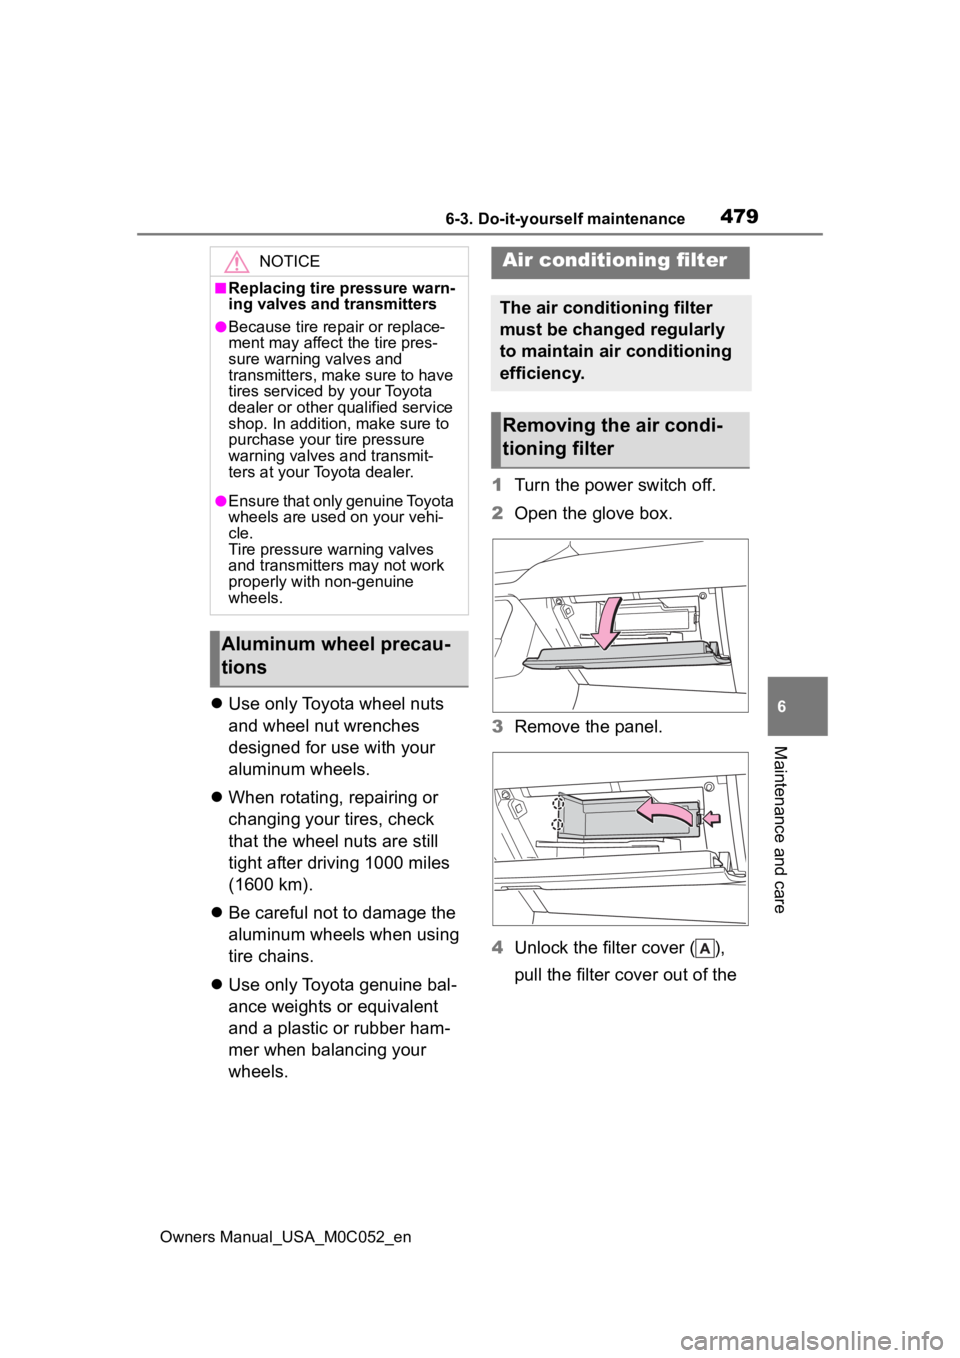
wheels. 1
Turn the power switch off.
2 Open the glove box.
3 Remove the panel.
4 Unlock the filter cover ( ),
pull the filter cover out of the
NOTICE
■Replacing tire pressure warn-
ing valves and transmitters
●Because tire repair or replace-
ment may affect the tire pres-
sure warning valves and
transmitters, make sure to have
tires serviced by your Toyota
dealer or other qualified service
shop. In addition, make sure to
purchase your tire pressure
warning valves and transmit-
ters at your Toyota dealer.
●Ensure that only genuine Toyota
wheels are used on your vehi-
cle.
Tire pressure warning valves
and transmitters may not work
properly with non-genuine
wheels.
Aluminum wheel precau-
tions
Air conditioning filter
The air conditioning filter
must be changed regularly
to maintain air conditioning
efficiency.
Removing the air condi-
tioning filter
Page 514 of 618
5167-2. Steps to take in an emergency
Owners Manual_USA_M0C052_en
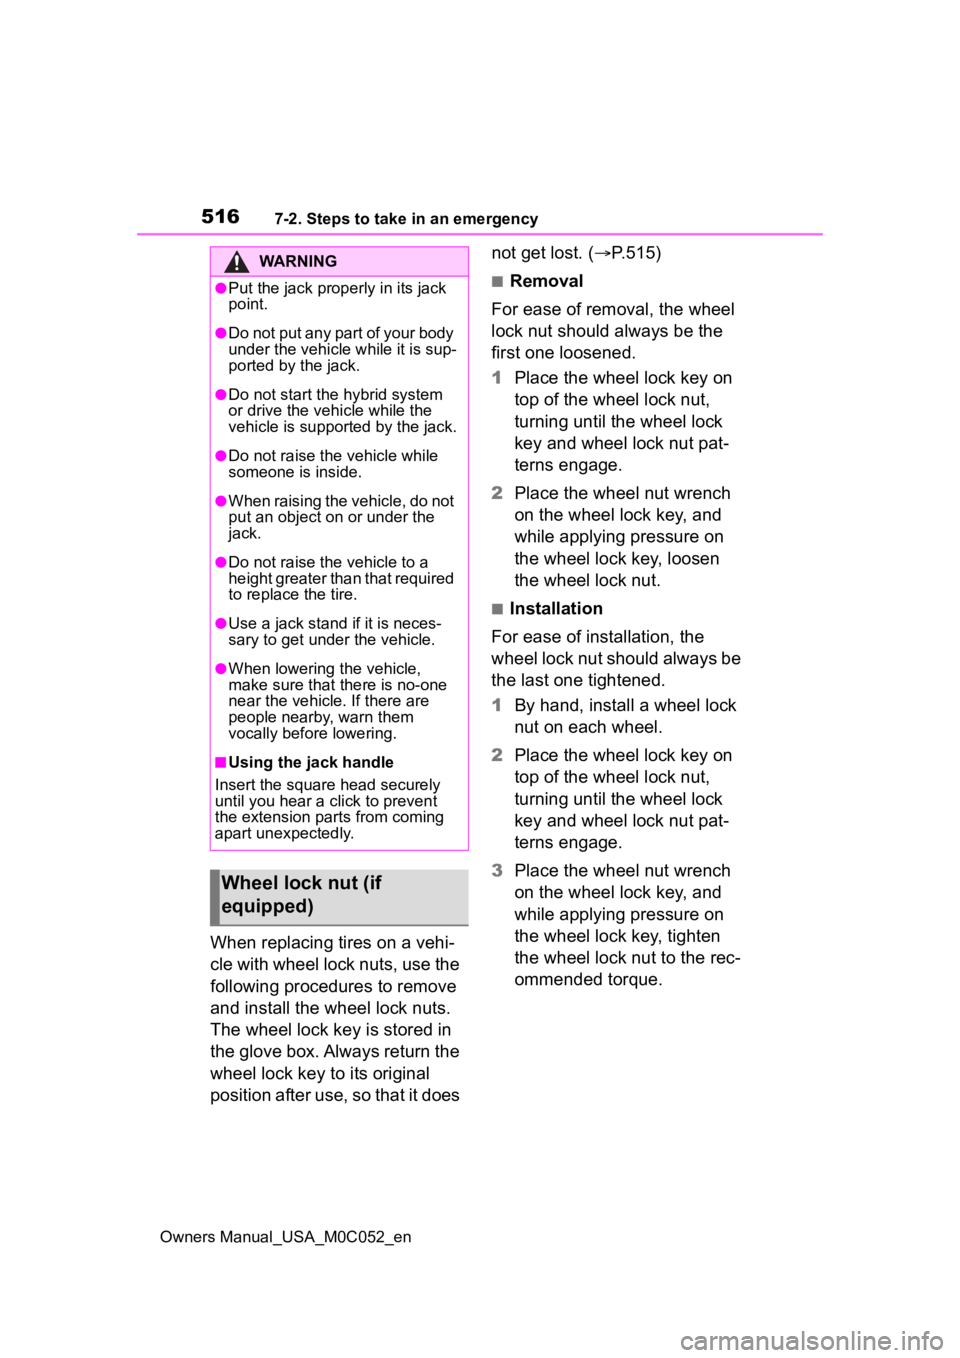
When replacing tires on a vehi-
cle with wheel lock nuts, use the
following procedures to remove
and install the wheel lock nuts.
The wheel lock key is stored in
the glove box. Always return the
wheel lock key to its original
position after use, so that it does not get lost. (
P.515)
■Removal
For ease of removal, the wheel
lock nut should always be the
first one loosened.
1 Place the wheel lock key on
top of the wheel lock nut,
turning until the wheel lock
key and wheel lock nut pat-
terns engage.
2 Place the wheel nut wrench
on the wheel lock key, and
while applying pressure on
the wheel lock key, loosen
the wheel lock nut.
■Installation
For ease of installation, the
wheel lock nut should always be
the last one tightened.
1 By hand, install a wheel lock
nut on each wheel.
2 Place the wheel lock key on
top of the wheel lock nut,
turning until the wheel lock
key and wheel lock nut pat-
terns engage.
3 Place the wheel nut wrench
on the wheel lock key, and
while applying pressure on
the wheel lock key, tighten
the wheel lock nut to the rec-
ommended torque.
WARNING
●Put the jack prope rly in its jack
point.
●Do not put any part of your body
under the vehicle while it is sup-
ported by the jack.
●Do not start the hybrid system
or drive the vehicle while the
vehicle is suppor ted by the jack.
●Do not raise the vehicle while
someone is inside.
●When raising the vehicle, do not
put an object on or under the
jack.
●Do not raise the vehicle to a
height greater than that required
to replace the tire.
●Use a jack stand if it is neces-
sary to get under the vehicle.
●When lowering the vehicle,
make sure that there is no-one
near the vehicle. If there are
people nearby, warn them
vocally before lowering.
■Using the jack handle
Insert the square head securely
until you hear a click to prevent
the extension parts from coming
apart unexpectedly.
Wheel lock nut (if
equipped)